Using Angular JS to send Ajax request PHP - Part 2: HTML Forms to PHP server
Repository: https://github.com/angularjs
What will I Learn?
In this tutorial, you will learn the following
- Use angular to send Ajax request to PHP scripts
- Fetch user details from database to front-end.
- Add new users to database on form submit.
- Delete user record on button click
- Update the record on the front-end without reloading the page.
Requirements
For this tutorial, you will need the following
- A laptop with any operating system such as Windows OS, Mac OSX and Linux
- Your favorite text editor like Atom, Sublime Text and so on.
- A server such as your wampserver or xampserver or mampserver.
- Knowledge of HTML, JavaScript, PHP
- ANGULAR JS script or include it using the cdn link https://ajax.googleapis.com/ajax/libs/angularjs/1.6.10/angular.min.js
Difficulty
- Basic
Tutorial Content
Angular JS framework which operates exactly as Javascript, makes coding more simplified and easy to use with other programming languages.
Ajax is sending request from your browser to a server and getting back a response without page reload. It helps to make the website more dynamic and "user-data" friendly.
In my previous tutorials (see links below tutorial) we used Angular JS to send request to github api to retrieve desired information and also This tutorial will show you how to send user information to database after filling a form, ensure that multiple emails are not allowed and also delete records of users. For the purpose of this tutorial, i will be using a PHP server called wampserver for Windows OS but as well you can use other PHP servers you may know such as Xampserver (also for Windows OS) and Mampserver (for Mac OS).
Step 1: Getting Started
To begin this tutorial, you need to setup up your localhost server by downloading and installing wampserver or xampserver on your Windows OS or mampserver on your Mac OS as the case maybe. After installation, open up the server and make sure all services are fully functional. Then open up your favourite text editor to include our Angular JS script. We will need to include the Angular JS script to the index.html file either using the cdn link or the angular.min.js file downloaded from Angular JS. Then include a blank js script file for writing our own Angular JS codes.
<!DOCTYPE html>
<html ng-app="myApp">
  <head>
    <meta charset="utf-8">
    <title>Ajax Using AngularJS with PHP (PHP FORMS)</title>
    <script src="js/angular.min.js" charset="utf-8"></script>
    <script src="index.js" charset="utf-8"></script>
  </head>
  <body ng-controller="MainCtrl">
    <h1>Ajax Using AngularJS with PHP Forms</h1>

  </body>
</html>
ng-app="myApp"is an angular directive that triggers angular js to function with the HTML DOM that it covers. It tells angular JS the area of the HTML to take charge of.ng-controller="MainCtrl"is an angular controller created within the angular scriptindex.jsfor manipulation of a particular area of in the html.
Then your index.js script for angular script should have the following code snippet.
(function(){
  // create a directive
  var app = angular.module("myApp", []);

  // creates a controller called MainCtrl
  app.controller('MainCtrl', ['$scope', '$http', function($scope, $http) {

  }]);

})();
We first have create a directive in our blank index.js script file which allows us create a controller which is in-charger of a particular area of our html file. To create a directive, you call the angular.module() which requires the following parameters;
- a name which is
myAppand; - an empty array
[]for dependencies such as$scope,$http,$logand so on.
The controller is then built based on the app directive that has been created earlier. We begin the controller with a controller name MainCtrl, a single dependency $scope and then a function with $scope as the only parameter of the function.
NOTE: The
$scopeparameter can be accessed anywhere within the confines of theMainCtrlcontroller in the html.
$http is an angular service that helps us send request to other script or url and get back response called a promise which is then manipulated based on the response. It has various parts:
- method: is dependent on how the parameters are defined either by GET or sending the parameter by POST
- url: is the link to which the parameters are sent for processing
- data: a JSON that contains necessary data for the script to function properly.
- function to execute if the Ajax was successful example onSuccess and;
- function to execute if it failed example onError.
Step 2: Create database for our project
After installing your preferred server, open the installed server and create a database for the purpose of this tutorial. I am using wampserver and below is a screenshot of the procedure for creating your database with a table and their fields.
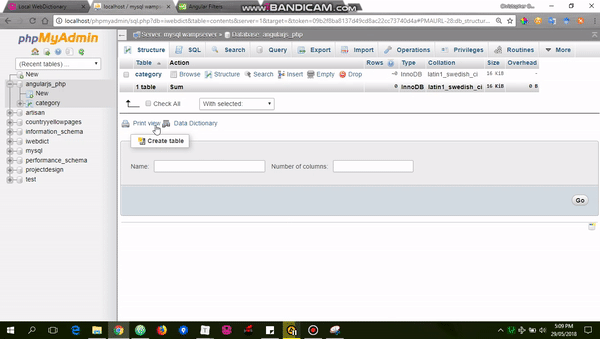
After creating the table, we need to insert some few user details for us to be able to fetch.
NOTE:
person's table holds the information users in the system.
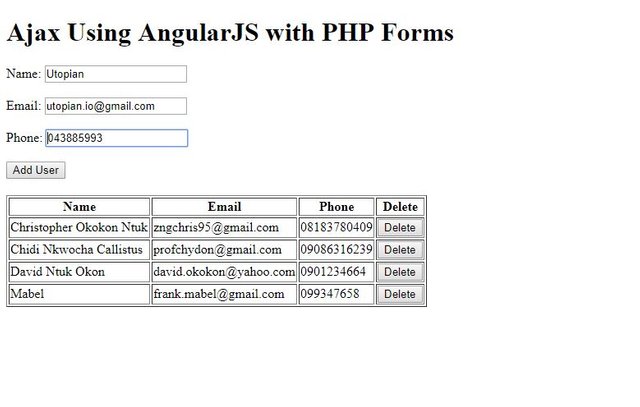
Step 3: Creating our Form Fields
Once, we have completed the database creation and inserting of user information, we can proceed to creating our form fields and retrieving the available information from the database. To begin copy the form code snippet into your index.html file.
<form id="form" method="post" ng-submit="addUser(name, email, phone, username)">
      <label>Name:</label>
      <input type="text" ng-model="name" value="" required> <br/><br/>
      <label>Email:</label>
      <input type="text" ng-model="email" value="" required> <br/><br/>
      <label>Phone:</label>
      <input type="text" ng-model="phone" value="" required> <br/><br/>
      <input type="submit" value="Add User">
</form>
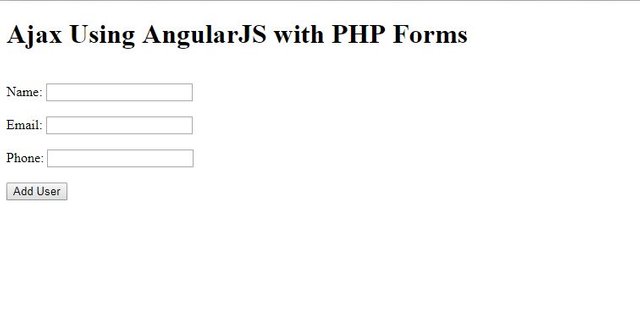
ng-modelangular directive handles two-way data binding in Angular JS. It helps to send dat to the script and also get data from the angular script as long as the model is defined within the confines of the controller. Every input has their ng-model name tied to the fields data collected.
ng-submitangular directive handles form submission, it collects all values in the field and sends it to the function which we will create soon.
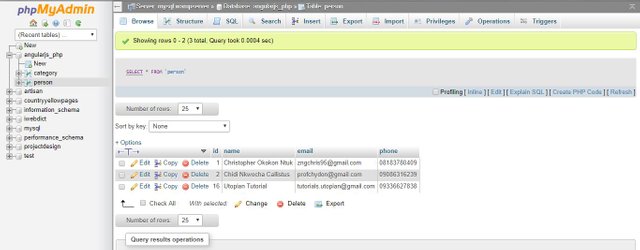
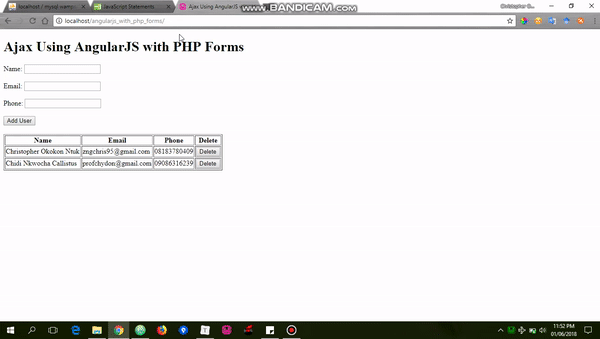
Step 4: Fetching user information from database
We need to fetch all available user information currently in the database to our front end. We will create two script that will helps us get the information we desire. The first script is to create a connection to our database and the second one will fetch the information to our angular script.
connect.php
<?php

  // declare variables neccessary for connection to database
  $host = 'localhost';
  $user = 'root';
  $password = '';
  $database = 'angularjs_php';
  // create the connection to datase using PDO
  $conn = new PDO("mysql:dbname=$database; host=$host", $user, $password);

 ?>
NOTE: Replace the declared variables with your localhost settings. But by default, localhost uses this connection information except the database name which must be changed to the one you created in step 2.
fetch.php
<?php
    require 'connect.php';// require our connection file

    // establish our SQL statement for retrieval
    $fetch = $conn->prepare("SELECT * FROM person");
    $fetch->execute();

    $result = $fetch->fetchALL(PDO::FETCH_OBJ); // get all results found

    echo json_encode($result); // sends the result in JSON to angular script
 ?>
NOTE: This script first requires our connection file
connect.phpbefore it can query that database with the SQL syntax provided in line 6. After executing the SQL syntax, it fetches the result and sends it as JSON to our angular script.
Next, we need to write the function that will process the result from our fetch.php in our angular script. Open up ur index.js script file, copy and paste the code snippet below within our MainCtrl controller.
index.js
    var fetch = function(){
      $promise = $http.get("script/fetch.php");
      $promise.then(onFetch, onFetchError);
    };

    var onFetch = function(response) {
      $scope.fetch = response.data;
    };

    var onFetchError = function(response) {
      $scope.FetchError = "Could not fetch data";
    };

    fetch();
NOTE:
- We first created a
fetch()which sends the$http.getrequest to thefetch.phpscript and gets back a promise which is sent to another functiononFetch()if successful andonFetchError()if an error occurs.- The second function
onFetch()is invoked if the request is sent successfully and the response is stored in a scope variable called$scope.fetchwhich we will process in our html file to see the information.- The third function
onFetchError()will only be invoked if there was an error during the$htttpservice request and also the error is stored in a scope variable called$scope.FetchError.- Then finally we need to invoke the
fetch()to execute once our HTML loads completely to show us the result.
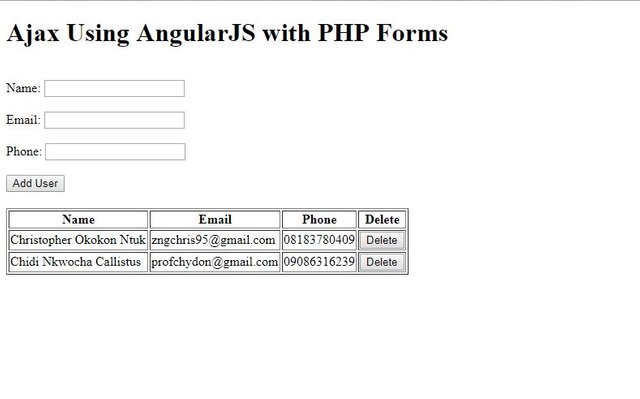
Now back to our index.html we need to create a table below our form where the retrieve data in our onFetch() and onFetchError() will be placed.
<p>{{ FetchError }}</p>
<table style="margin-top: 20px;" border="1">
      <tr>
        <th>Name</th>
        <th>Email</th>
        <th>Phone</th>
        <th>Username</th>
        <th>Delete</th>
      </tr>
      <tr ng-repeat="x in fetch">
        <td>{{x.name}}</td>
        <td>{{x.email}}</td>
        <td>{{x.phone}}</td>
        <td>{{x.username}}</td>
        <td>
          <input type="button" ng-click="removeUser(x.id)" value="Delete">
        </td>
      </tr>
    </table>
NOTE:
- Line 1 displays any error we get from the
onFetchError().- We used the angular
ng-repeatdirective to iterate through the JSON that was returned. It uses the same idea as foreach loop in PHP and Javascript to display the result in each table row.- We introduced an input button for deleting users. The
ng-clickdirective invokes theremoveUser()and passes the user's id as a parameter to the delete script (which we will create soon) in order to delete the user from the database.
For complete code snippet, check fetchScript.js, fetchIndex.html, connect.phpand fetch.php.
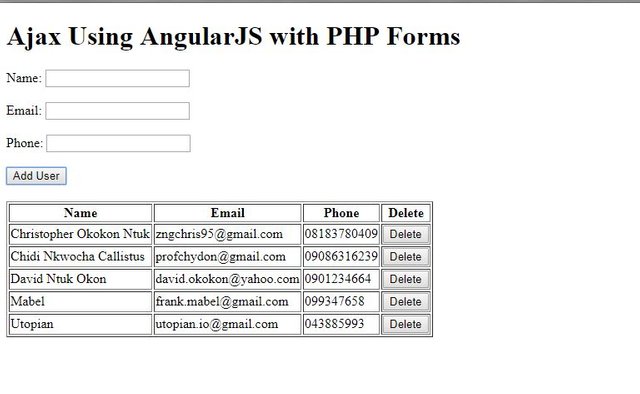
Step 5: Add New Users to database and update record
Now the we need to insert new users into the record available. To achieve this, we need to create the addUser() which will send the data collected to the PHP script and receive a promise. Also a addUser.php script that collects the data from our angular script and adds the information to the database.
addUser.php
<?php
  // require our connection file
  require 'connect.php';

  $datapost = file_get_contents("php://input"); // gets the posted data from the angular script

  if (isset($datapost) || !empty($datapost)) { // checks if there is a value in the posted script

    $request = json_decode($datapost);

    $name = $request->name;
    $email = $request->email;
    $phone = $request->phone;

    $addrecord = $conn->prepare("INSERT INTO person (name, email, phone) VALUES (:name, :email, :phone)");
    $addrecord->bindParam(":name", $name);
    $addrecord->bindParam(":email", $email);
    $addrecord->bindParam(":phone", $phone);
    $success = $addrecord->execute();

    if ($success) {
      echo "Success";
    } else {
      echo "Failed";
    }

  }

 ?>
NOTE:
- Line 5 of the code snippet is helps us get the data that is posted from the Angular JS script.
- Line 9 helps to decode the JSON that was sent, so we can retrieve the each data that was posted to the script.
- Line 15-19 is our SQL syntax that adds the user record to the database and upon successfully adding record, it returns a string "Success" else returns "Failed".
We need to define the addUser() in our Angular JS script, so that once the form is submitted, we can add the newUser and update the record on our front-end.
index.js
    $scope.addUser = function (name, email, phone) {
      $promise = $http({
        method: 'POST',
        url: 'script/addUser.php',
        data: {name: name, email: email, phone: phone}
      });
      $promise.then(onAddUser, onErrorAddUser);
    };

    var onAddUser = function(response) {
      if (response.data == 'Success') {
        $scope.user = response.data;
        document.getElementById("form").reset();
        fetch();
      } else {
        $scope.errorUser = 'Failed uploading record';
      }
      console.log($scope.user);
    };

    var onErrorAddUser = function(response) {
      $scope.errorUser = response.data;
    };
NOTE: The same principle applies to the way we fetch the data but in this case, the
addUser()is attached to$scopevariable which will only be invoked once the form is submitted.
- We send the form details as JSON to the
addUser.phpscript with aPOSTmethod and once we receive a promise, a function is invoked based on the promise.- If the promise is successful, the
onAddUser()is invoked but if it fails theonErrorAddUser()is invoked.- When the
onAddUser()is invoked, when we getSuccessas the response we store it to a scope variable$scope.userand reset the form fields to empty.- To achieve the auto-update of the table, we need to invoke the
fetch()which gets all information from the database.
For complete code snippet, check index.js, index.html, connect.php, and addUser.php.
Step 6: Delete User Record
The final stage, where we need to delete unwanted records from the database. This is actually easy as we tend to post the user's id to the PHP script on button click. Already we added the ng-click directive which invokes the removeUser() and passes the user's id as a parameter.
removeUser.php
<?php

  require 'connect.php';

  $datapost = file_get_contents("php://input");

  if (isset($datapost)) {

    $result = json_decode($datapost);

    $id = $result->id;

    $del_user = $conn->prepare("DELETE FROM `person` WHERE id=:id");
    $del_user->bindParam(":id", $id);
    $result = $del_user->execute();

    echo $result;

  }

 ?>
NOTE: This script gets the user's id and deletes the record where the id of such user is found in the database.
index.js
    $scope.removeUser = function(id) {
        var promise = $http({
          method: "POST",
          url: "script/removeUser.php",
          data: {id: id}
        });
        promise.then(onSuccess, onError);
    };

    var onSuccess = function (response) {
      fetch();
    }

    var onError = function (response) {
      $scope.error = response.data;
      console.log($scope.error);
    }
NOTE:
- A new scope variable
removeUseris created to handle the sending of the user's id once the button is clicked. The promise returned invokes a function if the request is successful or not.- If it is successful, it just need to invoke the
fetch()so it can reload the information from the database.- But if there's an error, it will log the error in the console and display it to the user.
For complete code snippet, check index.js, index.html, and removeUser.php.
VIDEO OF ENTIRE WORKDONE
Previous Tutorials
- https://steemit.com/utopian-io/@chri5h/consuming-github-api-using-angular-js
- https://steemit.com/utopian-io/@chri5h/using-angular-js-to-send-ajax-request-to-php-part-1
Proof of Work Done
I hope you find this tutorial very useful and you can access the complete code for this tutorial in the github repo.
Hi, A good tutorial, but it would be better to add javascript
alert ();or another dialog, to display whether the add and delete process is successfully executed or that the process of adding and deleting fails to run.Thanks for the information, I guess it skipped my mind. Next tutorial will consider that.
interesting post vote for you
Thank you for your contribution.
While I liked the content of your contribution, I would still like to extend one advice for your upcoming contributions:
Looking forward to your upcoming tutorials. Great Job!!!
Your contribution has been evaluated according to Utopian policies and guidelines, as well as a predefined set of questions pertaining to the category.
To view those questions and the relevant answers related to your post, click here.
Need help? Write a ticket on https://support.utopian.io/.
Chat with us on Discord.
[utopian-moderator]
Thank you @portugalcoin i will adhere to your advice on my next contribution.
Hey @chri5h
Thanks for contributing on Utopian.
We’re already looking forward to your next contribution!
Contributing on Utopian
Learn how to contribute on our website or by watching this tutorial on Youtube.
Want to chat? Join us on Discord https://discord.gg/h52nFrV.
Vote for Utopian Witness!
Thanks for helping us with your professional development skills. You have made it easy for us to develop a form using Ajax, PHP, and Angular Js. I'm looking for Hiring angular developer to develop a single page application for my product. I have visited Hiremotely they have explained to me about angular developers with various options to hire a developer. They have a team of professional developers helping people to develop an app at a reasonable price.