Seed - Development - Networking: Clients & Relay Nodes

Repository
https://github.com/Cajarty/Seed
Overview
These development updates and changes are based upon the Networking Design article.
Networking, the act of clients communicating with one-other, is a vital portion of any blockchain project. Without networking, transactions could not effectively be sent between users. The Seed networking design including creating two ways to launch the Seed Launcher; as either a Client or a Relay Node. The two have differing roles, however Relay Nodes can also act as Clients when communicating with other Relay Nodes. Below we will go into the design decisions and the end implementations.
Chosen Network Topology
One of the primary goals of the Seed network is to be a distributed blockchain system, giving no user more power than other users. This holds true at the Seed protocol level, however the same cannot necessarily be true for creating the networking level. A distributed network would be a full mesh topology, where every client is connected to every other client. Mesh topologies scale incredibly poorly with size, since each additional client increases every other clients required connections.
The decentralized approach blockchains traditionally take is to have a unique role known as a miner or a consensus node. These are special nodes which are part of the blockchain protocol itself. However, in Seed, no such role exists.
In order to minimize the amount of connections between clients, the simplest solution is to allow nodes to selectively act as a hub. A hub would be a special node which listens for other clients to connect. If a topology only has one hub, it is generally not secure as it has a single point of failure. However, if any client could choose to be a hub, there would be multiple points, keeping the network up as long as one hub stays online.
The chosen design is to use these hub nodes and have them relay transactions between each other. These nodes will be referred to as Relay Nodes.
Scenarios
Client Connects To Network
Clients must be able to connect to the network via any connected relay node. Once connected, a Client can request blockchain and entanglement header data to determine what data it needs to request. If its a clients first time running, they would request all block and transaction data. However, if the client has offline data already stored, they would request only block and transaction hashes that belong to transactions they do not already own.
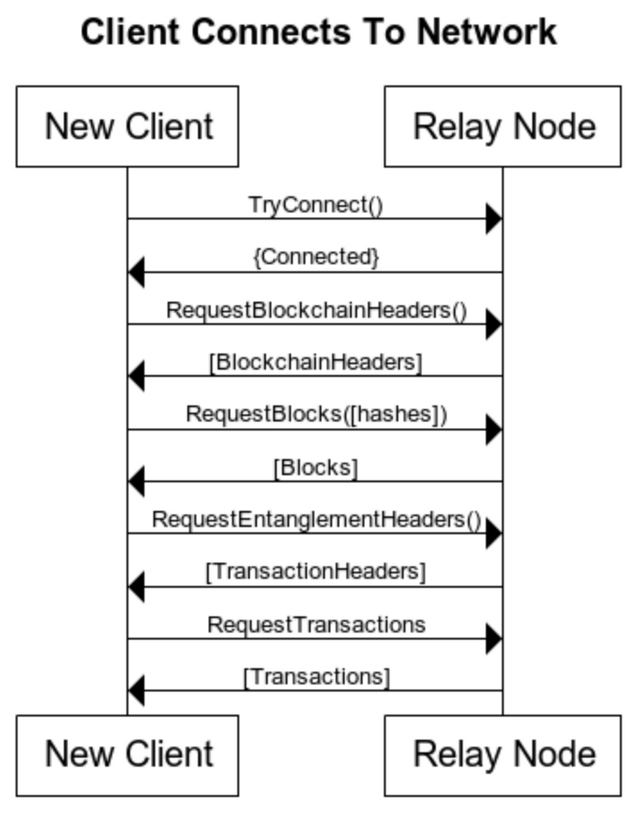
Below is a video showcasing a client connecting to the network, and successfully receiving all data from the relay node.
Client Sends Transactions
Clients must be able to propagate transactions to the network. A client would send their transactions directly to any relay nodes they choose. Relay nodes will then propagate the transactions to other users.
Relay nodes will also relay transactions between each other, routing transactions efficiently around the network.
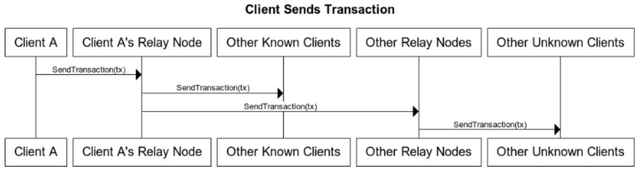
Below is a video showcasing two clients connecting to the same relay node, and then one client propagating a transaction, which then becomes validated. Once valid, the UI's for the launcher and other client update, acknowledging the received transaction and its validity.
Client
Clients are a type of user in the network who communicate through a connected Relay Nodes. They connect to listening relay nodes using web sockets. Clients primarily request and receive data through the relay nodes, however they also propagate created transactions by sending them to their connected Relay Node.
Launch Command
When launching the Seed Launcher as a client, a "--client" parameter must be passed into terminal.
The NodeJS package manager offers scripts to simplify the manner.
For example, if a Mac user wishes to launch a client, they could do so via a custom longer command, or by simply invoking a script via the command
npm run client:osx
Implementation
The implementation for the Client can be found in the client.js file.
The Client instance can be created via the exported functions "getClient" and "newClient", where getClient fetches a cached Client for scenarios where only one instance is necessary, and newClient creates a new one each time, for scenarios where multiple connections may be required. For example, a RelayNode who communicates with five other RelayNodes would need to create five internal clients.
Clients have access to the following functions for communication with Relay Nodes:
| Function | Description |
|---|---|
| connect(relayIPAddress) | Connects to the designated RelayNode's IP Address |
| requestBlockchainHeaders() | Requests block header data from the connected relay node. |
| requestEntanglementHeaders() | Requests entanglement header data from the connected relay node. |
| requestBlocks(blockInfos) | Requests specified blocks data from the connected relay node. |
| requestTransactions(transactionInfos) | Requests the spcified transactions data from the connected relay node. |
| sendTransaction(transaction) | Propagates a transaction to the connected Relay node. |
In order to accomplish complex tasks, Clients have an internal task list for future tasks that are yet to be executed. Whenever a listeners receives a valid response, it will execute the next task, if any are queued up.
This allows for complex scenarios to easily be built. For example, the exported function loadInitialState queues up multiple tasks to the passed in client, and then begins executing them. These tasks will execute asynchronously, in order. For example, the loadInitialState function will have a client request for blockchain headers, request for any missing blocks, add the blocks to the local blockchain, request for transaction headers, request any missing transactions, and then add the transactions to the entanglement. This complex chain of tasks are executed asynchronously to ensure the UI thread is never hung.
RelayNode
Relay Nodes act as a hub in the Seed network which clients can connect to. Relay Nodes listen for incoming connections, and handle requests made by their connected clients. Relay Nodes are expected to both serve the requested information, such as requests for available block headers or specific transactions, while also being expected to help a connected client propagate their transactions over the network.
Launch Command
When launching the Seed Launcher as a relay node, a "--relay" parameter must be passed into terminal.
The NodeJS package manager offers scripts to simplify the manner.
For example, if a Mac user wishes to launch a relay node, they could do so via a custom longer command, or by simply invoking a script via the command
npm run relay:osx
Implementation
The implementation for the Relay Nodes can be found in the relayNode.js file.
Upon creation, Relay Nodes may receive the IP addresses of other Relay Nodes as input. If any IP addresses are present, the node will create a Client for each IP address, in order to easily communicate with the other Relay Nodes as needed.
Relay Nodes listen for every available Client command, and can responds to each request. On top of simply responding to Clients, Relay Nodes have their own, albeit limited, set of commands.
| Function | Description |
|---|---|
| listen() | Begin listening for clients to connect. |
| loadState() | Creates a Client instance which communicates with another relay node, asking for all existing transactions and blocks to date. |
The listen() function is used when a Relay Node should begin listening for incoming client connections. This should only be called once.
The loadState() function is used when a Relay Node should request from its connected Relay Nodes the required state data. This will look for the first connection found, and simply act as a Client requesting the same information, loading it into local memory.
Honourable Mentions
High Level API
The High Level API was updated to easily allow loaded apps to change connected relay nodes and refresh the blockchain state, re-requesting all information from a connected Relay Node.
These calls are sent through interprocess communication to the main process, which responds by processing the request.
Launching Launcher Script Changes
In order to stay multiplatform, differing scripts have had to be added to the NodeJS package.json file. Mac-specific scripts contain a "osx" at the end of the command, while Linux-specific scripts contain a "linux" at the end.
Windows should run in the same fashion as Mac, and can launch with either the "osx" specific commands, or by simply running the OS agnostic versions.
For example, Windows could be launched via
npm run relay
while Mac requires
npm run relay:osx
and Linux requires
npm run relay:linux
Optional Storage Parameter
A optional storage parameter has been added when launching scripts. Storing newly created and incoming transactions to the local file system is off by default, however can be turned on via the optional parameter
--storage
The scripts for launching the launcher as a Relay Node will use the storage command, however clients will not. Clients have full capability of handling storage, however for now, networking tests have been through local host, and having multiple instances share the same folder may cause errors. In practice, this would not be a problem, as only one Launcher should be running at a time.
References
Seed - Development Design - Networking
GitHub
https://github.com/CarsonRoscoe
Thanks for the contribution, @carsonroscoe! Amazing read once again, it's really interesting reading these updates and seeing how the project is coming along. Already looking forward to the next update!
Once tiny bit of (nitpicky) feedback: you should try to keep the subject of your commit messages around 50 characters and write more information in the body if needed.
Your contribution has been evaluated according to Utopian policies and guidelines, as well as a predefined set of questions pertaining to the category.
To view those questions and the relevant answers related to your post, click here.
Need help? Write a ticket on https://support.utopian.io/.
Chat with us on Discord.
[utopian-moderator]
Thank you for your review, @amosbastian!
So far this week you've reviewed 2 contributions. Keep up the good work!
Hello! Your post has been resteemed and upvoted by @ilovecoding because we love coding! Keep up good work! Consider upvoting this comment to support the @ilovecoding and increase your future rewards! ^_^ Steem On!

Reply !stop to disable the comment. Thanks!
Hi @carsonroscoe!
Your post was upvoted by @steem-ua, new Steem dApp, using UserAuthority for algorithmic post curation!
Your post is eligible for our upvote, thanks to our collaboration with @utopian-io!
Feel free to join our @steem-ua Discord server
Hey, @carsonroscoe!
Thanks for contributing on Utopian.
Congratulations! Your contribution was Staff Picked to receive a maximum vote for the development category on Utopian for being of significant value to the project and the open source community.
We’re already looking forward to your next contribution!
Get higher incentives and support Utopian.io!
Simply set @utopian.pay as a 5% (or higher) payout beneficiary on your contribution post (via SteemPlus or Steeditor).
Want to chat? Join us on Discord https://discord.gg/h52nFrV.
Vote for Utopian Witness!