Algo - your own VPN!
%20-%20Copy.png)
Repository
https://github.com/trailofbits/algo
Three days ago, I was lying lazily on the couch after lunch with my phone in my hand and nothing to do at all. I opened Chrome and the suggested articles appeared. I remember one of then said something about a VPN client. This led me to think: What is a VPN essentially? A web server, came my own reply. Then, thought I, I should be able to use my server based in the US as a VPN server! And soon, I was running a search on creating a VPN on a web server.
The first result was a TechCrunch article with the title, 'How I mane my own VPN server in 15 minutes'. Reading through it, I came to know of a wonderful open-source set of Ansible scripts to set up a personal IPSEC VPN, Algo. Although I didn't exactly make my web server a VPN (although Algo could), I used my Azure cloud (free student account, kudos Microsoft!) to set up the VPN.
Features of Algo
- IKEv2 with strong encryption (AES-GCM, SHA2, and P-256)
- Possible to add and remove users anytime
- AdBlock option
- Option for SSH tunneling
Though I installed it on Azure cloud, it can be installed onto any of the following cloud computing platforms:
- DigitalOcean
- Amazon Lightsail
- Amazon EC2
- Vultr
- Microsoft Azure
- Google Compute Engine
- Scaleway
- OpenStack
- Your own Ubuntu 18.04 LTS server
The task took me some time to complete (an hour) owing to the fact that I was a perfect newbie to cloud computing (this was the first time I was actually making use of Azure), but the process was virtually automated - a couple commands for installing the required core dependencies for Algo to work in, then a few more for installing additional dependencies. Algo then runs scripts on a virtual machine created by you in a cloud solution of your choice. The precise instructions can be found on the repository, but I am adding them here along with my own suggestions and tips.
Deploying the Algo server
Getting Algo up and running
Set up an account on a cloud service. You can pick any one from the list above. I tried the process using Azure and Google Cloud Platform, and I have to say that the process for Google was a tad bit easier than that of Azure. On GCP, not only are the errors displayed but links to remedying them are provided too. The method in both cases is similar, with the only difference that Azure expects the user to know his way before running the scripts whereas Google helps him at every step.
Download Algo and unzip it to any location on your local machine. I used Linux (Ubuntu 16.04 LTS) for the process because I'd learned long ago that there's no better system for working with development projects, and also because I like the Linux terminal 😂. So, I'd only be mentioning the steps and commands for Linux (deb-based) system as I can't provide insights on others, but I'd certainly suggest not to use Windows as the Windows documentation ultimately asks you to set up a 'Windows Subsystem for Linux' and install Ubuntu from the Microsoft Store, which, according to me, doesn't make sense.
Install Algo's core dependencies.
cdinto thealgo-masterdirectory where you unzipped Algo, then run:
$ sudo apt-get update && sudo apt-get install \
    build-essential \
    libssl-dev \
    libffi-dev \
    python-dev \
    python-pip \
    python-setuptools \
    python-virtualenv -y
- Install Algo's remaining dependencies using the same terminal window as in the last step and run:
$ python -m virtualenv --python=`which python2` env &&
    source env/bin/activate &&
    python -m pip install -U pip virtualenv &&
    python -m pip install -r requirements.txt
At this step, I received an error that virtualenv was not found. To solve that, simply run the command pip install virtualenv.
Create the user list. Now that the environment for running Algo is set up, open
config.cfgfound in the Algo directory root and add the usernames by replacing the-phone,-laptopetc. in the second line of the code by usernames. Password will be generated by Algo.Start the deployment. Return to your terminal. In the Algo directory, run command
./algoand follow the instructions on the screen. You'll be presented by a few options to enable or disable in the VPN, none of which are required for a fully functional VPN.
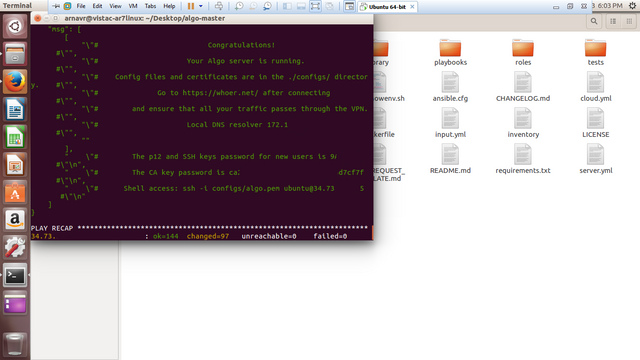
And that's it! Your Algo server is now up and running! You should take note of the p12 password as it will only be displayed this one time. You can now begin configuring VPN clients (your phone, laptop, refrigerator) by following the instructions here: https://github.com/trailofbits/algo#configure-the-vpn-clients
That was all about Algo. I found it a very simple and worthwhile - and most importantly, private - solution for setting up VPNs. Great work, Trail of Bits!
Cheers!
ArnavR
@arnavr
Hello, @arnavr!
Thank you for your contribution. This is a rather useful tool, and you did a good job in providing valuable information about this project. Your post is comprehensive and informative.
On the content side, even though I like all the information presented, I must admit that I wanted to see more editorial content in your review. The post certainly contains technical information related to the project, but tells the readers so little about your personal experience of using this tool.
Furthermore, I must admit that I wish you had presented all the information in a simplified manner. The post is highly technical, which makes it hard for your readers to get a grasp on the key points for the whole text. Regardless, I enjoyed reading about your personal suggestions, and appreciate the effort you put into your work.
That said, the post did have proofreading issues, but not to the level where it hurt the reading experience. In conclusion, I enjoyed reading your work, and look forward to your next contribution.
Your contribution has been evaluated according to Utopian policies and guidelines, as well as a predefined set of questions pertaining to the category.
To view those questions and the relevant answers related to your post, click here.
Need help? Chat with us on Discord.
[utopian-moderator]
Thank you for your review, @lordneroo! Keep up the good work!
Hi @arnavr!
Your post was upvoted by @steem-ua, new Steem dApp, using UserAuthority for algorithmic post curation!
Your post is eligible for our upvote, thanks to our collaboration with @utopian-io!
Feel free to join our @steem-ua Discord server
Hey, @arnavr!
Thanks for contributing on Utopian.
We’re already looking forward to your next contribution!
Get higher incentives and support Utopian.io!
Simply set @utopian.pay as a 5% (or higher) payout beneficiary on your contribution post (via SteemPlus or Steeditor).
Want to chat? Join us on Discord https://discord.gg/h52nFrV.
Vote for Utopian Witness!