Photography for beginners. Some tips and examples! (Part II).
Hello, welcome to this second part of "Photography for Beginners"!
I had told that there were some basic concepts (which might even seem as scientific) needed to start making excellent photographs.
For compact digital cameras photos, we usually use the "Automatic" mode, which allows you to achieve good photographs without making any adjustments at all; the photos are made by themselves. This type of cameras doesn’t have too many functions, and for the most part, these functions are predetermined settings that allow you to easily have some fun, there isn't any complexity involved.

Fuente: Google Images.
Now, talking about digital reflex cameras (DSLR, "Digital Single Lens Reflex") we have endless possibilities. In my personal opinion, using these types of cameras in "automatic" mode is like having a Ferrari and using it to go buy something from the corner store. I make this comment since many people use these cameras without knowing they have a tremendous equipment in their hands and they don't take the full advantage they could get with it.
Fuente: Google Images.
Here is where the theoretical part begins...
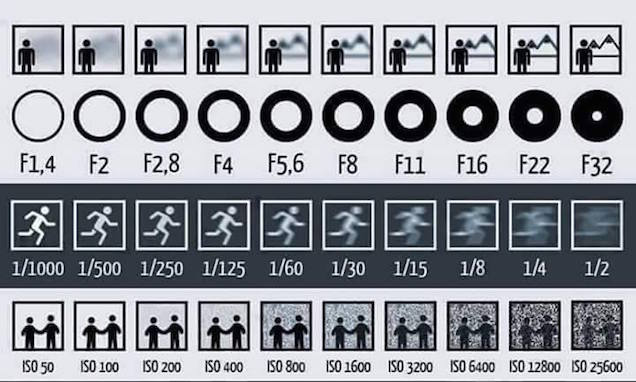
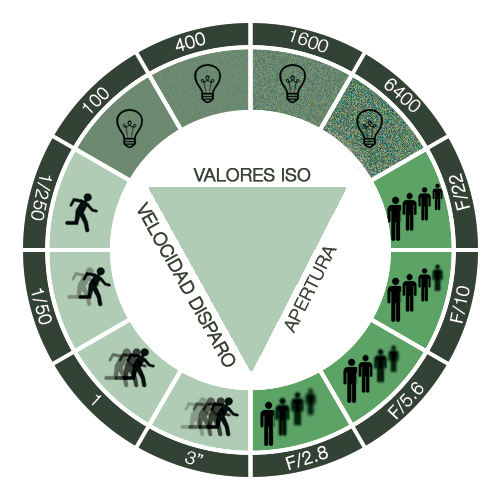
To start talking about camera modes, first we must define 3 basic concepts that will help you to make any photography you can imagine: ISO, aperture and shutter speed. These three values are part of the equation for "the perfect photography".
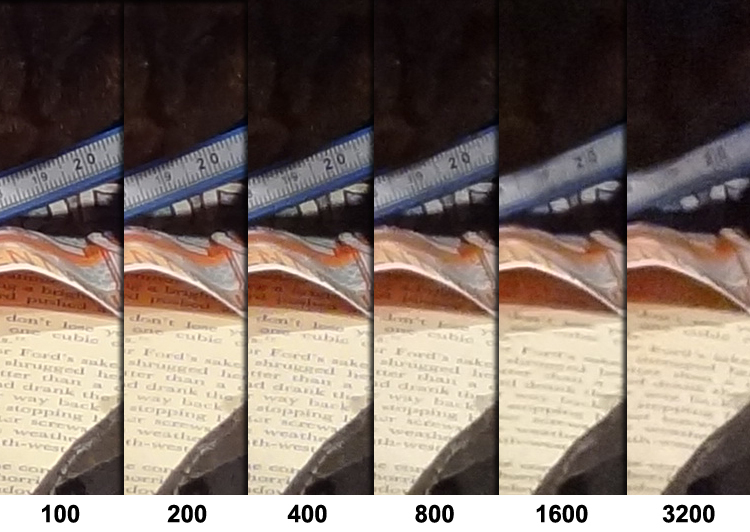
ISO: ISO sensitivity is the amount of light our camera needs to take a picture. This concept comes from the analog cameras, where it was known as "ASA" value. It was considered which film or roll was going to be used depending on this value and the conditions in which you were supposed to take the photos. For example, if a photo was taken on a sunny day, a film of lower ASA value was used, but when a photo was taken in dark spaces, a roll of higher ASA value was used. This value is directly proportional: the higher ISO, the more light we will capture.
The ISO values goes in the following order, starting from the smaller amount of light to the greater amount of light:
Fuente: Google Images.
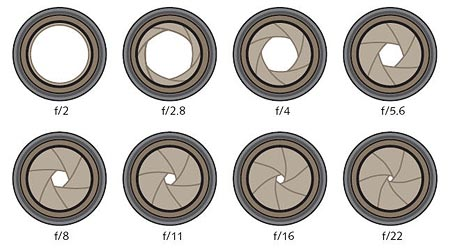
Aperture: The diaphragm is like the iris of the human eye; is the element that will control the light input through the lens. The more open the diaphragm, the more quantity of light our camera will capture; and the more closed, the less light our camera will capture. In dark spaces where there is little light, we must open the diaphragm, and in brighter spaces we must close the diaphragm. This is an inversely proportional value: the greater the number of apertures, the less light we will get.
The diaphragm aperture values are in the following order, starting from greater aperture to lower aperture:
Fuente: Google Images.
Shutter speed: The shutter speed is the third value you need to build your equation. The shutter speed is the period of time - expressed in seconds or fractions of a second - in which the shutter of the camera will be open, thus capturing in that period of time everything that happens in front of the lens. If there is a lot quantity of light in the space in which we are going to take the photo, the exposure time that your camera needs to take the image is less than if we have a low quantity of light. This is an inversely proportional value: at a higher shutter speed, less light our camera will capture.
The shutter speed values are in the following order, starting from lowest to highest shutter speed:

Fuente: Google Images.
Now, having these three values in mind, now we can play and experiment with the "Manual" mode of our camera. This mode, as its name implies, is the one that allows us to define how our photo will come out, allowing us to place our own ISO, aperture and shutter values. We are the ones who make the photo, the responsibility is entirely ours.
It’s important to emphasize that at the beginning it may seem a little complicated. Maybe we find a perfect moment or a perfect photo, and it can take us some time to think about these values and then adjust our camera to take de picture, but once you master these values, the pictures will come out almost as fast as an automatic photo. It's important to understand
how these values work and how to adjust them in the camera (usually they are direct functions inside the camera).
The most important advice that I can give you and with which you will achieve everything: practice my friend, and never feel discouraged if you do not get the photo you wanted! In photography, practice makes the master.
Here I leave two images that I found very interesting, and that will allow you to better understand how the equation works: ISO + Diaphragm + Shutter = Perfect Photography.
Fuente: Google Images.
Fuente: Google Images.
If you have not seen the first part of this post, here is the link: https://steemit.com/photography/@maerod/photography-for-beginners-some-tips-and-examples-part-i
Stay tuned and do not miss my next posts!
Mae Rod.
interesting information , and really good post
Thank you, @edsonrattner! Greetings! :D
When I have enough money to buy a better camera I will look at this page again. I bookmarked it :)
Thanks alot !
Hi, @openheart! I'm glad you find this post useful! What camera do you have?
Hi @maerod I have a Panasonic DMC-LS70.
Its from from 2007 so time for an upgrade :)
I am saving for it since I am on welfare due to multiple handicaps.
Not letting them get the best of me though :)
I focus on what I still can do :)
Best way to stay positive for me.
A good way to stay with positive thoughts is to go outside and take some pictures. Don't think you should buy a better camera to start doing that! As I said, practice makes the master, even with an old camera ;) Always stay positive! Go outside and have some fun with your Panasonic, my friend.
Thanks for you nice comment @maerod :) Much appreciated !
Gracias por el aporte
Gracias a ti por comentar, Mairon! Un abrazo!
Brutal estos tutoriales! te destacaste!
Gracias hermano! Que bueno que te gustara :D
nice informations
Thank you @impressions, I'm glad you find this information useful!
easy to eat and very practical infos. Thanks for your work
Hey, @detlev! Thanks to you for taking the time to read it. Greetings! :)
Good post. Very informative and full of useful facts and data for the beginning photographer. Good work and content. Will continue to follow your post. Good job.
Oh, such a pleasure, @steppingout23! I'm glad you find this post useful. Greetings! :)
Your welcome. Stay in touch. Will follow and look out for you.
Sure my friend! And thanks for the support!
great information to take best pictures
Thank you, @gunsmasterrock! Greetings! :)
Nice maerod. Thanks for sharing.
I'm glad you find this post useful, @cryptolife1! :)