How to make a Solar Panel yourself
Taking into account the fact that the increase in electricity prices has been steadily increasing, unlike wages, the question of an alternative energy source is becoming more urgent. We propose to consider in our article how you can make a solar battery yourself at home, the scheme of its manufacture, as well as feedback on the effectiveness and approximate price of work.

How does the battery work?
Before you build this system, we need to understand how it works.
When the semiconductor "p" and the semiconductor "n" are connected in one piece, a PN transition occurs at the interface between them. When the battery is exposed to the sun, positive and negative floating loads accumulate on both sides of this PN semiconductor junction, which generates PV voltage and develops a magnetic field. This is what we call the "PV effect".
Theoretically, if the electrode is withdrawn from both sides of this built-in area and connected to the correct load, the current power will depend on the heat received. Solar modules become fixed PV converters using the electronic properties of a semiconductor material.
There are various step-by-step instructions on how to make the simplest solar cells at home with your own hands, and consider the most effective electrical circuits.
Simple solar battery
First, let's consider the manufacture and connection of a simple solar battery.
We need:
- transistors;
- conductors;
- the installation panel;
- soldering iron.
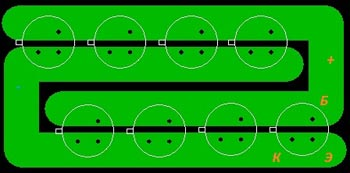
Scheme of placement of transistors
Determine the base of the elements. Be sure to take into account P-N transitions, they are both for transistors and for diodes. Let's dwell on the silicon transistor components of the KT801 series. They are quickly mounted in any case and do not corrupt monocrystalline components. Before installing them, press down on the transistors with pliers and remove the cover.
Next, you need to configure the settings. During normal daylight, the selected transistor will output 0.53 volts (collector and emitter - minus, base +).
Be sure to consider the power of transistors, in particular the fact that the details of 1972 g. equipped with a large crystal of white color, and can create a current strength of 1.1mA. But regarding the transistors from 1973 to 1980.v. - they have a power of 0.9mA. After that very weak series, with 0,13 mA began to be issued.
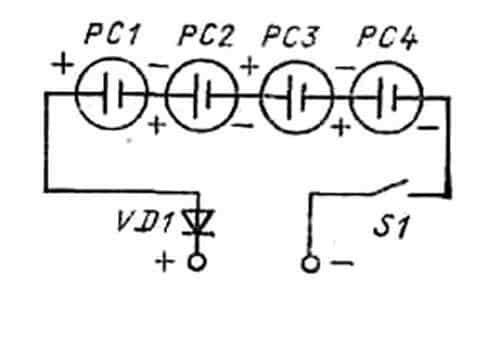
We propose to use a series-connected circuit of 4 transistor devices. During the load, it can create a free voltage somewhere 1.8V, 2-2.5mA for free. This is a very small load, but it is enough to eat simple appliances: a small lamp or a self-made diode light source, a clock, a bug eavesdropper, etc.
Solar battery of transistors
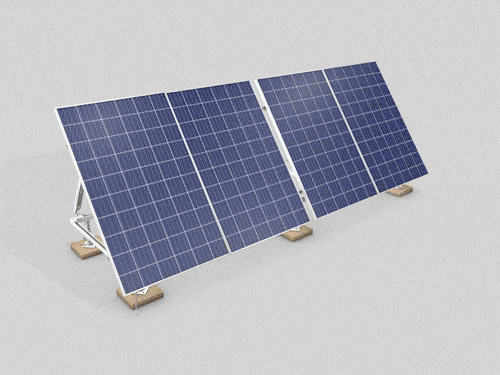
Powerful battery
This is a more serious design that can be used freely for heating a room, supplying a large house or apartment, etc. In the presence of photocells, it can be collected from improvised means. Drawing and details about the system work below.
Solar schematic circuit diagram
There are several components that need to be assembled before making your solar panel. You will need
- Plywood for the frame of the panel (you can use almost anything from cans to dense wooden sheets)
- Non-conductive material, for example, Masonite, which will act as a substrate
- Solar panels
- Soldering equipment for connections between solar panels
- Schottky Diode
- Powerful electrical copper wires
- A covering sheet of durable material, say, like plexiglass, to ensure the safety of our future battery.
You can use a coating of polymers, say, polypropylene - Silicone vacuum stands for the installation of batteries and their insurance against atmospheric destructive factors (water, snow, hail), and also to connect the panels to the housing
- Several screws that will be fixed battery panels, organic glass and frame
As a rule, all these components can be bought in the usual building material store, or on a thematic Internet platform. We advise you to visit the forum, where possible, you will be given advice, where it is more profitable to purchase.
How to choose solar panels
Solar panels are the most important component on the solar panel, and the first thing to buy. New solar cells can be very expensive (up to thousands of dollars per copy), so it's better to buy second-hand or slightly damaged. Such solar cells can provide almost the same amount of energy as new ones, there is no harm in their use.
Nevertheless, one must be very careful in choosing sections of solar radiators. Most solar cell dealers cover them with wax, so that the voltage in them is stable, and they are protected from external influences. These are the most expensive specimens, which are the most difficult to find, so we recommend that you still prefer options from a simple impact-resistant glass.
It is also very important to buy these components of our design, the kit. This is necessary because, different battery models have completely different thermal conductivity and structure. If radiators made of different materials or having different properties are connected to one panel, the work will be incorrect, up to the complete destruction of the solar energy absorption system.
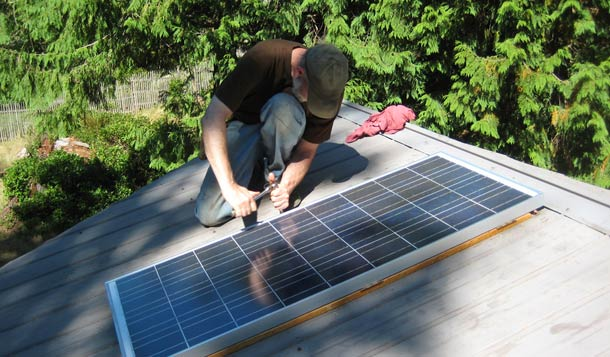
Battery design
Because of the fragility of solar cells, it is better that the panel be mounted in advance, and then the structural elements are installed on it. The case should be designed, in the form of a small box, with very small lateral ribs, because the shadow from them should not block the sun's rays falling on the battery exits.
The size of the panel depends on the requirements, but always remember that a large box will be very heavy and will require a lot of solar cells to fill it, while a small housing uses portable radiators and it requires a much smaller number of energy conductors. The substrate is placed on the panel and directly in the body, which must be treated inside and outside resistant to moisture and microorganisms, paints. Leave in the lower part of the future housing special ventilation holes must be provided, this is necessary to maintain the temperature in the radiator and to remove the gases, which will be released in small amounts during operation.
How to connect the battery
After the panel is ready, you need to start work on connecting the solar panel. If the solar cells you have bought have metal protrusions, then their installation is very simple: in most cases you need to connect the panels by soldering the battery ears together, this procedure is performed in any case independently, even if several panels were purchased together.
Soldering should be done very carefully and with a very light hand, otherwise very fragile solar cell parts will be damaged. First you need to attach the negative protrusions that are on the front side of the first cell with the positive tabs present on the bottom of the second cell. This scheme is also carried out for subsequent connections.
Install the batteries in the housing
Further after soldering, it is necessary to glue the connected cells to the substrate present on the top of the panel. This operation is mainly used silicone glue, which does not clog the sun's rays, and also promotes a normal process of heat exchange. But note, if there is too much glue between the substrate and the cells, this can damage the solar panels.
Thus, it is necessary to apply glue only on the center of the cells and insert it on the substrate after the silicone completely withers. Now, connect all of your cells to the wire and feed it to one of the ventilation holes left open at the bottom of the panel. Use silicone putty to fix the wire around the edges of the solar cells.
Before installing plexiglas on top of the solar panels placed inside the wooden panel, you need to connect the Schottky diode from sensitive heat-conducting elements. This diode will serve as a blocking agent that protects the batteries during power surges, and also stops the power supply of the device during insufficient power of the electrical network.
Thus, the batteries that we charge together with solar batteries will not be discharged when the power supply stops. After connecting the diode, you need to put the plexiglas on the top of the wooden case, and fix it with screws. Now connect the wire that comes out of the solar panel to the power cord of the house, and then to the battery.
The cost depends mainly on the purchased materials, of course, if you decide to buy new batteries, the design will cost much more. But on average, the solar heating battery described will cost about 5 thousand rubles (calculation in the city of Ekaterinburg).
As we can see, the principle of the device and connection - the processes are not complicated, but they require extreme accuracy and care. If at least one connection is broken sequence, the system will not work.

References for Images:
- http://www.mysolarpod.com/solarpodgt/?v=c86ee0d9d7ed
- http://learn.eartheasy.com/2012/07/our-simple-diy-home-solar-power-system/
- https://www.istockphoto.com/in/photos/solar-panel-cartoon?excludenudity=true&sort=mostpopular&mediatype=photography&phrase=solar%20panel%20cartoon
- http://s2ptech.blogspot.in/2012/03/how-to-make-solar-inverter-battery.html
References for Text:
- http://www.solarbarbados.com/2013/12/07/solar-photovoltaics-pv-actually-work/
- https://www.treehugger.com/solar-technology/nanostructure-sandwich-triples-efficiency-organic-solar-cells.html
- http://www.instructables.com/id/My-home-made-solar-cell-1/
- https://www.prlog.org/12098485-how-to-make-solar-panels-yourself-by-gogreenwithsolarpanelcom.html
- http://www.mdpub.com/SolarPanel/
Support @steemstem and the #steemstem
project - curating and supporting quality STEM
related content on Steemit

The production is better is some fresh air can cool the panel.
Awesome post! thank you!
So amazing post mate. Solar panel can solve the problem of electricity in the growing Asian countries, like mine Bangladesh.