Dare to Learn with me! Step by step Tutorial Earrings or Earrings made with the Soutache technique and my personal touch

Hello hello, today I will show you some beautiful tendrils that despite being simple look pretty elegant and give that special touch to your outfit. As you know those who have read me before I love designing accessories is more my passion than my work and steemit opened an incredible door to me to share what little I know. These tendrils that I bring today are medium 7 cm high by 5 cm wide this technique is simple everything is in practice, the love you dedicate and your desire to do everything is in you. It is always wonderful to learn something new, I always try to innovate and create new designs.
The soutache is a cord or braid that is originally used to embroider dresses and gala costumes at present also to go giving precious shapes to the threads with different jewels and cooking with each other until you get the desired shape for either a necklace or bracelet or tendrils. Sincerely, it is a technique that has been used for a long time. Although I gave it my personal touch and I do not use thread and needle, I use liquid silicon and stick the threads until I give them the shapes I want.
Try to do it in the simplest and most explanatory way possible so that if you follow the steps little by little you will achieve it and surely you will improve it with your personal touch as well as I do it, all the materials are easy to access, you can find them in a haberdashery . now let's start ...
Materials:
Soutache thread or rayon braid (The name varies according to your country). Color of your choice.
Apply round plane set 1 cm.
Piece of thick cloth or Leather for the base
Flat tendril base
Liquid silicone.
Fine tip eyebrow tweezers.
Scissors.
Rule.
Lighter.
Encourage to use base when working it.
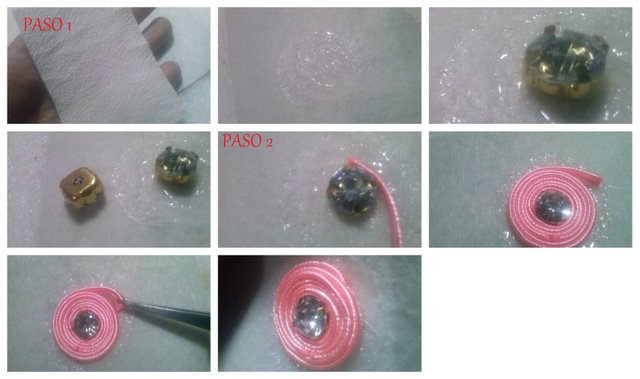
STEP 1: Cut a piece of leather of 9 * 7 cm looking for the medium of the same silicone liquid and stick the applique.
STEP 2: liquid silicone glue around the appliqué, then cut a thread of 38 cm long in this case is the salmon colored thread of the image and begins to wrap the appliqué with the thread, at the end with the help of the pinza mete the tip below so you can not see it. That gives a better finish to your piece.
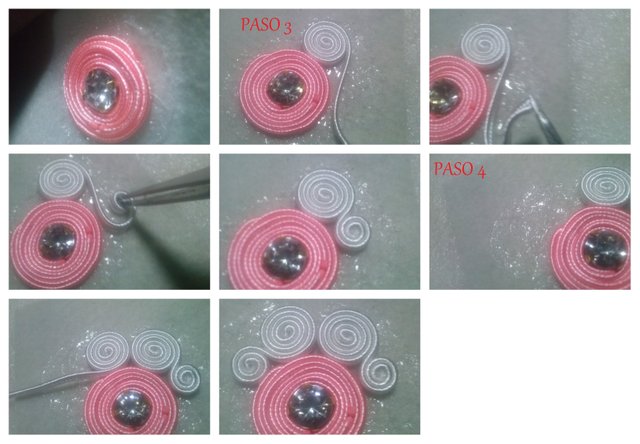
STEP 3: Cut 2 threads of 17 cm each in this case is the white you see in the image, give it 5 laps and paste on the top a little to the right you can do it by eye, with the help of the tip of the clip grasps the tip of the remaining thread and begins to twist it will remain as you see in the image.
STEP 4: Place more liquid silicon in the upper left and repeat the process in step 3.
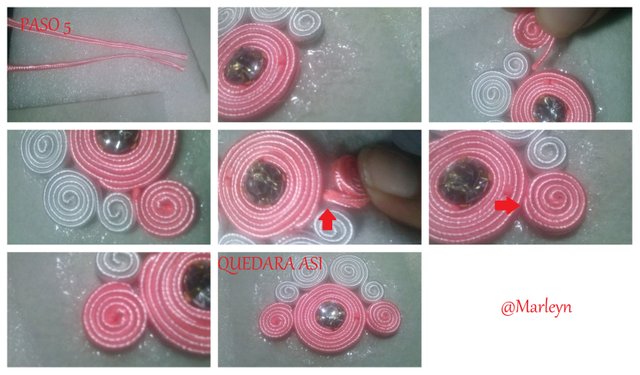
STEP 5: We are going to cut 2 threads of 10 cm each and at the bottom of the white threads we will proceed to place liquid silicone and with the help of your fingers we will wind the thread, sticking it with the final tip inwards, preferably just below the thread white as I show you in the image then fold the leather a little and with the help of the clamp it introduces that tip inwards so that it is not visible. It will stay as I show you in the last image.
STEP 6: Place liquid silicon on the underside of the threads that we just pasted and perform step 3 again at the bottom. Remember to burn the tips so they do not fray and damage the piece with time, it will stay as shown in the image.
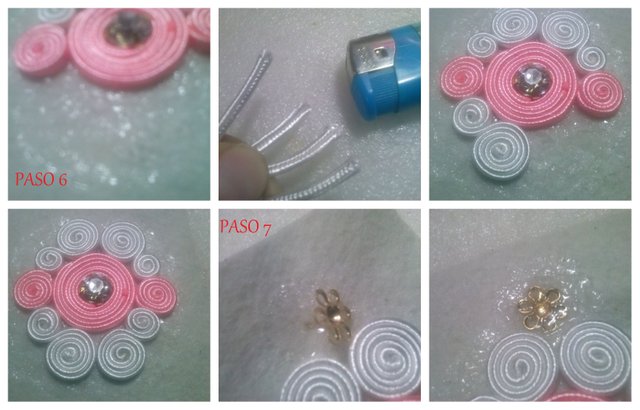
STEP 7: At the top of the white threads, introduce the tendril base by placing glue between the leather and the base so that it is fixed and then place more liquid silicon on the top of the base.
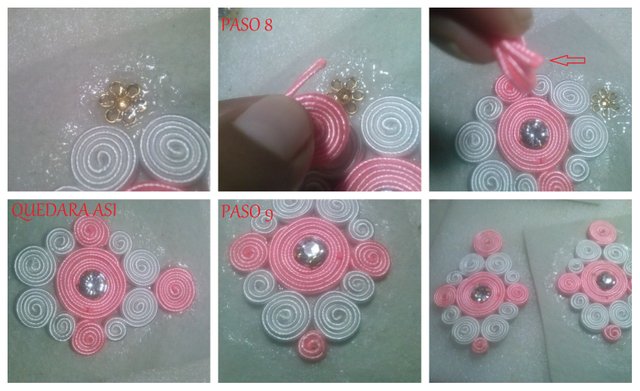
STEP 8: Cut a thread of 20 cm in length roll it with your fingers, remember to introduce the remaining tip of the thread by the bottom part of it, it will be as I show you in the image.
STEP 9: Cut a 4 cm long thread roll it and stick it on the lower tip to finish our beautiful tendrils ...
TIPS: If you want with these same steps you can make a beautiful pendant you just have to change a detail, do not place the base of tendril you only place the thread you trim the leftover leather then before it dry you raise a little the leather and between the thread and the leather introduces a hoop or ring then you re-stick it with a little pressure at that point, so you'll have a pendant.
Your post made me remember a series of articles I did many years ago on gemstones and jewelry.
Solid tutorial. Thanks.
Namaste, jaichai
Thank you very much for your words and support
Namaste...
Congratulations! This post has been upvoted from the communal account, @minnowsupport, by Marleyn from the Minnow Support Project. It's a witness project run by aggroed, ausbitbank, teamsteem, theprophet0, someguy123, neoxian, followbtcnews, and netuoso. The goal is to help Steemit grow by supporting Minnows. Please find us at the Peace, Abundance, and Liberty Network (PALnet) Discord Channel. It's a completely public and open space to all members of the Steemit community who voluntarily choose to be there.
If you would like to delegate to the Minnow Support Project you can do so by clicking on the following links: 50SP, 100SP, 250SP, 500SP, 1000SP, 5000SP.
Be sure to leave at least 50SP undelegated on your account.
so cool, one can create so many amazing things with these ...
Thanks, with creativity everything is possible
Another very good guide. Also these look very good. Thank you again for doing work like this sure it is helpful to any looking to do crafts like this.
Thank you I hope it is like that
nice write up
Nice to make something new from scratch