How to Mine Steem on Windows....
A short guide to help you get started mining on Windows.
The first thing you need to start with before moving with the actual mining is to register yourself an account on the steemit.com
– Start by downloading the latest https://github.com/btscube/steem/releases/
– The miner binary is compiled for 64-bit Windows, so it will not work on 32-bit ones
– Extract the steem-win-x64-012-2.zip archive to a folder on your computer and run steemd.exe
– The first time you run the Steem Daemon executable it will create a witness_node_data_dir directory and inside will generate some additional files and folders

– Go inside the witness_node_data_dir folder and open the config.ini file with Notepad or another text editor
– Start by adding a few steem nodes to connect to, just paste the following list under P2P nodes to connect to on startup:
seed-node = 52.38.66.234:2001
seed-node = 52.37.169.52:2001
seed-node = 52.26.78.244:2001
seed-node = 192.99.4.226:2001
seed-node = 46.252.27.1:1337
seed-node = 81.89.101.133:2001
seed-node = 52.4.250.181:39705
seed-node = steemd.pharesim.me:2001
seed-node = seed.steemed.net:2001
seed-node = steem.clawmap.com:2001
seed-node = seed.steemwitness.com:2001
seed-node = steem-seed1.abit-more.com:2001
– Under the name of witness add your steemit.com username (you need to register prior to start mining), so make sure it is something like: witness = "myusername"
– Under the name of miner and its private key add your steemit.com username and private key, so make sure it is something like: miner = ["myusername","yourWIFprivatekeyhere"]
– When setting different parameters in the ini file make sure you don’t leave the # sign in front of the line as it essentially comments it out and the miner behaves as this parameter is not set, so you can get an error that a witness or miner is not set!
– If you are not sure where to get the private key, then just login to your steemit.com account, go to your Profile and then to the Permissions tab. Here you need to click on Show the private key for Active (you may need to relogin first). Do note that the key shown by default is the public key, you need to show the private key and use the private key in the config! Alternatively you can use the Owner private key, this is also your login password, but due to security reasons you better stick with the Active key.
– Under the Number of threads to use add mining-threads = 1 or higher number, depending on how much of your CPU you want to utilize for mining, more threads result in higher hashrate
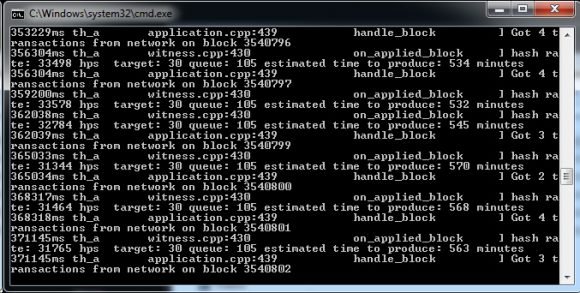
– You are now ready to start mining, just run steemd.exe again and wait for the blockchain to synchronize, it could take something like 15-30 minutes or more (depending on your internet connection)
– The steem blockchain is over 3.5 million block already, but the size is not that huge yet, it is around 3.3 GB in size, so you will need more than that free space available
– In our tests with an Intel Core i7 5820K CPU (6 cores, 12 threads) running at 12 threads configured in the ini file we are getting about 44390 HPS (hashes per second) as a hashrate or around 31-33 KHS with just 6 active threads
– Do note that the mining apparently requires a lot of RAM, we get about 3GB used for 6 threads and about 5GB used for 12 threads for mining, so make sure you have enough RAM in your computer (8GB or more is recommended)
– All you have to do now is to wait for your miner to first find a POW block and then put you in the Miner-witness queue until your turn comes in to confirm a block in order to get your reward transferred to your steemit.com account
"a witness or miner is not set"
I get this error no matter what i do!