Micro Guía: Lecciones prácticas de Markdown en Steemit #3 - Tablas e imágenes (>English Inside<)


Crear una galería de imágenes, organizar datos dentro de una tabla en Steemit, presentar datos de una manera más agradable. Todo esto, de una manera fácil rápida y reutilizable.
For English jump bellow please 
Saludos Steemianos y Steemianas, espero que todos tengan un muy feliz Steemit. Si estás aterrizando a la plataforma el día de hoy, te ofrezco la más cordial de las bienvenidas. Aprovecho además, para invitarlos a leer las guías que he creado para todos ustedes, en mi perfil.
Markdown. HTML sintetizado y sin tanto "enredo".
En mi opinión, algo que no debe detener tus capacidades creativas, son las limitantes tecnológicas. Cuando se trata de presentar datos o crear galerías de fotos o videos, las tablas creadas en Markdown, pueden facilitarte mucho las cosas. A diferencia del HTML, Markdown ofrece crear tablas de una manera más sencilla y, como todo código, es reutilizable. Antes de proseguir con la práctica y las plantillas, te ofrezco algunos usos de las tablas en tus artículos en Steemit:
- Organizar datos por columnas y filas.
- Presentar múltiples archivos de manera más organizada y visualmente, más agradable.
- Crear galerías de videos, fotos y archivos para descargas.
- Presentar tus perfiles sociales de manera práctica y con menos líneas de código.
- Presentar tus monederos o "wallets" de cripto monedas, para recibir regalos y propinas. (Este sin duda, es mi favorito.)
De seguro existen más usos para las tablas en tus artículos de Steemit. Eso, lo dejaré a tu criterio e imaginación. A continuación, dejaré ejemplos de plantillas de tablas que pueden reutilizar. Para darles uso, debes copiar y pegar los bloques con fondo gris. Luego, puedes modificar a tu gusto. Ante cualquier duda o error, escribe en la sección de comentarios.
Tabla "común y silvestre", tamaño 2x2.
| Celda Encabezado 1 | Celda Encabezado 2 |
|---|---|
| Celda contenido 1 | Celda contenido 2 |
Código Markdown utilizable: ![]()
|Celda Encabezado 1|Celda Encabezado 2|
|---|---|
|Celda contenido 1|Celda contenido 2|
Os explico un poco:
- Para definir los bordes o límites de las tablas, utilizamos el símbolo
|. Como puedes notar en la tabla anterior, este símbolo se coloca al inicio, en las separaciones y al finalizar cada celda. Puedes agregar cuantas celdas necesites. - Siempre se debe colocar una instrucción que define el encabezado de la tabla y las celdas de contenido. Dicha instrucción es
|---|---|. Si requieres agregar más columnas, debes incrementar el número de separaciones. Ejemplo:|---|---|---|. Ten en cuenta que esta instrucción es obligatoria para que el editor reconozca que estas "dibujando una tabla". - Es importante saber, que por defecto, los contenidos son alineados a la izquierda. Más adelante te mostraré que otras alineaciones tienes a disposición.
- Para agregar una nueva fila, simplemente coloca justo debajo (sin separación de línea), una nueva fila
|Celda contenido 3|Celda contenido 4|. - Markdown os permite colocar algunos códigos dentro de cada celda. Lo mostraré en los puntos siguientes.
- El editor de Steemit utilizará el ancho total del artículo para dibujar la tabla. Siempre debes hacer pruebas para ver cómo se presenta el texto. Algunas veces se auto-alínea de manera "no muy grata", visualmente hablando claro.
- Los colores por filas se alternan entre blanco y gris, de manera automática. Dentro de Steemit, aún no tenemos forma de modificar esos colores de fondo.
Tablas y alineaciones de contenido en celdas.
Alineación a la derecha:
| Celda Encabezado 1 | Celda Encabezado 2 |
|---|---|
| Celda contenido 1 | Celda contenido 2 |
Código Markdown utilizable: ![]()
|Celda Encabezado 1|Celda Encabezado 2|
|---:|---:|
|Celda contenido 1|Celda contenido 2|
Nota: Utilizando los dos puntos : dentro del separador de encabezado de tabla y celdas de contenido, puedes definir la alineación. Pero, por motivos de que Steemit aún está en desarrollo (Beta), algunas funciones no se ejecutan en cuanto a la alineación.
Alineación centrada:
Código Markdown utilizable: ![]()
|<center>Celda Encabezado 1</center>|<center>Celda Encabezado 2</center>|
|---|---|
|<center>Celda contenido 1</center>|<center>Celda contenido 2</center>|
Divisiones dentro de celdas. Uso de <div>.
Podemos dividir una celda en dos partes, cuando nos haga falta.
Sub Encabezado 1 Sub Encabezado 2 | Celda Encabezado 2 |
|---|---|
| Celda contenido 1 | Celda contenido 2 |
Código Markdown utilizable: ![]()
|<div class="pull-left">Sub Encabezado 1</div><div class="pull-right">Sub Encabezado 2</div>|Celda Encabezado 2|
|---|---|
|Celda contenido 1|Celda contenido 2|
Esto mismo podemos realizarlo para una celda de contenido. Supongamos que tenemos que presentar celdas con dos descripciones:
| Celda Encabezado 1 | Celda Encabezado 2 |
|---|---|
Sub Contenido 1 Sub Contenido 2 | Celda contenido 2 |
Código Markdown utilizable: ![]()
|Celda Encabezado 1|Celda Encabezado 2|
|---|---|
|<div class="pull-left">Sub Contenido 1</div><div class="pull-right">Sub Contenido 2</div>|Celda contenido 2|
Código Markdown permitido dentro de una tabla. Tabla 4 x 4.
| Encabezado 1 | Encabezado 2 | Encabezado 3 | Encabezado 4 |
|---|---|---|---|
| Negrillas | Cursiva | Italic | |
| Super texto10 | Sub texto10 | Enlace Web | Iconos |
| Icono-enlace | Super enlaceClic | Sub enlaceClic | Gifs |
Código Markdown utilizable: ![]()
|Encabezado 1|Encabezado 2|Encabezado 3|Encabezado 4|
|---|---|---|---|
|**Negrillas**|_Cursiva_|~~Tachado~~|*Italic*|
|Super texto<sup>10</sup>|Sub texto<sub>10</sub>|[Enlace Web](https://saturnomangieri.com)|Iconos |
|Icono como enlace [](https://steemit.com/@theghost1980)|Super enlace<sup>[Clic aquí](https://saturnomangieri.com)</sup>|Sub enlace<sub>[Clic acá](https://saturnomangieri.com)</sub>|Gifs pequeños|
Galería de Imágenes con tablas, con y sin, fuentes de contenido.
En este punto quiero nombrar a un gran artista y dibujante, el amigo @richi03 quien nos honra con sus creaciones. Aprovecho para recomendarle que utilice las tablas para mostrar la creación de sus dibujos y creaciones artísticas. El uso de las tablas para mostrar fotografías e imágenes en Steemit, nos permitirá:
- Ofrecer un ambiente visual más agradable, dando la oportunidad al lector, de sólo observar las vistas previas y abrir las vistas en pantalla completa si así lo desea.
- Tener más espacio para nuestros textos, escritos y explicaciones.
- En algunos ejemplos, he utilizado imágenes de 200x200 pixeles. Puedes utilizar los tamaños y resoluciones que tú desees. El editor los ajustará según la cantidad de imágenes que quieras mostrar en cada fila. Debes hacer pruebas para decidir la cantidad de imágenes por filas.
Galería de Imágenes en Tabla 4 x 2, sin fuentes de contenido:
 | | | |
|---|---|---|---|
| | | |
Código Markdown utilizable: ![]()
|https://upload.wikimedia.org/wikipedia/commons/1/1b/Square_200x200.png|https://upload.wikimedia.org/wikipedia/commons/1/1b/Square_200x200.png|https://upload.wikimedia.org/wikipedia/commons/1/1b/Square_200x200.png|https://upload.wikimedia.org/wikipedia/commons/1/1b/Square_200x200.png|
|---|---|---|---|
|https://upload.wikimedia.org/wikipedia/commons/1/1b/Square_200x200.png|https://upload.wikimedia.org/wikipedia/commons/1/1b/Square_200x200.png|https://upload.wikimedia.org/wikipedia/commons/1/1b/Square_200x200.png|https://upload.wikimedia.org/wikipedia/commons/1/1b/Square_200x200.png|
Ahora bien, si tenemos unos enlaces directos muy largos, se verá un poco complejo el código. Es por eso que les recomiendo utilizar las referencias de enlaces de tablas. En Markdown podemos referenciar enlaces y colocar dicha referencia debajo de la tabla. Observa la siguiente tabla:
|  | | |
|---|---|---|---|
| | | |
Código Markdown utilizable: ![]()
|![][i1]|![][i2]|![][i1]|![][i2]|
|---|---|---|---|
|![][i1]|![][i2]|![][i1]|![][i2]|
[i1]: https://upload.wikimedia.org/wikipedia/commons/1/1b/Square_200x200.png
[i2]: http://piq.codeus.net/static/media/userpics/piq_66223.png
Es mucho más sencillo de presentar y puedes agregar tantos elementos como necesites. Hacemos uso de la referencia ![][i2], y justo debajo de la tabla (sin espacios de lineas), colocamos dicha referencia con su enlace respectivo: [i2]: http://piq.codeus.net/static/media/userpics/piq_66223.png.
Galería de Imágenes en Tabla 4 x 2, con fuentes de contenido:
fuente | fuente | fuente | fuente |
|---|---|---|---|
fuente | fuente | fuente | fuente |
Código Markdown utilizable: ![]()
|![][i1]<br>[fuente][i1]|![][i2]<br>[fuente][i2]|![][i1]<br>[fuente][i1]|![][i2]<br>[fuente][i2]|
|---|---|---|---|
|![][i1]<br>[fuente][i1]|![][i2]<br>[fuente][i2]|![][i1]<br>[fuente][i1]|![][i2]<br>[fuente][i2]|
[i1]: https://upload.wikimedia.org/wikipedia/commons/1/1b/Square_200x200.png
[i2]: http://piq.codeus.net/static/media/userpics/piq_66223.png
Puedes notar como hacemos uso de la misma referencia para mostrar el enlace a la fuente de la imagen. Utilizamos la instrucción <br> para crear un "break" o "salto de línea", de manera que justo debajo de la imagen aparezca la referencia a la fuente de imagen [fuente][i1].
Con creatividad, una tabla sirve para muchos usos.
Tabla para presentar tus perfiles sociales. Tabla 1 x 2 con iconos cliqueables y contenido centrado:
Código Markdown utilizable: ![]()
|<center>*Encuéntrame en:* </center>|
|---|
|<center>[](https://www.facebook.com/satmangieri/) . [](https://twitter.com/saturnomangieri) . [](https://steemit.com/@theghost1980)</center>|
Recomendaciones Generales

- Empieza por utilizar tablas pequeñas y sencillas. Debes familiarizarte con las tablas y sus códigos, antes de utilizar tablas más complejas.
- Revisa mis tutoriales anteriores sobre Markdown, para que sepas cómo utilizar todas las instrucciones.
- Debes probar los mejores tamaños de imágenes a la hora de fabricar tus galerías. Puedes utilizar imágenes en alta resolución y la tabla, se encargará de reducir las imágenes según la cantidad de imágenes por filas. Siempre coloca la fuente de imagen, de manera que los lectores, puedan acceder a dichas fotos en alta resolución y hagas honor a los fotógrafos, personas o diseñadores gráficos.
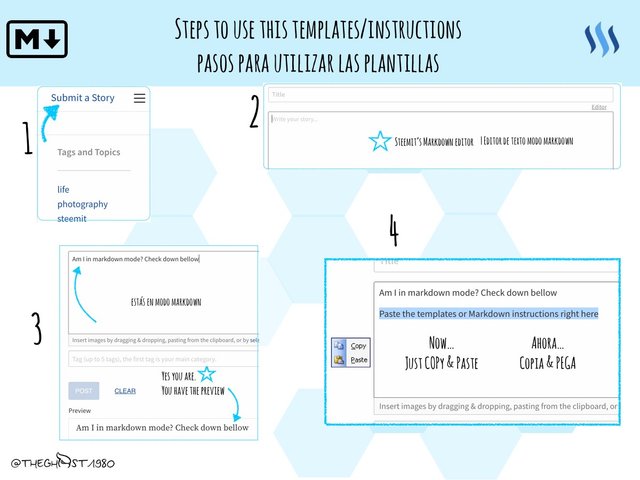
- Si tienes dudas de cómo configurar el editor en modo Markdown para utilizar las plantillas, consulta la imagen a la derecha.
Agradeciendo tu tiempo de vida para leer este artículo me despido por ahora. Espero te sea de mucha ayuda para crear buenos artículos en Steemit. STEEM ON, muchachON!

Cheers Steemians, I hope everyone may have a very happy Steemit. If you are landing into the platform today, I offer you the most cordial welcome. I also take this opportunity to invite you to read the guides I have created for all of you, inside my blog.
Markdown. HTML synthesized and without so much "trouble".
In my opinion, something that should never stop you from being creative, are the technological barriers. When it comes to presenting data or creating photo galleries, tables created in Markdown, can make things much easier for you. Unlike HTML, Markdown offers a way to create tables in a simpler way and, like all code, is reusable.
Before proceeding with the practice and templates, I show you some uses of the tables within your articles in Steemit:
- Organising data by columns and rows.
- Present multiple files in a way much more organized and visually pleasurable.
- Design photo galleries. Also make a "table of files" linking to download folders.
- Presenting your social profiles in a more practical way, while coding just a few lines.
- Show in a more organised way your crypto-coins wallets, in order to receive gifts and tips. (This is certainly my favorite.)
There are much more uses for tables within your Steemit articles. That, I will leave it to your criteria and imagination. In the following lines, I'll leave you examples and table templates you can use anytime. To use them, you must copy and paste the blocks with a gray background, then you can modify it as you like. If you have any doubts or errors, write in the comments section bellow.
Simple Table. Dimensions 2x2.
| Header 1 | Header 2 |
|---|---|
| Cell 1 | Cell 2 |
Markdown Code: ![]()
|Header 1|Header 2|
|---|---|
|Cell 1|Cell 2|
A little explanation:
- To define tables borders, we use the
|symbol. As you can see in the table above, this symbol is placed at the beginning, at the separations and at the end of each cell. You can add as many cells as you need. - You should always place an instruction that divides, the table header and the cells. This instruction is
| --- | --- |. If you need to add more columns, you must increase the number of separations. In example:| --- | --- | --- |. Note that this instruction is mandatory for the editor to recognize that you are "drawing a table". - It is important to know that, by default, any content is aligned to the left. Later on I'll show you more alignments options.
- To add a new row, simply place just below the current row (without blank lines), a new row . One example:
| Content cell 3 | Content cell 4 |. - Markdown allows you to place instructions inside each cell. I will show this in the next paragraphs.
- The Steemit editor will use the full width of the article to draw the table. You should always test to see how the text is presented. Sometimes it is placed in "weird" ways. Always make visual tests before publishing.
- Each row alternate its color between white and grey automatically. So far, we still have no way to change those background colors.
Table cell alignments.
Right alignment:
| Header 1 | Header 2 |
|---|---|
| Cell 1 | Cell 2 |
Markdown Code: ![]()
|Header 1|Header 2|
|---:|---:|
|Cell 1|Cell 2|
Note: Using the : colon inside the "divider section", you can define the alignment. As Steemit is still in Beta, some alignment functions aren't working.
Centered alignment:
Markdown Code: ![]()
|<center>Header 1</center>|<center>Header 2</center>|
|---|---|
|<center>Cell 1</center>|<center>Cell 2</center>|
Cell <div>isions within a Table.
As long we need it, we can divide a cell using the <div> instructions. We will use it one per division.
Sub Header 1 Sub Header 1.1 | Header 2 |
|---|---|
| Cell 1 | Cell 2 |
Markdown Code: ![]()
|<div class="pull-left">Sub Header 1</div><div class="pull-right">Sub Header 1.1</div>|Header 2|
|---|---|
|Cell 1|Cell 2|
We can divide headers, as shown above, or even a regular cell as follow:
| Header 1 | Header 2 |
|---|---|
Sub Cell 1 Sub Cell 1.2 | Cell 2 |
Markdown Code: ![]()
|Header 1|Header 2|
|---|---|
|<div class="pull-left">Sub Cell 1</div><div class="pull-right">Sub Cell 1.2</div>|Cell 2|
Markdown instructions you can use inside of table cells. Table dimensions 4 x 4.
| Header 1 | Header 2 | Header 3 | Header 4 |
|---|---|---|---|
| Bold | Italic | Italic | |
| Super text10 | Sub text10 | Web link | Iconos |
| Icon as a link | Super linkClick here | Sub linkClick here | Small Gifs |
Markdown Code: ![]()
|Header 1|Header 2|Header 3|Header 4|
|---|---|---|---|
|**Bold**|_Italic_|~~Strikethrough~~|*Italic*|
|Super text<sup>10</sup>|Sub text<sub>10</sub>|[Web link](https://saturnomangieri.com)|Iconos |
|Icon as a link [](https://steemit.com/@theghost1980)|Super link<sup>[Click here](https://saturnomangieri.com)</sup>|Sub link<sub>[Click here](https://saturnomangieri.com)</sub>|Small Gifs|
Image Gallery with tables, with and without, content sources.
Before continuing I want to name a great artist, my friend @ richi03 who honors us with his draws. I will take the chance to recommend him using the tables to show his drawings and artistic creations. Using the tables to show pictures and images in Steemit, will allow us to:
- Offer a more pleasant visual environment, giving the opportunity to the reader, just to observe the previews and open the views in full screen if they wish so.
- Have more space for our texts, writings and explanations.
- In some examples, I used images of 200x200 pixels. You can use the sizes and resolutions you want. The editor will adjust them according to the number of images you want to display in each row. You should do some tests to decide how many images per row you can fit in.
Image gallery. Table of dimensions 4x2. No content sources:
| | | |
|---|---|---|---|
| | | |
Markdown Code: ![]()
|https://upload.wikimedia.org/wikipedia/commons/1/1b/Square_200x200.png|https://upload.wikimedia.org/wikipedia/commons/1/1b/Square_200x200.png|https://upload.wikimedia.org/wikipedia/commons/1/1b/Square_200x200.png|https://upload.wikimedia.org/wikipedia/commons/1/1b/Square_200x200.png|
|---|---|---|---|
|https://upload.wikimedia.org/wikipedia/commons/1/1b/Square_200x200.png|https://upload.wikimedia.org/wikipedia/commons/1/1b/Square_200x200.png|https://upload.wikimedia.org/wikipedia/commons/1/1b/Square_200x200.png|https://upload.wikimedia.org/wikipedia/commons/1/1b/Square_200x200.png|
Now, if we have a very long direct links, the code will be a bit complex. This is why I recommend you use links references within tables. In Markdown we can reference links and place that reference under the table. Look at the following table:
| | | |
|---|---|---|---|
| | | |
Markdown Code: ![]()
|![][i1]|![][i2]|![][i1]|![][i2]|
|---|---|---|---|
|![][i1]|![][i2]|![][i1]|![][i2]|
[i1]: https://upload.wikimedia.org/wikipedia/commons/1/1b/Square_200x200.png
[i2]: http://piq.codeus.net/static/media/userpics/piq_66223.png
This is a much simpler way. You can add as many reference links and images you need. I am using the reference ![][i2], and bellow the table (without line break), We can write the link with his reference: [i2]: http://piq.codeus.net/static/media/userpics/piq_66223.png.
Image gallery. Table of dimensions 4x2, including content sources:
source | source | source | source |
|---|---|---|---|
source | source | source | source |
Markdown Code: ![]()
|![][i1]<br>[source][i1]|![][i2]<br>[source][i2]|![][i1]<br>[source][i1]|![][i2]<br>[source][i2]|
|---|---|---|---|
|![][i1]<br>[source][i1]|![][i2]<br>[source][i2]|![][i1]<br>[source][i1]|![][i2]<br>[source][i2]|
[i1]: https://upload.wikimedia.org/wikipedia/commons/1/1b/Square_200x200.png
[i2]: http://piq.codeus.net/static/media/userpics/piq_66223.png
You can notice how I am using the same link reference as a source. Usually we use the instruction <br> to create a "line break". In this way, we can guarantee our source link will be under the image within the same cell.
With creativity, a table may be used in many ways.
Social media links in a table. Table of dimensions 1x2. Clickable icons. Centred alignment:
Markdown Code: ![]()
|<center>*You can find me at:* </center>|
|---|
|<center>[](https://www.facebook.com/satmangieri/) . [](https://twitter.com/saturnomangieri) . [](https://steemit.com/@theghost1980)</center>|
General Conclusions and Recommendations
- Start by using small and simple tables. You must familiarize yourself with tables and their codes before using more complex tables.
- Check out my previous tutorials about Markdown, so you can learn how to use all the instructions.
- You should try out the best image sizes when making your galleries. You can use images in high resolution. The table will reduce the images according to the number of images per row. Always place the image source, so the readers, can access those photos in high resolution and you may honor the photographers, people or graphic designers who that work belongs to.
- If you have any doubts about how to configure the editor in Markdown mode in order to use the templates, see the image on the right.
Thanking you for your life time to read this article. Goodbye for now. I hope it helps you to create good articles in Steemit. STEEM ON!

Saturno Mangieri - Asesor de Tecnologías Blockchain
 .
.  .
. 
Excelente información y todo muy bien explicado.
steem on
thanks you again for this helpfull post!!

upvoted bro...
Thanks bro I will check out your blog too!
thanks bro..i love to have friends on this community
This post has received a 51.95 % upvote from thanks to: @theghost1980.
For more information, click here!
Thank you so much for sharing all this information! that's great! All the best! Waiting for more posts! :)
This post has received a 12.48 % upvote from @buildawhale thanks to: @theghost1980. Send at least 0.50 SBD to @buildawhale with a post link in the memo field for a portion of the next vote.
To support our curation initiative, please vote on my owner, @themarkymark, as a Steem Witness
This post has received a 8.82 % upvote from @booster thanks to: @theghost1980.
This wonderful post has received a bellyrub 16.68 % upvote from @bellyrub thanks to this cool cat: @theghost1980. My pops @zeartul is one of your top steemit witness, if you like my bellyrubs please go vote for him, if you love what he is doing vote for this comment as well.