🎨 [Step by Step] - 💙 ✨ 👘 Cosplay Tutorial: Team Mystic Badge 👘 ✨ 💙 (Leader Blanche Cosplay), by: Tesmoforia.
"When the World turns to Ashes, which side would you choose?"
🐠 Work/Photo by @tesmoforia, with a Lumix/Panasonic DMC-FH2..png)
.png)
.png)

.png)
The Designs were made by a member who was involved on the character design for the "Fire Emblem" Videogame Sagas.
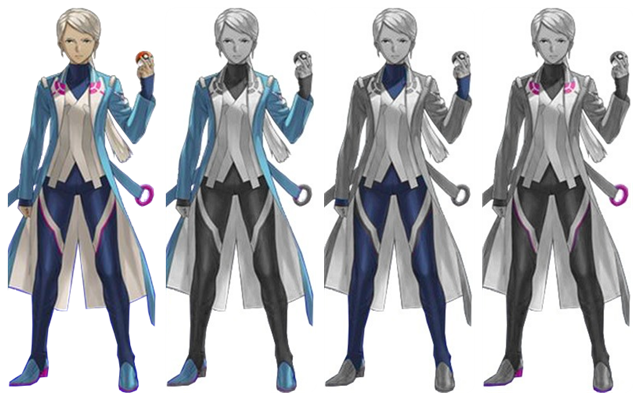
And who I fell in love with was, Mystic Team Leader: Blanche.

✋ BUT ONE MOMENT PLEASE! ✋
LET’S START WITH THE GOOD FOOT!
🎨 Cosplay Tutorial:
~ Team Mystic Badge (Leader Blanche Cosplay) ~
"Identifying every color of each piece of clothing separately will help you to avoid confusion, you will see colors and hues just as they are; usually: if you place one dark blue next to White, this blue will appear to be darker than it really is." - Duplication and color guide created by @vanuzza, my super designer and Cosplay teammate.-
"The final result must be like this!, use the dropper in the editing program of your preference to extract the color sample of each garment, accessory and detail, and thus create something similar to this." - Color Palette created by @vanuzza.-💡 What will you need to make this Badge? 💡
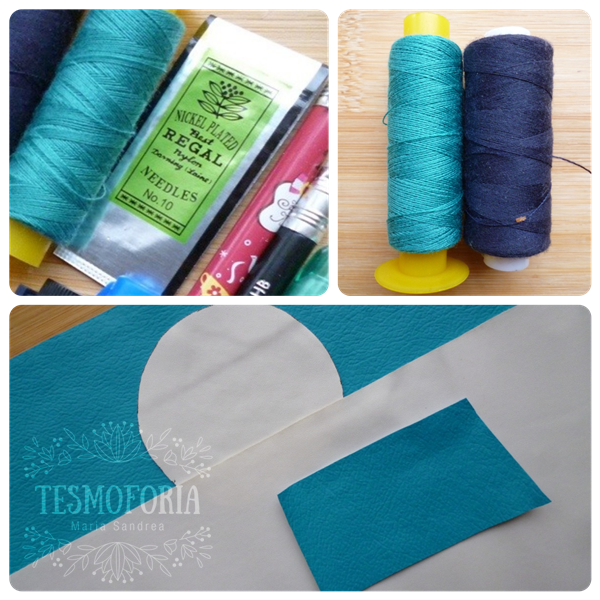
🐠 Collage/Photos by @tesmoforia, with a Lumix/Panasonic DMC-FH2. MATERIALS
| Greaseproof paper. | White Semi-Aniline. |
|---|---|
| Royal Blue Semi-Aniline. | Turquoise Semi-Aniline. |
| Turquoise Thread. | Dark Blue Thread. |
| Needles to embroid beads, N° 10. |
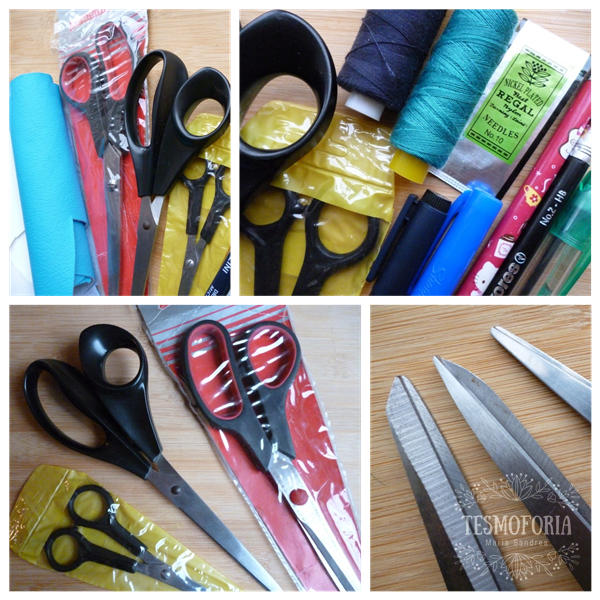
🐠 Collage/Photos by @tesmoforia, with a Lumix/Panasonic DMC-FH2. TOOLS
TOOLS 
| Pencil. | Fine Tip Marker. |
|---|---|
| Square. | Sewing Machine (optional). |
| Paper Scissors. | Royal Blue Permanent Marker. |
| Royal Blue Thread. | Contact or Permanent Glue (optional). |
 LET’S DO IT!
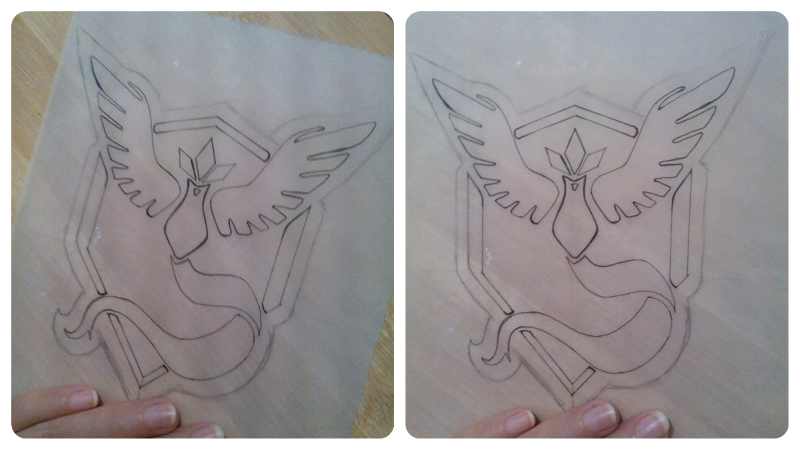
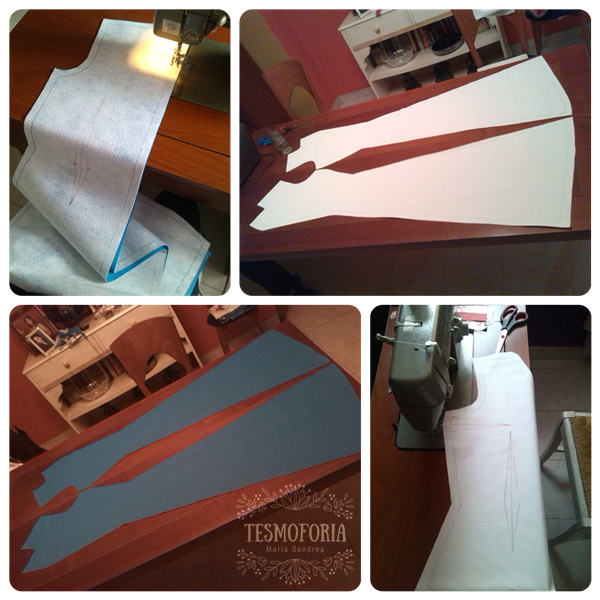
• • • STEP N° 1 • • •
"Making the Guide Pattern"


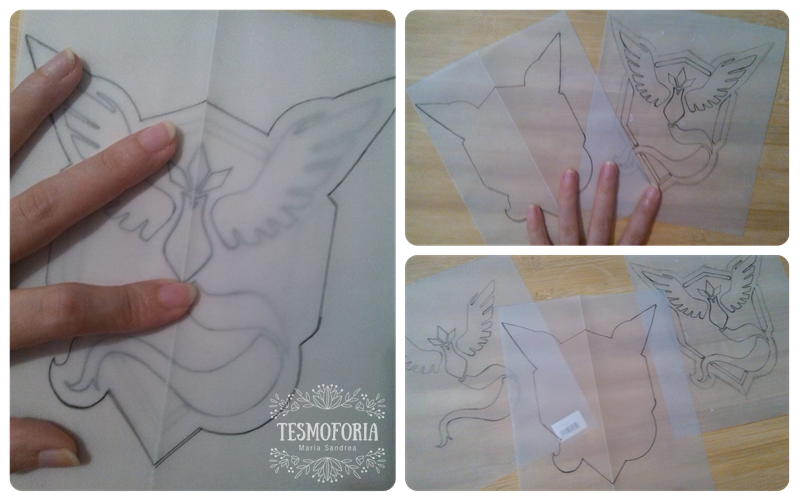
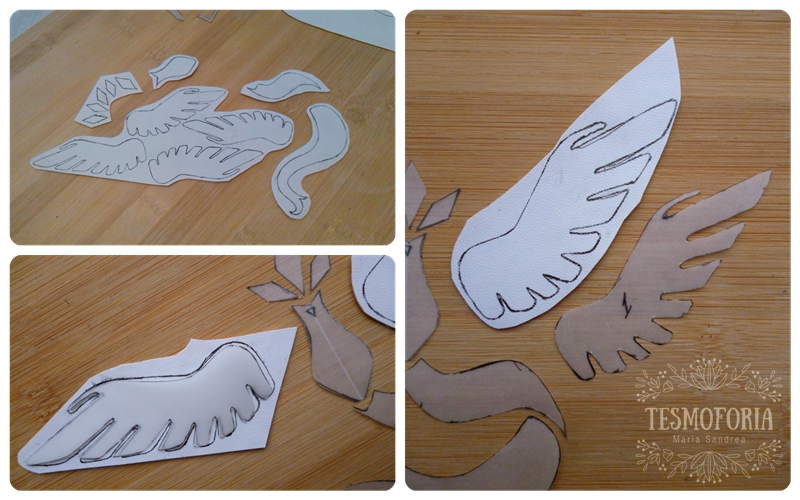
🐠 Collage/Photos by @tesmoforia, with a Lumix/Panasonic DMC-FH2. • • • STEP N° 2 • • •
"Duplicating the pattern to get all the Pieces"
🐠 Collage/Photos by @tesmoforia, with a Lumix/Panasonic DMC-FH2.
🐠 Collage/Photos by @tesmoforia, with a Lumix/Panasonic DMC-FH2.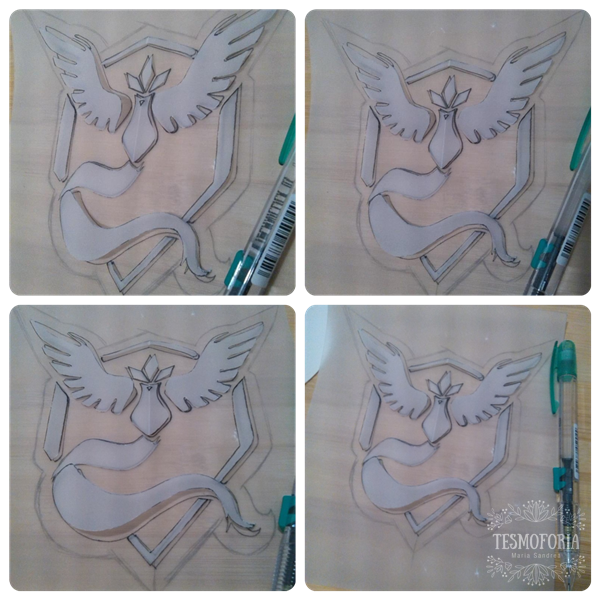
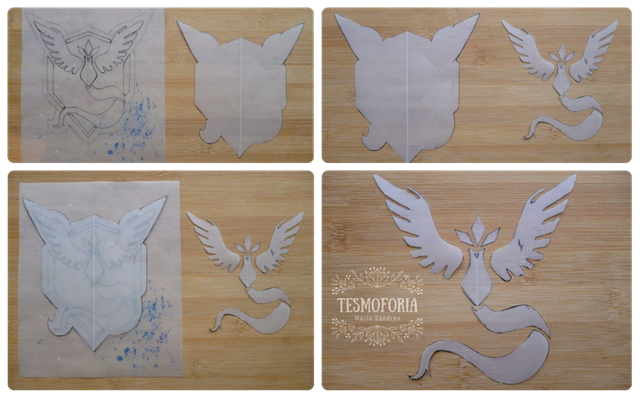
🐠 Collage/Photos by @tesmoforia, with a Lumix/Panasonic DMC-FH2. • • • STEP N° 4 • • •
"Copying the pattern into the final material"
🐠 Collage/Photos by @tesmoforia, with a Lumix/Panasonic DMC-FH2.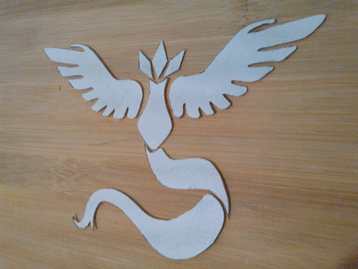.gif)
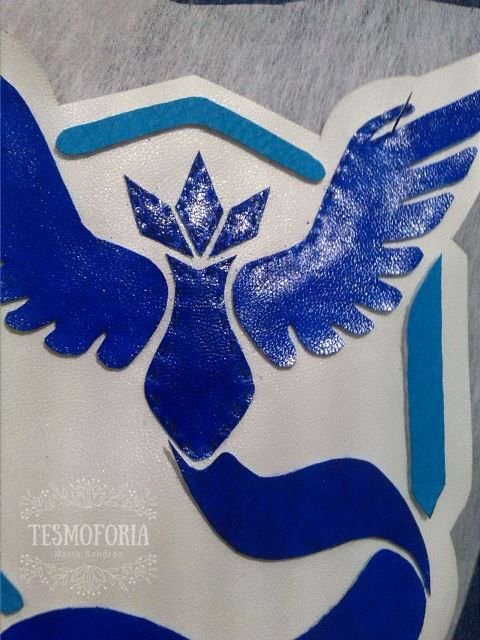
🐠 "On this occasion, I decided to make Articuno’s pieces on the white semi-aniline." - Work/Photos by @tesmoforia, with a Lumix/Panasonic DMC-FH2.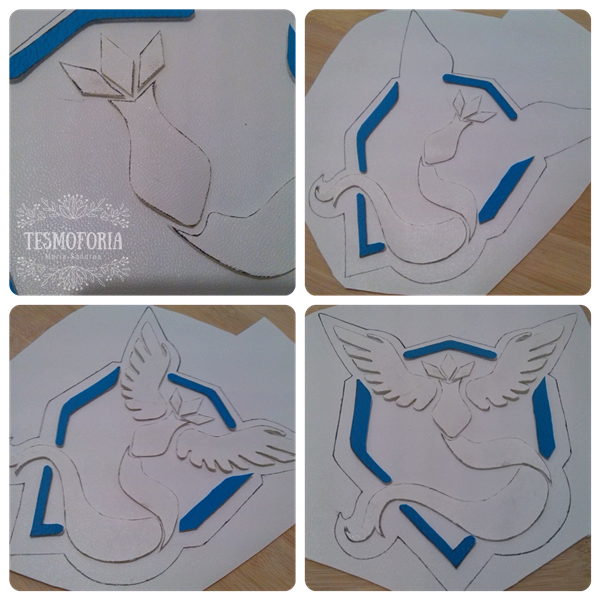
🐠 Collage/Photos by @tesmoforia, with a Lumix/Panasonic DMC-FH2..png)
.png)
• • • STEP N° 5 • • •
"Preview of the Final Result"
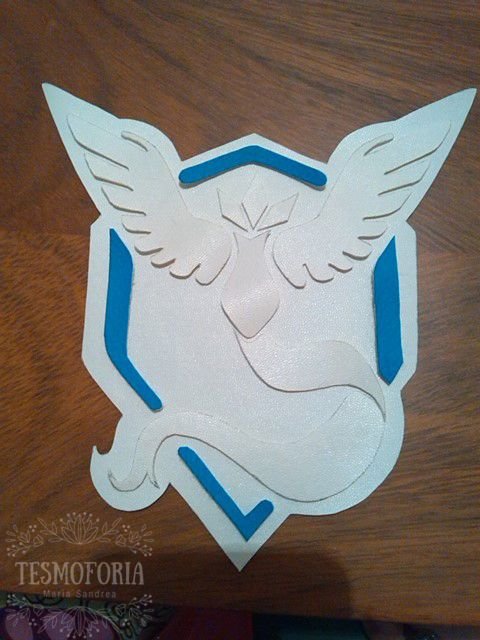
🐠 Collage/Photos by @tesmoforia, with a Lumix/Panasonic DMC-FH2.
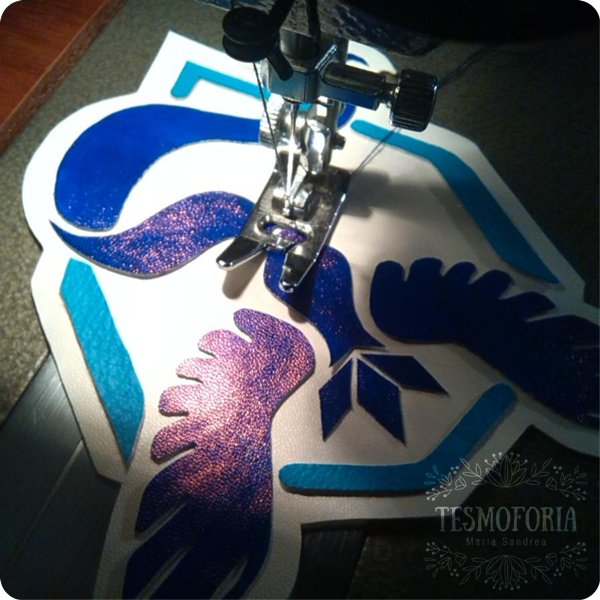
🐠 "Photo under natural lighting, and artificial lighting." - Collage/Photos by @tesmoforia, with a Lumix/Panasonic DMC-FH2. • • • STEP N° 6 • • •
"Attaching all the Pieces"
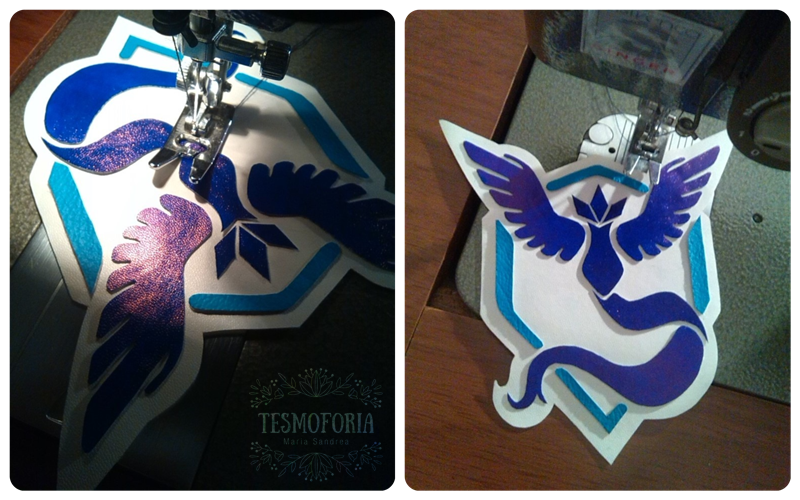
🐠 Collage/Photos by @tesmoforia, with a Lumix/Panasonic DMC-FH2.🚀 It’s the Moment of Truth! 🚀
🐠 Work/Photo by @tesmoforia, with a Lumix/Panasonic DMC-FH2.🎨 And why using needles that are usually reserved to embroider bride’s veils? 🎨
• • • STEP N° 7 • • •
"Finished!"
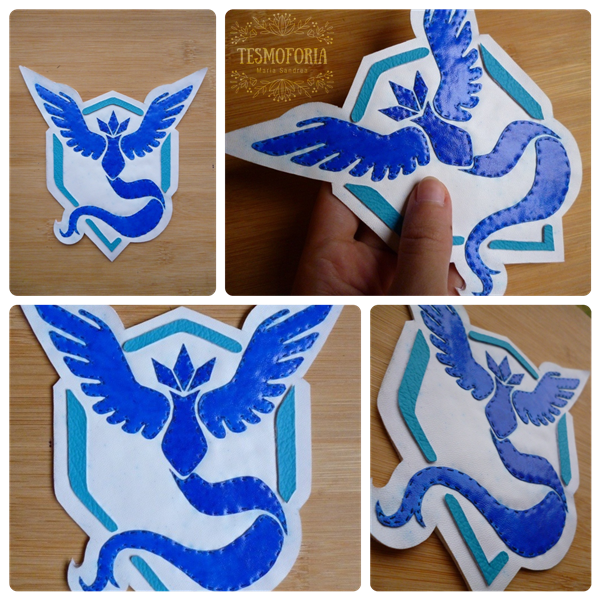
🐠 "Photos with natural lightning, finished piece." - Work/Photo by @tesmoforia, with a Lumix/Panasonic DMC-FH2.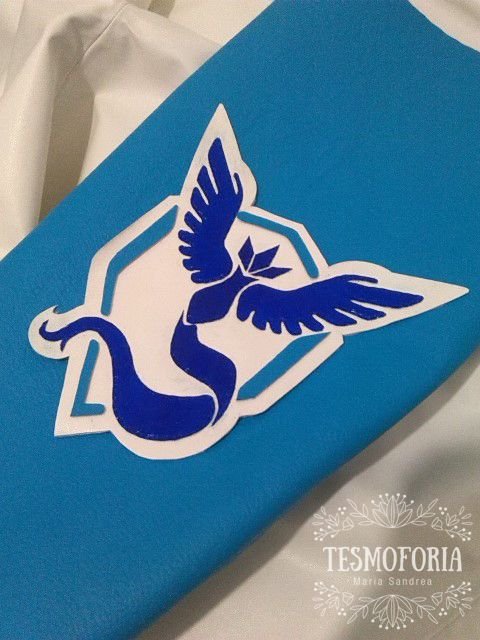
🐠 Work/Photo by @tesmoforia, with a Lumix/Panasonic DMC-FH2.✨ TIPS FOR A BETTER RESULT ✨
- If you had used a royal blue market to color Articuno’s part, you can seal the color with a little of SURPASS (dilute acrylic resin); the Surpass makes the piece waterproof and prevents it from cracking. Two layers will be enough.
✨ ANECDOTE ABOUT BLANCHE COSPLAY’S DEBUT ✨
🐠 Work/Photos/Collage by @tesmoforia, with a Lumix/Panasonic DMC-FH2.
🐠 Photos/Collage by @tesmoforia, with a Lumix/Panasonic DMC-FH2.
🐠 Photos/Collage by @tesmoforia, with a Lumix/Panasonic DMC-FH2.This is the First Cosplay Tutorial I share on Steemit!
✨ NOTICE ABOUT THE FOLLOWING UPDATES ✨
✨ SPECIAL THANKS ✨
Thank you so much to all the curator and helping projects that had come across this fluffy blog!. Each vote and every mention are something that worth a universe to me. Their work not only motivates content creators, but it also helps us and at the same time accompanies us in the search for our identities as artists. 💗
🐳 Slothicorn 🐳

🐳 Cervantes 🐳

🐳 Engránate 🐳

🐳 El Arca | The Ark 🐳

🐳 CELF 🐳

🐳 The Creative Crypto 🐳


💕 🙏 If you have reached this point, Thank you so much for Reading! 🙏 💕
Thank you so much to all the friendly users that follow and read me, to all those who stop for a moment to give their precious little votes and their affection condensed on comments, that I always love to read, even if I take a little while to reply back.
✨ 👘 ✨
✨
✨ 👘 ✨
✨

🍓 Credit of Text and All Images: @Tesmoforia 🍓
✨ Pokebabys Separators: FlatIcon.com✨
✨ Cute Gif´s: Giphy.com✨
💌 Thank you so much for Reading! 💌

Great work! These would definitely prove very popular at many of the Comic Cons we attend as vendors. We sell a bunch of Pokemon buttons/pins and people are always looking for more items. It is such a great idea and a perfect tutorial.
This post was nominated by a @curie curator to be featured in an upcoming Author Showcase that will be posted late Friday (U.S. time) on the @curie blog.
If you agree to be featured in this way, please reply and:
You can check out our previous Author Showcase to get an idea of what we are doing with these posts.
Thanks for your time and for creating great content.
Gene (@curie curator)
✨ 💖 I'm dazed (and honestly, really happy!) about reading you here, Mr. @randomwanderings 💖 ✨
It fills me with a lot of illusion to know that you liked my tutorial (I have been hyper excited and full of emotions since I noticed the vote from Curie, I don't know what to do!); one of my goals is to teach people how to make their own suits and props on a gentle and accessible manner, also to demonstrate that pretty and neat things aren’t necessarily made with expensive ways.
Of course I would love to participate in your Showcase for Friday! You have my complete permission to use any image or text in this, or any other article of my blog.
I'm super flattered and really thankful that my content was noticed ; ; ; ; u ; ; ; ... I will send an extra text to your Gmail as soon as I have it ready tomorrow.
💕 Thank you so much! 💕
[P.D: It would be marvelous to have the change to be part of one comic/anime con or event as a store, It makes me really excited to know that this kind of pieces is still on demand, thanks for this tip! ~]
Dang you went all out on this and it looks like something a store would sell!
💜 💚 ¡Hello @drtarts! 💚 💜
I feel really flattered, I think this is one of the best compliments that I had received; I always put a lot of effort on things so they would look good and likeable. Actually, as time comes by, I would like to have an online store and sell this kind of pieces! 🎁 🎀 ✨
Thank you so much for taking a moment to come and read my post >u<)/
You are welcome! Try Etsy! :D
Congratulations for every goal reached, everything you've earned, you deserve it, i've been following you for a few days, and hope to keep seeing all that you have to offer. So glad to find artist like you here to share. 🔮Your hands are Magic hands✨
You say so many lovely things, that I can barely think clearly what to reply ; 0 ; thank you so much for your congratulations and for every single one of your affirmations (I reach my fist towards the universe to keep them with me, fillinf myself with love and gratitude). Thank you for making me feel loved and welcomed, there's not other social media where I would have received love in such an especial and spontaneous manner.
Really, thank you for being here 🍓
If you cant find the words, never mind, the magic of your hands that's more than what i could ask, besides, if lovely words come out of my mouth, its because my eyes just fel in love with something new, now, i cant seem to find out, am I the cat or the guy? hahahah 🥞
That kitten is me right now 🐾
[ PEW PEW ! ! ! ]
Congrats sweet pie! OwO!!!
🎊 💦 I can't stop crying glittering confetti, send help ; v ;
Nice work!!! It looks very nice ^^ I'm also from the blue team :D
YOU ARE A MYSTIC BOI, HELL YEAH ! ! 💙
Nice to see you here @dziobitv, and thank you for reading me ; 7 ;
You've received an upvote from @slothicorn! Click Here to Read our New Curation Policy And Updated Rules
(@justatouchfey) ((.)ω(.))
🎇 🎈 Thank you very much! 🎈 🎇
Hi @tesmoforia ,
The new Curie Author Showcase featuring this post is now posted.
Thanks for being a part of it.
Gene (@curie Curator)
✨ Thank you so much for everything! ✨