Simplicity Remote Node Setup Guide
DISCLAIMER: This guide assumes a basic knowledge of Linux and command line interface. We are not responsible for any loss for using this guide without the pre-requisite knowledge. Do not proceed with this guide if you have any doubts.
Getting Started
Ensure you have the latest Simplicity wallet and you have already obtained your 200000 SPL (preferably just a bit more to cover fees when you are transferring around).
Step 1: Encrypt and Backup your wallet
If you have not done so already, make sure you encrypt your SPL wallet!
Go to Settings -> Encrypt Wallet.
After you have encrypted it, it is also recommended to do turn the wallet off and make a backup of the wallet.dat file. Store this backup wallet.dat on a separate physical drive or pen drive. The wallet.dat file is encrypted so even if the wallet.dat is exposed, if your password is secure enough (tip: use a random password generator!), it will be secure.
Please do not forget your wallet.dat password! There is no coming back from losing the password.
Step 2: Generate a masternode key and deposit address for the 200000 SPL collateral
The masternode key we create in this step is used to start/stop your masternode. Even if a third party gets in possession of this key he/she cannot steal your coins.
Your deposit address is where you will be depositing your 200000 SPL.
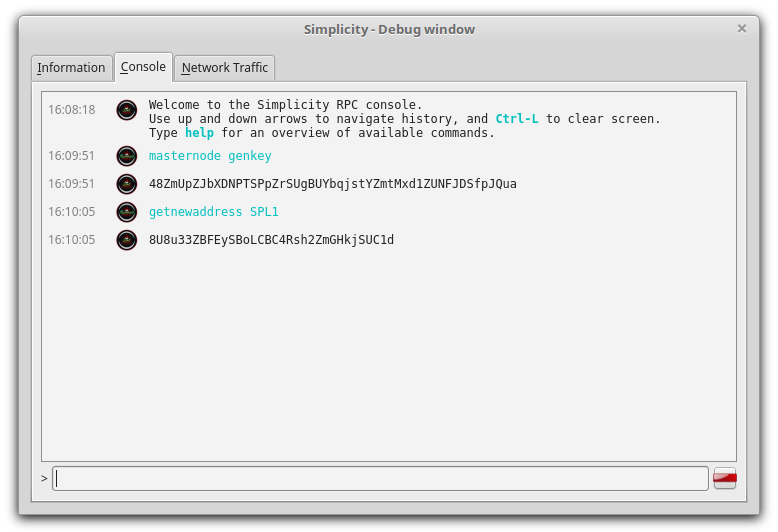
Click on Help -> Debug Window -> Console and enter in the following commands.
masternode genkey
This generates the masternode key. Copy it into a txt file.
getaccountaddress SPL1
This generates the deposit address for the collateral and labels it "SPL1". Copy the address into the same txt file where you copied the masternode key. If you have multiple masternodes, you can also create additional addresses and unique masternode keys for each one of them.
masternode genkey
getaccountaddress SPL2
masternode genkey
getaccountaddress SPL3
etc..
Send EXACTLY 200000 SPL into the deposit address just created in ONE SINGLE TRANSACTION. That means, do not send 500 and then another 500! It has to be in ONE SINGLE TRANSACTION! Also, do not tick subtract fee from amount!
It is not recommended to send it direct from an exchange as they might deduct certain withdrawal fees resulting in less than 200000 SPL in that transfer. First transfer the SPL from the exchange to your wallet and then send the 200000 SPL to yourself in EXACTLY ONE SINGLE TRANSACTION.
In the meantime, while we now wait for the transaction to confirm and be valid as your masternode deposit, we can proceed with the other steps.
A special note only for those who are creating more than one masternode: special care is required to ensure that you are creating deposits properly, as you do not want to break the previous 200000 SPL deposit you just made by taking by mistake funds from that deposit.
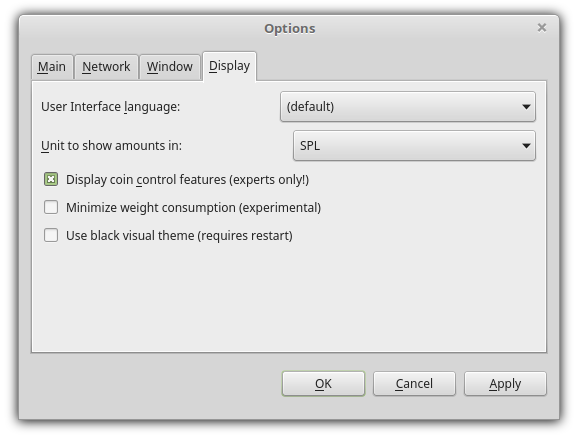
To do this, turn on the coin control settings by going to Settings -> Options -> Display and click on "Display coin control". This will enable fine grained control of which outputs you are using when making your next 200000 SPL deposit(s).
Once you activated the coin control features, go to the Send tab and click on the "Inputs" button. You should see your 200000 SPL deposit there. Make sure you lock it before sending out a new transaction of 200000 SPL.
Once you have done this, you can make the next 200000 SPL deposit for your next masternode. Repeat this everytime you have made a new masternode.
You can always verify you are doing this correctly by going into Help -> Debug Window -> Console and typing masternode outputs which would display all masternode capable deposits.
Step 3: Create a local masternode.conf file
We now need to find out the transaction ID and Index of your masternode deposit. To do this, go to Help -> Debug Window -> Console and type:
masternode outputs
You will receive an output that looks something like this:
{ "d6fd38868bb8f9958e34d5155437d009b72dfd33fc28874c87fd42e51c0f74fdb" : "0", }
The first portion is your transaction ID and the second number (typically 0 or 1) is the Index.
Now create a masternode.conf file in your Simplicity data directory.
On Windows this is located at %appdata%/simplicity (type this in Windows Explorer) unless you have changed the install directory. In Mac, this is in your $HOME/Library/Application Support/simplicity/ and in Linux it is typically in your $HOME/.simplicity folder.
Open it to edit it and enter in the following format.
LABEL IP:PORT MASTERNODE_KEY TX_ID INDEX
- LABEL: Any name that you want to call your masternode in one word. For e.g. SPL1
- IP:PORT: Your masternode remote IP and port (11957 for mainnet)
- MASTERNODE_KEY: This is the masternode key that you obtained from typing
masternode genkeyearlier. - TX_ID: This is the transaction ID for the transaction in which you got your 200000 SPL deposited which you obtained just now through the
masternode outputscommand. - INDEX: This is the Index of your transaction which you obtained just now through the
masternode outputscommand.
To make things clearer let us show a made up example of how a masternode.conf would look like. This example shows two masternodes.
SPL1 51.52.53.54:11957 XrxSr3fXpX3dZcU7CoiFuFWqeHYw83r28btCFfIHqf6zkMp1PZ4 d6fd38868bb8f9958e34d5155437d009b72dfd33fc28874c87fd42e51c0f74fdb 0
Once you have entered the necessary details, save your masternode.conf. Restart your Simplicity wallet so it would take the new settings.
Note for multiple masternodes:
If you are creating more than one masternode, the masternode outputs command will return several transaction hashes and indexes. Just determine which one is the new one by comparing it with your existing masternode.conf and see which one is not in it. You will then add the new corresponding details in new line in masternode.conf. Remember to restart your Simplicity wallet whenever you edit your masternode.conf.
Step 4: Get a VPS
There are many providers to choose out there. For instance:
- Chunkhost
- Digital Ocean
- Vultr
Select a VPS package that meets the minimum requirements:
- 1 GB of RAM (2 GB recommended)
- 20+ GB of disk space
- 1 or 2 CPU cores
Remember reliability is more important than price. If your masternode goes offline, you will potentially miss out on payouts which would be more than your VPS cost.
Pick Ubuntu 16.04 LTS 64-bit and install it.
Once it is done, the VPS provider should give you a username (usually root) and a password.
Use a SSH client like Putty or if the VPS provider provides, it open up a console window.
Step 5: Configuring Your VPS
Creating a New User
It is always good practice to create a new user to run the masternode so that the masternode application does not run with root access.
Login as root.
Create a new user with the following command, replacing <username> with a username of your choice.
adduser <username>
You will be prompted for a password. Enter and confirm using a new password (different to your root password) and store it in a safe place.
You will also see prompts for user information, but this can be left blank.
Once the user has been created, we will add them to the sudo (Super User Do) group so they can perform commands as root. Only commands/applications run with sudo will run with root privileges, while others will run with regular privileges. Add the user to the sudo group with the command:
usermod -aG sudo <username>
Updating the system
Now, while still as root, we will update the system from the Ubuntu package repository.
apt update && apt upgrade -y
Installing a Firewall
We are installing UFW (uncomplicated firewall) to further secure your server. This is optional but highly recommended.
While still in root user (or alternatively you can sudo within your newly created user).
apt install ufw -y
The next step opens port 11957 which is required for your masternode to communicate.
ufw allow ssh/tcp
ufw limit ssh/tcp
ufw allow 11957/tcp
ufw logging on
ufw enable
(press Y and Enter to confirm)
You now have a firewall setup!
Allocating a Swap File (Optional if your VPS/server has 4 GB or more RAM)
Allocating a swap file can guard your server against out of memory errors in the event your RAM is fully utilized. This step is optional if your VPS / remote server has a lot of RAM. It is generally not needed if you have 4 GB of RAM or more.
Swap is an area on a hard drive that has been designated as a place where the operating system can temporarily store data that it can no longer hold in RAM. Basically, this gives you the ability to increase the amount of information that your server can keep in its working "memory", with some caveats. The swap space on the hard drive will be used mainly when there is no longer sufficient space in RAM to hold in-use application data.
The information written to disk will be significantly slower than information kept in RAM, but the operating system will prefer to keep running application data in memory and use swap for the older data. Overall, having swap space as a fall back for when your RAM is depleted can be a good safety net against out-of-memory exceptions on systems.
While still root type:
cd /
dd if=/dev/zero of=swapfile bs=1M count=4000
chmod 600 swapfile
mkswap swapfile
swapon swapfile
nano etc/fstab
Add the following line at the end of the file (press tab to separate each word/number).
/swapfile none swap sw 0 0
Then press Ctrl+O and Enter to save and Ctrl+X to close the editor.
Install basic utitlities, libraries, etc.
Install a few basic unix utilities just in case you might need them.
apt install -y git mc htop screen wget unrar unzip libboost-all-dev libevent-dev software-properties-common
apt install -y protobuf-compiler libminiupnpc-dev libevent-dev libtool libssl-dev libboost-all-dev libprotobuf-dev libqrencode-dev autoconf build-essential autotools-dev automake pkg-config bsdmainutils software-properties-common python3
add-apt-repository ppa:bitcoin/bitcoin
apt update
apt install -y libdb4.8-dev libdb4.8++-dev
Reboot the server
You can now reboot the server.
reboot now
Your VPS is now ready for operation.
Step 6: Installing Simplicity in your VPS
After logging into the new user you created in Step 5, type the following to download the latest Simplicity package.
To make sure you are in the user's home directory type:
cd ~ or cd
Then build the Simplicity wallet from the latest sources on GitHub.
git clone https://github.com/SimplicityDev2018/Simplicity && cd Simplicity/src/secp256k1/ && chmod +x autogen.sh && ./autogen.sh && ./configure && make && sudo make install && cd ../leveldb/ && chmod +x build_detect_platform && sudo ./build_detect_platform build_config.mk . && cd .. && sudo make -f makefile.unix
LD_LIBRARY_PATH=/usr/local/lib && export LD_LIBRARY_PATH
Create a new config file for your masternode. This will create a new directory and also open up a new text file called simplicity.conf. Type:
mkdir ~/.simplicity
nano ~/.simplicity/simplicity.conf
In that new file type the following and change the parts in capital letters to match your actual details. The rpcuser and rpcpassword can be anything you wish (try to make it longer a bit).
The MASTERNODE_KEY is from what you got from Step 2.
rpcuser=ANYUSERNAME
rpcpassword=ANYPASSWORD
rpcallowip=127.0.0.1
listen=1
server=1
daemon=1
logtimestamps=1
maxconnections=64
txindex=1
masternode=1
externalip=IP:11957
masternodeprivkey=MASTERNODE_KEY
Press Ctrl+O and Enter to save and Ctrl+X to exit.
Type following commands to link simplicityd globally and run the wallet.
sudo ln -s /home/<username>/Simplicity/src/simplicityd /usr/local/bin/simplicityd
Start your simplicityd daemon and let it sync. This might take some time.
simplicityd -daemon
You can always check the status of syncing and check how far the block number has gone in relation to our block explorer by typing:
simplicityd getinfo
Once it has synced, it is now time to start your masternode!
Step 7: Start your masternode
Now let us go back to your local PC wallet (not the VPS). Hopefully you will have already gotten enough confirmations on the transaction with the 200000 SPL collateral. If not, wait a bit more!
Remember if you have not restarted your local wallet after creating masternode.conf, please restart your wallet.
Once the wallet is up again go to Help > Debug Window > Console and type:
masternode list-conf
If you have done it correctly, it should show the masternode(s) that were listed in your masternode.conf.
Now unlock the wallet by typing:
walletpassphrase "<YOUR WALLET ENCRYPTION PASSWORD HERE>" 60
You will be asked the encryption password to your wallet. Give it and press enter. Now the wallet will be unlocked for 60 seconds.
Now within the 60 seconds that the wallet will be unlocked type:
masternode start-alias "<LABEL>"
e.g. masternode start-alias "SPL1"
Your masternode should now activate and show PRE_ENABLED status. After a few minutes or so, the status should transition to ENABLED. If the status transitions to EXPIRED, there might be something wrong with your setup, double check again.
To check the status type:
masternode list status "<TRANSACTION_ID>"
Step 8: Getting your masternode payments
Your first payment may take some time to show but payments after the first one should take place more regularly.
As an estimate, divide the total number of masternodes by the number of blocks/day and that will get you roughly the interval of your payouts in days.
The formula is "number of masternodes" / "number of blocks per day" = "interval in days at which one can expect a payment".
IMPORTANT NOTE: Everytime you start a masternode, it resets its place in the payout queue thus delaying payments. Therefore although there is also a masternode start-many command, it is not recommended since it would also restart nodes that have no issues.
If one of your masternode servers has an issue (for e.g. the server was rebooted), only restart the masternodes which are down by using the masternode start-missing command and not the start-many command.
To get version v.1.1.2.0 wallet replace with this
upvote my post if helped you
autogen.sh not permitted. Is there a work around?
v1.2 If you run into a build error with something about a support folder
just run " mkdir -p obj/support " in the src folder
Congratulations @r1979! You received a personal award!
You can view your badges on your Steem Board and compare to others on the Steem Ranking
Do not miss the last post from @steemitboard:
Vote for @Steemitboard as a witness to get one more award and increased upvotes!