PHP Storm's Best Features

PhpStorm, my IDE of choice, is one of the best IDE's for working with PHP based web projects. Let's take a look at the features that we could use to work in PhpStorm like a pro.
1. Focus on the code
Sometimes you want to focus on your code by making your IDE as minimal as possible. There are a lot of things going on in PhpStorm. The biggest thing is the sidebar. We could toggle the sidebar by using Alt + 1 on windows or ⌘ + 1 on Macintosh or just clicking on the hide icon at the top right corner of the sidebar. You could toggle navigation bar by selecting View > Navigation Bar. Also if you want to enter the full-screen mode where you will only see your code, go to the View drop down and select Enter full screen mode View > Enter Full Screen Mode. You could also remove tabs by right-clicking on the tab and selecting Tabs Placement > None. If you would click on any method or function, you will see that you see a nice breadcrumb shows up at the top. If you want to remove that as well, Go to your settings/preferences. On Windows go to your settings by pressing Ctrl + Alt + S or choosing File > Settings. If you are using Mac, go to your preferences or just press ⌘ +,. Now in the search box write breadcrumb and then deselect Show Breadcrumbs check box. If you want tabs back, simply go to settings/preferences > Editor > General > Editor Tabs and select Top from the Placement drop down. You could toggle a lot of things, and you can check them out in the View drop down. Now your IDE is minimal as possible and only focusing on the code.
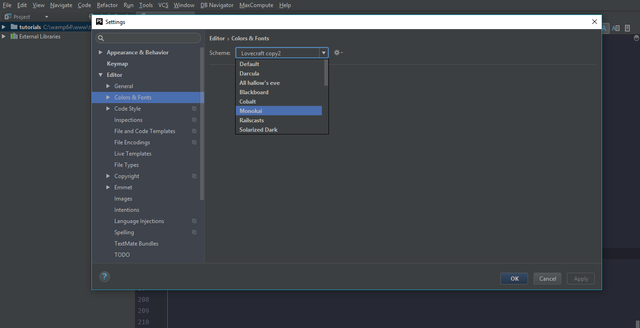
Color Schemes
Go to your settings/preferences. Now go to Editor > Colors & Fonts and you will see that you have a default scheme of Darcula or Default. You could change it to any other available schemes you like and press OK, or you could also download other themes as well. Go to phpstorm-themes.com and select any theme of your choice. Click on that theme and download the .icls file. If you are using windows move that file into C:\Users\USER_NAME.PhpStorm_VERSION\config\colors folder. USER_NAME and VERSION are your username and PhpStorm version in the folder paths above. If you are using Mac move that file into ~/Library/Preferences/PhpStormVERSION/colors folder. Now you need to restart your PhpStorm. Go to settings/preferences select Editor > Colors & Fonts and select your new color scheme and apply it. You could also customize this color scheme by going to settings/preferences > Editor > colors & fonts drop down.
You could also review more themes here and then download the desired themes from here.
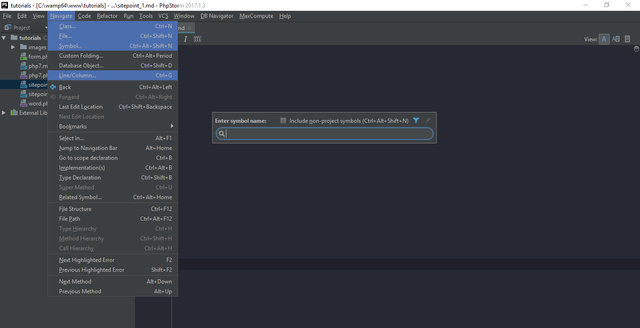
Navigation
Go to the Navigate menu, and you could see that PhpStorm offers various ways to navigate around your project. You could browse by class name. Simply press Ctrl + N on windows or ⌘ + o on mac and write the class name. Or you could browse by file name. Simply write your desired file name and select the file. You could also search by symbol. Think of symbol as the methods or functions. If you wanted to search by either of them, use the symbol navigate option. You could also navigate to any Line and any Column inside that Line by choosing Navigate > Line/Column.
Key bindings in PhpStorm
You could change key bindings in PhpStorm by going to settings/preferences and then select Keymap. First Copy your default keymap and save it with any name you want and apply it. Let's say you want to change the key binding for Navigate > Line/Column. You could either enter line/column in the search box or you could also use the search button on the right of your search box and press the present key binding for that option. In case of Line/Column, default key binding on windows is Ctrl + G or ⌘ + G on mac. Double click on Line/Column and select Add keyboard shortcut. Press any key binding you want and if there are any existing key bindings, simply change it to any other keybinding or press ok to remove that binding from the conflict and apply that binding to the selected option. Click Apply to apply those changes.
Creating new files
You could simply create a new file by opening your sidebar, right clicking on a folder and choosing New > File. Now enter the name and extension for your file and press ok. But there are some faster ways to create new files as well. So, if you press ⌘ + ↑ on mac or Alt + Home on windows, it will bring up a floating file system. You could use your arrow keys to move through that file system and enter to open the active folder in the filesystem. You could also search by writing a couple of letters within that floating file system, and it will filter down the results. Every tree view in PhpStorm can be filtered down by writing a couple of letters. Since this one is also a tree view, you could filter that as well. Now if you want to add a new file in the current directory within that floating system press ⌘ + N on mac or Alt + Insert on windows to add a new file. You could also use any file templates like PHP Class or Javascript file, and in that case, you do not have to write the file extension as well as sometimes you get some options as well. If you open the floating file system, it will set the current directory to whatever file is open. It will not begin at the root of your project. So, if you use the keyboard shortcuts to create a new file, it will save your time.
File templates
Let's say we want to create a PHP Class. Simply press ⌘ + ↑ on mac or Alt + Home on windows, then press Alt + Insert on windows or ⌘ + N on mac, then select PHP Class and create a new PHP Class named Word (or whatever you want). Now you will notice a file template right after the <?php. That does not look good, but we could change it to anything we want. One important shortcut that you could use to find any option is ⇧ + ⌘ + A on mac or Ctrl + Shift + A on windows. Now you could enter any action here. Let's search for file template and press enter to select the highlighted result. So, we have here a variety of dynamic code snippets that will be inserted when a file of the appropriate type is created. For example, let's select PHP Class, and you will notice that it includes a file header at the top that gets added. If we switch to includes tab, you will see that there is a PHP File Header that just includes a simple doc block. Now if you do not want that doc block, remove this line #parse("PHP File Header.php") from the PHP Class inside Files Tab. Now if we create a new PHP Class named Check, it will not include any doc block. We could also create new File Templates that we could use when we press Alt + Insert on windows or ⌘ + N on Mac. Go back to file and code templates in settings/preferences and click on the plus or add icon at the top of the tabs. Add Blade as the name and blade.php as the extension or whatever you are trying to create. Now if you create a new file by using Alt + Insert on windows or ⌘ + N on mac, you will see another option to create a Blade file. Click on it and enter any name and it will create a file with blade.php file extension that you could use for your Laravel PHP framework project. Also, you could use variables the same way as they were used in PHP class template. You will be asked for their values when you create a new file.
Live Templates
Let's talk about live templates. Think of them as just dynamic code snippets that you could use in your code. Let's go through an example so we will understand all about live templates. First, you need to create a template. Let's say I'm working on a bootstrap project and I have to create a lot of forms with an input field, a text field fields and a submit button. Instead of typing it every time, I could create a new live template. I use this template for creating bootstrap forms.
<form action="/" method="post">
    <div class="form-group">
        <label for="title">Title:</label>
        <input name="title" type="text" class="form-control" id="title" placeholder="Post Title">
    </div>
    <div class="form-group">
        <label for="description">Description:</label>
        <textarea name="description" id="description" class="form-control" placeholder="Post Description"></textarea>
    </div>
    <div class="form-group">
        <button type="submit" class="btn btn-primary">Submit Post</button>
    </div>
</form>
I also want to change most of the values in the form. Now let's save this as what JetBrains refers to as live templates. Simply search for the command live templates by pressing ⌘ + ⇧ + A on mac or Ctrl + Shift + A on windows. Open live templates present in your settings/preferences. We have a user section where we could save our new live templates. Simply click the plus or add icon at the top left and select the first option live template. Now enter the abbreviation that will be used to expand the code snippet. In my case, I will be using bootform. Now enter the description for this piece like A bootstrap form with input field, textarea and a submit button. Now paste the code above in the template text area. Check Reformat according to style on the right of the template text area. You also need to define the context for a live template by pressing the define button below the live template text area. Context is defining where this live template will be available. You could also use everywhere, but it's not a good practice if you have a lot of live templates. Since it is a form and I will be using it inside. HTML and .PHP file. So, I defined the context to HTML and PHP by selecting the HTML and PHP checkbox in the context. Now press OK. If you go to any HTML or PHP file and type bootform it will expand it to the form code above.
Now that our form live template is created and working but there is one thing we have not yet covered. Changing the values in that form is quite difficult. We have first to select the value and then change it. To solve this problem, PhpStorm uses variables inside live templates. We could move to change the next variable value by pressing tab key (default). Variables starts and ends with $ sign in PhpStorm. Go to settings/preferences, click Live templates and then select bootform snippet. We want the same value in the for attribute on the label as well as the id attribute on the corresponding input field. So, we will use same names for the variables in those places. Now our snippet will look like this
<form action="$ACTION$" method="$METHOD$">
    <div class="form-group">
        <label for="$INPUTLABEL$">$INPUTLABELTEXT$</label>
        <input name="$INPUTNAME$" type="text" class="form-control" id="$INPUTLABEL$" placeholder="$INPUTPOSTPLACEHOLDER$">
    </div>
    <div class="form-group">
        <label for="$DESCLABEL$">$DESCLABELTEXT$</label>
        <textarea name="$DESCNAME$" id="$DESCLABEL$" class="form-control" placeholder="$DISCPLACEHOLDER$"></textarea>
    </div>
    <div class="form-group">
        <button type="submit" class="btn btn-primary">$BUTTONTEXT$</button>
    </div>
</form>
But there is one little problem with this template. When you press tab key after writing the label text, it will create an HTML tag for that text rather than moving on to the next variable because it thinks we are entering an HTML Tag. Let's fix this by going to settings/preferences, then search for emmet or select Editor > Emmet and then change the expand abbreviation with to enter. Now it will only expand for emmet with enter rather than the tab. You could create a new line using shift + enter as well. Now, this live template will work perfectly.
You could also use some expressions for variable values. For example, if we want the label text to be the capitalized version of the for attribute value on the label tag. Select your snippet in the Live templates section. Click Edit variables on the right of Template text area. Select the rows with the name INPUTLABELTEXT and DESCLABELTEXT. Replace their corresponding expression value to capitalize(INPUTLABEL) and capitalize(DESCLABELTEXT) respectively. You could also check other options by clicking on the drop arrow in the selected expression row.

Code Reformatting
One of the most fantastic features of PhpStorm is Code Reformatting. Here I have a class that is messed up regarding code formatting.
<?php
namespace App\Http\Controllers\Auth;use App\Http\Controllers\Controller;
class RegisterController extends Controller {
    use RegistersUsers;
    protected $redirectTo = '/home';    public function __construct() {
    $this->middleware( 'guest' ); }
    protected function validator( array $data ) {
        return Validator::make( $data, [
            'name'     => 'required|max:255',
            'email'    => 'required|email|max:255|unique:users',
            'password' => 'required|min:6|confirmed',           'username' => 'required|max:60|unique:users',
        ] );
    }
                public function verify( $token ) {      User::where( 'email_token', $token )->firstOrFail()->verified();
    session( [ 'message' => 'Your Email Address has been verified. Please login to access your account' ] );        return redirect( 'login' );
}       }
But PhpStorm is very useful in automating the process of reformatting. Simply press ⌘ + ⌥ + L on Mac or Ctrl + Alt + L on windows or select Code > Reformat Code and if you see a dialogue box pops up on the screen, simply select Do not show again and press Run. Now all of that messed up code is formatted.
<?php

 namespace App\Http\Controllers\Auth;

 use App\Http\Controllers\Controller;

 class RegisterController extends Controller {
    use RegistersUsers;
    protected $redirectTo = '/home';

    public function __construct() {
        $this->middleware( 'guest' );
    }

    protected function validator( array $data ) {
        return Validator::make( $data, [
            'name'     => 'required|max:255',
            'email'    => 'required|email|max:255|unique:users',
            'password' => 'required|min:6|confirmed',
            'username' => 'required|max:60|unique:users',
        ] );
    }

    public function verify( $token ) {
        User::where( 'email_token', $token )->firstOrFail()->verified();
        session( [ 'message' => 'Your Email Address has been verified. Please login to access your account' ] );

        return redirect( 'login' );
    }
}
But let's say I do not want to use this coding style. I want this file to be formatted in the same coding style as my whole project. So, I want my file to look like this after getting formatted automatically.
<?php

namespace App\Http\Controllers\Auth;

use App\Http\Controllers\Controller;

class RegisterController extends Controller
{
    use RegistersUsers;

    protected $redirectTo = '/home';

    public function __construct()
    {
        $this->middleware( 'guest' );
    }

    protected function validator( array $data )
    {
        return Validator::make( $data, [
            'name'     => 'required|max:255',
            'email'    => 'required|email|max:255|unique:users',
            'password' => 'required|min:6|confirmed',
            'username' => 'required|max:60|unique:users',
        ] );
    }

    public function verify( $token )
    {
        User::where( 'email_token', $token )->firstOrFail()->verified();
        session( [ 'message' => 'Your Email Address has been verified. Please login to access your account' ] );

        return redirect( 'login' );
    }
}
Since everything in PhpStorm is configurable and customizable. We could change the formatting rules so that when this poorly formatted file is auto formatted, it takes the same coding style as my whole project. Go to settings/preferences, then select Editor > Code Style > PHP and here you could customize each and everything. You could save this scheme per project, or you could make it default to use the same coding style across all of your projects. You could select default or project from the Scheme drop-down menu. Now, let's switch to Wrapping and Braces tabs and here you could change all options for wrapping and braces. First, let's alter the brace after the class declaration to be on the next line without getting shifted. In the braces placement section, set in class declaration to next line. Now it will reformat, and class declaration brace will be like this.
class RegisterController extends Controller
{
Also, we want a blank line around every field as well. To change this, go to blank lines tab and set around field value to 1. This will add an empty line around every field. Now press OK to apply those changes.
Now if we simply press ⌘ + ⌥ + L on Mac or Ctrl + Alt + L on windows to reformat code. It will reformat code according to our rules. Now that messed up code after remoting will exactly match the above code.
You could change other options as well according to your coding style and save it per project basis or make it your default.
Guys thanks for upvotes. Looking forward to your posts. Thanks everyone.
Resteemed your article. This article was resteemed because you are part of the New Steemians project. You can learn more about it here: https://steemit.com/introduceyourself/@gaman/new-steemians-project-launch
Very good information, please upvote me back
Done