To HDR Or To Not HDR
For this post, I’ll depart for a moment from the glittering world of fashion photography and talk about a technique that can be used for different types of photography, called HDR, or High Dynamic Range. It's a technique that has generated a fair bit of controversy so I like having an opinion on it :)
First a little bit of basics… “Dynamic range” applies to the scene you are taking a photo of and it refers to the difference between the brightness of the brightest and the darkest spots in the scene. It is usually measured in “stops” which are a measure of brightness. A sunlit landscape at noon with reflecting surfaces (e.g. water / metal) and dark shadow has a high dynamic range. The same landscape under a full dark cloud cover will have a low dynamic range.
The reason why this can be important is that the sensor in your digital camera has limits in the span of dynamic range it can record (once a photosite on the sensor has had its fill of photons it will register pure white, and no amount of additional photons will change that – similarly below a certain thresholds a photosite will register pure black and different amount of photons below that threshold will not make any difference) and, at times, the sensor’s dynamic range will not be able to cover the image’s dynamic range. Different sensors have different capabilities in this regard but I am not getting into that :)
When you want to take a photo of a scene with a greater dynamic range than your camera’s sensor can record, you need to make a choice and accept that you may lose details in the shadows or in the highlights depending on the way you expose the image.
While modern sensors are improving in this regard, they are still unable to record the full dynamic range of such landscape under daylight sun with dark shadows and bright surfaces. Our eyes though can see such a scene. How is that possible? Because our brain, unconsciously, moves our eyes to focus on different bits of the scene and automagically adjusts aperture (the iris) to deal with dark and bright areas. Our brain does a composite image without us realizing it. Therefore humans can see 20+ stops of dynamic range, while the best cameras nowadays top out at 15 stops (more or less).
Inspired by the way our vision works, a technique called HDR was invented time ago. The idea is relatively simple: Take multiple (2 or more) images of the same scene, gradually varying the exposure, so that the combinations of the overlapping dynamic ranges recorded in each image covers the dynamic range of the scene. Then run HDR software to merge the multiple images into a single one et voila’ :)
Of course it’s not that easy :) unless you have one of those phones or cameras which offer an in-built HDR mode. I wouldn’t use them because of the lack of control on the final result… but if it works for you more power to you :)
How do I do it? Like this:
- Set your camera to exposure bracketing, a mode that takes a sequence of a certain number (fixed in some cameras, configurable in others - I typically use 5 but many cameras are limited to 3 which is usually plenty) of different exposures by changing the shutter speed – the aperture should not change otherwise the different exposures will have varying depth of field. You can execute this technique even if your camera does not have exposure bracketing: provided that you can manually control exposure, you can simply take multiple photos by manually changing the shutter speed. I usually set anything between 1 and 2 stops of difference between each exposure, but it is scene-dependent
- Put the camera on a solid tripod, set MLU (Mirror Lock-Up) unless you use a mirrorless camera
- Attach cable release (to further reduce vibrations) – if you don’t have one you can use the timer to take a photo a few seconds after you click the shutter button
- Meter the scene to make sure that the extremes of the scene’s dynamic range are covered by the overlapping ranges and set the middle exposure
- Take the sequence of photos
- At home, use your favorite software to merge the exposure (I use the merge to HDR function of Photoshop, but there are many other alternatives, some even for free) - before you merge, do make sure that the white balance is consistent among the sequence: if you use to set your camera to AWB, you may get different color tones in your images... this is easily fixable if you shoot RAW. If you shoot JPEG it is suggested to fix the white balance before you take the images.
- The resulting HDR image cannot be used as is since it will have a dynamic range that goes beyond the capabilities of monitors and printers, therefore you need to perform a second step called tone mapping that effectively compresses the dynamic range of the image to something that can be dealt with
- This is the non-trivial part: you usually have a choice of different types of tone mapping (4 in Photoshop), with multiple parameters. It’s not an exact science… what I do is to create multiple tone mapped versions of the same images (usually 4 or 5) using various combinations of the options offered by the HDR software
- Then I stack these versions along with the 2 extreme original exposures (the brighest one and the darkest one). And in Photoshop I use masks and different blending modes to create a further composite that shows the best parts (in my opinion) of each version. The 2 extreme original exposures are used in case the HDR process has created artifacts in the brightest or darkest areas – which happens relatively frequently
- Then I do my usual post processing to adjust color, noise and sharpness as required. Crop and clone as needed.
- Then I dial back in contrast in some areas, effectively reducing further the dynamic range, until I obtain an image that I like - this is key, in my mind, to create more realistic images that do not scream HDR
Common issues with HDR
- Some people hate the look of raw HDR… when you apply HDR processing and push the sliders in your HDR software a lot, you may obtain highly cartoonish, bordering on radioactive and unrealistic images… sometimes these work and sometimes these don’t. It’s a highly subjective matter
- There should be minimal to no movement in the scene. Wind that moves leaves is a problem. People moving can be a problem. Most HDR software have “remove ghosts” functions but they are not magic
- Related to the first point, HDR tends to create a lot of artifacts, especially haloes, and different people have different tolerances to that. Mine is really low :)
- Colors tend to suffer as well. It's easy to get either too dull or on the other side too saturated colors or simply wrong colors in HDR images
- It takes me half an hour to apply my home-grown method to create HDR images… I don’t have always the will to do so – combined with the time it takes to take the images in the first place, it makes HDR a significantly more laborious process than taking a single exposure
- You can do without tripods and the such but then you risk to have too many alignment issues among your multiple exposures and too many of those will ruin the HDR image
So what is my opinion on HDR? I think it's neither inherently evil nor automatically good. It is simply another tool in the photographer's bag of tricks. I think it applies to landscape, architecture and house interiors type of photos more than anything else.
Personally, I dislike the artefacts and unrealistic effect that "excessive" HDR can cause. And if you read me, you know I dislike relinquishing control to automated filters - I am particular about maintaining creative control. I am more for using HDR subtly to overcome camera's limitations. But I do believe that this, like any other, is a choice which is entirely the photographer's prerogative, therefore I do not mind one bit if others despise or abuse of HDR :)
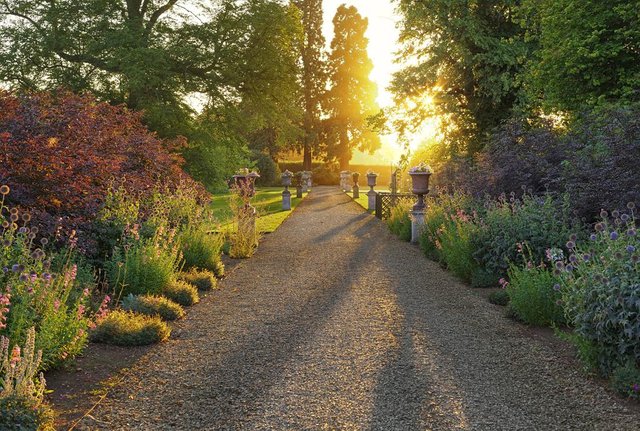
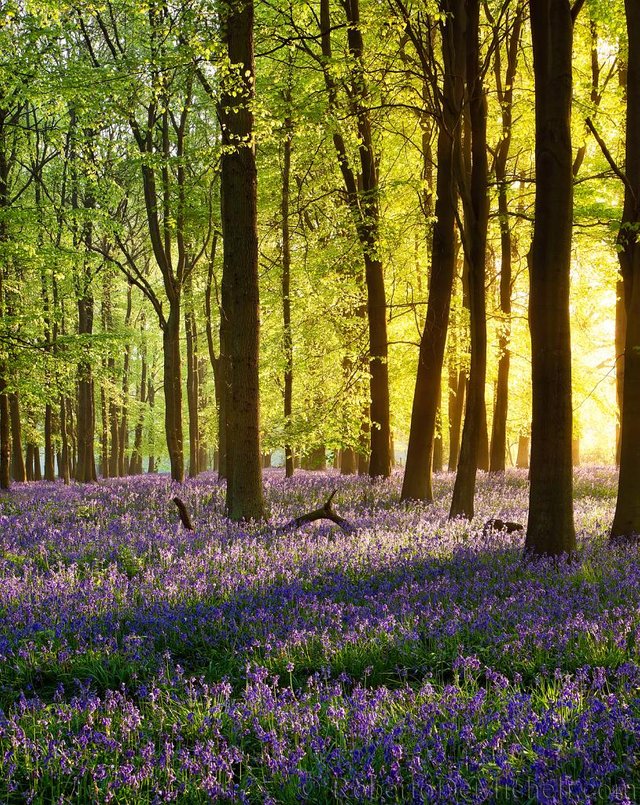
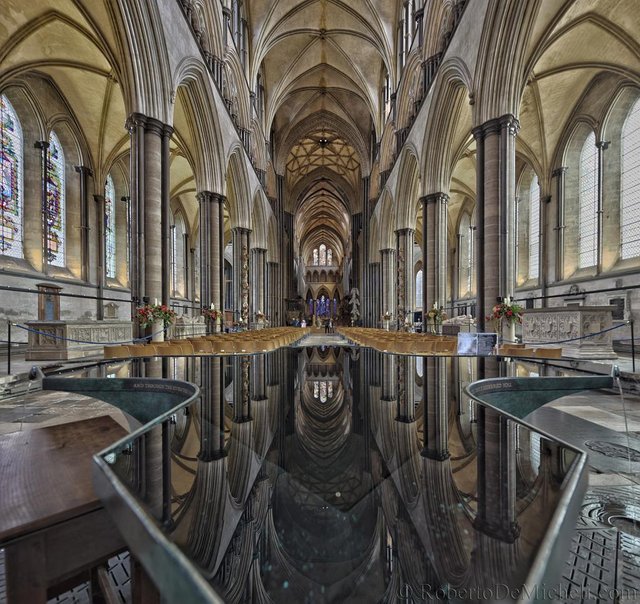
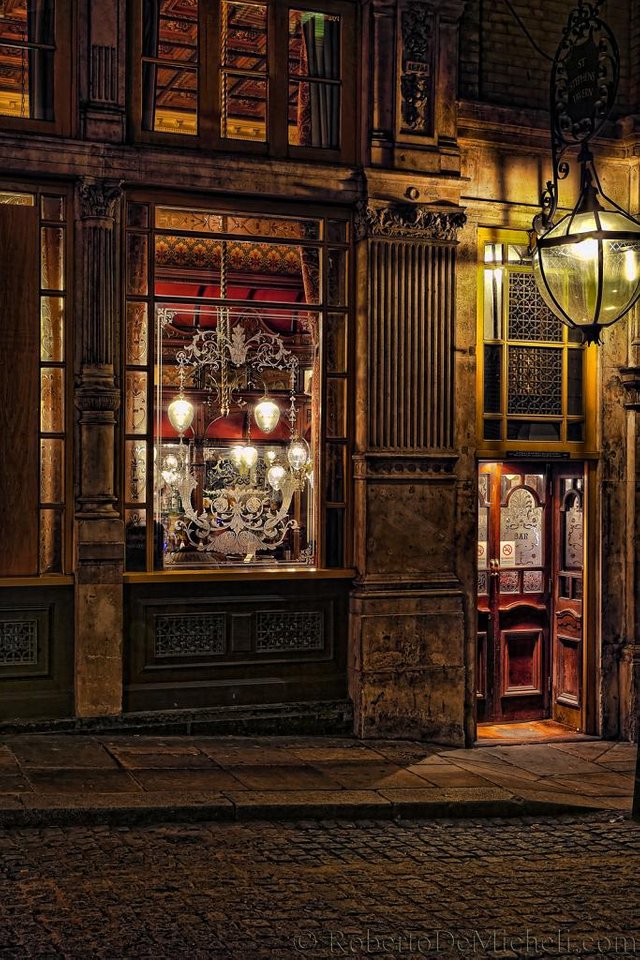
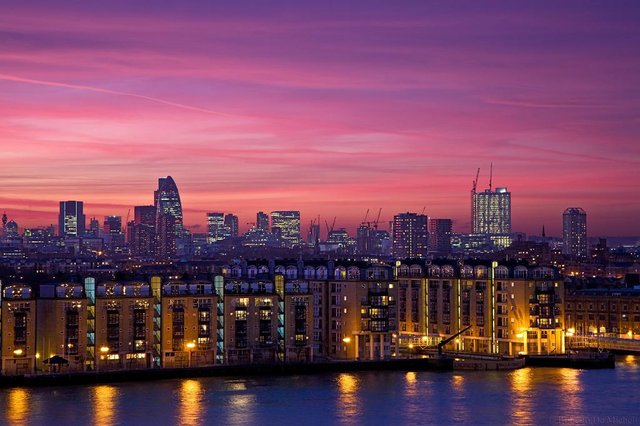
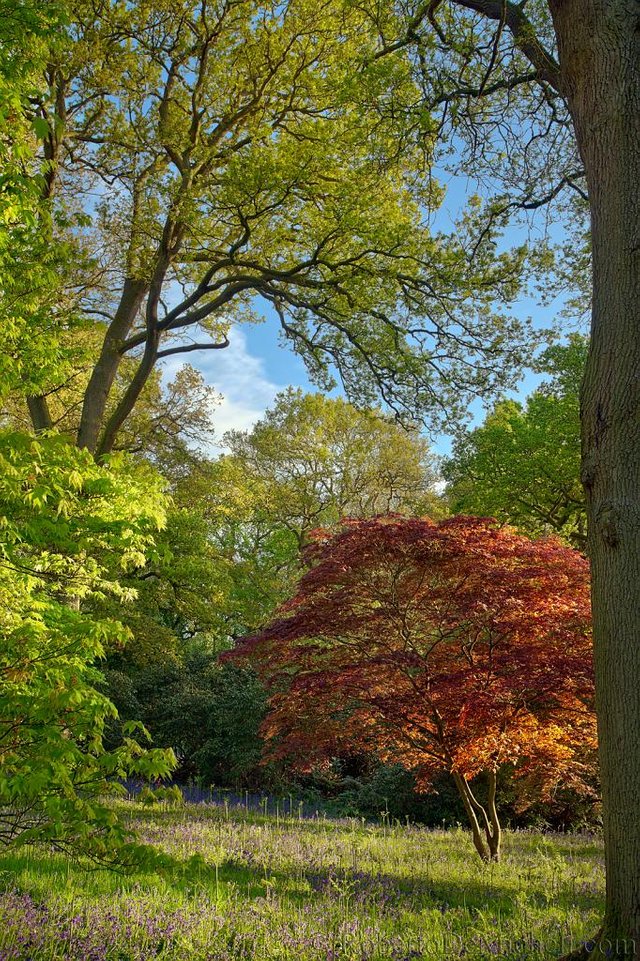
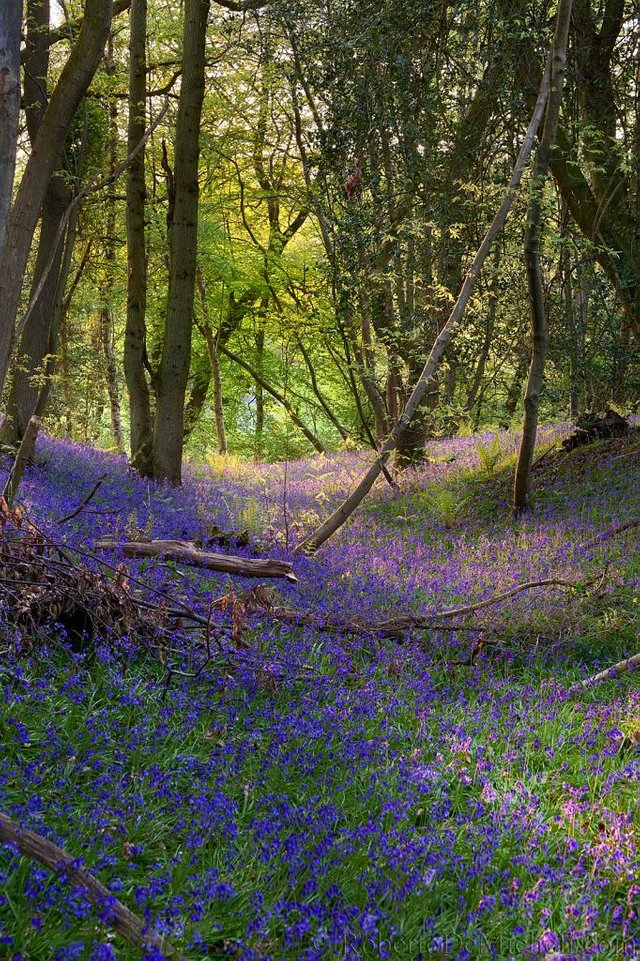
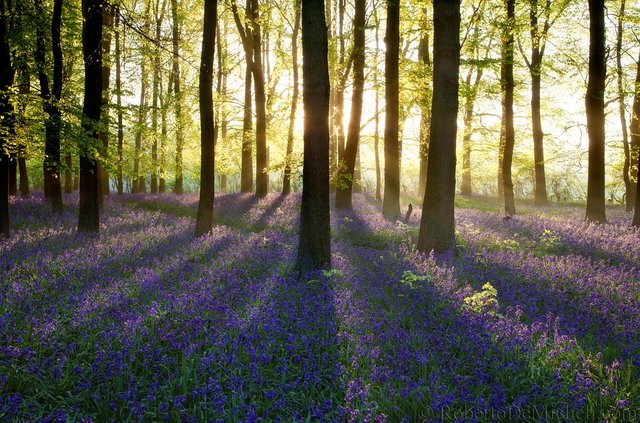
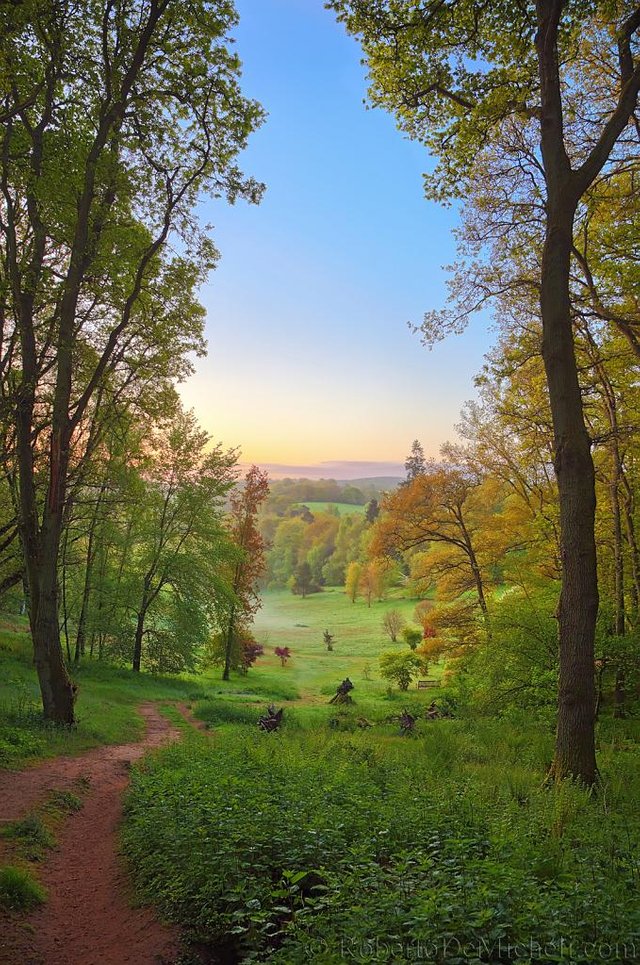
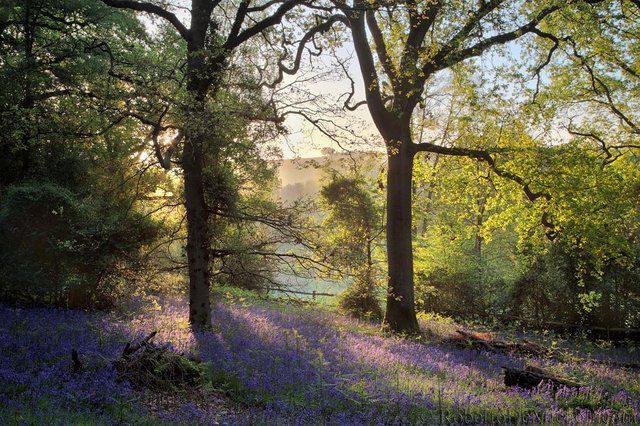
Some examples of mine that I hope will show what I mean with a "judicious" use of HDR. I do not have examples of "bad" ones I've done because those hit the bin pretty quick :) In some of these you will see very bright or very dark areas - I could have kept details in those areas but it was my choice to achieve a better (imho) balance.
And also, you can see I do not only take photos of pretty models :D

Very nice article. I enjoyed reading :)
Thank you!
Hello,
Here is a very good article that summarizes HDR.
I really like your idea of tools in the bag of photographers. Indeed, it is not necessary to use a chainsaw to cut a metal tube.
On the HDR in itself, which is a pity to use them to excess as the Breneizer method.
PS : wonderful photo :-)
I love the Brenizer technique. As overdone as some may think it might be, I gotta say that our brides love it. :)
I like it too for family pictures :)
In my opinion is not as easily overdone as HDR can be... but as HDR it does make the process more cumbersome of course
New post added about it :)
Thank you :)
The number of toys and techniques we photographers have available is mind-boggling and would sustain endless Steem posts :) All of them have a place somewhere if used correctly. But of course it's all quite subjective, isn't it.
I like the Brenizer method. I've used with my family a few times successfully (I think). Again it has its place... Maybe I'll write about it ;)
very good idea.
Steemit is a good tool for creating an interesting photo exchange space :-)
I haven't tried to upload photos with the new facilities... so far pasting links to images was a bit of a pain... :/
But I do like the community here
I did add post about the Brenizer method :)
The use of proper HDR gives the creation a lifeline.
In the past, I used to have fun.
By the way, the pictures you gave as an example are so beautiful. ^^
Thank you! :)