Photography Hacks: 5 Tips to Help You Take Sharper Landscape Photos
Many factors affect the overall quality of your images, but one of the most obvious is sharpness.
There will usually be an area of your shot that you want to be in crisp focus, even if you choose to use depth of field to separate the in-focus elements from the background with a nice blur, or bokeh, effect.
For the purpose of this post I'm going to assume that you know a little about the exposure triangle and what depth of field is and why it affects sharpness. If you don't, the explanation is a little too long to include with these tips, so check out the links before reading on.
In landscape photograpy we often aim to have the whole image as sharp as possible. Here are 5 tips to help you take sharper landscape shots:
1 - Use a tripod
If, like me, you lothe the idea of carrying extra stuff, this may be a dissappointing start. However, using a tripod to steady your shots gives you the most bang-for-buck in getting sharp photos.
Motion can be introduced into your images if the camera moves a perceptible amount whilst the shutter is open. When you hold a camera in your hands to take a shot, small movements can be introduced, even if you can't tell you're moving.
You can mitigate this by ensuring that your shutter speed is a short as possible for the shot you want to take, but the only way to eliminate movement completely is to use a stabalising device like a tripod.
If you're new to using a tripod for photography then you might be excited to know that in addition to helping keep your shots crystal clear they also enable a bunch of other cool techniques, such as exposure bracketing and the longer shutter speeds necessary for astrophotography and long exposure photography.
If you don't have a tripod with you, look for another way to stabalise your camera. Sometimes placing your camera on top of a wall or table, and levelling it up with the strap can be a makeshift alternative.
Tripods come in all shapes and sizes. Above left, a Gorillapod is a lightweight and flexible option, capable of providing traditional tripod orientation as well as gripping onto objects like railings and fences. Above right, a professional tripod made of carbon fibre, a material that minimises the transmission of vibrations.
Pro tip: Extreme winds can play havoc with tripods, introducing extra vibrations or knocking them over completely. Many quality tripods have a hook at the base of the centre column. To give extra stablity in extreme conditions pack a cheap bungee cord and strap it around something heavy, like a rock or your gear bag.
2 - Lose the strap
In windy conditions a camera strap is like a kyte tied to your camera. It will catch the wind and blow around, adding movement to your shot whilst bashing you in the face (depending on the wind direction). If you have a neck strap on your camera, tie it around the tripod to prevent it blowing freely in the wind. Or, if you can, detach it completely and keep it in your pocket.
Above: The Peak Design clutch strap is an alternative to traditional neck straps supplied with your camera. It has a much lower profile, meaning it's less likely to catch the wind when your camera is on a tripod. It also has quick release fastenings so you can easily remove it.
Pro tip: The standard straps supplied with most cameras are fiddly to attach and detach, even in the best conditions. For a range of detachable straps, including alternatives to the standard neck strap, check out Peak Design. Their straps are some of the best I've ever used, and they have a nifty quick release mechanism which is perfect for quickly switching to tripod mode.
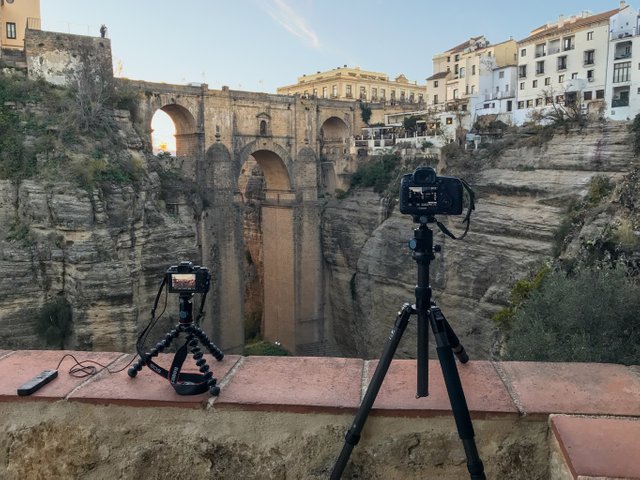
3 - Use a self timer or remote shutter release (aka cable release)
Most cameras have an inbuilt timer function, and this isn't just for selfies and group shots. Use the inbuilt timer to trigger your camera to take a shot, then remove your hands from the camera completely. By the time the shot is taken any small vibrations caused by you touching the camera will have dissippated. Most cameras have default options of a 2 or 10 second timer. Usually 2 seconds is enough.
In the image above, the camera on the left is connected to a remote shutter release, and the camera on the right is using an inbuilt self timer.
Pro tip: To trigger the camera without risking any movement, check out if your camera model has a smartphone companion app. Models from Canon and Fujifilm can often be used with a remote shooting app which triggers via wifi or bluetooth.
4 - Disable image stabalisation
Many semi-pro and pro series lenses have inbuilt image stabalisation. Manufacturers call it different things, such as IS in the Canon world, OIS in the Fuifilm world, and so on. When you are using a tripod you should always turn it off.
I know, confusing, right?
IS works by using a small gyroscope inside the lens. This flips backwards and forwards like a pendulum expecting movement and aiming to counteract it. When you know the camera and lens are stable it's best to switch off IS because that small gyroscope can actually add movement.
Look for a switch located on the side of your lens labeled IS, OIS or similar, and set this to off when your camera is mounted on a tripod.
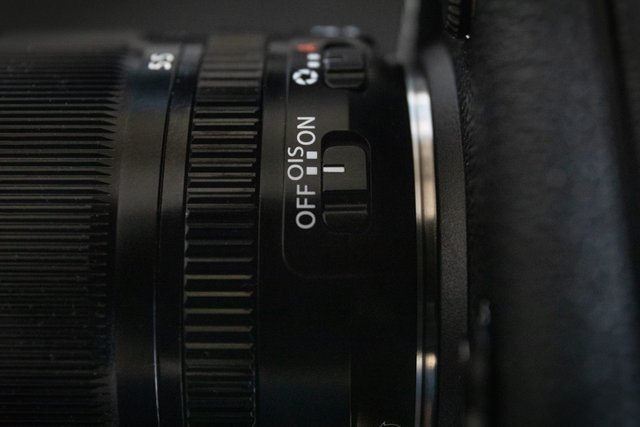
Lenses with Image Stabalisation functions usually have a sliding on-off switch. Different manufacturers choose different terms for the same technology, such as OIS (Optical Image Stabalisation), VR (Vibration Reduction), and so on.
Pro tip: Remembering to disable IS when mounting your camera on a tripod, and then enabling it again afterwards, can be difficult. I've often taken a series of hand held shots wondering why the focus seems to be off before realising the blurriness is actually just camera shake because I forgot to turn IS on again. Try thinking of this as a mental checklist at the point you attach and detach your camera from the tripod. E.g. un-screw bracket, place camera, screw in brachet, disable IS and vice versa. This will help it to become second nature.
5 - Consider whether you need the lens hood
Many lenses come with petal-like hoods which screw onto the end of the lens and provide shade to the front elements which helps to avoid lens flare. A secondary benefit of a lends hood is to reduce the possibility of bashing the glass elements on rocks or other objects as you move around, so I normally keep mine on all the time.
Lens hoods are most beneficial when shooting in direct sunlight. If your shot doesn't need it, consider removing the hood whilst your camera is on a tripod. By reducing the weight and size of the camera and lens combination, you'll reduce the likelihood of a gust of wind causing vibrations.
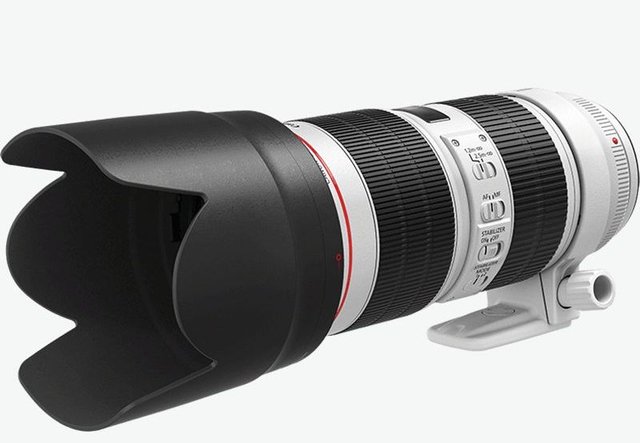
Lens hoods on telephoto lenses such as the Canon EF 70-200mm can add as much as a third of the length of the lens body. This can add weight to skew the balance of your tripod, and make it more likely that your setup will be shaken by wind. Image from the Canon product page.
Pro tip: Figure out whether the lens hood is necessary by assessing whether sunlight is directly hitting the front glass element of your lens. If in doubt, quickly remove it and see if lens flare is introduced in a test shot.
I hope these tips are helpful in guiding you to take better images. If you have any questions, or would like to see a follow-up post on anything in particular, give me a shout in the comments.
About me:
I'm a travel and landscape photographer based in the UK. I work on the Global Photo Guides series of digital guidebooks for photographers. You can see more of my work on Instagram, 500px and ViewBug.
About the embedded images:
All images included in my posts are my own unless otherwise credited. Please respect the effort they took to create. These images may be shared with attribution, but may not be used for commercial purposes without permission. Full resolution versions are available for licensing, prints etc - please drop me a line.
haha i came to see if any of them were "use a tripod" and it's the first one.
Definitely the best one.
Great share!
@petervenkman - yep! it feels so predictable to say it, but as I mentioned in the post I do think it's the one change you can make that will bring the most impact! :) Thanks for reading & commenting :)
Thank you for the tips @jonbarker. This very helpful with dummy photographer like me :p. Frankly, i always didn't know how to take a good photo. I don't know how catch the light, the photos always either very bright or it turn out with shadow :p.
Photographer always need to have patience to wait for the right moment just to take one nice shoot.
Hey, @oliviackl thanks for reading! From your brief description I think the problem you are having is down to exposure of the image. If you want to understand a little more, have a look into the concept of dynamic range, and how to expose for the correct area in your photo. Even with pro cameras you still get the problem where in a high contrast scene some shadow areas might be completely black, or highlight areas might be completely white, so we have to pick which area of the image is most important, or use more complex camera techniques. Happy shooting :)
Hey @jonbarker, thank you so much give me some simple concept site. I definitely have a look. Hahaha thank you pointed out what was my issue. I didn't know myself that's is the reason why I always shoot it in a dark, hope that one day I able to fix it :p
Hey, @jonbarker.
Thanks for sharing these tips. Sharpness is something I feel like I could use a lot of practice with.
Really enjoyed the images you provided, too. That bridge in the second one looks like it was quite the project. I suppose the idea was to show the different camera setups, but that's a spectacular backdrop to do it with.
Congratulations on the curie. Well deserved. Like a chapter out of a photography book. :)
Hey @glenalbrethsen, thanks for reading! Yeah that bridge is pretty epic, isn't it? It's called Puente Nuevo, and it's located in Ronda, Spain. It's become a very popular spot with travel and landscape photographers. I was there earlier this year shooting for the "Exploring Spain - Malaga & Ronda" PDF travel itinerary we sell at Global Photo Guides. The town is packed with beautiful photo spots. I'll maybe publish some of the edited pics that made it into the PDF in another post sometime.
Thanks a lot for sharing these tips. They sound so basic but very interesting to know as they defy most of what I thought. I am an amateur or more appropriately a feeling photographer who eventually forgot about my DSLR (collecting dust in the box for years now) when smartphones came out. So yes, the tripod is not a good start. I did not realize though that it makes a difference with the shots. The strap is another thing. I never cared about how it is attached to the camera and how I utilized it. I just let it hang over my nape and let the camera take care of its self.
Timer? I am a little impatient waiting just for few seconds. I use it with just what you said, selfie and group photos when I need to run and join the group.
Your image stabilization tip is the most "wow" thing for me among the five tips. When I decided on buying DSLR, I had high regards about image stabilizer and thought the camera I'll buy must have it. All along, I thought it should always be turned on to counter any shake specially with my hands. I wonder if even other professional photographers know that should not be the case.
I once thought about the hood but eventually shrugged it off and did not buy one. I heard it has an effect on the shots but being just a hobbyist of photography, I did not take it seriously.
Ahh, I think it is about time to dig my camera from the box and test my learnings from your post! Maybe not with the hood as I don't plan to buy one but at least with the first four tips. Thanks again for sharing them here!
Hey @macoolette, thanks for reading, it's nice to hear your perspective. I think many other people also left the heavy and cumbersome cameras behind once smartphone cameras started to become so capable :) It's worth noting that a mini tripod can still help get sharper photos on your phone, but a mini tripod for a phone is way easier to carry :)
I hope you get some great pictures if you dig the DSLR out :)
Yeah, maybe I can consider at least a mini-tripod for the phone. But your post reminded me of the DSLR so I really have to dig it up this weekend. I am crossing my fingers that it still works. 😊
Congratulations @jonbarker! You have completed the following achievement on the Steem blockchain and have been rewarded with new badge(s) :
Click here to view your Board of Honor
If you no longer want to receive notifications, reply to this comment with the word
STOPDo not miss the last post from @steemitboard:
I have been thinking of getting myself a DSLR camera for quite some time now but with the advent of smartphones, this thought has been kept aside but ever so often, I would think of it again, like now, after reading your post :) The tips you shared are very easy to follow and are very fundamental too. And yes, I hate it when my pictures are not sharp, thanks to my shaky hands. I wouldn't have thought it is as simple as using a tripod, losing the strap, using self timer, disabling image stabilization and considering a lens hood. Even with smartphones, we can pretty much apply tip 1 and 3. Thank you for sharing them with us. I also appreciate the additional links that you shared for further reading. I for one am unable to figure out what is a suitable camera for me but with more articles like yours, I hope I'd be able to figure it out one day :)
Hey @marblely, thanks for reading, I'm glad you found it useful. Totally appreciate your thoughts on smartphone vs dedicated camera. Smartphone technology is improving at such a rate that they are really catching up. For now, I think camera tech still has a significant edge on what manufacturers can cram into the tiny cameras on our phones, but it's really interesting to see how companies like Apple are using software to bridge the gap - for example, their portrait mode on the newer iPhones mimics in software what we've been doing using expensive lenses for years!
Maybe some food for thought...I find there are so many reasons for us to be using computers and phones these days that it feels like life gets lived through a phone screen. I think it's nice to have a dedicated camera so that I don't have the distraction of notifications, chat messages, instagram likes etc popping up, and it means we can be that bit more connected with whatever we are photographing. Obviously the trade-off here is that we have to carry something extra, but for me I think it's still worth it. For the time being :)
Thank you so much for your reply. That is a good food for thought. You are absolutely right, pop up notifications that appear in the middle of trying to get a good shot is such a darn disturbance! :D
You know what I like most about the photos from dedicated cameras? The amazing macro shots it takes and the stillness of the surroundings when taking a portrait shot (not sure if you know what I mean, sorry, I do not know what is the correct word for it) and of course, the coolness of carrying one of the heavy duty cameras like yours :) I still can't achieve these shots using my smartphone's basic settings. I think I probably need to download or buy some software first.
Do you have any camera recommendation for a total newbie in photography? Or starting from the basics, any links that I should read up first?
I think that effect you mean in portrait shots is probably bokeh, where you get a nice blur on the background but the person is in perfect focus?
In terms of camera recommendations, it's difficult to say because everyone's needs are slightly different. I would suggest looking at an interchangeable lens system (as opposed to 'bridge' cameras which you can't change the lens on) because the range of different lenses can make a huge difference to your shots. For example, there are lenses specifically designed for macro and portrait shots.
As to which system...this is where you have to weigh up cost vs size vs ability. If you are stepping up to a more professional cameras from a smartphone then size will probably be important. The full frame gear like my Canon EOS 5D is expensive, and it can feel very heavy and clunky, although that comes with amazing image quality.
The newer mirrorless technology is starting to become really popular, and they cram some amazing capability into a slightly smaller package than a DSLR. I have just bought a Fujifilm X-T3 and a couple of lenses, and I can't speak highly enough of it. For the size and price the quality is amazing, and it looks beautiful :) I will write a post on what the considerations were for buying it - maybe that might be helpful for you.
Thank you so much @jonbarker!! Yes yes, it has to be bokeh! Such a cool word. Now I can speak some photography lingo :)
Ah, interchangeable lenses are better than the auto changing lens, right? It would be cool if there is beginner's high end camera to start with but when technology changes, will the camera become obsolete? How do you upgrade your cameras as you progress? Should we get a good one from the very beginning and stick with it for as long as we can or get a beginner's one and upgrade as we move up? Do you keep all your old cameras?
Sorry, so many questions :D Yes, yes, that would be very helpful. I look forward to your post :) In case I miss it, can you please drop me a note here? Thank you!!!
Oh, you may ignore my questions until your next post :)
Congratulations @jonbarker! You have completed the following achievement on the Steem blockchain and have been rewarded with new badge(s) :
Click here to view your Board of Honor
If you no longer want to receive notifications, reply to this comment with the word
STOPDo not miss the last post from @steemitboard:
Recently I have been practicing footgraphy. I don't have the equipment. neither the cameras, all the photos that I can take, I do with a cell phone. But I'm sure I can apply the tips you share. I'll put them into practice now that I'm Caracas... Thank's for sharing good content my friend.
Hey @wisejg, thanks for taking the time to read & comment. I think you can definitely apply #1 and #3 with a smartphone. You can get some great small and cheap phone tripods that are not too much hassle to carry.
Also, look out for dedicated camera apps like ProCam, or the camera built into the Lightroom Mobile app. These allow you to have more control over the settings of the camera on your phone, so you can force it to use different shutter speeds and ISO settings to optimise the quality of your images.
Most inbuilt camera apps like the one on the iPhone assume people don't know much about how the camera works so they hide away a lot of the settings to avoid confusing people.
I've spent a little time trying to get the best images out of my iPhone 7 - maybe I'll do a quick post with some tips in it sometime.
Happy shooting :)
Excellent article. I will save it for future reference.
PS: I have found your post because @zorank featured it on his entry for the Pay It Forward Contest
@trincowski, thanks for taking the time to read and comment. I will thank @zorank for the kind recommendation :)