Restoring a russian woodstove to its former glory.
As I have said more than once, the majority of bulgaria burns wood for heat. Wood is stupidly cheap here for burning and for building.
It has to be because a lot of Bulgarian people are poor, and it would be unfair for fuel to be so expensive not to be able to afford it to keep warm.
You have to keep warm here.
Winters are harsh, this year I have been told we are quite fortunate that the lowest it will get to is -12 C. (I don't know what that is in F.)
Last year it got down to -21C but it has been known to get to -40C now that is cold.
When we bought the house, the room that is the kitchen had a beautiful old russian stove in it. I wanted to give the history about this make of stove but sadly I could not find anything about it. I think its because stoves are so varied over here, many countries in the balkans rely on wood for heating. But with each countries there are different makes, so its kind of looking for a needle in a haystack.
So this is the stove. Its make is called Metaл (Metal) Commonly you will see the letter l like this ^.
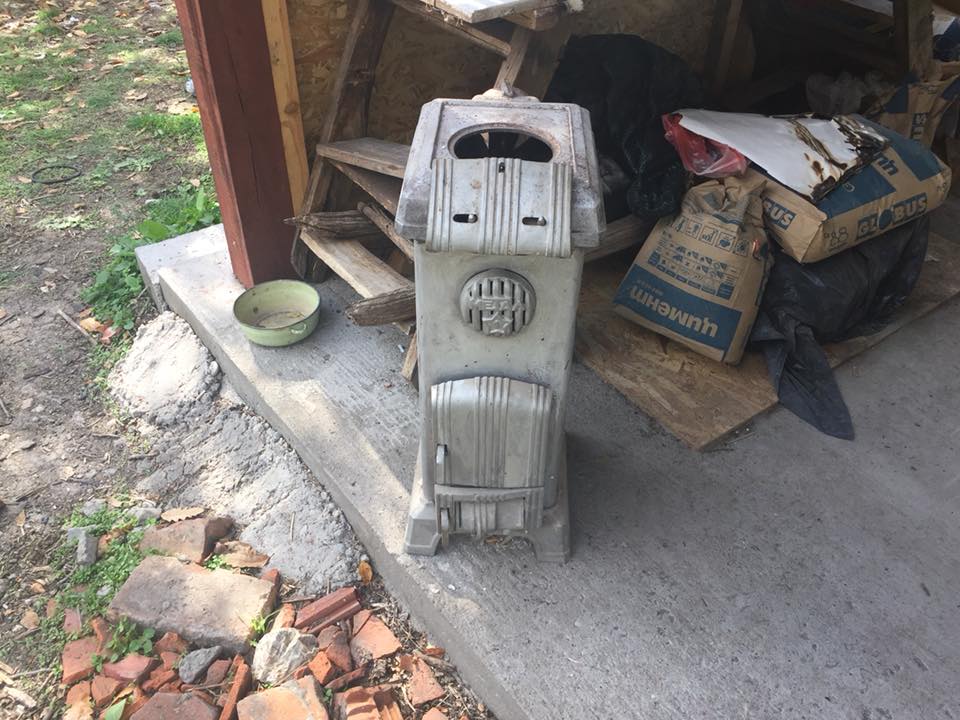
I deeply felt bad for this stove when I first saw it, there was absolutely nothing wrong with it from a working point of view. The firebricks were all still in tact it was sturdy no signs of damage at all.
But someone thought it would be a great Idea to spraypaint the whole thing a glossy silver, which after time the paint was peeling, rust was starting to show.
The stove has three dampers, one at the very bottom door, one at the top door, and one at the back of the flue pipe.
Begin operation save the stove.
After carefully removing the doors, we checked and made sure all the pins supporting them were in tact, they were all fine which was good.
So we stripped it down to its bare bones and sandblasted it to get all the paint off. It was hard work getting rid of all that silver I can tell you, and the dust it created getting the paint off was incredible.
Years and years of layers of paint coming off it, till finally we got it down to the bare metal.
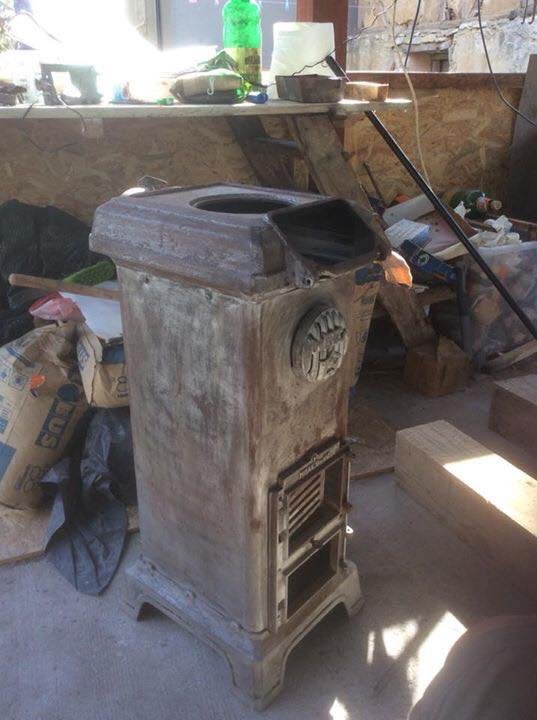
Then we had to get any remaining dust off.
This was a painstaking process of getting any dust off before painting was to start. If we didn't then it would mean the paint would just look speckled not the impression we wanted to give at all.
I had decided to give it a black and gold finish and wanted to use a matt black colour on it. I did not like the thought of glossy because after time it can bubble off the heat and it shows impurities better.
Painting commences.
We used a heatproof matt spray paint which was up to 800 C. It took four layers and hours of careful painting to make sure it was coated evenly and to make sure that the paint did not run. Eventually though we came up with a pretty decent result, and then we had to do the same with all the doors and other parts.
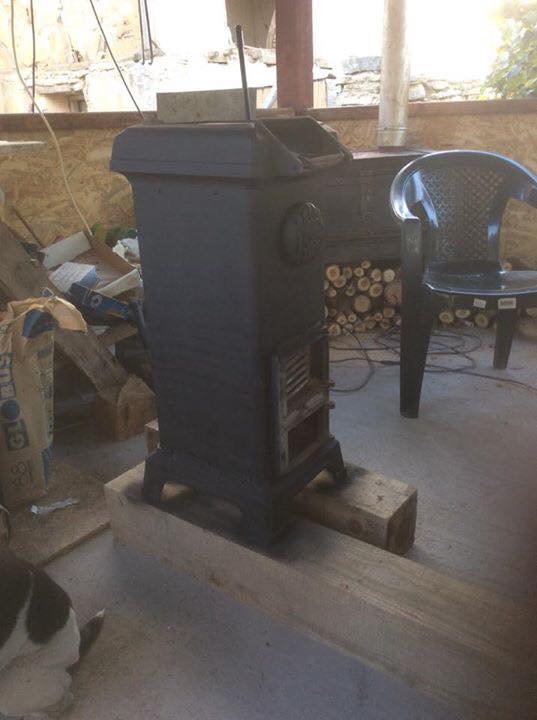
(Paddy the dog had to get his bum in shot.)
Painting the doors.
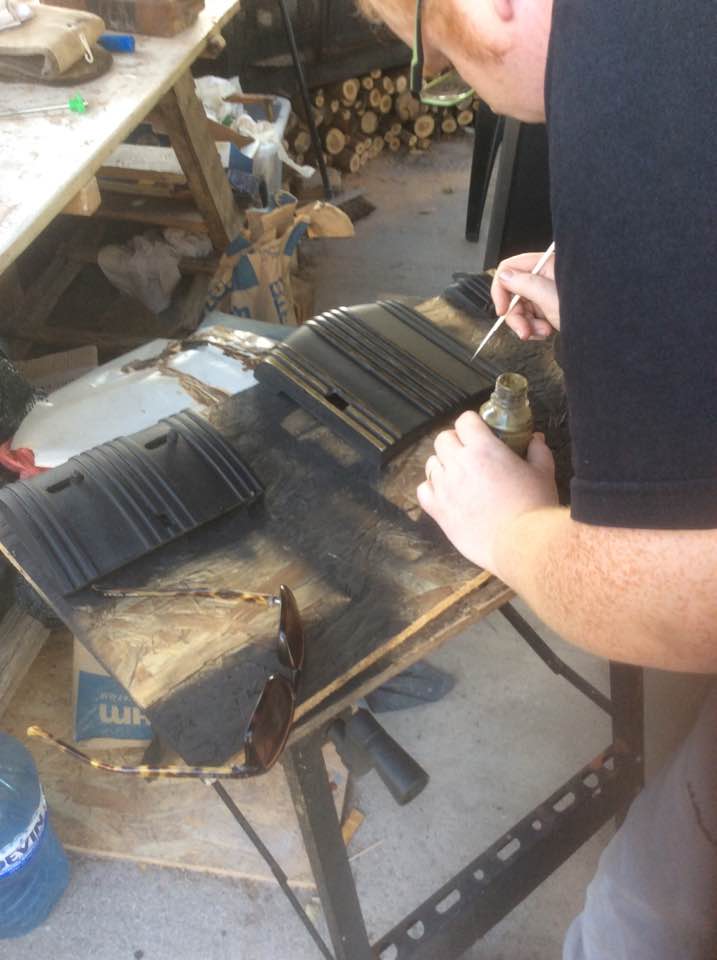
I knew after painting it black that all the grooves and handles I wanted to paint gold. I don't know what was more painstaking, sandblasting the stove or this part because this took ages and many many many layers of gold.
It was such a shame, because the grooves when sanded down showed originally they were chrome, but the chrome was in such bad shape that we only managed to save one of the doors with the original chrome.
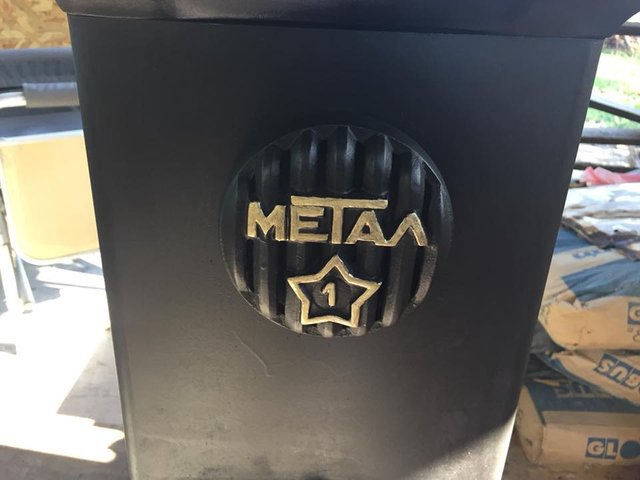
Painting the gold bits.
I am not good at doing stuff like this I don't have a steady hand, and a couple of times I did slip up but I persevered, I must have put on like 20 coats of the gold paint.
But with each coat the gold became more and more noticeable, the first coat you would have thought I had just painted it with water.
 ,
,
But in the end we got there and the gold finishes were done, I painted all the grooves the front vent and the flue handle at the back.
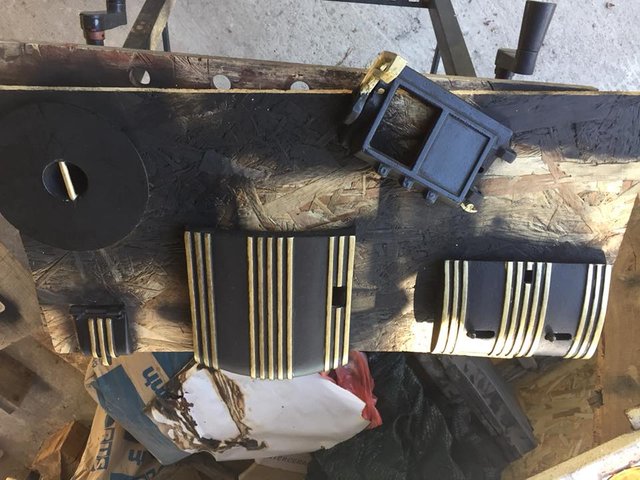
Then after giving the whole lot a few days to completely dry it was time to put it all back together. Now this part it was like putting a jigsaw together, there was a lot of head scratching and working out how something went the way it did, and how could it possibly work that way.
We moved it over and put it into it's rightful spot in the kitchen, I am so happy that I went with the black and gold colour. The stove itself looks a lot happier and ready to do some serious heating.
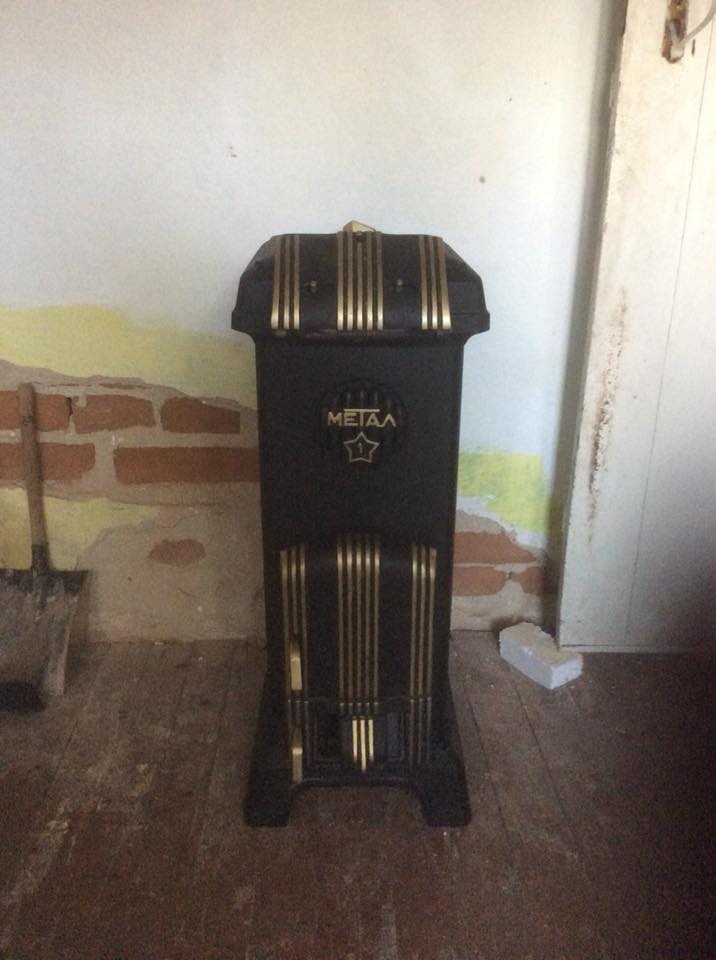
Then it was just a case of putting it on a base which we just used paving slabs, their cheap and great for standing stoves on. All of our fires we use slabs to stand on their also good because if any embers spit or fall they usually land on the slabs so as not to cause fires.
The flue pipe was a bit of a nightmare to sort out because, of its size the standard diameter is 130 mm, but this was was 100, so we managed to find a new flue pipe, which I love the colour. Its like a pewter and when it gets hot it changes colour.
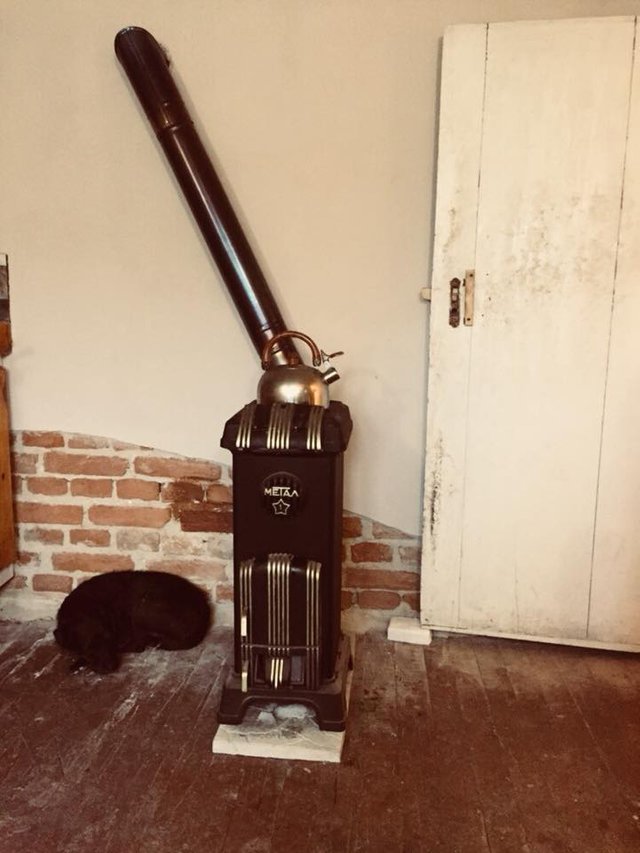
(The black mass you see at the side is Mr Max the dog snuggled by the fire. He is not photogenic.)
I really enjoyed the project over all I am so happy that I managed to save the stove. To me I think it looks old still certainly not new. The design is art deco for sure, very 1920's which is wondering if it was the era it came from. I wish I knew how old it was. I wanted the intention that it had been there for years.
So now when the stove is lit, I put a kettle on the top to keep warm and I love to work in the kitchen by it. It keeps the kitchen lovely and warm and sometimes too warm which I open the door and let the heat escape into the passage way.
People with OCD, might have something to say about that flue pipe. But due to the dimensions it was the only way we could get it to work. but I kind of like it.
Thank you for reading I hope you enjoyed that.


I assume it works and you actually use this for heat, but I don't think after all that work I could bring myself to light a fire in it. Marvelous job. It looks lovely!
As nice as it would be to say no its for show, it is lit it has to be because it gets so cold but even lit and working in the kitchen it is so cozy, I put a kettle on the top to heat water.
Good work!!! Old things are always the best, they were built to last, you have done a good job there :)
Thank you I really enjoyed the restoration project working as good as ever.
Good clean up and restoration job man... Its always good to revive retro style gear...
Wonder how many Kilowatts it puts out? At a guess i would say between
4kw and 6kw...
Yeah I am going to say 4 maybe 5 at a push but you can't load too much wood into it.
Wah apa ini kompor zaman dahulu kala.
Saya juga sangat indah saat menikmati barang unik seperti ini.
htt
@crazybgadventure
Sorry I don't understand do you speak english???
which I mean is it a unique material in ancient times
Congratulations! This post has been upvoted from the communal account, @minnowsupport, by crazybgadventure from the Minnow Support Project. It's a witness project run by aggroed, ausbitbank, teamsteem, theprophet0, someguy123, neoxian, followbtcnews, and netuoso. The goal is to help Steemit grow by supporting Minnows. Please find us at the Peace, Abundance, and Liberty Network (PALnet) Discord Channel. It's a completely public and open space to all members of the Steemit community who voluntarily choose to be there.
If you would like to delegate to the Minnow Support Project you can do so by clicking on the following links: 50SP, 100SP, 250SP, 500SP, 1000SP, 5000SP.
Be sure to leave at least 50SP undelegated on your account.
This post has received a 18.75 % upvote from @chronocrypto thanks to: @crazybgadventure.
That is a very beautiful piece awesome work on the restoration. It takes passion to do that. Now you just need to play some vinyl on an old turn table with a glass of wine.
Thank you for the wonderful comment yes perhaps you are right maybe I need to restore a gramaphone next or I might just be being a bit to adventurous there.
Go for it. It would be perfect and also a beautiful addition to your collection 😊
Very good work. I'd wish I'd have enough time to do manual work. Have you sandblasted it before painting, circular sandpaper or did everything by hand? I know it is very time consuming to do anything by hand. I use a powertool adapter and sandpaper to speed it up. And protective glasses and a Pharmacy Mask as the dust will enter your lungs and cause damage.
Looks great and I bet it feels good to be able to restone something and be able to use it.
Oh absolutely I really enjoyed it.
Beautiful work. I love refinishing itself things but don’t go out of my way enough to do it. There’s just something about taking something apart and bringing back to its original beauty (and use!) By the way, I found your post because we are both in @theinbox’s curation post today!
Thank you so much for letting me know about it being in @thinbox, I have not had a chance to check it bu till be soon. Its such a great stove I am sitting by it now, had to go out when I did I banked it up with wood two hours later came back its all embers not gone out put more wood on it and it took straight away. Kitchen is lovely and warm.
That’s awesome. I stayed with a friend once while traveling who lived in a geodesic dome/cabin with only a wood stove for heat. I was amazed at how all you had to do was add a log first thing in the morning and it heated right back up. I wish my house was designed better for a stove as a primary heat source.