How to make your own fancy countdown timer to your blog(with integration to weebly, godaddy and WordPress)
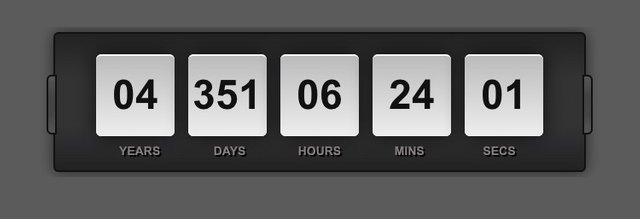
Hi steemit.I was trying to find a countdown timer code. Then i found this code and modify it according to my needs. I will show how you can integrate it to any website and modify it.
- The code:
Years
Days
Hours
Mins
Secs
body{
font: normal 6px/10px Arial, Helvetica, sans-serif; word-wrap:break-word;
color: #eee;
background: #5B5B5B;
}
#countdown{
width:310px;
height: 56px;
text-align: center;
background: #222;
background-image: -webkit-linear-gradient(top, #222, #333, #333, #222);
background-image: -moz-linear-gradient(top, #222, #333, #333, #222);
background-image: -ms-linear-gradient(top, #222, #333, #333, #222);
background-image: -o-linear-gradient(top, #222, #333, #333, #222);
border: 1px solid #111;
border-radius: 3px;
box-shadow: 0px 0px 8px rgba(0, 0, 0, 0.6);
margin: auto;
padding: 12px 0;
position: absolute;
top: 0; bottom: 0; left: 0; right: 0;
}
#countdown:before{
content:"";
width: 4px;
height: 33px;
background: #444;
background-image: -webkit-linear-gradient(top, #555, #444, #444, #555);
background-image: -moz-linear-gradient(top, #555, #444, #444, #555);
background-image: -ms-linear-gradient(top, #555, #444, #444, #555);
background-image: -o-linear-gradient(top, #555, #444, #444, #555);
border: 1px solid #111;
border-top-left-radius: 3px;
border-bottom-left-radius: 3px;
display: block;
position: absolute;
top: 24px; left: -5px;
}
#countdown:after{
content:"";
width: 4px;
height: 33px;
background: #444;
background-image: -webkit-linear-gradient(top, #555, #444, #444, #555);
background-image: -moz-linear-gradient(top, #555, #444, #444, #555);
background-image: -ms-linear-gradient(top, #555, #444, #444, #555);
background-image: -o-linear-gradient(top, #555, #444, #444, #555);
border: 1px solid #111;
border-top-right-radius: 3px;
border-bottom-right-radius: 3px;
display: block;
position: absolute;
top: 24px; right: -5px;
}
#countdown #tiles{
position: relative;
z-index: 1;
}
#countdown #tiles > span{
width: 46px;
max-width: 46px;
font: bold 24px 'Droid Sans', Arial, sans-serif;
text-align: center;
color: #111;
background-color: #ddd;
background-image: -webkit-linear-gradient(top, #bbb, #eee);
background-image: -moz-linear-gradient(top, #bbb, #eee);
background-image: -ms-linear-gradient(top, #bbb, #eee);
background-image: -o-linear-gradient(top, #bbb, #eee);
border-top: 1px solid #fff;
border-radius: 3px;
box-shadow: 0px 0px 12px rgba(0, 0, 0, 0.7);
margin: 0 4px;
padding: 9px 0;
display: inline-block;
position: relative;
}
#countdown .labels{
width: 100%;
height: 12px;
text-align: center;
position: absolute;
bottom: 4px;
}
#countdown .labels li{
width: 51px;
font: bold 7px 'Droid Sans', Arial, sans-serif;
color:#8D8888;
text-shadow: 1px 1px 0px #000;
text-align: center;
text-transform: uppercase;
display: inline-block;
}
var target_date = new Date(2024,1,5,0,0,0,0); // set the countdown date
var years, days, hours, minutes, seconds; // variables for time units
var countdown = document.getElementById("tiles"); // get tag element
getCountdown();
setInterval(function () { getCountdown(); }, 1000);
function getCountdown(){
// find the amount of "seconds" between now and target
var current_date = new Date().getTime();
var seconds_left = (target_date - current_date) / 1000;
years = pad( parseInt(seconds_left / 31536000) );
seconds_left = seconds_left % 31536000;
days = pad( parseInt(seconds_left / 86400) );
seconds_left = seconds_left % 86400;
hours = pad( parseInt(seconds_left / 3600) );
seconds_left = seconds_left % 3600;
minutes = pad( parseInt(seconds_left / 60) );
seconds = pad( parseInt( seconds_left % 60 ) );
// format countdown string + set tag value
countdown.innerHTML = "" + years + "
" + days + "
" + hours + "
" + minutes + "
" + seconds + "
";
}
function pad(n) {
return (n < 10 ? '0' : '') + n;
}
This is the whole part that you will copy+paste. Lets start to understand the parts of the code that we will use.
- Some basic info about the code: This is an html code actually. It has three parts. The first part starts with and ends with . This part is all about the webpage. Second part starts with and ends with . This is the css part and this part gives our timer the fancy look, number fonts, countdown boxes and all other things about the design. Third section starts with and ends with . In this section, all arithmetic operations done such as getting second, minute, hour info seperately from two given date.
- Setting date: To set the date, in the “script” section, you will change the new date() line. Date format is like this: date(year,month,day,hour,minute,second,milisecond). An example date for 1st of april 2019 is date(2019,3,1,0,0,0,0). As you may notice, the month part start from zero.For january you should write 0 to month part.
- Set background color: According to your website background color, you may want to change the background color. To change the background color, you will change the “background” part under the and body{} part. The # symbol means that the value is hex format. To see your own website’s color in hex format, write “color picker” to google and press enter. Then, use screenshot of your website and upload that screenshot to clor picker website. After that, click the area that you want to choose for your countdown timer. Then copy+paste the value to “background” part.
- Disable year part: A year is a big amount of time so days, hours, minutes and seconds parts probably will be enough for you. To remove the year part first remove the “Years” line in the part. Secondly, in the part , at the countdown.innerHTML variable remove the ‘years + "" +’ part and your timer is ready!
Feel free to ask any question
Thank you so much for being an awesome Partiko user! You have received a 8.38% upvote from us for your 1606 Partiko Points! Together, let's change the world!
Thank you so much for being an awesome Partiko user! We have just given you a free upvote!
The more Partiko Points you have, the more likely you will get a free upvote from us! You can earn 30 Partiko Points for each post made using Partiko, and you can make 10 Points per comment.
One easy way to earn Partiko Point fast is to look at posts under the #introduceyourself tag and welcome new Steem users by commenting under their posts using Partiko!
If you have questions, don't feel hesitant to reach out to us by sending us a Partiko Message, or leaving a comment under our post!
Congratulations @brn28! You have completed the following achievement on the Steem blockchain and have been rewarded with new badge(s) :
You can view your badges on your Steem Board and compare to others on the Steem Ranking
If you no longer want to receive notifications, reply to this comment with the word
STOPDo not miss the last post from @steemitboard:
Vote for @Steemitboard as a witness to get one more award and increased upvotes!
Congratulations @brn28! You received a personal award!
You can view your badges on your Steem Board and compare to others on the Steem Ranking
Vote for @Steemitboard as a witness to get one more award and increased upvotes!