Anschluss eines LED-Strahlers für die Werkstatt. / Connection of an LED spotlight for the workshop.
Hallo Elektronikfans.
LED-Strahler gibt es im Handel mittlerweile schon recht günstig in unterschiedlichen Qualitäten. In meiner Werkstatt habe ich einige unterschiedliche Typen an Stellen wo ich punktuelles Licht brauche verbaut. Über meinem Schleifbock fehlt noch so ein Spot. An dem von mir gekauften ist noch kein Netzkabel montiert. In diesem Beitrag will ich euch zeigen wie man dieses anschließt. Aber denkt bitte daran: Netzspannung ist gefährlich! Nur nachmachen, wenn ihr wisst was ihr tut.
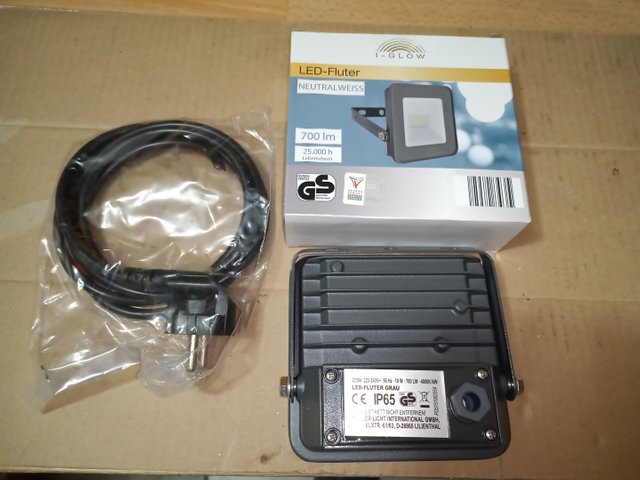
Bild 1:
Im Bild1 der Strahler und ein 1,5m langes Netzkabel. Ich habe ein Exemplar mit angegossenem Schuko Stecker gewählt, welches es für wenig Geld im Handel gibt. 3-adiges Kabel ist unbedingt nötig, weil das LED-Gehäuse aus Metall besteht und im Fehlerfall der Schutzleiter euer Leben retten kann.
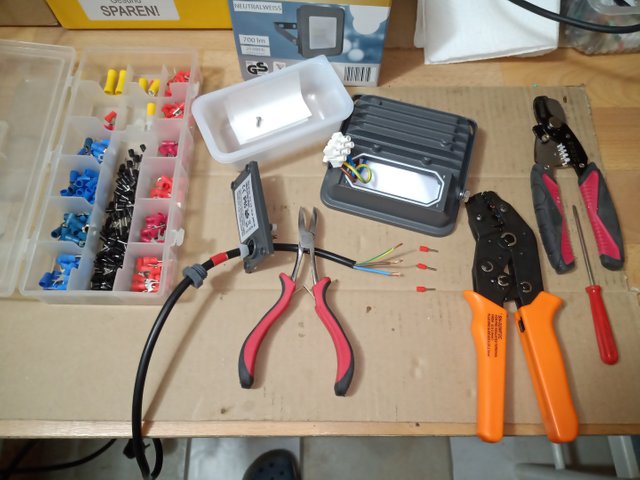
Bild 2:
Außerdem werden noch 3 Adernendhülsen benötigt sowie eine Krimzange. Im Bild1 zusehen, der aufgeschraubte Strahler und das vorbereitete Kabel. Oft vergisst man die Verschraubung, die Dichtung oder andere benötigte Teile über das Kabel zu schieben, welche für die korrekte Montage nötig sind. Also alle benötigten Komponenten in der richtigen Reihenfolge auf das Kabel aufschieben.
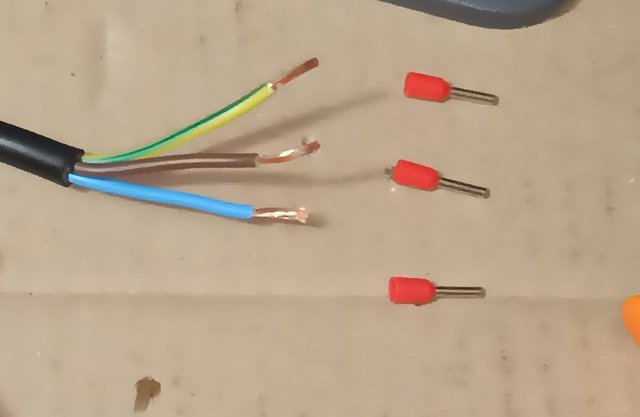
Bild 3:
Bild 3 zeigt die vorbereiteten Kabelenden mit den Adernendhülsen. Diese sollen dem Kabelquerschnitt entsprechen und dürfen nicht zu groß sein. Ein Fehler ist es die Litzen des Kabels zu verdrehen! Die Kabelendhülsen werden nur unter leichtem hin und herdrehen auf die Kabelenden aufgesteckt und dann mit der Krimp - Zange verpresst.
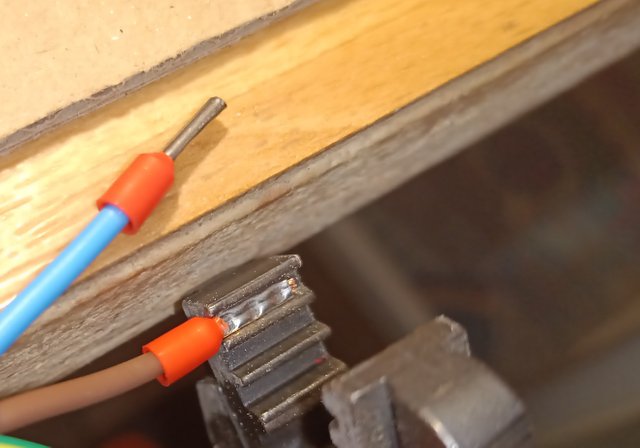
Bild3a
Dabei ist darauf zu achten das keine Litze nach hinten herausstehet, sondern sich in voller Länge im Metallteil der Hülse befindet. Sollte Litze vorn aus der Hülse herausragen wird diese nach dem Verpressen abgeschnitten.
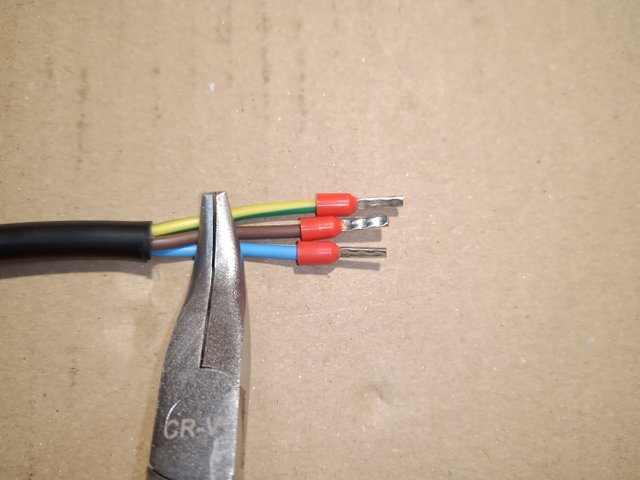
Bild 4:
Bild 4 zeigt die Kabelenden nach dem Verpressen. Wie man sehen kann ist der gelb-grüne Schutzleiter einige Millimeter länger. (er könnte ruhig länger sein) Das ist wichtig, wenn die Zugentlastung versagen sollte. Beim herausreißen des Kabels ist der Schutzleiter der Letzte der abreißt. Kommt das stromführende Kabel an das Gehäuse löst die Sicherung aus und unser Leben ist nicht mehr in Gefahr.
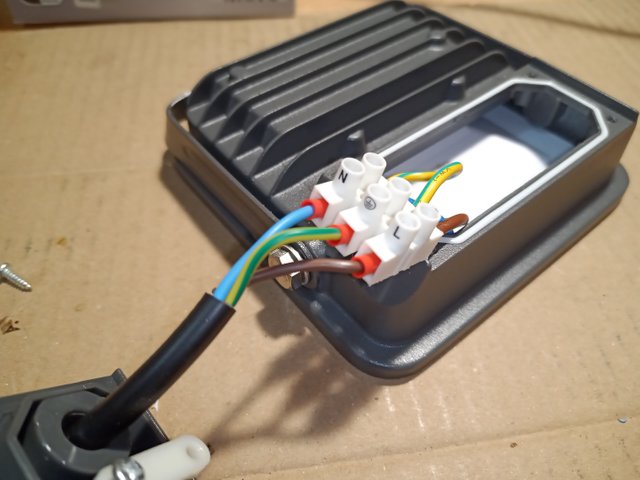
Bild 5:
Hier im Bild das montierte Kabel. Die roten Enden der Kabelendhülsen sitzen gleichmäßig tief in der Lüsterklemme. Ist das nicht der Fall stimmt etwas nicht! Sind die Hülsen zu lang (metallischer Teil ist sichtbar) werden die Hülsen gekürzt.
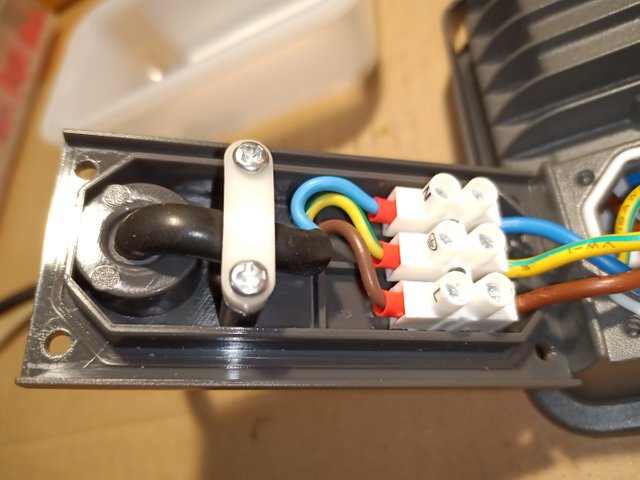
Bild 6:
Bild 6 Das Kabel mit montierter Zugentlastung im Verschlussdeckel des Strahlers.
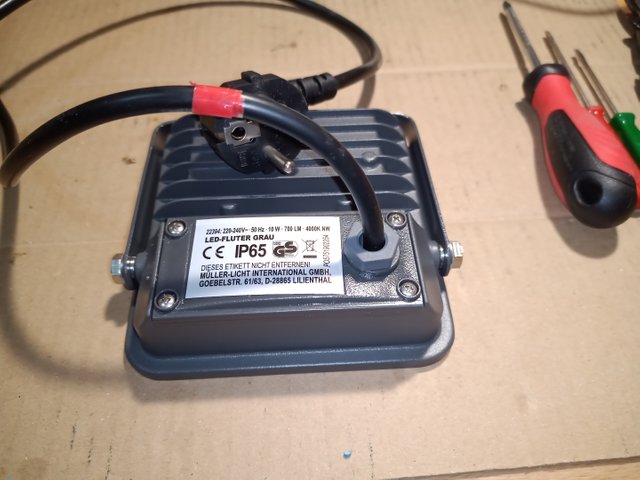
Bild 7:
Hier dann der Strahler fertig montiert.
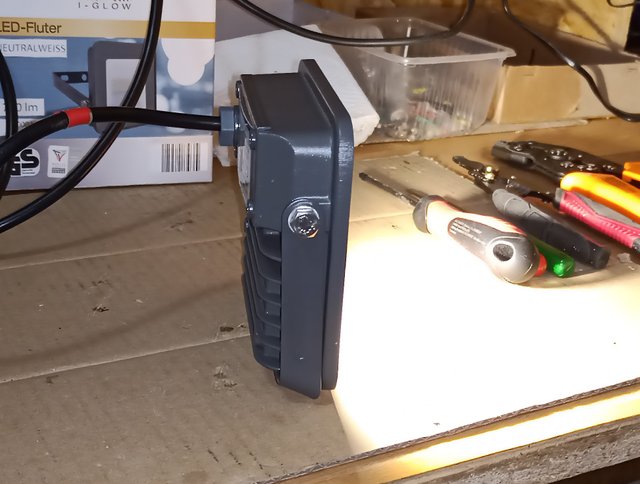
Bild 8:
Und Bild 8 der Funktionstest. Die LEDs leuchten.
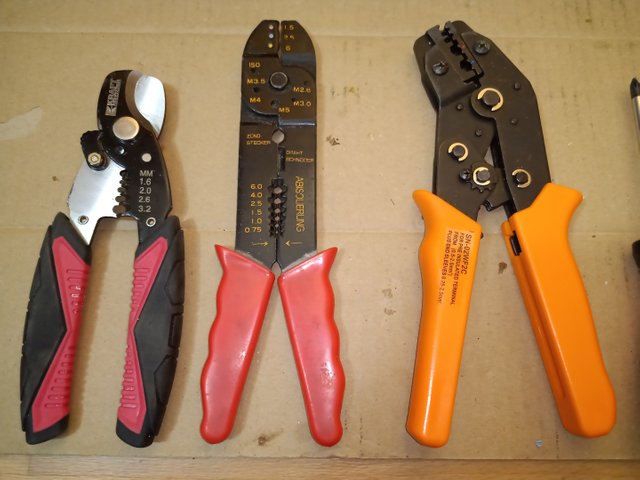
Bild 9:
Im Bild 9 Werkzeug zum schneiden, abisolieren und krimpen. Die in der Mitte gezeigte Universal - Zange ist nicht zu empfehlen. Dies ist nur ein Hilfswerkzeug für gelegentlich Anwendung. Die Krimp -Verbindungen sind oft nicht sicher und müssen mehrmals verpresst werden. Hier ist besonders auf festen Sitz der Hülsen zu achten.
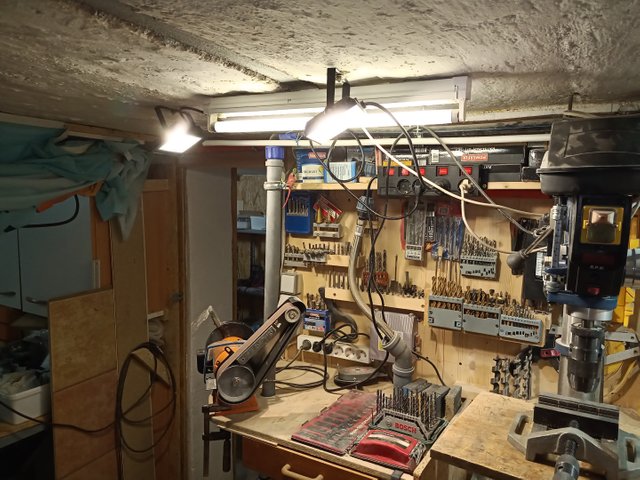
Bild 10:
Bild 10 und 11 Der Strahler montiert unter der Decke in Aktion und ein Teil meiner Werkstatt.
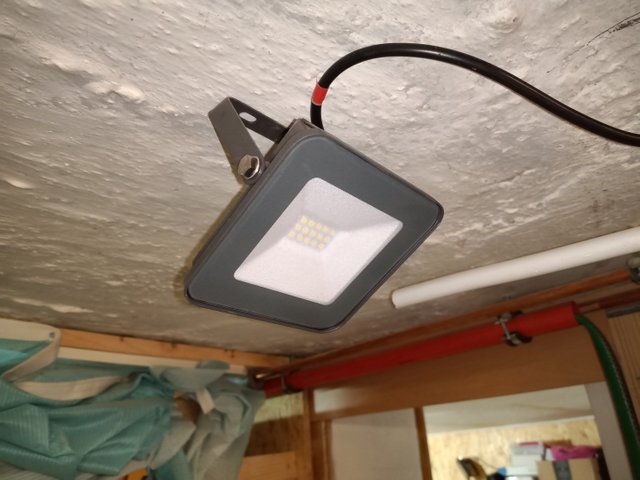
Bild 11:
Ich hoffe der Beitrag hilft euch ein flexibles Kabel fachgerecht an ein elektrisches Gerät anzuklemmen. Aber denkt daran: Netzspannung ist gefährlich.
Bis bald
=========================
Google translator
Connection of an LED spotlight for the workshop.
Hello electronics fans.
LED spotlights are now quite cheap in different qualities. In my workshop I have installed several different types in places where I need spot light. There is still a spot missing above my bench grinder. No power cord is attached to the one I bought. In this post I want to show you how to connect this. But please remember: mains voltage is dangerous! Only imitate if you know what you are doing.
Image 1:
In picture 1 the spotlight and a 1.5m power cord. I chose a copy with a molded Schuko plug, which is available in stores for little money. 3-wire cable is absolutely necessary because the LED housing is made of metal and in the event of a fault, the protective conductor can save your life.
Picture 2:
In addition, 3 wire end sleeves are required as well as a crimper. In picture 1 you can see the screwed on spotlight and the prepared cable. Often you forget to push the screw connection, the seal or other required parts over the cable, which are necessary for the correct assembly. So slide all required components onto the cable in the correct order.
Picture 3:
Figure 3 shows the prepared cable ends with the ferrules. These should correspond to the cable cross-section and must not be too large. One mistake is twisting the strands of the cable! The cable end sleeves are only slipped back and forth on the cable ends and then pressed with the crimping pliers.
Image 3a:
Make sure that no wire protrudes to the rear, but is in full length in the metal part of the sleeve. If stranded wire protrudes from the front of the sleeve, it is cut off after pressing.
Image 4:
Figure 4 shows the cable ends after crimping. As you can see, the yellow-green protective conductor is a few millimeters longer. (it could still be longer) This is important if the strain relief should fail. When the cable is pulled out, the protective conductor is the last one to tear off. If the live cable comes to the housing, the fuse trips and our lives are no longer in danger.
Image 5:
Here the assembled cable. The red ends of the cable end sleeves sit evenly deep in the luster terminal. If not, something is wrong! If the sleeves are too long (metallic part is visible), the sleeves are shortened.
Image 6:
Fig. 6 The cable with strain relief installed in the cover of the spotlight.
Image 7:
The spotlight is then fully assembled here.
Image 8:
And picture 8 of the function test. The LEDs light up.
Image 9:
In the picture 9 tools for cutting, stripping and crimping. The universal pliers shown in the middle are not recommended. This is just an auxiliary tool for occasional use. The crimp connections are often not secure and have to be pressed several times. Particular attention should be paid to the tight fit of the sleeves.
Image 10:
Image 10 and 11 The spotlight mounted under the ceiling in action and part of my workshop.
Image 11:
I hope the article helps you to properly connect a cable to an electrical device. But remember: mains voltage is dangerous.
See you soon
!giphy Electricity
giphy is supported by witness untersatz!
Du hast ein kleines Upvote von unserem Curation – Support – Reblog Account (German Steem Bootcamp) erhalten. Dieser wurde per Hand erteilt und nicht von einem Bot.
Du findest uns im Discord unter https://discord.gg/Uee9wDB
Vielen Dank für die Unterstützung
A very instructional post explaining how to set up your work area with some lighting. I would have loved to see what device you used to capture your photographs, but all in all... well done my friend!
@alliedforces curate
Keep up the great work and join us in The Castle sometime!
The #spreadlovenotwar curation campaign is under the guidance of witnesses @enginewitty and @untersatz.
Thank you for your support.
I use my smartphone (Oukitel Y4800) to capture the photographs.
Very nice... I always suggest placing a "blanket" statement such as:
All photos and graphics are mine, unless otherwise noted</sub<
At the bottom of each post... just to be sure you have correct source and citations for your awesome content :)
!trdo
Congratulations @wesphilbin, you successfuly trended the post shared by @qwertm!
@qwertm will receive 2.87140950 TRDO & @wesphilbin will get 1.91427300 TRDO curation in 3 Days from Post Created Date!
"Call TRDO, Your Comment Worth Something!"
To view or trade TRDO go to steem-engine.com
Join TRDO Discord Channel or Join TRDO Web Site
@tipu curate
@untersatz curate
The @untersatz witness and manual curation is under the guidance of @contrabourdon and @organduo.
Hi qwertm,
Visit curiesteem.com or join the Curie Discord community to learn more.
Thank you very much for this massive support.
Hello!
This post has been manually curated, resteemed
and gifted with some virtually delicious cake
from the @helpiecake curation team!
Much love to you from all of us at @helpie!
Keep up the great work!
Manually curated by @wesphilbin.
@helpie is a Community Witness.
Thank God you used a translator to offer the publication!
The construction work of the led bulb does not look difficult but I am afraid to work with electricity. However, I will show this publication to my brother. One question: can this spotlight be used outdoors, for example a garden?
A cordial greeting @qwertm
Hi @marcybetancourt thank you very much for your support and interrest.
The led bulb i have used in this project can be used outdoor but have to be protected under a canopy. I dont know if this standard is international but here in germany are some "protection classes" like "IP65" in this spot that says it is restistant against little water drops. For direct outdoor use you need the protection class IP67. Lights with this class can be installed outdoor because they are waterproof.
Thank you very much! for the information
A vote of support!
!tip