Creating a Light Client for Neo, a Blockchain Developer’s Gateway Drug
Since Neo’s rebranding, it has generated a considerable amount of hype in the cryptocurrency community. However, one of the major criticisms has always been the “there’s only one developer” line. his statement has been rebuffed, but it’s still the case that the Neo developer community is still very much behind it’s counterparts Ethereum and Bitcoin. There has been tremendous progress, and it’s crazy to think that just two months ago, there was no solid wallet, there was no network monitor, and there was no way to send a transaction programmatically without running a full node. So the progress that’s been made has been admirable, though there has still been a lack of in depth reading/learning materials about the Neo network. CoZ has done a great job of providing weekly reports, but I’d love to see their members share their project progress at a much more in-depth technical level. If we as a community are going to attract more developers away from platforms like Ethereum, we will need these types of materials to be readily available.
So I’d like to kickstart this effort with my own post about the project that I and other contributors have been working on: neo-swift Neo-swift is a light client for interacting with the Neo blockchain, written primarily in Swift 4. Although it is currently a light client, there is no reason that it could not be extended into a full node implementation.
So in this blog I’ll go over what it took for us to get neo-swift to the state it is right now. At the end of this I’ll hope you’ll have a better understanding how the blockchain works under the hood, and if you’re a developer I hope you’ll be encouraged to build your next project on the Neo blockchain.
Why?
The first question to any project is why build it in the first place. When I started this project there were four main reasons
- I want to build decentralized iOS applications, and I think others in the future will want to as well.
- Currently the most “developer friendly” blockchain community is Ethereum. We should strive to surpass that, and one way to do this is to create SDK’s that are easy to use for non blockchain programmers.
- I love Swift


… I got you Erik ( It was harder than you made it seem though 😂 )
Now let’s dive into the guts of this.
Read Operations
Implementing read operations of the blockchain is the first and easiest step. As most of you know, a blockchain is a public distributed database, so it makes sense that one should be able to read the information on it without any sort of authentication. One method of performing these read operations is by running a full node on your machine. A full node maintains a fully synced copy of the blockchain, but we obviously can’t store a full copy of the blockchain on a mobile device….yet. So then how can we read the data? Luckily there are plenty of people in the world that are running their own full nodes and are kind enough to let you communicate with them via RPC. You can see some of the available nodes here.
Given this, it should be trivial for anyone who has developed an API to implement something like the function below…
    public func getBlockBy(index: Int64, completion: @escaping (NeoClientResult<Block>) -> ()) {
        sendRequest(.getBlock, params: [index, 1]) { result in
            switch result {
                case .failure(let error):
                    completion(.failure(error))
                case .success(let response):
                    let decoder = JSONDecoder()
                    guard let data = try? JSONSerialization.data(withJSONObject: (response["result"] as! JSONDictionary), options: .prettyPrinted),
                        let block = try? decoder.decode(Block.self, from: data) else {
                            completion(.failure(.invalidData))
                            return
                    }

                let result = NeoClientResult.success(block)
                completion(result)
            }
        }
    }
which gets one of the blocks from the chain at a given index. The block height at time of writing is 1,348,910, so any index under this value we can retrieve and explore. For instance here is the Neo genesis block.
If you’re interested, I encourage you to search through the chain for things like transactions, blocks, and addresses to get a better understanding of how these data structures actually work.
NEO Tracker Blockchain Explorer & Wallet
Chinese Explorer
Creating a wallet
While reading from the blockchain is great for something like gathering stats, the real fun starts when you want to write data to the blockchain. In this blog I’ll discuss the two main write operations that are currently being used on the Neo Blockchain, sending an asset, and claiming gas. Hopefully, by the end it will demystify the currently most used blockchain operations . The first thing that you will need to have in order to be authorized to write to the Neo blockchain is a valid public, privatekey pair.
A wallet doesn’t actually store any of your funds, it uses your private key to send write requests to the blockchain. This is one of the biggest misunderstandings that wallet software users have. Your funds are stored in the blockchain; the wallet is simply an interface that lets you input your private keys and move the funds around: i.e.,perform a write operation the distributed ledger.
So how do we generate this (public, private key) pair? First we generate a private key, which is simply a 64 character hexadecimal string. This represents a number between the range 0 and 2^256 (1.15792089e77). From this number, the rest of your “Account” information is derived. I consider an account to consist of your Private Key, WIF (Wallet Import Format), public key, and address.
The first challenge of any wallet software is deriving the account from the private key. We’ll go briefly go into more details of the 3 other keys. If you’re already familiar with address generation from another blockchain feel free to skip ahead, as Neo basically follows the same method as all others.
WIF
The WIF is relatively to understand. In practice a private key can end up looking something like this…
0C28FCA386C7A227600B2FE50B7CAEEC86D3BF1FBE471BE89827E19D72AA1D
Caution: Never use these private keys for anything
It would be nice to have something that is at least a little bit more human readable, so we can convert the private key into the WIF otherwise known as the wallet import format
5HueCGU8rMjxEXxiPuD5BDku4MkFqeZyd4dZ1jvhTVqvbTLvyTJ
which although still not entirely readable is certainly better than the original string. WIF also has some basic error checking so that when you send to an address denominated by WIF format you are more likely to catch an error. For an in-depth look at the conversion algorithm you can read here.
Public Key
Once we had successfully got the private key and WIF the real trouble began. When we started we had high hopes of making of building the client entirely in Swift. However, we realized that this would be impossible. Swift lacks any Cryptography libraries to do Elliptic Curve Cryptography. In particular Neo uses the secp256r1 elliptic curve for public key derivation.
Further Study:
elliptic curves - Is secp256r1 more secure than secp256k1? - Cryptography Stack Exchange
https://github.com/neo-project/neo/blob/master/neo/Cryptography/Crypto.cs
Given this limitation we decided to cross compile with another language that would have good support for these more complicated cryptographic protocols. We eventually found btckeygenie which once modified, we could import into our golang wallet generator and compile using go mobile.
I’m not a cryptography guy, so this was one of the most painful parts of the process. In the future we would like to support a full fledged ECDSA library written in Swift, but for now we will make do.
Address
Once you’ve derived the public key you only need to get the address to have a “full account.” The process is described here, and is much simpler than deriving the public key from the private key.
At this stage we had a go package that was able to take an input private key in either Hex or WIF and output a full account
public init?(wif: String) {
    var error: NSError?
    guard let wallet = GoNeowalletGenerateFromWIF(wif, &error) else { return nil }
    self.wif = wif
    self.publicKey = wallet.publicKey()
    self.privateKey = wallet.privateKey()
    self.address = wallet.address()
    self.hashedSignature = wallet.hashedSignature() //We'll discuss this later
}
WOOT! This was definitely the first big win in developing this SDK, and should be considered the first challenge one most overcome as someone creating a light client. It was made exponentially more difficult by the fact that Swift just doesn’t have good support for cryptographic libraries. I suspect getting to this stage would be loads easier with a language that has first class Cryptography support.
Note: There are a few small points that go into the derivation that are specific to Neo, but I won’t go into them here, but you can reach out to me if you have further questions.
Sending assets and claiming gas
With the wallet generation complete, we have enough to build something like a simple paper wallet generator. You would be able to receive money at that address, but you would need to use another application like the Neon Wallet in order to send assets or claim your gas, and of course we want to build an SDK that can be embedded in any iOS mobil application.
This requires implementing the sendrawtransaction RPC method located here. Sendrawtransaction method
The payload for this RPC method would like something below:
"params": [ "80000001195876cb34364dc38b730077156c6bc3a7fc570044a66fbfeeea56f71327e8ab0000029b7cffdaa674beae0f930ebe6085af9093e5fe56b34a5c220ccdcf6efc336fc500c65eaf440000000f9a23e06f74cf86b8827a9108ec2e0f89ad956c9b7cffdaa674beae0f930ebe6085af9093e5fe56b34a5c220ccdcf6efc336fc50092e14b5e00000030aab52ad93f6ce17ca07fa88fc191828c58cb71014140915467ecd359684b2dc358024ca750609591aa731a0b309c7fb3cab5cd0836ad3992aa0a24da431f43b68883ea5651d548feb6bd3c8e16376e6e426f91f84c58232103322f35c7819267e721335948d385fae5be66e7ba8c748ac15467dcca0693692dac"]
😱😱
Unfortunately this payload data isn’t particularly well documented anywhere, And there’s also this difficulty when parsing the response data.
From
Official Docs -> Network Protocol · neo-project/neo Wiki · GitHub
When the result is true, the current transaction has been successfully broadcasted to the network.
YAY!
When result is false, the current transaction has failed to broadcast. There are many reasons for this, such as double spend, incomplete signature, etc. In this example, a confirmed transaction was already broadcasted, so the second broadcast failed due to double spend.
…shit
This basically means that when it fails to send the transaction, you’ll have no idea why that’s the case. You’ll have a very long hex string to send to the RPC server, say the magic words it will simply respond false!
However after many hours of working through this…literally matching up hex strings that were outputted by the javascript sdk with my own
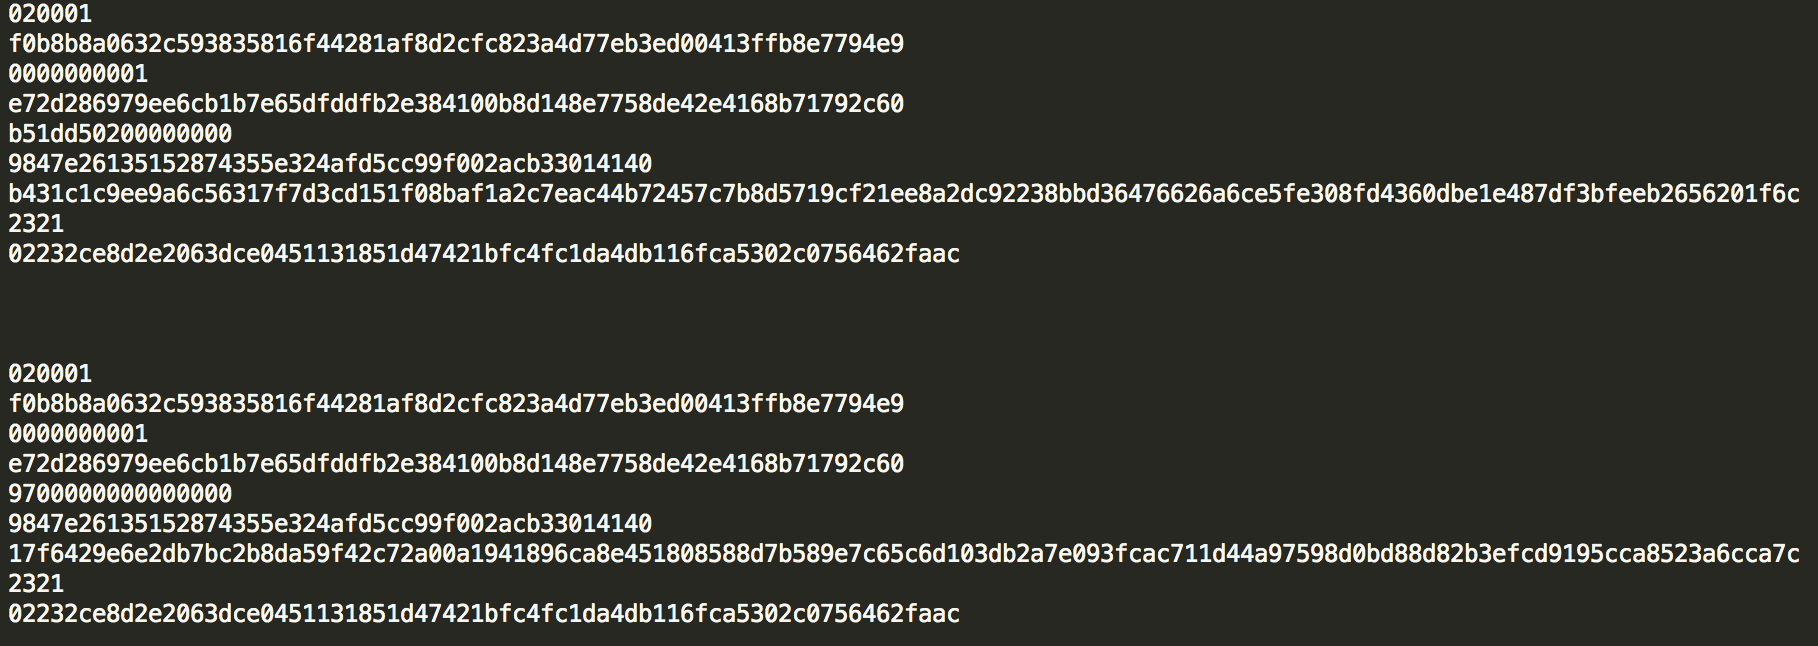
I got this beautiful message.
![7F58937D-E65D-4885-9A7A-B4F0E17C49F2.png]
( )
)
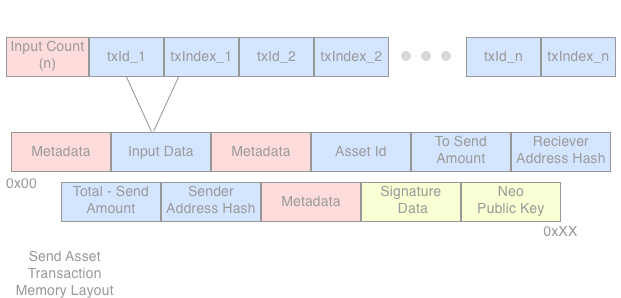
By following all with the javascript we were able to create a clearer picture of the full memory layout of a send asset transaction and it looks something like this:
My Docs -> Swift SDK Docs (Explains more about how to build up this structure with code to follow along)
Let’s go through each of these parts in detail. The transaction will start from the lowest memory address (0x00) and go to the highest memory address (0xXX) where XX is the length of the transaction in hexadecimal
First Metadata: Contains the TYPE, VERSION, and ATTRIBUTES of the transaction. The type in this case would be transfer /80/. The version would be /00/ (Might need to be updated?). There are no specific attributes of this transaction.
Input Data: The Input data is where things begin to get interesting. With Neo, or any other blockchain system, your balance is not a single number in a database like with a traditional server client model. In practice it ends up looking something like this:
"GAS": {
        "balance": 29.02751232,
        "unspent": [
            {
                "index": 1,
                "txid": "74cc80ffb1588a964fc6a656302bfe5c3465d2214c64211d8fe2f322cb342a29",
                "value": 28.0
            },
            {
                "index": 0,
                "txid": "819e00aeca6be42a436b9535b2c165670be9011bbd41afe5d475b0c858a7f6c5",
                "value": 1.0
            },
            {
                "index": 1,
                "txid": "3d96fb31185394147b237a987730fa2e4c1848744530842e468a6d9bdeec4069",
                "value": 0.02751232
            }
        ]
    }
Your total balance is the aggregate of these objects in the unspent array which are linked to a particular transactionID. When you send an asset, gas in this case, you need to use these unspent inputs in order to produce an output. So say I need to send 28 gas. This will require one input, the one that has a value of 28. However, if I need to send 29 gas I will need to use two inputs, one with value 28 and one with value 1. So you can see how this generalized to an arbitrary number of transactions. Here the biggest transaction that we could have would be sending 30 gas which would require 3 inputs.
Note: You also need to reverse the transaction ID’s due to endianness
This is not a raw RPC command that you can send, you’ll need to use CoZ’s API to retrieve this data, or run your own node.
Metadata 2: This is the number of outputs. Say we want to send exactly 28 gas, then will have only one output, because we will consume the entire input and have one output which is the new transaction to the receiver. However, it becomes trickier if we want to send something like 27 gas. In this case we are going to have two outputs. One that sends 27 gas to the receiver, and one that returns the change back to sender. 28 - 27 = 1 gas returned as change. So every individual transaction can have either 1 or 2 outputs.
Asset ID: Every asset in the Neo network has its unique identifier. Currently there are only two, but there could be infinite of these.
Note: Byte order reversed due to endiannessSend Amount: Self Explanatory, need to multiply this value by 100000000 for floating point precision.
Receiver address hash: Self explanatory, hash the address of the recipient
Total - Send Amount: This is the change that you are returning back to yourself. If there is zero change then you would not put this field or the sender address hash that follows.
Sender address hash: The address hash you return the change to, yourself

Signature: Uses the same p256 elliptic curve to sign the payload which is everything before the third metadata block.
- Neo Public Key: This is the normal public key, but it has a prefix and suffix byte, I’m not really sure the usage for these. Maybe it helps the error checking process
WOW! That was a lot, but if you got through and understood all of this, then you’re probably one of the most knowledgable people about how the Neo network actually works.
The claim transaction is not too difficult to understand, but I will cover it in a subsequent post since this is already a lot to take in.
Conclusions
Lot’s of takeaways from this project. Blockchain isn’t easy, but if you’re someone like me who’s really excited about the possibilities then a nascent project like Neo is a great place to get involved. Neo, after all, is an open source project and we could always use more developers. Please pop in to the slack channel for questions and feel free to message me directly (andreit1)
After working on this project, I also gained a new respect for the originators of bitcoin and ethereum. These guys really paved the way, and the resources for developing new projects basically stem from these two projects.
Respect for localhuman and unignorant who got through all of this stuff before any of these resources available. Thank you to both of these guys, and to my partner apisit for doing most of the underlying golang cryptography work.
If you want to go more in depth into the code checkout Neo-swift on GitHub. I tried to a good job of documenting the main features, but let me know if you spot any issues.
After “completing” this project, I’m more confident than ever in the Neo project. We have the opportunity to be the gold standard of dBFT consensus and Asia based blockchain technology, and I look forward to contributing to these efforts in the future.
Cheers
SaltySkip
P.S.
Keep an eye out. Along with continuing to support neo-swift, I’ll have another exciting Neo project to announce soon… 😎
Check out the other SDK’s as well
https://github.com/CityOfZion/neon-js
https://github.com/CityOfZion/neo-python
https://github.com/CityOfZion/neo-go-sdk
Great write up! I really wish I had the time to learn to code and start helping out and developing on projects like this. I've always thought that I'd like to start with swift and go from there.
I didn't realize you could use swift outside of the Apple world. Knowing I could code stuff that interacted with NEO is just more motivation to learn. Just goes to show how much I don't know!
Good luck with your future endeavors, looking forward to seeing what other things you come up with.
You can help by commiting to the StackExchange proposal and lead others there as well :^)
https://area51.stackexchange.com/proposals/110921/neo-blockchain
Yes since Swift became open source, it is moving in the cross platform direction. Linux support is ok, but at this stage you would only use it on Linux if you're super dedicated to the language.
I upvote this post please visit my account
@hatemelpop
You deserve more votes man!
Thank you for the kinds words :)