Not a grey mouse - a crochet baby cardigan tutorial <3
Finally … may I present you the little No Grey Mouse cardigan?
.png)
Do you remember that I showed you a photo of this little jacket and asked if you would like the pattern and you said yes? As I gifted this cardigan to a good friend I had to stall time, because my notes were not complete, and I no longer had the cardigan with me to check my inconsistent notes. Therefore, the lengthy posts in the last weeks about how to knit or crochet a cardigan. But as you perhaps already guessed because of my evasive and long introduction: I still do not have this cardigan back and my notes are still – ahem – not optimal. Nevertheless, I decided to publish this pattern and ask for your help and lust for adventure.
My idea is, I give you my notes and you could perhaps tell me, if there are mistakes in my pattern. (Perhaps you remember that I currently cannot crochet because my fingers instantly hurt).
But to be honest, this is a really basic pattern, you could make the cardigan perhaps also without my notes :-D
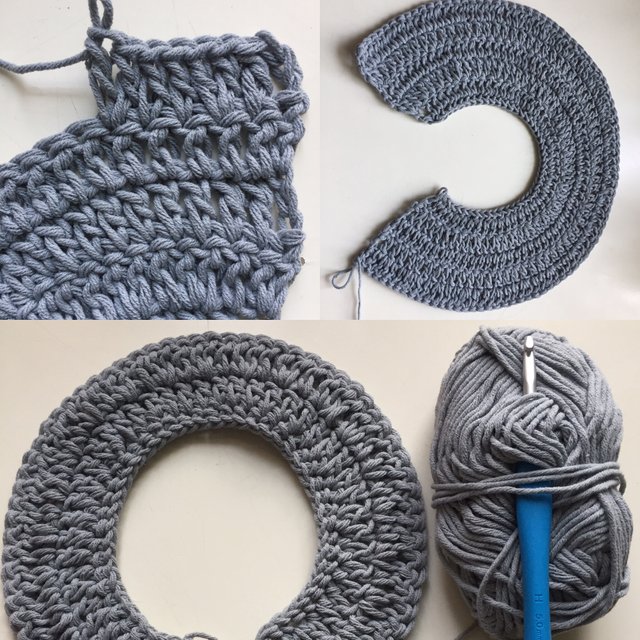
Construction
The cardigan is crocheted top-down with a round yoke. When you reach the desired yoke length, sleeves and body are separated. First you crochet the body and afterwards the sleeves. The final touch is a border in single crochet in a contrast color.
Material
3 skeins made by me soft (50% cotton and 50% acrylic) in 50 g / 100 m, 2 grey and 1 red
Hook 5 mm
Stitch marker
Scissors
Tapestry needle
Tension and size
As I have written above, I currently do not have this jacket at home and sadly (I am soooo sorrryyyy) I did not write down the size and the stitches. I asked my friend to measure her jacket, but it is worn and washed several times. So, beware that the size might not be super exact.
12 stitches and 10 rows are 10 x 10 cm.
Width 28 cm and length 30 cm.
Skills used / Abbreviation
yo = Yarn over
ch = Chain
fsc = Foundation single crochet (UK foundation double crochet)
ss = Slip stitch
sc = Single crochet (UK double crochet)
dc = Double crochet (UK treble crochet)
dc2tog = Double crochet two together (UK treble crochet two together)
Asterik …. Asterik = repeat
The ch 3 at the beginning of the row counts as dc throughout. Remember to skip the first stitch.
The yoke
Row 1: 46 fsc (46 sc)
(If you like you can also crochet 48 chains and in the next row 46 sc instead of one row made of fsc)
Row 2: 3 ch, dc in next 45 stitches (46 dc)
Row 3: 3 ch, 2 dc in second st, * dc in next st, 2 dc in next st *, end with 2 dc in turning chain. (69 dc, 23 st increased)
Row 4: repeat row 2
Row 5: repeat row 2
Row 6: 3 ch, 1 dc in second st, 2 dc in third st, * 1 dc into next st, 1 dc into next st, 2 dc into next st *, end with 1 dc in turning ch. (92 st, 23 st increased)
To make a wider and longer cardigan, simply go on and increase every third row 23 stitches.
Body
Separate sleeves
The yoke will be separated into 14 st for the left front, 18 st for the left sleeve (plus 4 fsc), 28 st for the back, 18 st for the right sleeve (plus 4 fsc), 14 st for the right front.
.png)
Row 1: To separate the sleeves from the body, 3 ch, crochet 1 dc into next 13 st, make 4 fsc and miss next 18 st, 1 dc into next dc, crochet 1 dc into next 27 st, make 4 fsc and miss next 18 st, 1 dc into next dc, crochet 1 dc into next 13 st. (64 st)
Row 2-9: 3ch, dc in ever dc. (64 st)
Cut yarn
.png)
Sleeves
Row 1: 3 ch, distribute 23 dc evenly around armhole, ss into turning ch and close to round. (24 dc) Two dc are worked into the legs of stiches, therefore the 24 st.
Row 2-4: 3 ch, dc in each st acrocss, ss into turning ch and close to round (24 dc)
Row 5: 3 ch, dc2tog, 19 dc, dc2tog, , ss into turning ch and close to round (22 dc, decreased 2 dc)
Row 6-8: 3 3 ch, dc in each st acrocss, ss into turning ch and close to round (22 dc)
Change to contrast color.
Row 9: 1ch, sc in each st acrocss, ss into turning ch and close to round (22 sc)
Cut yarn.
.png)
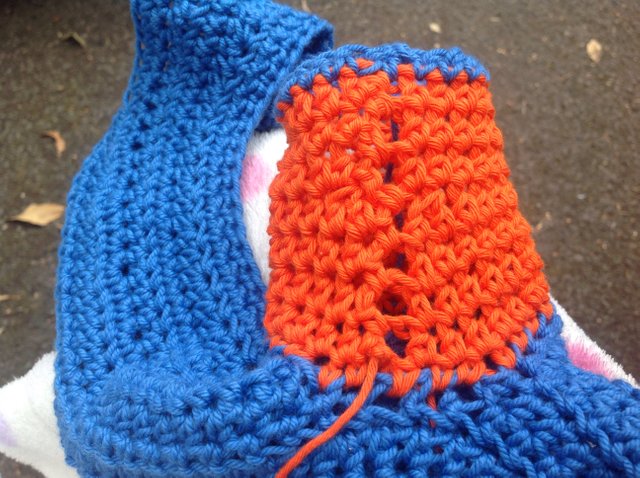
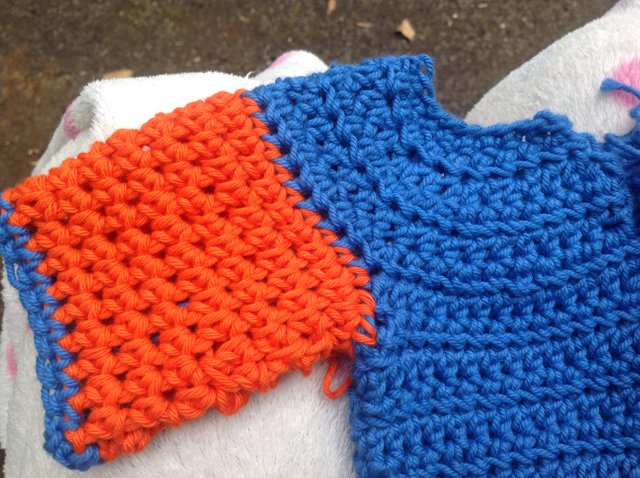
The instructions for the second sleeve are essentially the same, only I used the red yarn for the sleeve and the grey for the last row of single crochet.
Finishing instructions
To add a splash of color I crocheted in a contrast color around the complete cardigan. I used single crochet for this border (one stitch in every stitch, but two into the corners!).
Now sew in all yarnends and instantly make the next :-D
If you make this little cardigan, please tell me if everything worked out :-D
Happy and hot (38°C) #needleworkmonday to you all <3
Thank you @crosheille and @crystalize for hosting the #needleworkmonday
.png)
It's beautiful and I like challenges @neumannsalva :D I will have to take notes as I go to try and avoid my usual tendencies to 'wing it'...
Really hot there at the moment @neumannsalva !! it's drab here but pleasant (: bit of drizzle and cloudy).
Thank you :-D (Now I am a tad excited, hopefully nobody finds mistakes)
And with the weather... IAMMELTING!!! No really, it is hot humid and clouds... perhaps I simply need the see in front of our flat instead of a street :-DDD
It's beautiful! But I am not a crocheter, so I couldn't tell you about any errors. 😉
Thank you for the compliment and reading and commenting my post, although you do not crochet :-D
No problem - and hopefully there are no mistakes .... :-D
By the way: I still see my copper braclet in another light <3
Help! I tried a tension swatch with 12 stitches and 10 rows. The width is 8cms and the length is 13cms. How can I correct this?
Hello @shanibeer... My first impression would be to change the size of your crochet hook to achieve the correct tension. Does the yarn come with a recommended hook size?
The yarn label recommends 4-4.5mm, my tension is very loose so I usually start with a much smaller needle. However, I tried the size 5 and changed the stitch to half treble. That seems to work better (I have shown it in another comment).
The cardigan is looking beautiful, @shanibeer, and so cute 😍
Oh nooo, the crochet is not behaving 😉
I normally make the swatch the same way as in knitting, means if the pattern tells me I need 12 stitches in width for 10 cm, I make a swatch that has 20 stitches. The swatch should be considerably bigger than the 10 x 10 cm square. (I think in knitting this is even more important than in crochet)
After I have done this, I compare ... If I need more stitches to get 10 cm I must use a bigger hook, if I need less stitches I should use a smaller one.
In your case you seem to have used a to small hook (for the pattern above I used a 5 mm hook and on your photo I can see a 4 mm hook)
If you can get gauge with a smaller or bigger hook all is well (in your case bigger, perhaps 5,5 or 6 mm)
As ever there is a but :-D
Sometimes your stitches get tighter or more relaxed if you knit/crochet longer (therefore the bigger swatch). And sometimes the drape of the crochet/knitting is not to your liking in a different hook size. Then you have to recalculate the pattern for your personal stitchcount. Also the yarn is important. I suppose you could not buy the yarn I recommend (its from a Dutch shop), so it is possible that your yarn behaves different.
If you want to work the grey cardigan with your yarn and the 4 mm hook (because you like the drape of the swatch) than I would recommend to start with a bigger swatch and then calculate how many more stitches you need.
Desired width x stitches per 10 cm) / 10
I have the impression my answer is not very structured.... Hopefully I nevertheless could answer your question. If not feel free to force me into coherence :-DDD
Lovely :) I have tried a bigger needle - size 5 - and changed one of the stitches (I have written another comment with the new approach). I like the softness of the fabric with the larger needle, it was pleasing to work which is always a key thing with me - it has to feel nice while I am making it!
This is a good way to practice the different constructions you suggested in your previous posts. The little jackets don't take long (good news for @crosheille 😊), so I can quickly learn and practice before trying a full size garment.
Well that’s good to know because my time is so limited these days. Thanks @shanibeer! 😉
sorry my photo wants obviously to lay down
Okay...you know how EXCITED I am about this post right? Your pattern will be the FIRST pattern I ever use to attempt to make a baby cardigan. I want my baby girl to have one for the Fall so I will be shooting to make this to fit a 3-6 month old.
I will definitely write down things as I go as far as questions for you and any problems/mistakes (if any) that I may face. I’m not sure how soon I will be getting to this as I have two Fall orders to get to.
It is just sooo adorable and I love the different color sleeve as well as the contrasting border color. I will definitely be doing that!! 😍
Thanks so much for sharing this!!
I hope your fingers get better soon~ ☹️😙❤️
Yes please a little fall cardigan, this would be so nice. I am curious for your color combination. And you will be a great help with the pattern <3
The baby I made the cardigan for was very big at his birth (5,6 kg) and the cardigan was a tad too big. But now, one year later it is much too small for him. (I am not sure if this helps)
But do not stress yourself, you have so much time to make baby clothes ahead of you.
And thank you for the well-wishing, I hope this too, but I also do not understand why crochet is so hard on my fingers (knitting is a little bit better...)
I’m curious to see which colors I decide too lol!
Okay thanks for sharing that with me. I’ll be sure to measure the cardigan to her along the way making sure it’s not too big. 😊
I’m glad at least knitting is not too hard on them.
I must try one for my daughter in autumn (It was 32° at our place ... ). And you are an artist. The color combination is great and the idea to put color on a sleeve is hammer!
Oh thank you so much for the compliment. I wanted something simple which is nevertheless nice :-) It would be so nice to see your adaption of this pattern <3
And with the weather: ahhhhhhhhhhhh..... Our sleeping room is at a courtyard and we have 37° in this room, I think this should be forbidden 😅 😅
Yes! Thank you for sharing the pattern @neumannsalva! I hope to crochet your cardigans (marian and this one) soon!
Hopefully I made no mistakes (uhhhh touch of jitters) My friend also asked if I could make her a bigger cardigan, because it no longer fits her baby... but my fingers still do not want to crochet - sigh
That is so adorable, and I like your colors choice!
Happy you like it. I used the colors to have a gift for a boy or girl... :-)
Beautiful!! Thanks for posting instructions too, your photos are fantastic! ♥
Thank you so much for the compliment. I would have like photos with the super cute baby to whom I gifted it, but I absolute understand my friend for not wanting baby photos in the internet :-D
Aha! I have used a bigger needle and half treble instead of treble. I have another three rows to do on the body. The only thing I am not sure about is the foundation single crochet for creating the underside of the armholes.
I'm using Rowan cotton handknit dk with size 5 crochet needle.
Oh lovely!! I’m so glad you gave it a try too!! It looks good so far! 😍 Keep it up you can do it!
Thank goodness I have a baby here to help me measure which always helps. But yet I have to make it a little bigger than what she is now so that she can wear it all next Fall!
Uiiiiiii! This looks super cute. I think you did all well and I am so excited that you used my tutorial <3 <3
How did you made the underam stitches? With chains (because this techniques works also very well)?
By the way I have edited my tutorial. You only need 3 skeins and I inserted one sentence into the sleeve section (only to make the stitch distribution clearer)
For the underarms stitches, I used chains, but they are a little loose, I think. I will look on youtube for the foundation single crochet. I found I struggled to have 64 stitches, even though I created an extra one under each arm in the second row! I'm not sure what I am doing, I will have to pay closer attention next time (by this time, I had already tried three swatches and re-worked the increases on the yoke several times - I just wanted to crochet)! I will try the sleeves this evening. I think I will probably use about 75g-100g of yarn for the whole garment (excluding the contrast colour).
Oh no, I hope its not because I made mistakes... I think I have also to try to crochet it with my pattern... (sh*** fingers...I mean mine)
Neverthless , the photo of your cardigan seems to be fine
The smaller amount of yarn is perhaps because you used half treble instead of treble. (You did think of the different chains at the beginning of the row because of the half treble?)
No, I don't think you have made any mistakes! It's more about me fully understanding the techniques of crochet (I used two chains for the turning chain). Once I have understood the construction/tension, then I can start to experiment! You left me some ideas for v- and scoop- necks, I want to try those as well 😊. Now I must work (sigh).
Oh nooo work (I am procrastinating )
I send you some fresh and cool air (I guess it is also super-hot around London) and strong nerves <3
The sleeves, the sleeves 😱
The stitches keep multiplying, as fast as I am decreasing two, another two appear in their place!
I have finished one sleeve, but I have this ladder effect where the rounds end (it is the underside of the sleeve, so I have gone ahead and finished anyway, babies never wave their arms about, do they 😂)!
Also the pattern is different as every row is knitted in the same direction?
I have learned fsc now - youtube is wonderful!
Congratulations!!!! You finished the sleeve <3
And yes hdc look distinctly different if crocheted in the round. But the sleeves are not really crocheted in a round, because you close the round with a slip stitch and the start a new one. The real 'round' would be a spiral where you do not close the round but simply go on crocheting.
Here is a link with different kinds of rounds and their closure:
http://www.lookatwhatimade.net/crafts/yarn/crochet/crochet-tutorials/how-to-crochet-in-the-round-spiral-vs-joining/
Your end of the row looks too loopy, but I am not sure why... perhaps you made the ss into the wrong stitch? or perhaps someone else has an idea? (huhu @crosheille or @cryptocariad)
And to not add accidentally stitches (which often happens at the end or beginning of the round) I use stitch markers to mark the last / first stitch.
But all in all: so wow!!!! All stitches on the body look lovely and neat, and I am still honoured that you used my tutorial <3
wow! Experts are talking. I am impressed by this response. I am in no way capable of answering any of this. But I am bowing down towards you and all of those who know what this adventure is about. :) Have fun, people.
Hihihi.. sometimes I think knitting and crochet abbreviations sound like a secret language and nobody knows that we are only hiding our secret plan for world domination :-D