Sewing tie-back top: adjusting online free pattern and bra hack
I'm in the 40s now and going into this era of if not now then when? And who cares!!
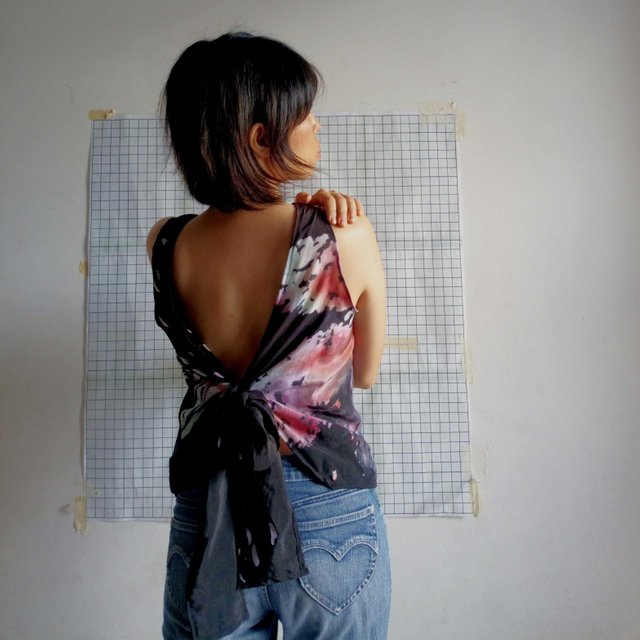
This is the backside of the same shirt I am wearing for my profile picture, it's almost like an apron.
I made it 2 months ago, want to share how I made it.
I like this style, you see. And all tropical weather all year long also encourages me to choose this style, too.
Well, obviously I am no glamorous type, so front side I got nothing to show! :p
[Free sewing pattern online]
Anyway, this is a tie-back top, I didn't even know it is called tie-back, though I liked it when I first found it together with other patterns.
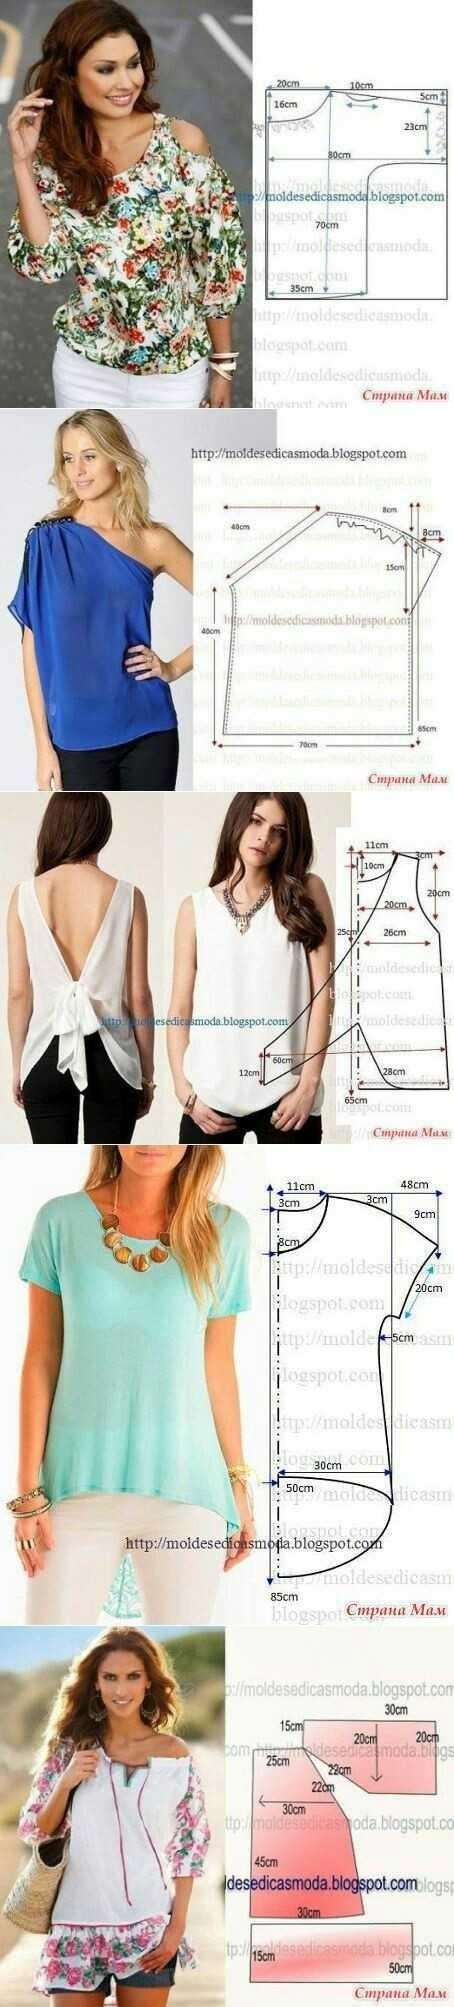
The link above goes to people who shared it. The original designer's blog is here.
The one I used is in the very middle. Looking very easy to make and somehow very appealing!!
[Adjusting the measurements]
The pattern obviously looked large for me. My height is 150cm/5foot, I'm from Lilliput, hehehe.
I remember, when I was in the US, I always had hard time looking for petite size.
The size of this pattern is not written, but I had to make a change.
It is very important to know that there is no such thing as "one size fits all". Even I could fit, yah, just so the head could pop out from the collar, but all baggy and no figure.
The power of knowledge, I believe, comes when we could modify things around us to what we want. Things sold at shops are produced based on average datas. And many of us would be out of it's range.
And I am sure the designer knows that too. That's why instead of size or ask to print out its pattern, she provided the measurements.
So I figured out that by putting a small bit of effort to reshape it would make me smile at the end. And it did!
So here is the fact.
I am not a professional seamstress.
I'm self taught and do pretty much what I want to do.
So I cheat! Here we go:
For anyone knows how to take your own measurements, please do so. For anyone doesn't know much or uncertain about it, follow me! First thing I did was to take out my best fitted cotton top. Cotton tank top or shirt would do. Take its bust and hip measurements.
Make a sketch with your measurements.
For this shirt pattern, there's no waist line! Mostly bust and hip measurement should be sufficient because it's like an apron and you could tighten or loosen the shirt unlike other clothing.Minor change done to the ribbon. I made it longer to 90cm. Long enough I could double(twice) tie ribbon, so it won't come loose easily. No wardrobe malfunction like celebs! Hehehe.
Another reason was to make the ribbon bigger so I could hide the bra straps.Find a fabric you like. In my case, I made a rayon batik for this.
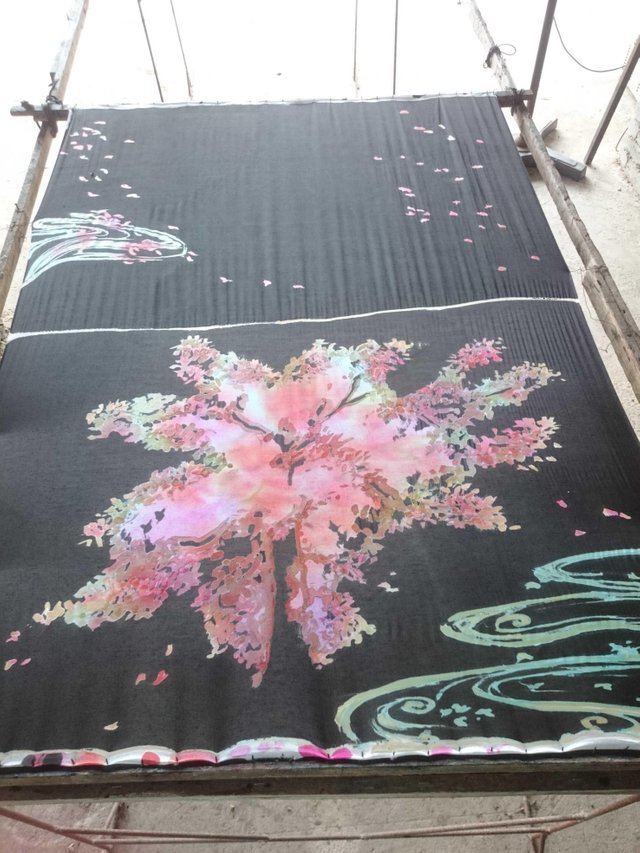
One of my friend gave me a challenge to make it with Japanese tasete.
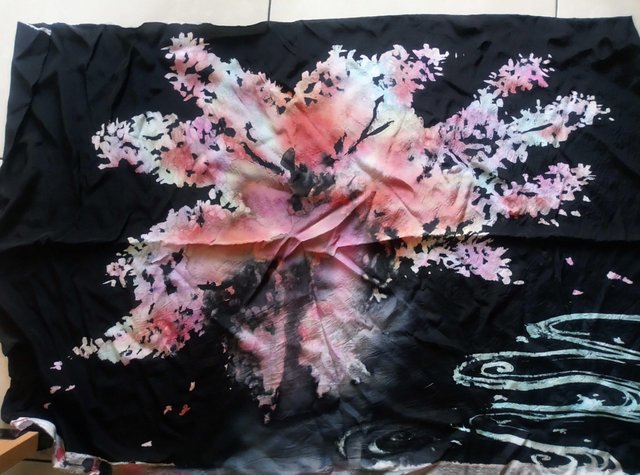
Actually there was an accident..... After I took that above photo, my batik master's workshop, the roof had a leaking and done water damage. Nothing comes easy... But on the bright side, thank god the damage wasn't so obvious and the damaged spot was supposed to be on the side the shirt!!
Draw the pattern directly to the fabric or make a paper pattern and trace. Which ever is comfortable to you. I prefe the latter. It moves a lot while I am tracing it but I could file it in the folder. When I wanted to make it again, I could easily trace it again. Follow as in the free pattern, starts from front side. Bust, up to the neckline, shoulder, armhole, and down to hip. The back side also from bust, but skip to shoulder and armhole, down to hip. Then draw that long opening from neck down to the ribbon.
Cut and sew!
Last but not least, is how to wear bra for this back open shirt.
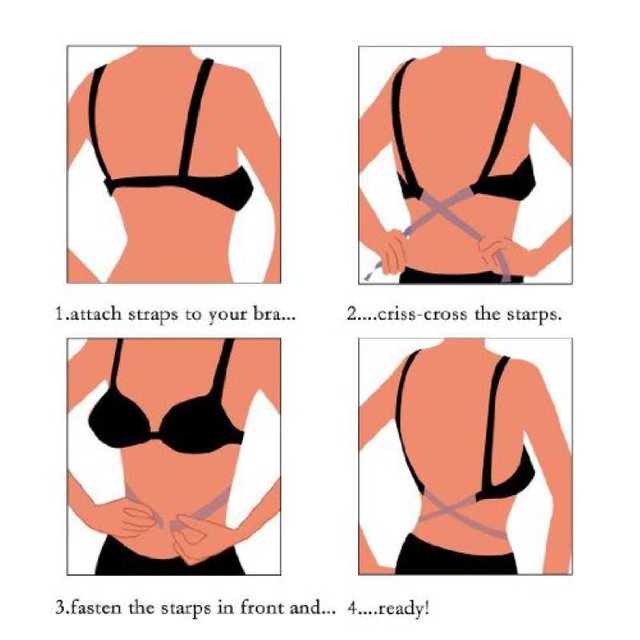
source
This hack uses additional 2 straps. You hook each strap to the hook at the back and crisscross. Hook them in front.
Another alternative and what I prefer to use only original 2 straps. Take off the straps and make it a strapless. Then hook as same as the image, then bring the strap just under the bra to support. The bra hardly get loosen or move around by this!! Don't forget to tighten it too!!
Thank you for reading, all the photos and works are done by me, except for the one has source link.
I love that material! The shirt pattern is very cute!
Thank you so much @violetmed!!
I do like the tie back, I even made crochet top in tie back. I go look for more😊
You have collected your daily Power Ups! Your posts received total upvotes worth of 0.98$.
Learn how to power up smart here!
Congratulations @naomipangolin! Your post has been placed in the spotlight for this weeks @NeedleWorkMonday Featured Post!
Thank you for your quality post and for being apart of the needlework community!
#NeedleWorkMonday is an initiative that supports and rewards the needlework community while inspiring the Steemit blockchain. You can read more about us here.
Wooohhoooo!!!
Thank you so much @needleworkmonday!!!😄 😄 😄 ❤️
So much encouragement, I will be enjoying needle work more than ever!!!!
Thank you for your support and contributions to the community @naomipangolin!
It is so cool that you can create your own batik @naomipangolin! I 😍😍😍 batiks and yours is beautiful! Love the tie-back action of your blouse. The patterns you shared all look so comfy. Very fitting for Msian weather :)
Posted using Partiko iOS
Wow! Your tie back top is Nice, Thanks for your source pattern all beautiful...
Posted using Partiko Android
Thank you for your comment @jurich60!
If you are tall, I suggest you keep it long and cut the bottom according to your need after you test wear it. I was asked my husband to cut even shorter... You know he is the one who see it often, hahaha😂.
WOW ! your top is definitely 'one of a kind', @naomipangolin !
Thank you @cryptocariad! ❤️❤️❤️ The only problem was the the knot of the ribbon became hard and bumpy, so I have to sit up straight on car ride😂
😂 That made me laugh, @naomipangolin...
I imagined you sitting really straight in the car looking very elegant like that.
Hahaha😂 good idea hahaha lots of laugh on that😂 will try next time!
Dear Artzonian, thanks for using the #ArtzOne hashtag. Your work is valuable to the @ArtzOne community. Quote of the week: Art, freedom and creativity will change society faster than politics. -Victor Pinchuk
Thank you for your recognition!!
Thanks for using eSteem!
Your post has been voted as a part of eSteem encouragement program. Keep up the good work! Install Android, iOS Mobile app or Windows, Mac, Linux Surfer app, if you haven't already!
Learn more: https://esteem.app
Join our discord: https://discord.gg/8eHupPq
Thank you for your recognition!!
Congratulations @naomipangolin! You have completed the following achievement on the Steem blockchain and have been rewarded with new badge(s) :
Click here to view your Board of Honor
If you no longer want to receive notifications, reply to this comment with the word
STOPTo support your work, I also upvoted your post!
Do not miss the last post from @steemitboard:
Great work!
Thank you @sweettais for always supportive 😄❤️
Wow you look stunning in your blouse. You are so beautiful and the fabric you created mirrors this. Your tutorial is super, sadly we are currently transitioning to winter, so no back-free shirts for me :-DDD
Thank you so much for writing this <3
Thank you for your comment @neumannsalva!
Hahaha!! I know, some places are getting so cold right now. I used to live in cold places, even the car widow gets ice. I miss wearing sweaters and jackets, I even don't wear socks for long time now, keep yourself warm!😁😊