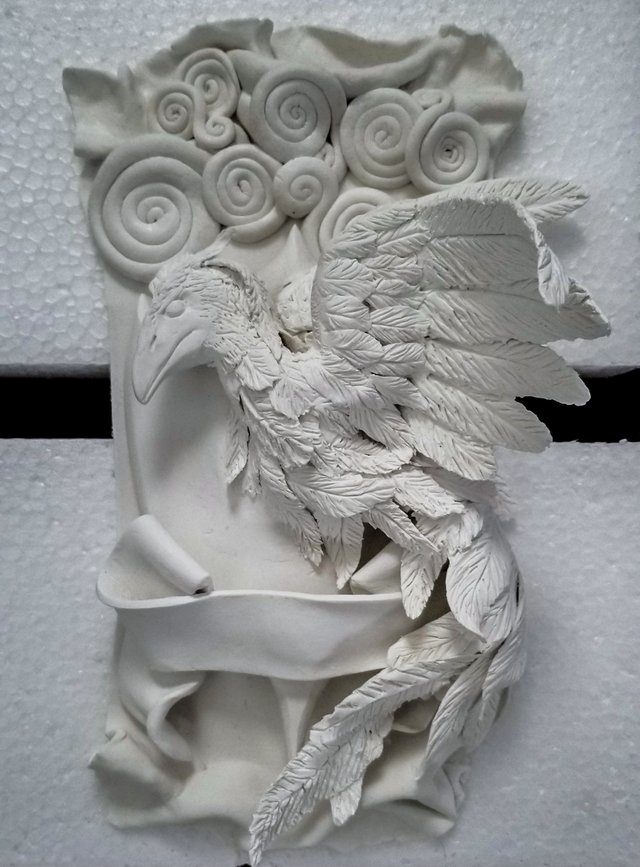
House Ravenclaw and Thunderbird of Ilvermorny
So my friends brother has a door plaque of his Hogwarts house of Gryffindor and I'm not going to lie about how insanely poor and jealous I am at it. So being the little artist I am I decided, hey, I might have enough artistic ability to try and sculpt myself a door plaque instead of buying one for a price I apparently cannot afford.
So here begins my projects, for reasons unknown to me it didn't occur to my high as fuck mind that I should've started documenting this. And so i'll have to fill you in on some things that I missed before I realized I shoulda been documenting this epic task. I waited till the dead of night to go to the corner of the street in order to make enough money to buy the art supplies. After 30 mins of fun work and a 10 minute shower I now had the financial means to kick off this project. Michaels art supply opened and I was the first one at the door waiting to buy some paper cellulose clay. what's so special about this clay? no idea. it was all I could afford at the time. once I got what I needed I began heading home, and from there I started sculpting the shield that acted as the base for everything. I also created the ribbon in which the name of my house would be engraved in.
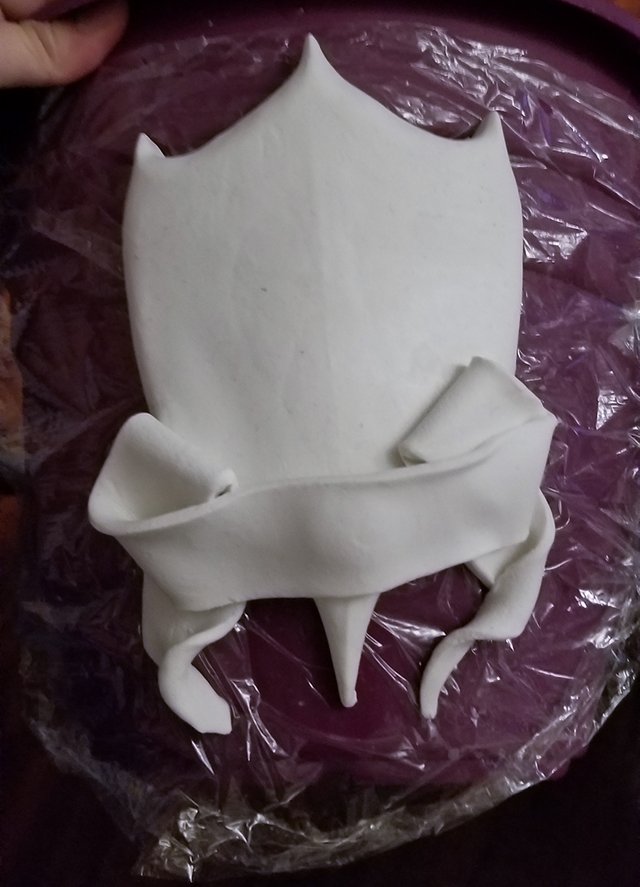
For the entire life of me I dunno why I thought it was a good idea to curve the shield, sure, it adds a visual appeal... kinda. but it makes placing it on a flat surface impossible. kill baby hitler? no thanks, i'll bat myself in the head in the head for this incredibly stupid choice I made at this point. and yes the ribbon is crooked, this is why you should not do stuff like this high, but being high was also the reason I could fix it later on.
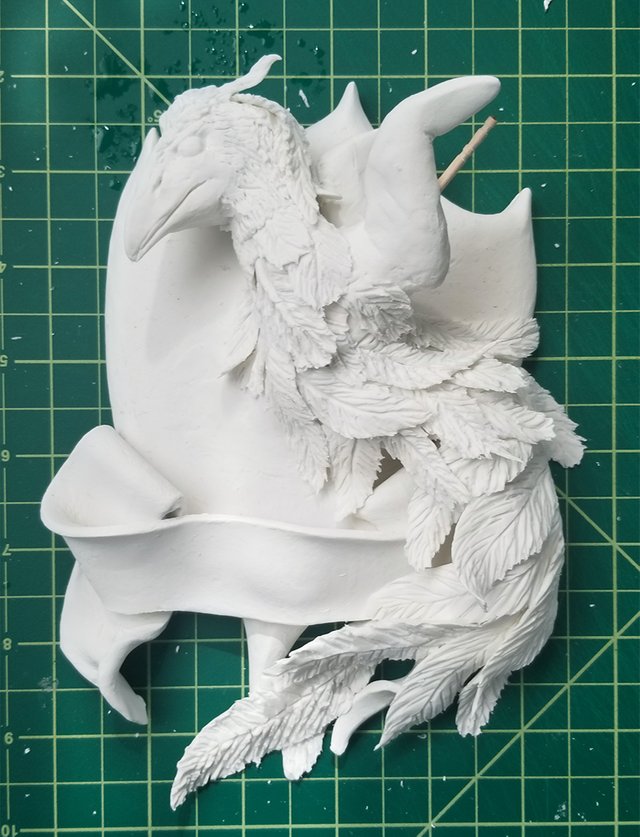
once again it didn't occur to me to start documenting the initial stages of sculpting, as you read along you'll realize there is a lot of things that don't occur to me. at this stage my little raven is looking more like an angry pigeon chicken. you tell me that wing doesn't look tasty... the feathers were the fastest part to make, though there was many to make. if anything the hardest part was doing the head and the body. at this point I still had no idea wtf I was doing, but my high level art skill was taking lead and something that could be confused with arrogance took the reins. I just went with the flow. my mind was clear of though and therefore clear of doubt. however I with my heart had some patience. that woulda really helped with this particular project cuz clay takes time to dry, wups, didn't take that into account. I built the head of the raven first and then just squeezed clay together until some semblance of a body appeared.
I did however plan ahead with the wing, I knew it would have to be firmly stuck in place somehow so while it was still wet I gouged in some texture so the wet clay woulda had something to stick too. I began with the ravens right ring first since it would be laying flat.

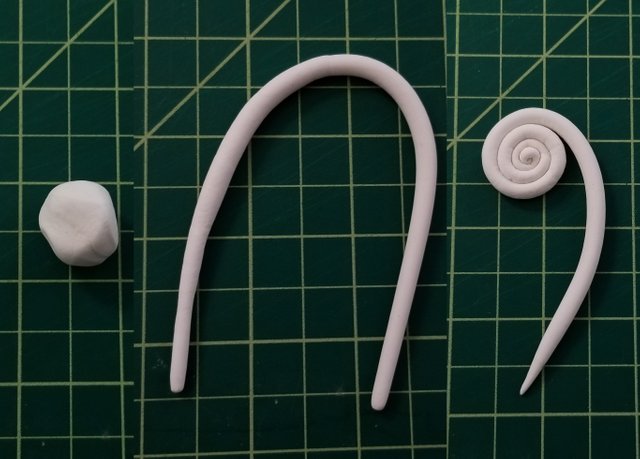
To make the feathers you grab a bit of clay, in this case I used my testicles as a size reference, I gently rolled it in the palm of my hand and with utmost gentle pressure, as if giving yourself a testicular check up, I elongated the shape. then with great fear,i squeezed down until it flattened itself into a spade like shape. obviously you should not try this with your actual testicles for you'd be in the hospital soon after. I then used my poverty shaper (a toothpick) to shape the veins and details of each individual feather until I had enough to make a wing. and then I did it again for the other wing. however drying this wing was tricky, wet clay bends like a limp softy. I had to place it on a curved surface and blow on it until it dried enough to hold its shape then I had to glue it to the ravens little wing with some wet sticky stuff... it was just wet clay. once I was satisfied with how it looked I sculpted some more fathers and permanently bonded the feathers to the wing.
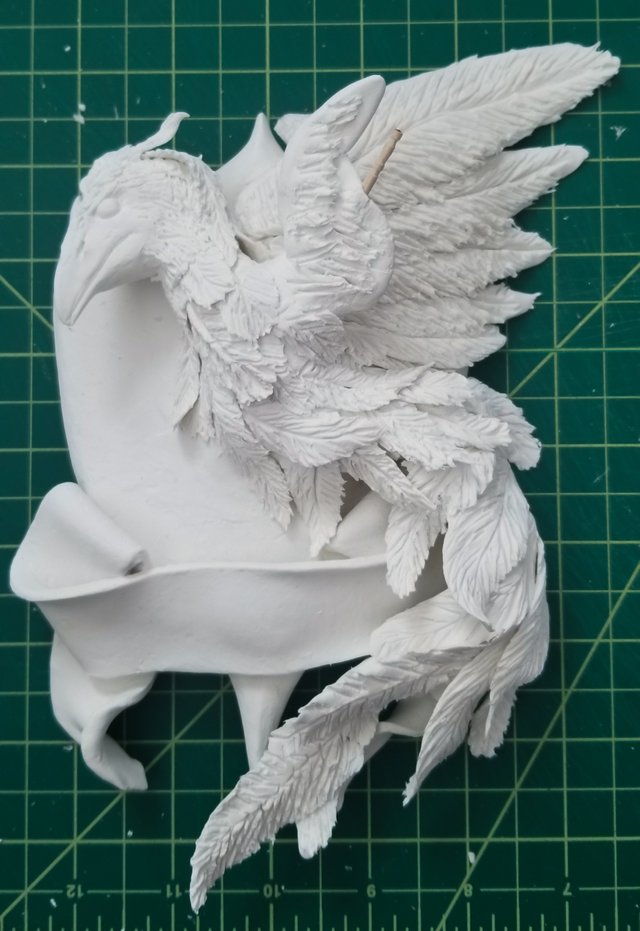
Here you can see that the sculpting of the raven is complete. The next phase would be sanding the areas that I had access to with delicate ease, but what do I use? I went back to the corner to work up some money and went to the local pharmacy to look for some nail files. And so began the tedious sanding process.
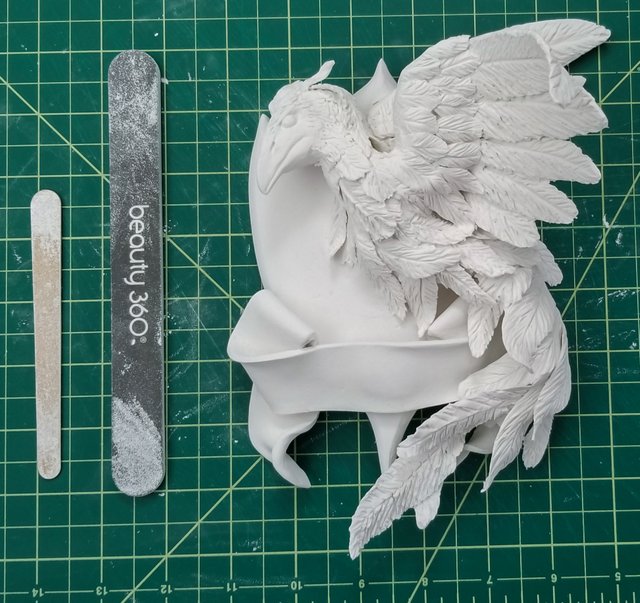
While filing I realized that he ribbon was loose and I managed to separate it thus giving me a greater control over where and how to sand. It took about an hour to sand and by the end my nails never looked better, the raven looks pretty smooth as well I guess. The easiest part to sand was the shield, the hardest were the feathers.
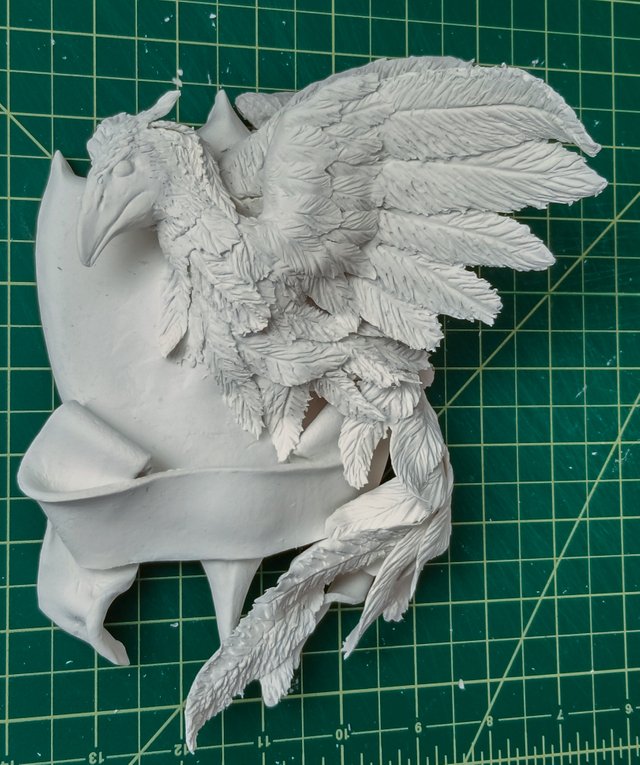
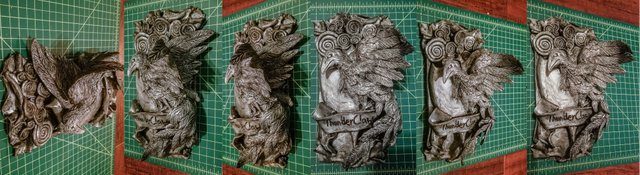
To make the clouds I once again use my testicle as a size reference but this time I rolled it out into a long strand and curled it into a Cinnabon. I wish again I had the mindset to document the creation of the back plate, my idea was a wrinkled piece of fabric. On the very top would be clouds in order to represent the thunderbird part of this mash out plaque.
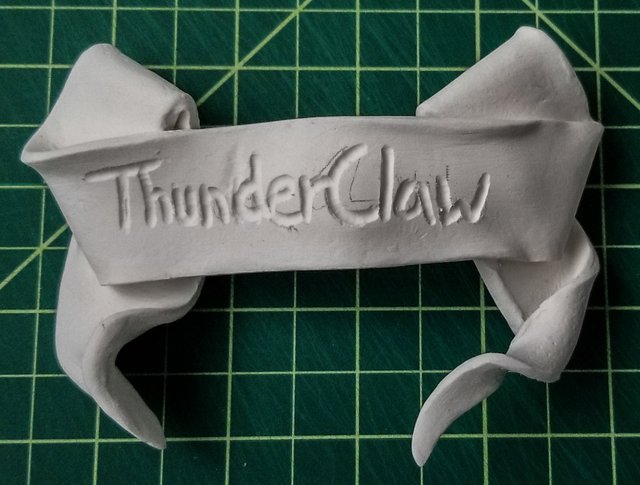
Now here is where I really fuck up. I literally forgot the difference between a "d" and "b" and if I had not caught myself, "Thunder Claw" would have been "Thunber Claw" but wait it gets worse! I went ahead and engraved the C and forgetting the R so in fact I had spelled "Thunbe Claw" so after I finally remember english 101 I managed to fix it to say "ThunderClaw"
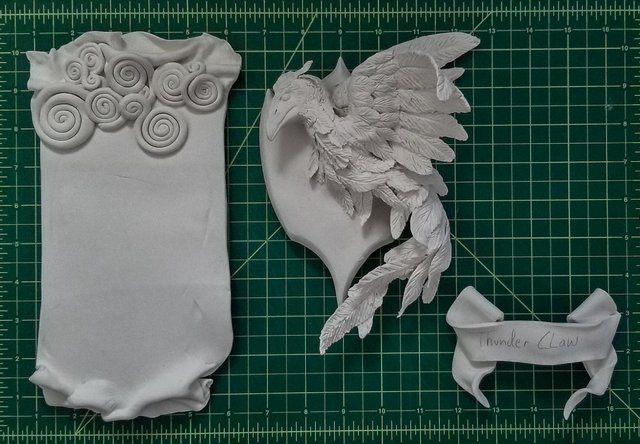
Finally I have all the pieces for assembly. now here is when I realized I should have made the shield flat instead of round...
This was actually the initial assembly, you can tell cuz I haven't engrave the ribbon piece yet, but you get the idea. after a day of drying in front of the fan the next step is to painted it. now here is where it got really tricky, I had no silver paint so once again I had to go back to the corner of the street, when I was done and got my paint, I had actually discovered a little tin of silver paint while looking for a paint brush, fml. finally with the painting and antiquing done I present to you the final piece. I hoped you enjoyed this little project of mine! if your interested in commissioning a piece please hit me up, money is preferable and actually the only thing ill accept at this point, I need to pay bills :(
Hey there @edgecelize!
You have such amazing gift. Well the artist in you had truly emerged qyite well. True enough, an artist always find other alternatives or ways to innovate. We dont really settle for what is given but merely we usually think out of the box.
Overall, i like how you documented almost every step. Its reallt funny that we realized a lot of things while we are in the middle of doing things.
Great job on your little project and for your curie! I hope it gets the bills paid.. 😉
Cheers! ❤
Posted using Partiko Android
Thanks, that means alot! I had no idea it was going to be seen by so many people, if I had known I woulda been more conscious about putting effort into recording each step and the finer details of everything, but this was a good learning experience on what to do for the next project🤝🏻
Yes! That is the most important part in your project, that despite the fact that you enjoyed doing it, you also had learned in the process. It really doesnt need to be perfect.
Good luck on your next project!
Posted using Partiko Android
This post was shared in the Curation Collective Discord community for curators, and upvoted and resteemed by the @c-squared community account after manual review.
@c-squared runs a community witness. Please consider using one of your witness votes on us here
Congratulations @edgecelize! You have completed the following achievement on the Steem blockchain and have been rewarded with new badge(s) :
You can view your badges on your Steem Board and compare to others on the Steem Ranking
If you no longer want to receive notifications, reply to this comment with the word
STOPTo support your work, I also upvoted your post!
Do not miss the last post from @steemitboard:
Vote for @Steemitboard as a witness to get one more award and increased upvotes!
Hi edgecelize,
Visit curiesteem.com or join the Curie Discord community to learn more.
You did an amazing job on this work. I'm glad Curie found this, however a before/after thumbnail pic would have really helped give this post the attention it deserved if they hadn't. Well done bro!
Posted using Partiko Android
Ahh thanks man, I'm still learning how to properly share stuff, a before and after never occurred to me and neither did a thumbnail😫 I'm definetly going to keep that in mind next time though
I spend a lot of time choosing just the right image so that it pops off the page.
The first pic becomes your thumbnail so that and the title has to compete for eyeballs scanning blog posts on Steemit.
My post Steemit Tips #8 gives an example of how I select pics. Cheers! :)
This post is sponsored and featured by @Appreciator in collaboration with @c-squared. Just keep up the good work.
Oooooh C'mon! Those mistakes made the whole thing better, the whole post is a DIY adventure, I really enjoy it, and the final product is really amazing, eat your heart out friend's brother! Thanks for sharing!
This post was nominated by a @curie curator to be featured in an upcoming Author Showcase that will be posted in about 12 to 24 hours on the @curie blog.
NOTE: If you would like us to NOT feature your post in the Author Showcase please reply, or DM me on Discord as soon as possible. Any photos or quoted text from your post that we feature will be properly attributed to you as the author.
You can check out our previous Author Showcase to get an idea of what we are doing with these posts.
Thanks for your time and for creating great content.
Franz (@curie curator)
Lol thanks man, im really glad you enjoyed this adventure, I got another one coming up, it's going to be a bit of a task to get it all together, but I hope at the end i'll have a viable product to show for it lol
Posted using Partiko Android
This is really impressive. It would have been great to have a full picture of the final result.
It is elegant, classic, the paint makes it look metalic, which adds more cachet.
I think that the shield could have been bigger, so that the bird and the ornaments did not hide it.
Looking forward to more of your work
I know, when I was done with the post it didn't even occur to me that I didn't have a final picture, would it even be a good idea to make an individual post about the piece in its completed state? When I was making the shield I was thinking oh, the bird will be small it'll be fine, but then nope, that wasn't what happened lol, I thought about making a slithern one, but I feel like id be repetitive. I got a new project in the works right now, I hope to complete it in a week or 3, we'll see lol
Posted using Partiko Android
Congratulations @edgecelize! You received a personal award!
You can view your badges on your Steem Board and compare to others on the Steem Ranking
Do not miss the last post from @steemitboard:
Vote for @Steemitboard as a witness to get one more award and increased upvotes!