Spring Boot에서 웹 푸시 알림 보내기
웹 푸시 알림 은 중요한 일이 발생했을 때 앱 사용자에게 알리는 방법입니다.
사용자는 예를 들어 앱이 백그라운드 탭에서 열려 있거나 열려 있지 않은 경우와 같이 애플리케이션을 적극적으로 사용하지 않는 경우에도 웹 푸시 알림을 받을 수 있습니다.

열린 브라우저 창 위의 알림 메시지.
푸시 알림은 Safari를 제외한 모든 브라우저 에서 광범위하게 지원 됩니다. 웹 사용자의 78%가 푸시 알림을 지원하는 브라우저를 사용합니다.
이 자습서에서는 브라우저에서 알림을 구독하는 방법 과 Java 서버에서 알림을 보내는 방법을 보여줍니다 .
비디오 버전
약간의 배경 지식: 웹 푸시 알림 작동 방식
웹 푸시 알림은 Notification API 및 Push API ( ServiceWorker 사용)의 두 가지 웹 표준에 의존합니다 . 작동하려면 HTTPS가 필요합니다.
푸시 알림 구독
- 서버는 공개 키를 브라우저와 공유합니다.
- 브라우저는 푸시 서비스에 가입하기 위해 공개 키를 사용합니다(각 브라우저에는 자체 키가 있음).
- 푸시 서비스는 푸시 메시지를 보내는 데 사용할 수 있는 고유한 끝점 URL이 있는 구독을 반환합니다.
- 구독이 서버에 저장됩니다.
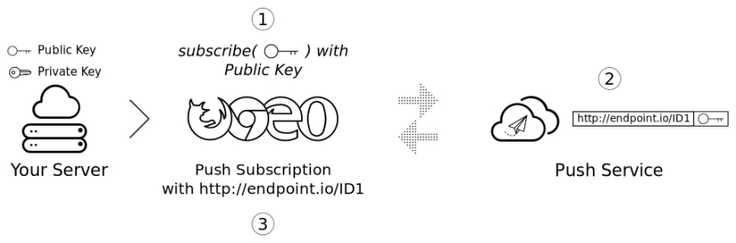
서버, 브라우저 및 엔드포인트를 보여주는 다이어그램. 서버에는 공개 키와 개인 키가 있습니다. 브라우저는 공개 키를 사용하여 끝점을 구독합니다.
Google Web Fundamentals 의 이미지 제공
푸시 알림 보내기
- 서버는 개인 키로 인증 헤더에 서명합니다.
- 서버는 메시지를 고유한 끝점 URL로 보냅니다.
- 푸시 서버는 인증 헤더를 해독합니다.
- 푸시 서버는 장치/브라우저에 메시지를 보냅니다.
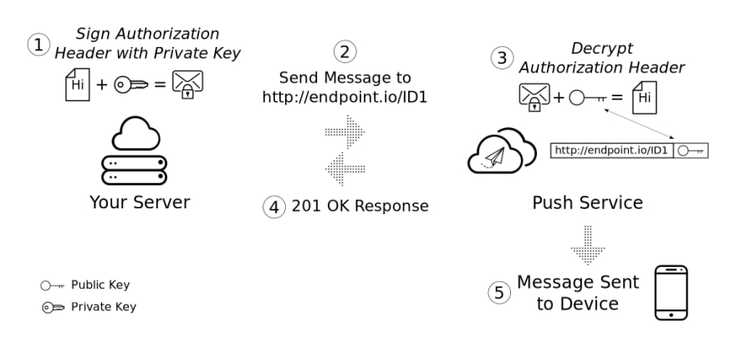
서버가 개인 키로 메시지에 서명하고 엔드포인트로 전송하여 헤더를 해독하고 메시지를 디바이스로 전송하는 것을 보여주는 다이어그램
Google Web Fundamentals 의 이미지 제공
프로젝트 설정 및 VAPID 키 생성
이 예에서는 Hilla 를 사용 하고 있습니다. Hilla는 백엔드에서 Spring Boot 를 사용하고 프런트엔드에서 Lit 를 사용합니다.
여기서는 주요 단계만 다루겠습니다. GitHub 에서 전체 소스 코드를 찾을 수 있습니다 .
Vaadin CLI를 사용하여 새 Fusion 프로젝트를 생성할 수 있습니다.
npx @vaadin/cli init --hilla push-app
web-pushnpm 패키지 로 VAPID 키 세트를 생성 합니다.
npx web-push generate-vapid-keys
.env프로젝트 디렉터리에 새 파일 을 만들고 키를 저장하는 데 사용합니다. .gitignore실수로 게시하지 않도록 에 추가하세요 .
export VAPID_PUBLIC_KEY=BAwZxXp0K....
export VAPID_PRIVATE_KEY=1HLNMKEE....
다음에 Java WebPush 및 BouncyCastle 라이브러리 종속성을 추가합니다 pom.xml.
<dependency>
    <groupId>nl.martijndwars</groupId>
    <artifactId>web-push</artifactId>
    <version>5.1.1</version>
</dependency>
<dependency>
    <groupId>org.bouncycastle</groupId>
    <artifactId>bcprov-jdk15on</artifactId>
    <version>1.70</version>
</dependency>
환경 파일을 로드하고 앱을 시작합니다.
구독 처리 및 알림 전송을 위한 Java 서비스 생성
새로운 Spring Boot 서비스인 MessageService.java. 이 서비스는 키를 읽고
package com.example.application;

import java.io.IOException;
import java.security.GeneralSecurityException;
import java.security.Security;
import java.time.LocalTime;
import java.util.ArrayList;
import java.util.List;
import java.util.concurrent.ExecutionException;
import java.util.stream.Collectors;
import javax.annotation.PostConstruct;
import org.bouncycastle.jce.provider.BouncyCastleProvider;
import org.jose4j.lang.JoseException;
import org.springframework.beans.factory.annotation.Value;
import org.springframework.scheduling.annotation.Scheduled;
import org.springframework.stereotype.Service;
import nl.martijndwars.webpush.Notification;
import nl.martijndwars.webpush.PushService;
import nl.martijndwars.webpush.Subscription;

@Service
public class MessageService {

  @Value("${vapid.public.key}")
  private String publicKey;
  @Value("${vapid.private.key}")
  private String privateKey;

  private PushService pushService;
  private List<Subscription> subscriptions = new ArrayList<>();

  @PostConstruct
  private void init() throws GeneralSecurityException {
    Security.addProvider(new BouncyCastleProvider());
    pushService = new PushService(publicKey, privateKey);
  }

  public String getPublicKey() {
    return publicKey;
  }

  public void subscribe(Subscription subscription) {
    System.out.println("Subscribed to " + subscription.endpoint);
    this.subscriptions.add(subscription);
  }

  public void unsubscribe(String endpoint) {
    System.out.println("Unsubscribed from " + endpoint);
    subscriptions = subscriptions.stream().filter(s -> !endpoint.equals(s.endpoint))
        .collect(Collectors.toList());
  }

  public void sendNotification(Subscription subscription, String messageJson) {
    try {
      pushService.send(new Notification(subscription, messageJson));
    } catch (GeneralSecurityException | IOException | JoseException | ExecutionException
        | InterruptedException e) {
      e.printStackTrace();
    }
  }

  @Scheduled(fixedRate = 15000)
  private void sendNotifications() {
    System.out.println("Sending notifications to all subscribers");

    var json = """
        {
          "title": "Server says hello!",
          "body": "It is now: %s"
        }
        """;

    subscriptions.forEach(subscription -> {
      sendNotification(subscription, String.format(json, LocalTime.now()));
    });
  }
}
참고해야 할 몇 가지 주요 사항:
@Value("${vapid.public.key}")주석은 환경 변수를 필드로 읽습니다 .- 서비스는 구독을
List. 보다 실용적인 응용 프로그램에서는 사용자와 함께 데이터베이스에 보관합니다. - 로 푸시 알림을 보냅니다
pushService.send(new Notification(subscription, messageJson)). 페이로드는 일반 텍스트일 수도 있지만 JSON이 더 유연합니다. - 이 서비스는 현재 시간이 포함된 알림을 모든 구독자에게 15초마다 보냅니다.
서버 접속을 위한 Endpoint 생성
다음으로 브라우저에서 서버에 액세스하는 방법이 필요합니다. Vaadin Fusion에서는 Endpoint 를 정의하여 이를 수행합니다 . 엔드포인트는 클라이언트 코드에서 사용할 수 있는 TypeScript 유형 및 TS 접근자 메서드를 생성합니다.
package com.example.application;

import com.vaadin.flow.server.auth.AnonymousAllowed;
import dev.hilla.Endpoint;
import dev.hilla.Nonnull;
import nl.martijndwars.webpush.Subscription;

@Endpoint
@AnonymousAllowed
public class MessageEndpoint {

  private MessageService messageService;

  public MessageEndpoint(MessageService messageService) {
    this.messageService = messageService;
  }

  public @Nonnull String getPublicKey() {
    return messageService.getPublicKey();
  }

  public void subscribe(Subscription subscription) {
    messageService.subscribe(subscription);
  }

  public void unsubscribe(String endpoint) {
    messageService.unsubscribe(endpoint);
  }
}
참고할 사항:
- 끝점은 기본적으로 보호됩니다. 를 사용하여 익명 액세스를 허용할 수 있습니다
@AnonymousAllowed. - 끝점은 메시지 서비스를 주입하고 구독 및 구독 취소를 위임합니다.
브라우저에서 알림 구독
알림을 구독하기 위한 보기를 만듭니다. LitElement 구성요소 는 두 가지 상태를 추적합니다.
- 사용자가 알림을 허용했는지 여부
- 사용자에게 기존 푸시 구독이 있는지 여부
import { html } from "lit";
import { customElement, state } from "lit/decorators.js";
import "@vaadin/button";
import { View } from "../view";
import { MessageEndpoint } from "Frontend/generated/endpoints";

@customElement("notifications-view")
export class NotificationsView extends View {
  @state() denied = Notification.permission === "denied";
  @state() subscribed = false;

  render() {
    return html`
      <h1>Web Push Notifications 📣</h1>

      ${this.denied
        ? html`
            <b>
              You have blocked notifications. You need to manually enable them
              in your browser.
            </b>
          `
        : ""} ${this.subscribed
        ? html`
            <p>Hooray! You are subscribed to receive notifications 🙌</p>
            <vaadin-button theme="error" @click=${this.unsubscribe}
              >Unsubscribe</vaadin-button
            >
          `
        : html`
            <p>You are not yet subscribed to receive notifications.</p>

            <vaadin-button theme="primary" @click=${this.subscribe}
              >Subscribe</vaadin-button
            >
          `}
    `;
  }

  async firstUpdated() {
    const registration = await navigator.serviceWorker.getRegistration();
    this.subscribed = !!(await registration?.pushManager.getSubscription());
  }

  async subscribe() {
    const notificationPermission = await Notification.requestPermission();

    if (notificationPermission === "granted") {
      const publicKey = await MessageEndpoint.getPublicKey();
      const registration = await navigator.serviceWorker.getRegistration();
      const subscription = await registration?.pushManager.subscribe({
        userVisibleOnly: true,
        applicationServerKey: this.urlB64ToUint8Array(publicKey),
      });

      if (subscription) {
        this.subscribed = true;
        // Serialize keys uint8array -> base64
        MessageEndpoint.subscribe(JSON.parse(JSON.stringify(subscription)));
      }
    } else {
      this.denied = true;
    }
  }

  async unsubscribe() {
    const registration = await navigator.serviceWorker.getRegistration();
    const subscription = await registration?.pushManager.getSubscription();
    if (subscription) {
      await subscription.unsubscribe();
      await MessageEndpoint.unsubscribe(subscription.endpoint);
      this.subscribed = false;
    }
  }

  private urlB64ToUint8Array(base64String: string) {
    const padding = "=".repeat((4 - (base64String.length % 4)) % 4);
    const base64 = (base64String + padding)
      .replace(/\-/g, "+")
      .replace(/_/g, "/");
    const rawData = window.atob(base64);
    const outputArray = new Uint8Array(rawData.length);
    for (let i = 0; i < rawData.length; ++i) {
      outputArray[i] = rawData.charCodeAt(i);
    }
    return outputArray;
  }
}
여기서 중요한 부분은 subscribe()-method입니다. 이것이 하는 일은 다음과 같습니다.
- 로 알림을 표시할 권한을 사용자에게 요청합니다
Notification.requestPermission(). 대답은 "승인됨" 또는 "거부됨"입니다. 참고: 사용자가 거절하면 다시 요청할 수 없습니다. 사용자가 알림을 기대하고 원할 때만 메시지를 표시해야 합니다. - 사용자가 권한을 부여하면 서버에서 공개 키를 가져오고 ServiceWorker PushManager를 사용하여 알림을 구독합니다.
applicationServerKey공개 키를 포함하는 Uint8Array입니다 . 포함된 방법으로 변환해야 합니다. (가장 편리한 API는 아닙니다 🤷♂️) - 구독에 성공하면 서버로 보냅니다.
ServiceWorker에서 들어오는 푸시 메시지 처리
알림을 구독하면 서버에서 15초마다 알림을 보냅니다.
target/sw.ts-> 를 복사하여 Vaadin에서 생성한 ServiceWorker를 재정의합니다 frontend/sw.ts.
에 다음 두 수신기를 추가합니다 sw.ts.
self.addEventListener("push", (e) => {
  const data = e.data?.json();
  if (data) {
    self.registration.showNotification(data.title, {
      body: data.body,
    });
  }
});

self.addEventListener("notificationclick", (e) => {
  e.notification.close();
  e.waitUntil(focusOrOpenWindow());
});

async function focusOrOpenWindow() {
  const url = new URL("/", self.location.origin).href;

  const allWindows = await self.clients.matchAll({
    type: "window",
  });
  const appWindow = allWindows.find((w) => w.url === url);

  if (appWindow) {
    return appWindow.focus();
  } else {
    return self.clients.openWindow(url);
  }
}
fetch리스너는 새 메시지가 들어올 때 호출됩니다. 이벤트 속성을 JSON으로 읽어 메시지data페이로드에 액세스합니다.- 메시지 데이터를 사용
self.registration.showNotification()하여 알림을 표시하는 데 사용합니다.
- 메시지 데이터를 사용
- 알림을 클릭 하면
notificationclick리스너가 호출됩니다.- 알림을 닫습니다.
- 사용자에게 열린 탭 애플리케이션 탭이 있는지 확인합니다. 그렇다면 집중하십시오. 그렇지 않은 경우 새 창을 엽니다.
출처 : https://hilla.dev/blog/send-web-push-notifications-java/
[광고] STEEM 개발자 커뮤니티에 참여 하시면, 다양한 혜택을 받을 수 있습니다.