Viewing Steem Blockchain Data in a Web Browser. Part 8: HTML, CSS, and Javascript comments and Organizing javascripting using functions and the MVC framework
This is part 8 of a series of posts describing how to use the Steem Javascript API in a simple web page. The previous seven posts are:
- Part 1: Text editors and minimal HTML
- Part 2: Metadata, Unicode, and inline CSS
- Part 3: Metadata, nav and footer bars, divs, and HTML entities
- Part 4: Forms, scripts, and the developer console
- Part 5: Using HTML id attributes to modify HTML elements using Javascript
- Part 6: Using the Steem API CDN and the getAccounts() function, and examining the account data model
- Part 7: HTML tables, javascript for/in loop, CSS in the HTML style element
In the last post we wrote some javascript code that retrieved references to HTML elements, took user input from a form, and used that input with the Steem API getAccounts() function to retrieve a user’s account data from the Steem blockchain. We then displayed this data in a table in our web browser. All of these things were done in a single “showUserData()” function. The function is getting a little long and complex now so we are going to discuss how to organize this code better. We will first discuss comments, then functions, and then the Model-View-Controller paradigm.
Comments in HTML, CSS, and Javascript
HTML Comments
HTML comments are enclosed in special tags. The text of a comment can be put between “< !--“ and “-->”. Any text or markup between the double dashes is ignored by the browser and does not appear when the HTML is rendered. For example:
<body>
    <nav>
    </nav>
    <br>
    < !-- The following div contains the user input form.  It is called "formDiv" and has a light blue background color.
            The comment can continue on multiple lines and the browser will ignore it.  At the end of the comment there is
            a closing tag.  -- >
    <div id="formDiv">
      <br>
      <form action="#" onsubmit="showUserData();return false;" id="nameForm">
        Enter your steemit userName: <input type="text" name="sUser" id="userNid">
        <input type="submit" value="Submit">
      </form>
      <br>
    </div>
(The above example has a space between the exclamation point and the opening carat and the double dashes and the closing carat of the comment tag. The Steemit markup language interpreter won't allow me to put the proper tags in. The exact proper way to write the tags can be found here. Please remove the spaces in your tags.)
CSS Comments
CSS comments are any text between “/*” and “*/” embedded in the CSS between the "<style>" tags in the HTML document. Any text between the comment bars will be ignored by the CSS interpreter. For example:
<style>
  table {
        width: 100%;
  }
/* Use the div selector to reference all of the divs and put 10 pixels of padding between
their text and the edge of the div.  Also put a margin of 5 pixels around the div and
make the background color pink. */
  div {
        padding: 10px;
        margin: 5px;
        background-color: pink;
   }
</style>
Javascript Comments
In Javascript, a programmer can use both multi-line and single line comments. Single line comments are designated by using "//" at the beginning of each line and cause whatever is on that line to be ignored by the interpreter. Multi-line comments start with "/*" and end with" */" just like CSS comments and allow you to enclose multiple lines that will be ignored. Javascript comments can be used between "<script>" tags in the HTML document. For example:
<script>
// This is a single line comment.
      function showUserData() {
/* This is a multi-line comment.  The showUserData function retrieves a user's account
data from the Steem blockchain and puts it in an HTML table for display in a web
browser. */
        steem.api.getAccounts([uName],function(err,result){
          var accountData = result[0];
          var theText = "<table>";
          theText = theText+"<tr><th>keys</th><th>values</th></tr>"
          for (var key in accountData){
              theText = theText+"<tr><td>"+key+"</td><td>"+accountData[key]+"</td></tr>";
          }
          theText = theText+"</table>";
          dataViewEl.innerHTML = theText;
/* The following line of code is commented out.  We don't want to log anything on
the console but we still want to keep the code so we don't have to re-type it in the
future */
//          console.log(Object.keys(result[0]));
        });
      }
    </script>
Comments are useful when your coding becomes complicated and you want to make human-readable notes about what the code does. For example, we could comment up our javascript showUserData() function like this:
<script>
      function showUserData() {
        // Get references to HTML elements.
        var inputForm = document.getElementById("nameForm");
        var dataViewEl = document.getElementById("dataView");
        // Get the user input from the form.
        var uName = inputForm.elements["sUser"].value;
        // Retrieve the account data for uName from the Steem blockchain.
        steem.api.getAccounts([uName],function(err,result){
          var accountData = result[0];
          // Mark up the accountData into a two-column table.
          var theText = "<table>";
          theText = theText+"<tr><th>keys</th><th>values</th></tr>"
          for (var key in accountData){
              theText = theText+"<tr><td>"+key+"</td><td>"+accountData[key]+"</td></tr>";
          }
          theText = theText+"</table>";
          //  Set the inner HTML of the dataView element to "theText"
          dataViewEl.innerHTML = theText;
          //Log the account data's keys to the console.
          console.log(Object.keys(result[0]));
        });
      }
    </script>
Functions
Comments are a good way to make your coding easily interpreted by humans but an even better way to organize your code is to put blocks of related instructions into functions. For every part of the script that we commented in the example above, we could have instead written a function for that block of code. Functions are also useful if we find ourselves coding the same thing over and over again and it becomes obvious that it needs to be put into a function. Now, we will write some functions to make the script from the last blog entry easier to read. We will write functions to get the HTML elements, make a table from an Object, and get the user input. We will also make some Objects to group our outputs together. These Objects and new functions will appear outside the showUserData() function but inside the <script tags> enclosing it.
The first thing we do in the showUserData() function is retrieve references to the HTML elements that we need. Instead of setting them inside the showUserData() function, we will make a function called “getElementReferences()” to which we will pass a list of element ids for which we desire references. The references will be put in a global object called “htmlElements” (“global” means that the object is accessible to any javascript function in our HTML document). Here is the code modified from what is above:
<script>
      var htmlElements = {};
      function getElementReferences(elementNames){
        for (index in elementNames){
          var name = elementNames[index];
          htmlElements[name] = document.getElementById(name);
        }
      }
      function showUserData() {
        // Get references to HTML elements.
        getElementReferences(['nameForm','dataView']);
        // Get the browser user input.
        var uName = htmlElements.nameForm.elements["sUser"].value;
        // Retrieve the account data for uName from the Steem blockchain.
        steem.api.getAccounts([uName],function(err,result){
          var accountData = result[0];
          // Mark up the accountData into a two-column table.
          var theText = "<table>";
          theText = theText+"<tr><th>keys</th><th>values</th></tr>"
          for (var key in accountData){
              theText = theText+"<tr><td>"+key+"</td><td>"+accountData[key]+"</td></tr>";
          }
          theText = theText+"</table>";
          //  Set the inner HTML of the dataView element to "theText"
          htmlElements.dataView.innerHTML = theText;
        });
      }
    </script>
The htmlElements object is first declared outside of the showUserData() function. Then, the getElementReferences() function is declared and the showUserData() function is rewritten to call getElementReferences() and use the htmlElements object.
Next we will write a function called “getUserInput”. We will pass the form elements to it and put the values in a global object called userInputs. Now our code looks like this:
<script>
      var htmlElements = {};
      var userInputs = {};
      function getElementReferences(elementNames){
        for (index in elementNames){
          var name = elementNames[index];
          htmlElements[name] = document.getElementById(name);
        }
      }
      function getUserInputs(formElements){
        for( var i=0;i<formElements.length;i++){
          if(formElements[i].name !== ""){
            userInputs[formElements[i].name]=formElements[i].value;
          }
        }
      }
      function showUserData() {
        // Get references to HTML elements.
        getElementReferences(['nameForm','dataView']);
        // Get the browser user input.
        getUserInputs(htmlElements.nameForm.elements);
        // Retrieve the account data for uName from the Steem blockchain.
        steem.api.getAccounts([userInputs.sUser],function(err,result){
          var accountData = result[0];
          // Mark up the accountData into a two-column table.
          var theText = "<table>";
          theText = theText+"<tr><th>keys</th><th>values</th></tr>"
          for (var key in accountData){
              theText = theText+"<tr><td>"+key+"</td><td>"+accountData[key]+"</td></tr>";
          }
          theText = theText+"</table>";
          //  Set the inner HTML of the dataView element to "theText"
          htmlElements.dataView.innerHTML = theText;
        });
      }
    </script>
In the getUserInput function, we use a for loop that increments an indexing variable called "i" every time the loop is completed. This is a little different than the for/in loop introduced in part 7 of this series. We make the function more generic than the instructions in the original showUserData() function by retrieving all of the values of the inputs that have meaningful name attributes from the form. This will make the function reusable if we add more inputs to the form. Another new construct here is the “if “ statement. This "if" statement checks if the name of the form element is strictly not equal to an empty string and if that is true, then the instructions in the curly brackets following the if() are carried out.
Next, we put the instructions that make the HTML table into a new function called “generateTable()” located outside the showUserData() function. Here is the generateTable() function and the final showUserData() function calling all the functions that we wrote and using the new objects that we declared:
<script>
      var htmlElements = {};
      var userInputs = {};
      function getElementReferences(elementNames){
        for (index in elementNames){
          var name = elementNames[index];
          htmlElements[name] = document.getElementById(name);
        }
      }
      function getUserInputs(formElements){
        for( var i=0;i<formElements.length;i++){
          if(formElements[i].name !== ""){
            userInputs[formElements[i].name]=formElements[i].value;
          }
        }
      }
      function generateTable(header1,header2,objectToTable){
        var tableText = "<table>";
        tableText = tableText+"<tr><th>"+header1+"</th><th>"+header2+"</th></tr>";
        for (var key in objectToTable){
            var keyStr = key.replace("_"," ");
            tableText = tableText+"<tr><td>"+keyStr+"</td><td>"+objectToTable[key]+"</td></tr>";
        }
        tableText = tableText+"</table>";
        return tableText;
      }
      function showUserData() {
        // Get references to HTML elements.
        getElementReferences(['nameForm','dataView']);
        // Get the browser user input.
        getUserInputs(htmlElements.nameForm.elements);
        // Retrieve the account data for uName from the Steem blockchain.
        steem.api.getAccounts([userInputs.sUser],function(err,result){
          var accountData = result[0];
          // Mark up the accountData into a two-column table.
          var theText = generateTable('keys','values',accountData);
          //  Set the inner HTML of the dataView element to "theText"
          htmlElements.dataView.innerHTML = theText;
        });
      }
    </script>
The inputs to our new function “generateTable()” are the column labels and an object to put in a table. We access the keys in a for/in loop like we did before but this time we replace underscores in the keys with spaces before we put the text in the table using the javascript [String.replace()](function https://developer.mozilla.org/en-US/docs/Web/JavaScript/Reference/Global_Objects/String/replace). The generateTable() function returns a string that is the table in HTML format so when it is called in showUserData(), it has to be set equal to a variable ("theText") to catch the return value.
Using all of our new functions in showUserData() nearly halves the number of lines of uncommented code and leaves us with functions that we can re-use later. We put our new functions above their calling function (showUserData()) but these functions can be put anywhere above or below showUserData() inside of "<script>" tags in the HTML document and they will be available for calling. They are available because of something called "hoisting" where all variables and functions are moved up in the code by the interpreter as needed. After all the functions and objects are put inside of the "<script>" tags in our HTML document from part 7 and the text file is loaded into a web browser, the rendering is the same as the end result in part 7.
Notice that now the table function is more generic. Instead of just passing it the userAccount object and dumping everything into the browser table, we can make our own object called "someAccountValues" and pass it to the generateTable() function like so:
function showUserData() {
getElementReferences(['nameForm','dataView']);
getUserInputs(htmlElements.nameForm.elements);
steem.api.getAccounts([userInputs.sUser],function(err,result){
var accountData = result[0];
var someAccountValues = {
User_Name: accountData.name,
STEEM_Balance: accountData.balance,
SBD_Balance: accountData.sbd_balance,
Vesting_Shares: accountData.vesting_shares
};
// var theText = generateTable('keys','values',accountData);
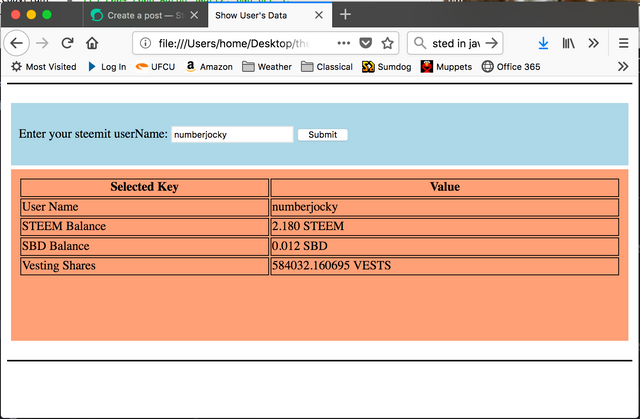
var theText = generateTable('Selected Key','Value',someAccountValues);
htmlElements.dataView.innerHTML = theText;
});
}
Notice that our previous call of "generateTable()" using the accountData object is commented out and is ignored by the javascript interpreter.
If we substitute the new "showUserData()" function into our HTML document, load the HTML document into the browser, enter a valid Steemit user's name, and click the submit button the output looks like this:
Model-View-Controller Framework
While functions are a good way to organize code and make tools that can be used over and over again, something to keep in mind when designing apps is the model-view-controller (MVC) “framework”, “architecture”, or “philosophy”. MVC is a way of thinking about and organizing objects in the app that helps you design re-usable parts. Model (M) stands for the data model. View (V) stands for the ways of presenting data to users through a GUI (graphical user interface) (here, the GUI is shown in the Web Browser) and controllers (C) are methods for bringing data in and out of the data model objects and in and out of the view objects. When I write functions for web apps, I try to separate instructions pertaining to each of these things into separate functions. For example, our "generateTable()" function is a controller for moving data from a model into a view. The "getUserInputs()" function is a controller for moving data from the view into a data model. References to the HTML elements are retrieved using one function that acts on the document view.
In the next post we will write functions to calculate voting power and reputation score from the userAccount data.
Hello! Your post has been resteemed and upvoted by @ilovecoding because we love coding! Keep up good work! Consider upvoting this comment to support the @ilovecoding and increase your future rewards! ^_^ Steem On!

Reply !stop to disable the comment. Thanks!
Your post had been curated by the @buildawhale team and mentioned here:
https://steemit.com/curation/@buildawhale/buildawhale-curation-digest-09-14-18
Keep up the good work and original content, everyone appreciates it!