Lecture : 3 | Drop Shadow | STRUCTURE AND QUALITY | SHADOW OF A SHAPE | CLUB100 | Burnsteem25
Hello and Greetings Everyone. This is your very own Haidermehdi, Country Representative of Pakistan and Admin Steemit Pakistan. I am sure most of you are aware of the Graphic Designing and Adobe Illustrator sessions that I used to conduct. This time I am out here to share the work that I have done on Adobe Photoshop. It's not much and I am still in the learning phase ( Beginners). But I won't shy from sharing some of my work here on Steemit with you all :)
This is the third post. If you have missed the first and second one, Don't worry. I am sharing the links below so that you can catch up with us :)

To being with drop shadow, this is to tell you that it's a very vast topic and today we will be learning about a few basic things in the drop shadow topic.
It can be applied to a shape, a picture, a part of a picture, an object within the picture, and much more. Today, in this lecture, we'll be looking at how we can use a drop shadow on an image. Later, when we will learn the tools such as the selection tool and others, then we will focus more on applying this to the images.
Let's get going with how we can use drop shadow. So for that, first create a new layer and draw a shape. I have drawn a rectangle.
- Fill the rectangle with a color so that it could be visible on the screen.
- Now click on the fx option right under the layers.
- Click on drop shadow.
- This will open the following popup on your screen.
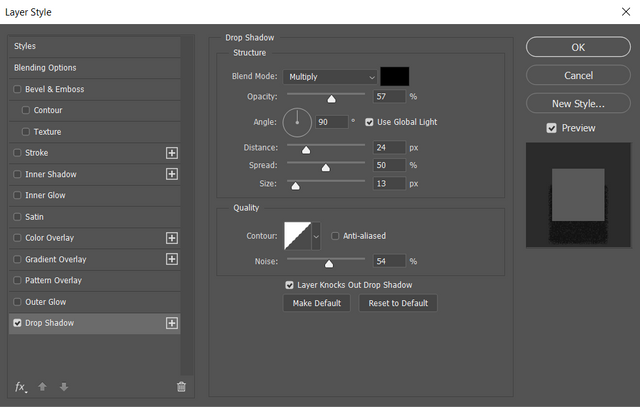
We can observe that the pop-up shows we have selected Drop Shadow. We can see clearly there are a lot of options on the panel on the left side. But we will focus on the center part which is our drop-shadow screen.
We can see the options with which we can play in the drop shadow screen. These options are:
1. STRUCTURE:
- Color of shadow
- Blending mode ( Different modes apply different effects)
- Angle
- Opacity (The visibility)
- Distance (How close or far shall the shadow be)
- Spread ( The width of shadow)
- Size (The size of shadow)
2. QUALITY:
- Noise ( Observe via increasing and decreasing)
- Contour ( Different stylings, can be observed by switching)
.gif)
I hope you guys were able to understand the purpose of why we use separate layers for each object in the Adobe Photoshop. In the next post, we will be learning about some quick tools that help us a lot while working on Adobe Photoshop. TIll then, take good care of yours and remember me in your prayers.
Yours, Haidermehdi.
Country Representative Pakistan.
Steem On!
Thank you for contributing to #LearnWithSteem theme. This post has been upvoted by @daytona475 using @steemcurator09 account. We encourage you to keep publishing quality and original content in the Steemit ecosystem to earn support for your content.
Regards,
Team #Sevengers
The #learnwithsteem tag focuses on teaching through tutorials and lessons some knowledge, skill or profession that you have. Please avoid using it if it's not about that. Thank you!
Nice interesting and useful information from you. Thanks for sharing us.