Photography Basics - Part I - Exposure
Greetings, friends!
In this series I am going to share with you some of the basics of Photography, which every serious beginner wants to know.
We shall answer the Who, When, What, Why, Where and How. I know it’s the How that most of the people rush towards and so I will very soon get to it.
But we can’t skip the What. They are, actually, quite interconnected.
Exposure
You all know what photography (painting with light) is but there’s a term people get to use and maybe it is not that familiar to each and every beginner, so we have to know what Exposure is and then learn how to make a proper exposure by controlling our equipment.
So, we have a light sensitive material which 'memorizes' the patterns that light it is exposed to would draw onto it. In digital photography the sensor simulates that process. So a well controlled Exposure means we let just the light we want to and do not let the rest of it reach our picture.
We have three basic settings to work with in order to achieve that.
Letting light paint... But for a controlled time period (see Shutter Speed), in a controlled beam (see Aperture), interacting with the light sensitivity value (see ISO) of our choice.
Those tools of the craft will each be explained in separate articles and in detail. For now we just have to bear in mind that...
Shutter speed is how fast the mechanical curtains open and close to allow light to print on the sensor/film;
Aperture is the opening installed in the lens unit through which light enters and it may be adapted like the pupil of an eye. It is much the same;
ISO in photography is the standardized measure of the light sensitivity of the sensor/film.
And all of those have side effects, too. And they can be used to achieve a variety of results in the same conditions.
Histogram feedback
Our digital cameras or editing software give us feedback on how we did by showing us Histograms - graphics, using vertical bars to show us how much of the frame has been exposed so that we achieve the best detail and how much of the frame has been underexposed or overexposed.
Let's see the three most common readings and what they mean:
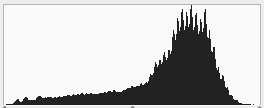
Exposed with no loss of detail.
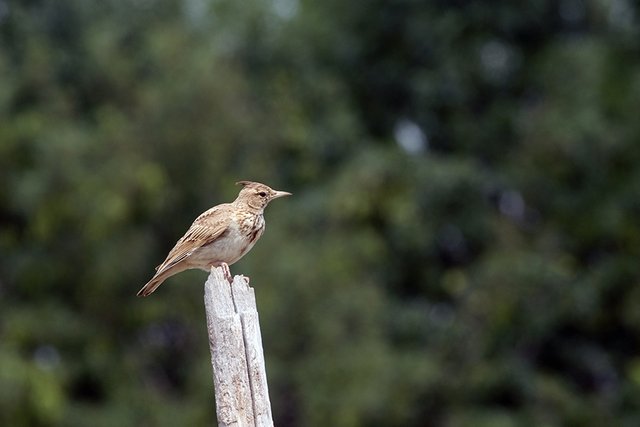
High bars here mean a lot of the volume of the frame fits that amount of exposure. The middle of the horizontal dimension means between total darkness and blinding light. It is the perfect exposure. But a frame may contain a variety of colors and shades and so we can't have everything in a diverse frame perfectly exposed. Unless we're shooting at something like a flat wall with the same color and with the same amount of light falling all over each section of it (or at least all that fits into the frame.
A spike touching the right side means some detail has been lost to blinding light. The higher the bars, the more of the volume of the frame is overexposed.
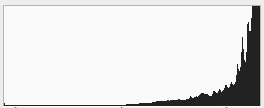
Overexposed. Some of the frame will be pure white.
Sometimes we would allow that in order to expose another part of the frame since light is reflected unequally across the frame due to a lot of factors. Direction and shadows as consequence, reflecting surface, dispersion of light, etc.
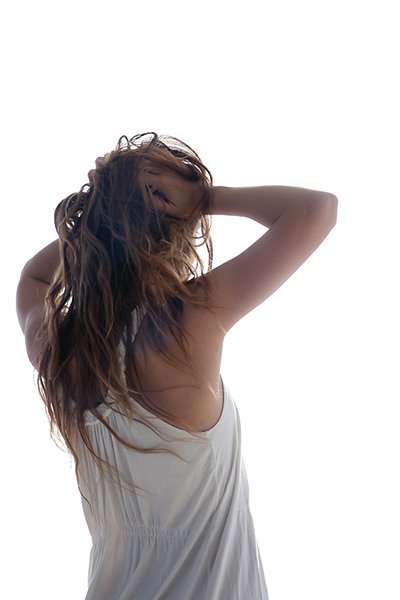
That image does not have exactly the histogram shown above. More of the volume is in the tones in the middle and some of the hair even touches the black on the left side of the histogram:
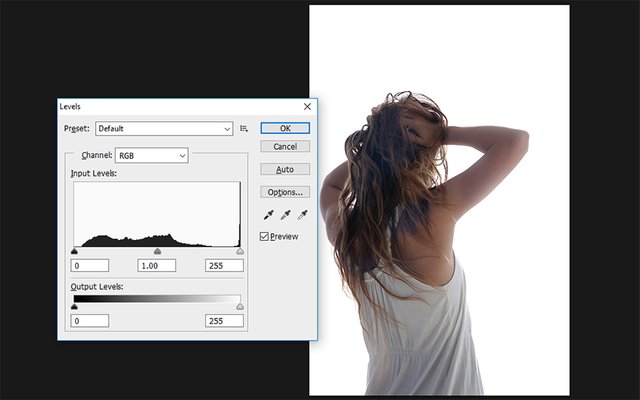
If we want our model exposed despite the shade, we allow enough exposure so that everything in the shade still reflects enough light. And we don't feel the shade that much or at all. But everything not in the shade reflects too much light in comparison so we have it become completely white. And sometimes we may allow that on purpose. Sometimes - as a compromise.
Same with underexposure...
Underexposed. Some of the frame will be pure black.
Sometimes we would like to keep the background well exposed to keep details in the tones in the middle and the foreground will be in shade and completely dark since we try to avoid the flood of background light. Strong light will be normal, normal light will be low light and low light will be darkness.
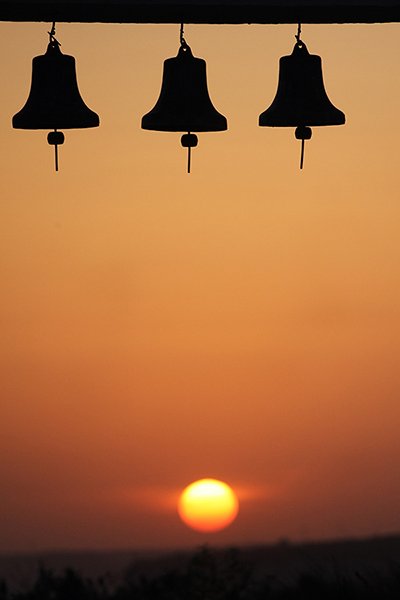
Here is the histogram for this particular image:
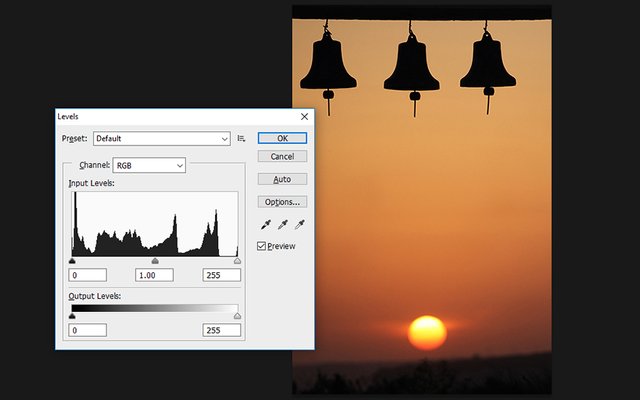
We see that it touches on the right where totally white is. With a small but pronounced bar. That means some part of the frame is overexposed, too. The histogram won't tell us which part, where in the frame. Only how large a portion and how exposed it is. Well, I know it is the white area in the disk of the Sun itself. The strongest source of natural light.
The lesson should finish on...
Pick your light conditions carefully. Those will separate regular images from great images. Your skills, also, and that will include positioning, framing and control of the tools at your disposal. The moment, too. And so on, and so on. But light is essential.
Take care and until next time!
Yours,
Manol

Nice tutorial! You gave a very well written and detail explanation of the histogram!
Thank you very much for the comment! Perhaps I could explain it better in a talk... But I would also answer any additional questions that people who learn about it for the first time might have. My comment section is open ;)
Written like a pro.
Really nice tutorial @manoldonchev.
Thank you. I hope people find the series useful. I am just starting with basic things... I've been all over the place and now it's high time I make a nice basic structure and go from there.
This tutorial will come in handy for me. Thanks!
Posted using Partiko Android
Welcome to share more about yourself. What is your experience and motivation? What would you like to learn?
I'm totally a beginner! Hahaha. I will keep an eye on your tutorials for a start
Posted using Partiko Android
Congratulations! Your post has been selected as a daily Steemit truffle! It is listed on rank 6 of all contributions awarded today. You can find the TOP DAILY TRUFFLE PICKS HERE.
I upvoted your contribution because to my mind your post is at least 3 SBD worth and should receive 192 votes. It's now up to the lovely Steemit community to make this come true.
I am
TrufflePig, an Artificial Intelligence Bot that helps minnows and content curators using Machine Learning. If you are curious how I select content, you can find an explanation here!Have a nice day and sincerely yours,

TrufflePigThank you for your appreciation and support!
Howdy sir manoldonchev! this is a great post and very well written, easy to follow tutorial sir, well done!
Thank you, feedback is very important on those pieces. It's quite valuable to know how others comprehend what I try to say.
yes sir manoldonchev I agree. I thought it was very well done!