My Guide To Building a Low Cost Garden PolyTunnel To Grow More Organic Food All Year Round. :)
Since I live in England and I aim to grow as much organic food as possible each year - I really need the help that a polytunnel provides, since I can grow for longer and produce higher yields. Here's my guide to how I built mine - maybe it will inspire you too!
Why build a Polytunnel?
There are many benefits to Polytunnels and for many growers they are now indispensable
- Protection for your crops from the elements and from animals/birds.
- Increased temperature for the plants means longer growing seasons and higher yields.
- Retaining moisture means less water used and better potential for watering of crops and higher yields.
- Improved UV light transmission as compared to traditional glass houses - resulting in healthier plants.
What do you need and how much does it cost?
There are a few different designs used in polytunnel construction but they are all basically a frame that holds up a specially made plastic sheet that is strong enough to protect the plants and thing enough to let through a lot of light. The colour of the plastic may vary depending on whether you are specifically growing seedlings in it (blue plastic), plants that usually prefer a canopy of cover (green plastic) or more general crops (transparent/white-ish plastic). I used the general/white/transparent option for mine.
Modern kits have an evolved setup system that is faster than the traditional kind, but will cost more to buy.
I bought an older style frame, second hand via ebay and actually had to go to the guy's house to deconstruct it before taking it home. That saved quite a lot of money and as I recall, the entire project cost about £600GBP.
Parts Used:
- Metal Frame - including tubes, bolts and supports.
- Plastic cover
- Spongy tape to put on the tubes to protect the plastic from melting in hot weather.
- Wood and Handles and Hinges to make simple doors for the tunnel.
- Wood to make raised beds.
- Metal braces to connect together wooden parts of the doorframes.
- Bags of appropriate galvanised nails and screws.
- 2 x solar powered internal lights.
- Irrigation system and timer.
Building my tunnel
I started the project in the Winter and that is not ideal because the plastic needs to be stretched tightly over the frame - which is helped by the sun. If possible, setup yours when the weather is warm.
I first of all marked out the intended area on the ground using string and wooden sticks.
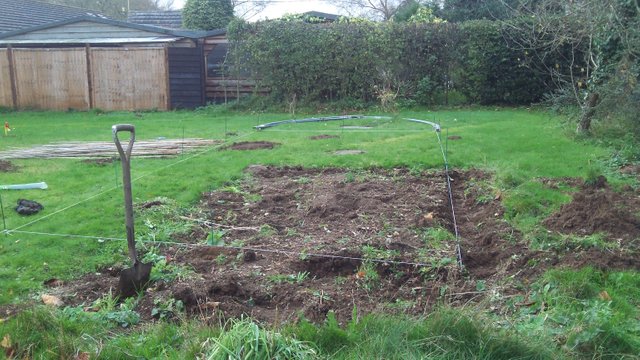
Next I dug a trench around the outer edge of the tunnel which I later used to bury the edges of the plastic tunnel in - which weighs them down and prevents the plastic blowing away! Then I constructed the frame, which includes several long poles which go into the Earth to act as anchors for the structure.
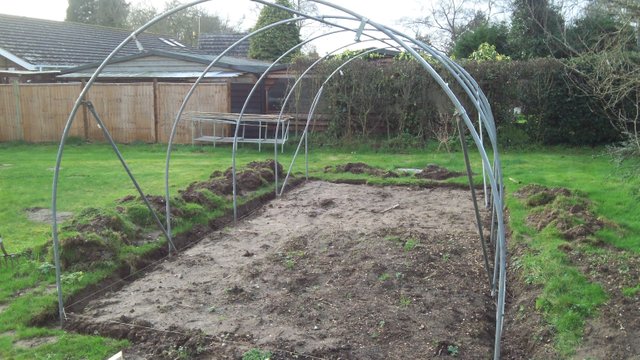
Once the frame was rigid, I dug holes for the vertical wooden posts that formed the two door frames and wrapped their bottoms in protective plastic. I then placed the vertical posts in position and constructed the rest of the door frames using the metal brackets. I used a plumb line and spirit level to make sure the frames were upright and balanced.
Next, I went ahead with the hardest part, placing the plastic and getting it tight. This required two people and it took more than one attempt of fitting the plastic to the frame and tightening it at the door frames before the plastic was tight enough. I also placed an electric heater inside the tunnel to warm up the air and make the plastic more pliable and stretchy.
The plastic is held in place around the door frames with additional pieces of wood which the plastic is wrapped around tightly. These pieces of wood are then screwed inside the tunnel to the door frames and can be removed later if needed to allow the plastic to be further tightened.
The plastic is further tightened by burying the edges of if in the trenches with soil. This is an instensive job which wasn't much fun in the cold Winter weather!
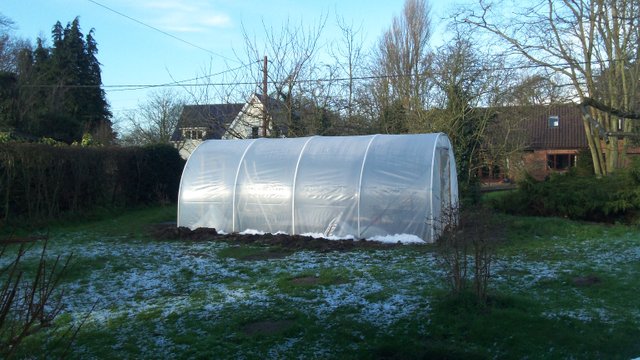
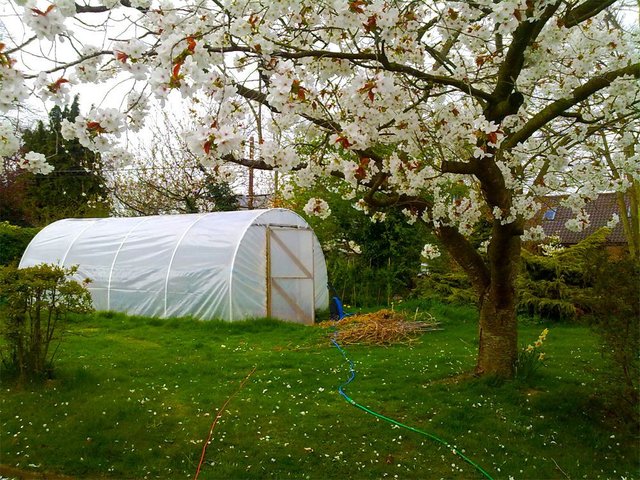
After about a week of sessions, the tunnel was completed to a basic level, although I needed to return to it once the weather warmed to tighten the plastic as it was sagging a bit in places.
Installing the raised beds and irrigation
To grow high quality produce it is necessary to have high quality soil and that requires a good starting soil, plus making intelligent choices to maintain it. The full process I use is beyond the scope of this post, but essentially I had a ton of soil delivered that was mixed to a PH of about 6.3-.6.5. I then made simple frames for raised beds out of old wood that was lying around which I then filled with the soil. I also laid a set of plastic walkways in between the beds which are modular (from ebay). The tunnel kit also came with some simple shelves which I placed at one end of the tunnel.
The irrigation system came later in the year and required me to dig a channel from an outside tap all the way to the tunnel and then bury a food grade plastic pipe to carry the water from the house to the tunnel. An anti backflow valve was used to prevent the water from re-entering the house water supply for safety reasons and a pressure reduction valve was also used.
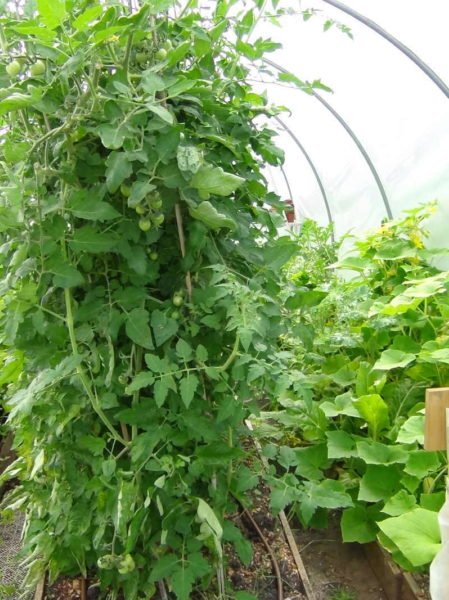
Each bed has 3 sprinker pipes running all the way down it's length that drips water into specific areas twice a day for a few minutes and that is enough to keep the plants happy even in the Summer.

As You can see, the Tomato plants love it in there! :)
Do You have any questions or tips to share?
Let me know in the comments below - I love to learn and share on this important topic. :)
This Post have been Manually Curated / Upvoted.
Thanks for using #whalepower Tag ,
Please share Our #whalepower Tag with the community . Upvote , Reblogged Us , when ever you can.
This message comes-up when #whalepower Tag in use.
#whalepower is community project
Curated By @paul-gillbanks for #whalepower Tag
Founder @bullionstackers
Latest Blog – Please Click to Read
it looks nice
thanks!
So cool! I've always wanted something like this but we don't have that type of space in our backyard :(
for most of my life we didn't have room either, but we recently moved to a bigger place after my grandparents passed on and we inherited from them a bit of money. one option is to get together with your local community and make a community garden. I feel that is actually a better choice than doing it all yourself. Where there's a will there's a way! ;)
Beautiful! Great share! Gonna need something similar to protect our plants from the tropical rain and sun!
Thanks! It is possible to get alternate/similar structures for hotter climates that protect the crops but that keep a high level of airflow - I think you can even get chilled systems to let you grow plants that normally won't grow in hot areas!
Ohh thanks for the tip... will be looking into that as soon as we move house!
Hi ura-soul. Interesting post. I'd love a polytunnel, though the garden is currently so overgrown that I'm thinking of turning it all into minimal effort raspberry canes! I'm Rob's wife btw - Mrs Organics :) and I wouldn't be on steemit if you hadn't told him all about it so thank you!! Kinda wanted to send you a message but haven't worked out if you can do that on steemit yet!!
Aha! Hey there, welcome to Steemit. I don't think there is a way to send direct messages on here yet, so replies to posts are the only way for now. I just upvoted your latest post btw and followed you.
You should check out 'randowhale' too as a way to boost the value of your posts: https://steemit.com/@randowhale
Plus.. I have a competition running at the moment, if you upvote me you might win a T-shirt or other prize! :)
https://steemit.com/contest/@ura-soul/competition-prize-give-away-win-steemit-t-shirts-and-other-goodies
Have fun!
Thanks! I'll check that out.
You received a 3.00 upvote from @worldclassplayer
Good on you.