Photoshop
Hey everyone, it’s Adam Bird here (adambirdyy). I’m excited to show you how to create a storybook-inspired image. Swipe through to see my #Ps_Swipe tutorial.
•
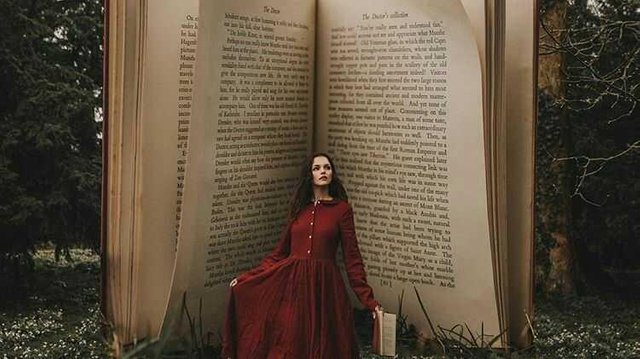
To begin, I’m going to add the book onto our base image. Select the image by using the rectangular Marquee Tool and copy (CMD+C). Paste (CMD+V) the image onto your base photograph.
•
Now, press 5 on your keyboard to change the layer opacity. This will help you decide where it is best to place the book. Use the Transform Tool (CMD+T) to change the size of your image.
•
Next, we need to remove the book from its background. I chose to use the Lasso Tool to remove the bulk as you can simply cut out your image. Once you have a selection, simply press the backspace button to delete the area.
•
Now, use the Pen Tool to get a more precise selection of the book. I do this by clicking a point & then dragging to the next one. Once this is complete, right-click on the path and click ‘Make Selection’. I then feathered the selection by 1 pixel & deleted it.
•
To get a nice blend between the book and ground I added a Layer Mask. I then chose a black fluffy brush & erased the harsh line to make it look like a seamless blend. Once completed, right-click the Layer Mask & click ‘Apply Layer Mask’.
•
To match the perspective of the images, I pressed CMD+T on my keyboard and right-clicked Perspective. I then pulled out the corners of the image to suit my preference. I then right-clicked Distort to further adjust the image.
•
Add a new layer mask & select your Brush Tool. I used a small brush size between 9px and 25px to get an accurate edge. By using a bigger brush around the hair, it helped make the composite look more realistic. I erased the image by painting with black. Once completed, apply the Layer Mask.
•
Next, add a new layer above & Alt-Click between the layers, so it only affects the one below. Start painting behind the subject with a black brush at 15% opacity to add a shadow. This works best by building up the effect subtlety.
•
Finally, right-click the Background Layer & flatten the image. Then, I added a Curves Adjustment Layer to add color & tones to the image.
•
I hope you enjoyed this tutorial!

Your voting will force your voice to give me strength.
thanks.
Note to my dear readers, friends and followers: Please understand that I am unable to answer all of your comments because if I was to do that, I'd not have any time left for creating the series and the rest of my extensive Steemit-related work. The amount of comments is overwhelming. It is beautiful to see that my work is appreciated and that it inspires so many people. I read all of your comments before going to sleep. It is my evening routine. Thank you so much for your support!
Congratulations! This post has been upvoted from the communal account, @minnowsupport, by sandiiyong from the Minnow Support Project. It's a witness project run by aggroed, ausbitbank, teamsteem, theprophet0, someguy123, neoxian, followbtcnews, and netuoso. The goal is to help Steemit grow by supporting Minnows. Please find us at the Peace, Abundance, and Liberty Network (PALnet) Discord Channel. It's a completely public and open space to all members of the Steemit community who voluntarily choose to be there.
If you would like to delegate to the Minnow Support Project you can do so by clicking on the following links: 50SP, 100SP, 250SP, 500SP, 1000SP, 5000SP.
Be sure to leave at least 50SP undelegated on your account.