Biomechatronics II: Move Things with Your Muscles
Last post,
I made a simple rack and pinion claw mechanism that moves like this:
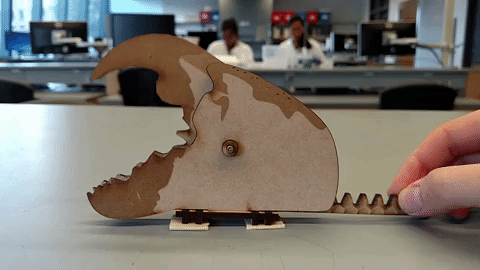
My rack and pinion claw in action. All I have to do is push and pull the rack to move the claw up and down.
But here, I have to use my fingers to make the claw pinch. What if I wanted the claw to pinch by itself? Even better: what if I wanted it to be muscle-activated — pinch when I flex my arm muscle?
That's what I did.
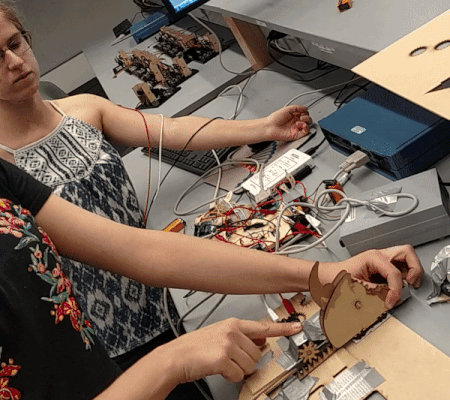
When my partner flexes, the claw pinches. When she relaxes, the claw opens up.
You can imagine something like this is similar to how muscle-activated prosthetics work.
The person determines what his prosthetic hand does by contracting the remaining muscles in his amputated limb. That muscle contraction information is processed by a computer and conveyed to the prosthetic hand, telling it exactly what to do.
Here are the steps for how I did it:
- Get data from arm muscle contracting
- Process that data so it is perfectly clear when the muscle is contracting
- Make a motor move when that data says the muscle is contracting
- Attach that motor to my claw mechanism
1. Get data from arm muscles contracting
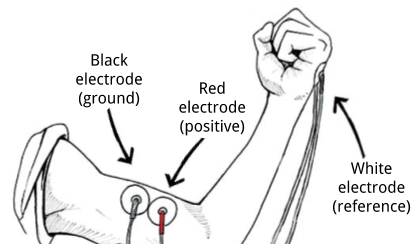
I hooked up my partner to some EMG electrodes.
Black is ground, red is positive, and white is reference. They're adhesive; you just need to add some conducting gel between the electrodes and the skin before you put it on.
Then, using a bunch of cables, we sent the voltages from the electrodes into a computer with MATLAB (a programming software), we got this:
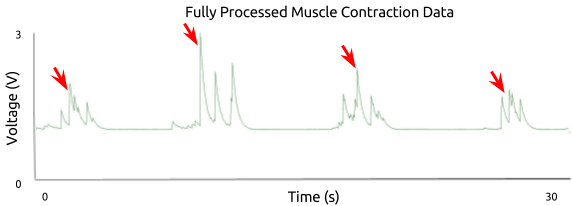
Those spikes in the data (shown by the red arrows) happened when my partner contracted her arm muscles! But this graph is very shaky.
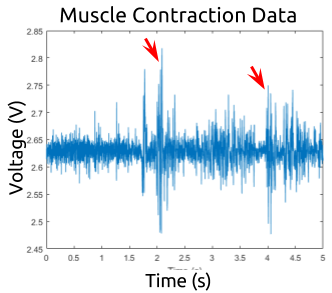
The electrodes are collecting muscle contraction data, but it isn't smooth enough to be useful. How did we clean it up?
2. Process that data so it is perfectly clear when the muscle is contracting
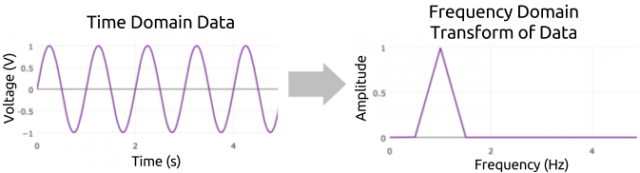
The data we got has time in the x-axis; it is in the time-domain. However, to clean it up, we want it in the frequency-domain. This groups all the voltage changes that happen at the same rate in the time-domain graph into a single spike in the frequency-domain plot. The bigger the spike, the greater the voltage change happening at that frequency. Basically, we want the left graph below to turn into the right graph below:
We did this with our data using a Fourier transform algorithm in MATLAB. It took all the data we collected in our 5-second window and turned it into this:
Looking at the transformed data [right] makes it much easier to decide what information I want and what I do not want. For instance, I can decide that I want to keep the stuff at 10 Hz and to get rid of the stuff at 10,000 Hz.
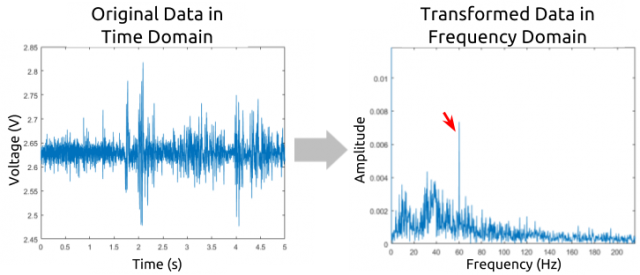
That big spike at 60 Hz in the right plot is noise from the outlets we needed to plug our equipment into. (Outlets output electrical power in alternating current or AC, which alternates at a rate of 60 times per second. Fun fact: it would be 50 Hz if we were in Europe or Asia because the standards for electrical outlets are just different in those continents). We want to get rid of that 60 Hz noise or filter it out.
We did this by adding an instrumentation amplifier. Basically, this is an arrangement of electrical components that, when applied to a circuit, takes two input signals and gives you one output signal. That output signal shows only the difference between the two inputs.
We used an instrumentation amplifier to get the difference between the red and the white electrodes. The output was only the voltage changes that are happening across the red and white electrodes (i.e. the voltage changes due to the muscle moving/contracting!). Here it is:
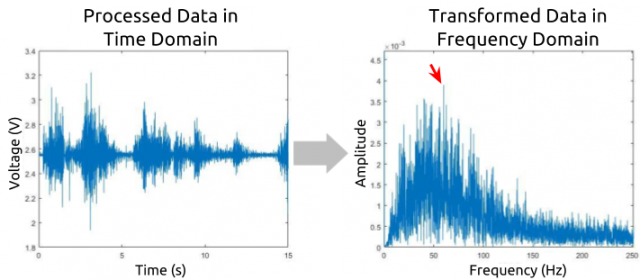
That peak at 60 Hz [right plot] is MUCH smaller now relative to everything else. With the instrumentation amplifier, we also got rid of a lot of other noise in the room from other electronics (because it was consistent across the red and white electrode), making the data much smoother in the time-domain [left plot].
Alright, much cleaner, but not quite what we want. This is what we want:
All the red arrows point to spikes that clearly correspond to a muscle contraction. Anything that isn't a contraction is flat.
And that is what we got when we added an envelope detector. This arrangement of electrical components takes a very shaky, high-frequency signal and outputs data that just skims the top of it, like this:
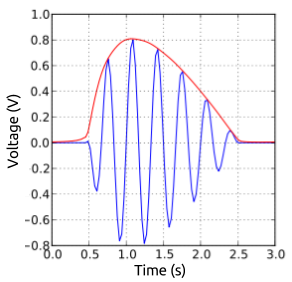
The blue line is what we had before envelope detection. The red line is what we have after envelope detection (as the green line in the previous plot).
3. Make a motor move when that data says the muscle is contracting
We have this nice clean data. Now we want a motor to see that data and determine whether it will spin forward or backward.
First, we needed an Arduino (a microcontroller or a really small computer), which we programmed to look at the processed data and decide whether the muscle was contracting or not (whether the voltage was above a threshold or not).
If the processed muscle contraction data was above the 1.5 volt threshold, the Arduino told the motor to spin forward. If not, spin backward.

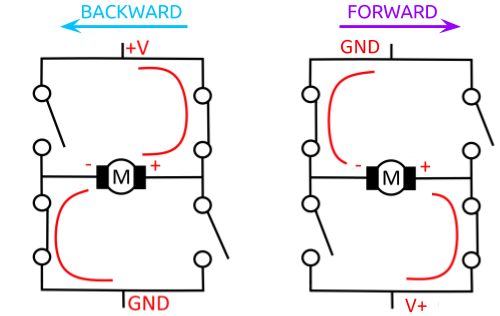
That decision was sent to an component called an H-bridge, another arrangement of electrical components. Basically, by switching the poles of the H-bridge (V+ and ground), we controlled which direction the motor turned. The Arduino did that switching for us.
If above the 1.5 volt threshold, Arduino sends the right information to the H-bridge to turn the motor forward. If below, Arduino sends the left information (just flips the ground and V+) to the H-bridge to turn the motor backward.
Now that we have the motor turning forward if the muscle is contracted and backward if the muscle is relaxed, we need to connect that motor to the rack and pinion mechansim.
4. Attach that motor to my claw mechanism
To link the motor to the mechanism, we just made another little gear, and attached it to everything else:

The motor is attached to the gear. When the gear turns forward, it moves the rack and makes the claw pinch.
And... TADA, a mechanism that responds to arm movement! Here's a quick recap:
Here it is again in case you forgot what the goal was during all this technical stuff.

Thanks for reading!
If you missed my post about making the claw mechanism, here it is.
Stay tuned! I have two more projects from my Biomechatronics
class to share, including my robotic gripper.
very cool!!
Thank you @natureofbeing!
Dope Stuff! reminds me of when i was yonger i always wanted to build my own robot but i ended up in music domain making robot music hahah
Great stuff! Keep it up
haha aw thanks @djlethalskillz
Awesome!!!
Thanks @buildrobotics :)
Looking over your profile I see you make a lot of cool stuff - followed :)
Congratulations @jshmu! You have completed some achievement on Steemit and have been rewarded with new badge(s) :
Click on any badge to view your own Board of Honor on SteemitBoard.
For more information about SteemitBoard, click here
If you no longer want to receive notifications, reply to this comment with the word
STOPGreat Post !!!!
Thank you @rksumanthraju :)
This is fascinating work @jshmu
Thanks for providing such a comprehensive breakdown of how you softened the muscle contraction analysis. What's the next step for your claw? Looking forward to more :)
Glad you enjoyed it @voronoi! Sorry to say that there is no next step for this claw :/ BUT robotic gripper project (will post about it in a bit) uses much more accurate muscle contraction data from the Myo Gesture Control Armband (commercially available) to move the gripper.
Hello, your post was nominated for an upvote by a fellow within the Sndbox incubator. Thank you for sharing your detailed research and creative engineering with us @jshmu! Steem on :D
Thank you so much for the support @sndbox! :)
This is a great post @jshmu. Your explanations are really clear and easy to follow.
Thank you @choogirl. That's what I hoped for :)