¿Cómo hacer efecto grime en illustrator? | How to make grime effect in illustrator?
 De mí autoría/Of my authorship
Español
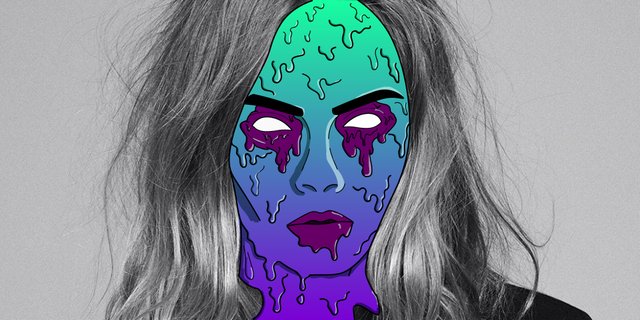
¡Saludos, humanos! hace un tiempo aprendí a editar imágenes con efecto grime, y mucísimas personas quisieron que les enseñara la manera de hacerlo (y aunque nunca lo hice, por falta de tiempo), así que decidí traerles un "tutopost" con la explicación paso a paso para lograr este efecto.
English
Greetings, humans! some time ago I learned to edit images with grime effect, and a lot of people wanted me to teach them the way to do it (and although I never did it, due to lack of time), so I decided to bring them a "tutopost" with the step-by-step explaining to achieve this effect.
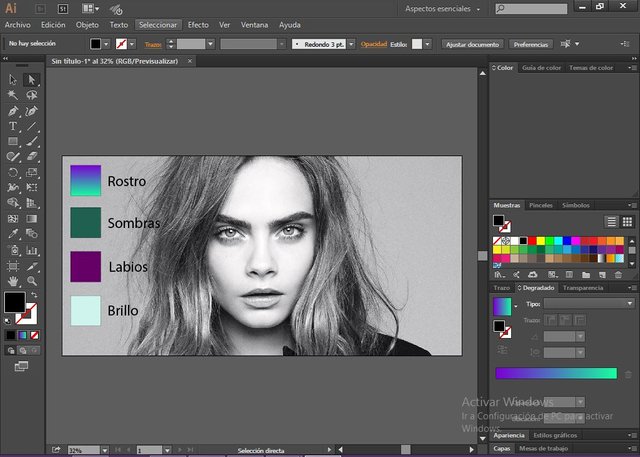
Lo primero que debemos hacer es elegir la imagen a editar, teniendo en cuenta que mientras sea de mayor calidad podremos trabajar más cómodamente, también debemos escoger los colores con los cuales trabajaremos. Iniciaremos el programa de Illustrator y abriremos la imagen elegida, recomiendo crear cuadrados y rellenarlos con los colores que has escogido, de este modo será mas fácil y rápido.
The first thing we must do is choose the image to edit, taking into account that while it's of higher quality we can work more comfortably, we must also choose the colors with which we'll work. We will start the Illustrator program and open the chosen image, I recommend creating squares and filling them with the colors you have chosen, in this way it will be easier and faster.
Primero que nada debemos crear una nueva capa, ahora, con la herramienta pluma debemos seleccionar toda el área en el cual trabajaremos, básicamente a contornear la cara y cuello -en este caso- del protagonista de la foto. Para degradar el color del relleno en el área principal debemos dirigirnos a "degradado" en el tablero de opciones a tu derecha, allí podrás escoger los colores a degradar y la dirección en que se degrada, para esta imagen yo he elegido la dirección vertical.
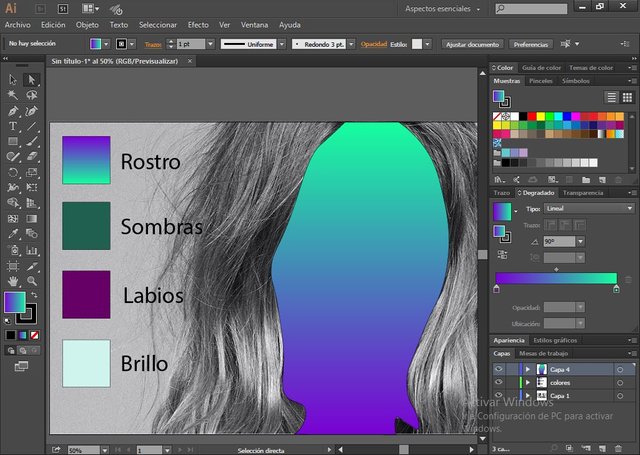
Lo siguiente que debemos hacer es ir a la opción de transparencia y bajar la opacidad al 60% para poder visualizar lo que haremos a continuación, ahora tenemos que crear una nueva capa, tomaremos nuestra herramienta "pincel", seleccionaremos el que sea de nuestra preferencia y contornearemos los rasgos faciales de la persona; sus ojos, boca, nariz, e incluso arrugas. Podrás jugar con el grosor del pincel según el grosor de las líneas que desees para cada objeto.
The next thing we must do is go to the option of transparency and lower the opacity to 60% to be able to visualize what we'll do next, now we have to create a new layer, we'll take our tool "brush", we'll select the one of our preference and we'll outline the facial features of the person; his eyes, mouth, nose, and even wrinkles. You can play with the thickness of the brush according to the thickness of the lines you want for each object.
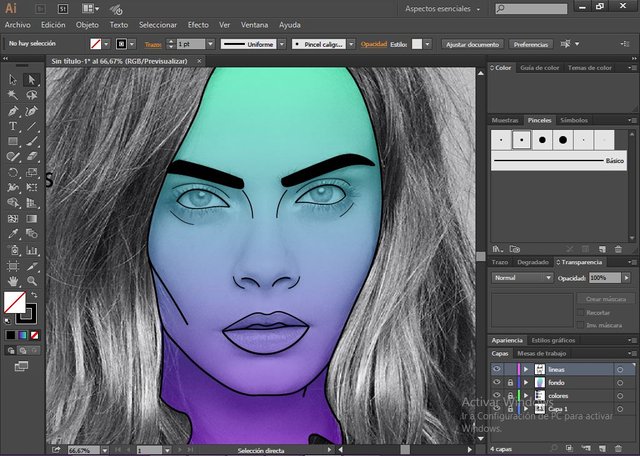
Ya tenemos una base con la cual trabajar, así que crearemos una nueva capa (sí, siempre necesitarás una nueva capa) y con la misma herramienta dibujaremos pequeñas gotas o curvas, de forma que asemeje un rostro derritiéndose, esto lo haremos tanto en la cara como en el cuello, en este paso puedes variar el grosor del pincel para que las gotas tengan variación y le den mayor calidad a la imagen.
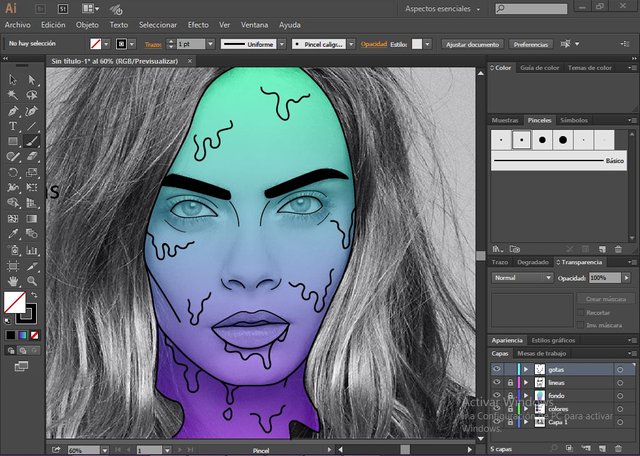
Crearemos una nueva capa y la ubicaremos bajo la capa de las líneas faciales y sobre la capa del fondo, para que de este modo todo lo que hagamos quede bajo dichas líneas y sobre el fondo. Tomaremos El pincel pero esta vez seleccionaremos el color blanco y rellenaremos los ojos, no tengas miedo en pisar el contorno porque el color blanco estará bajo estas líneas y no se notará. Este mismo proceso habrá que repetirlo con los labios.
Ahora, en la misma capa, dibujaremos "ojeras" alrededor de los ojos, pero también le daremos el aspecto de que se derriten, en este punto, podemos subir el nivel de opacidad.
Now, in the same layer, we will draw "eye bags" around the eyes, but we will also give it the appearance of melting, in this point, we can raise the level of opacity.
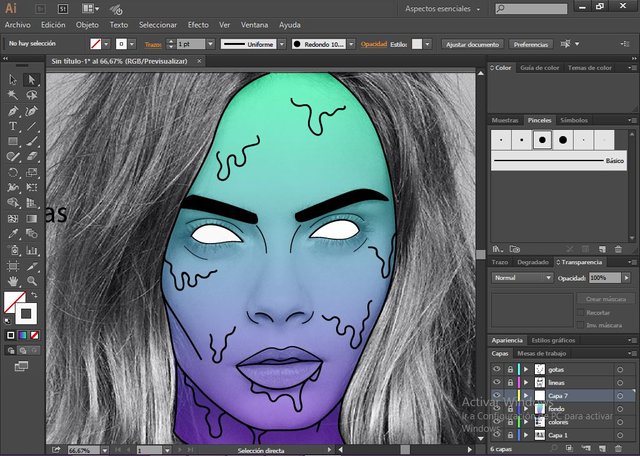
Ahora nos enfocaremos en dar más detalle a las gotas, también contornearemos las ojeras para redondearlas más y lograr el efecto deseado, haz todas las gotas que creas necesarias.
Now we will focus on giving more detail to the drops, we'll also contour the eye bags to round them more and achieve the desired effect, make all the drops you think necessary.
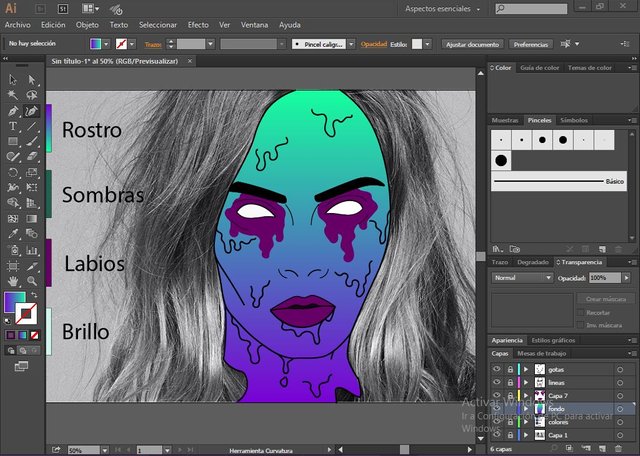
Lo siguiente que haremos será asegurarnos que todas las capas están bloqueadas (menos la actual) y seleccionamos todo, vamos a "objeto" y presionamos "expandir apariencia", ahora podremos borrar las lineas entre la cara y las gotas (como las del mentón o los labios) y de esta forma se mejorará el efecto. A continuación crearemos una nueva capa, con ayuda del pincel, seleccionaremos el color elegido para la sombra y comenzaremos a añadir sombras de un lado de las gotas (ten en cuenta que debe ser el mismo lado en cada gota). No te preocupes si se ve extraño el color, luego se solucionará.
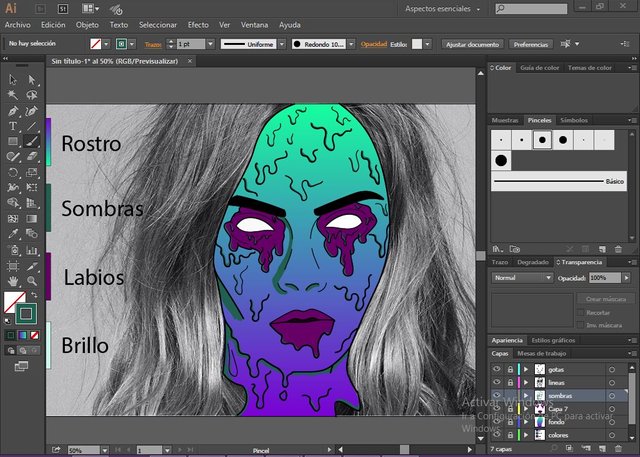
The next thing we'll do is make sure that all layers are blocked (except the current one) we'll select everything, go to "object" and press "expand appearance", now we can erase the lines between the face and the drops (like those of the chin or lips) and in this way the effect will be improved. Then we'll create a new layer, with the help of the brush, we'll select the color chosen for the shadow and begin to add shadows on one side of the drops (keep in mind that it must be the same side in each drop). Don't worry if the color looks strange, then it will be fixed.
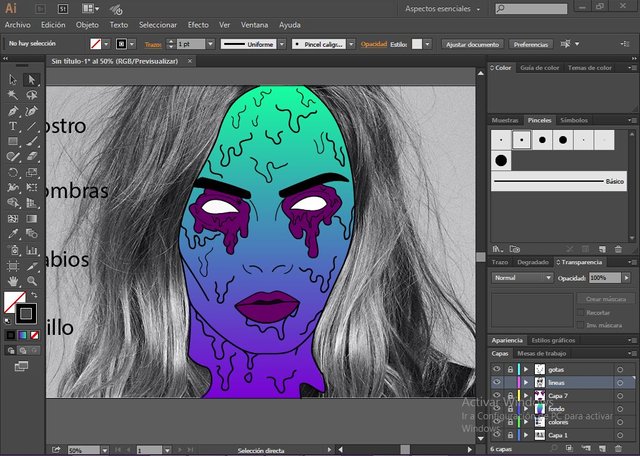
Ahora, para suavizar el color, seleccionaremos todo nuevamente, asegurándonos de que todas las capas estén bloqueadas menos la actual, presionaremos "objeto" e iremos a "expandir apariencia", presionamos la herramienta "buscatrazos" y allí vamos a "soldar", ahora cambiaremos la transparencia de "normal" a "multiplicar" y bajaremos la opacidad a 60%. Creamos otra capa y repetiremos este proceso pero ahora con el color elegido para el brillo y en el lado opuesto de cada gota.
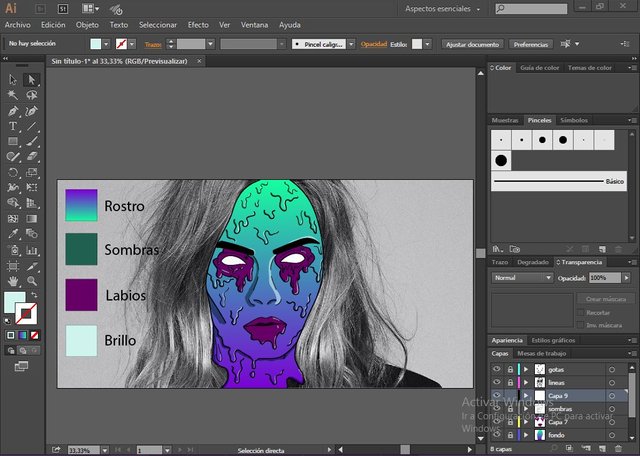
Now, to soften the color, we will select everything again, making sure that all the layers are blocked except the current one, we will press "object" and we will go to "expand appearance", we press the tool "buscatrazos" and there we will "solder", now we will change the transparency from "normal" to "multiply" and lower the opacity to 60%. We create another layer and repeat this process but now with the color chosen for the brightness and on the opposite side of each drop.
¡Y listo! / Ready!
Gracias por leerme / Thanks for reading me
View post on Elegance
A place to show your skills
I love it, it's really great.
¡Muy buen trabajo! no uso el mismo programa pero tomare en cuenta los tips para futuras ediciones. ¡Gracias por compartir!
Att. Hacker
This post is sponsored by Elegance - Art Community in collaboration with @appreciator and will be showcased in weekly Featured posts of @elegance. Just keep up the good work.
Amé esta información, excelente!
¡Felicidades! Esta publicación obtuvo upvote y fue compartido por @la-colmena, un proyecto de Curación Manual para la comunidad hispana de Steemit.
Si quieres saber más sobre nuestro proyecto, acompáñanos en #la-colmena, nuestro canal de Discord dentro de Curation Collective.
Este post fue compartido en el canal hispano #la-colmena de la comunidad de curación Curation Collective y obtuvo upvote y resteem por la cuenta de la comunidad @c-squared después de su curación manual.
This post was shared in the #la-comena channel in the Curation Collective Discord community for curators, and upvoted and resteemed by the @c-squared community account after manual review.