Automate your home with 4$ !
You would like to have a domotic house with little money? Here i'll show you how to do it.
First of all you'll need some sonoff module, these are All-in-one modules with a power supply, a relay and an esp8266; by default they come with a pre-installed firmware (that is actually not so bad) but we can flash some personalized code (using an FTDI chip) for using with mqtt or like i'll show here: with the Blynk app.
Materials:
- Sonoff (Aliexpress -
http://cur.lv/16j2jt) - FTDI (Aliexpress -
http://cur.lv/16j2jv) - DHT22 (Aliexpress -
http://cur.lv/16j2k7) - This is a temperature sensor - Some jumpers for the DHT module and the serial module
To start you'll need to install the Arduino IDE (i recomend to dowload the portable version for easy library modification - http://cur.lv/16j2kp ); now you need to prepare the IDE, just simply follow the instuction that you find here https://github.com/arendst/Sonoff-Tasmota/wiki/Prerequisite.
When all is ready you need the software: You can use the tasmota (http://cur.lv/16j2l8) that work with mqtt, but i'll use my software that work with the blynk app, it's more simple: no mqtt broker, writing code, ecc. simply download it, install on the sonoff, clone my app on your blynk and it's done!
1. Download the firmware
https://github.com/regi18/Sonoff-Blynk
Remember to change the Wi-Fi credentials and the Auth token
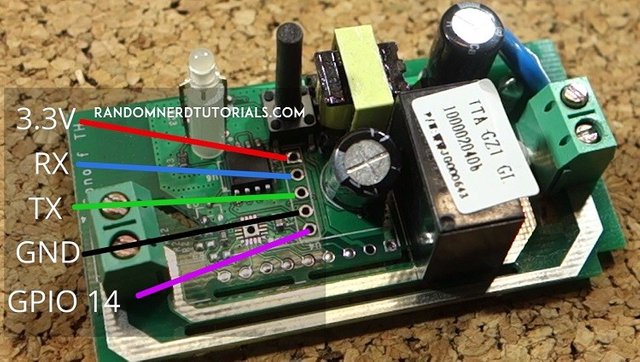
2. Connect the serial adaptor to the sonoff
5. Flash the firmware
First you need to change some flash setting, go to tools and change:
- Board: "Generic esp8266 module"
- Flash Mode: "DOUT"
- Flash Size: 1M (no SPIFFS)
- Reset metod: "ck"
- Port: the right serial port
, leave the others settings as they are and upload.
4. Connect the DHT22 or the switch (not a button)
- For the DHT you simply put the VCC to 3.3v, the GND to GND, and the data pin to the GPIO 14
- For the switch you need to connect one pin to GPIO 14, add a pull-up resistor (20k Ohms is Ok) from the gpio to ground, and the other part of the switch to 3.3v
5. Make the blynk app
Since I can not share my app with you ('cause the energy) i'll show you how to make it; it's very simple!
- For the DHT version, add two gauge or labeled value and connect it to V1, for Temperature, and V2 for humidity
- Next add a button, then click on it and put the settings in this way: V0 pin, Mode: switch.
6. DONE!
I hope that this will be useful! Bye.
Nice job.
What do you think about Home Automation System like openHAB or Home Assistant? I'm trying to integrate these devices in OpenHAB through MQTT protocol using TASMOTA firmware.
Raspberry PI 3 running OpenHAB and mosquitto (as MQTT broker) and some SONOFF to control my garden (for now) lights. A very low-cost system 😎