DIY DRYER REPAIR
CLOTHES DRYER NOT DRYING?
Before you call the repair man, maybe you can check a couple things for yourself first, and possibly save a few bucks. Normally, when a dryer stops drying clothes, there are just a few possible reasons.
First, and probably one of the more common issues is for the heating element or one of it's control devices to have quit working. And secondly, there is a good chance that the inside of the dryer had become clogged with lint...but how to check these things?
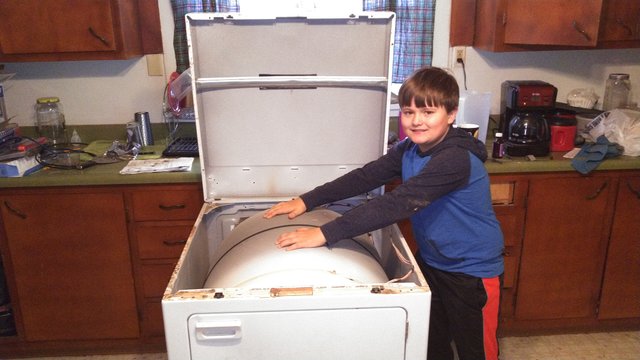
Normally all dryers are made to be easily serviced and most come apart with relative ease. Bear in mind that the manufacturer doesn't want to make it hard for the repair man to do his job so they generally keep service on mind while designing them. With that in mind, it may not be necessary to even move your dryer in order to service it.
LET'S DISCONNECT THE POWER FIRST.
I prefer to simply unplug the appliance instead of shutting off a breaker because it guarantees that there is no power to the unit. Once that is done, dissection can begin.
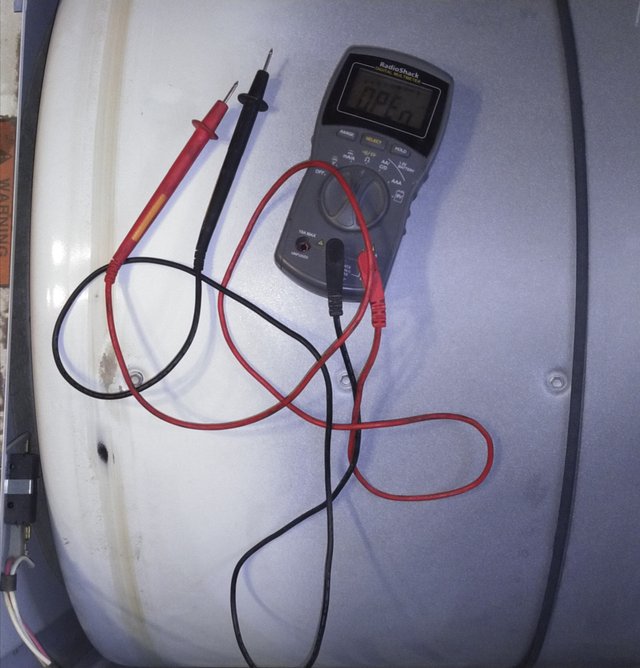
We will begin by checking to make sure our heater elements are good.(These are small curly wires inside that get hot when electrical current is applied to them. Air is pulled over them and directed into the dryer to dry out clothes.) To do this we will need no more then a simple ohm meter to check resistance.
On our unit, I simply had to lift up(with a bit of effort) on the front of the top panel and it opened right up...
GETTING INTO THE TESTING
The heating elements get very hot during operation and since a dryer also deals with lint, which is very flammable, the elements will almost always be located as high as possible inside the machine. This is to prevent lint from coming on contact with the elements and starting a fire. And in our case they were located in the top left rear corner on our old Maytag model.
So out comes the ohm meter and the testing can begin.
Below is a couple pictures to help identify what a heating element looks like and to help with explaining how to test them.
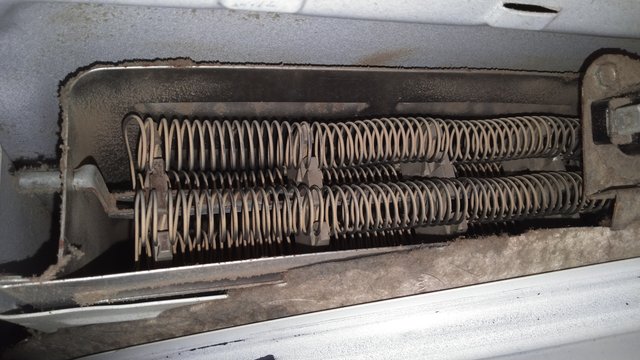
*This is the element itself and all will look generally like this.
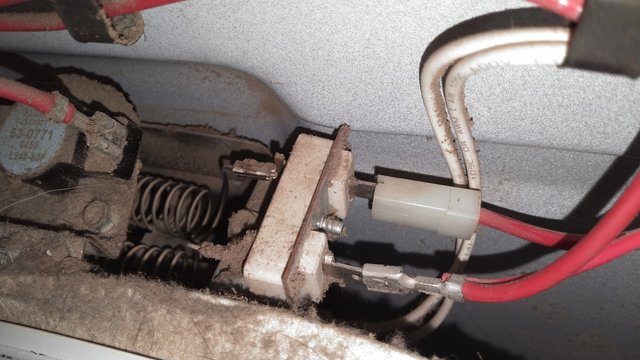
In the picture above you can see the wires that connect to them that provide the electricity to power the element....ALL OF THE WIRES ATTACHED TO THE ELEMENT MUST BE DISCONNECTED TO PROPERLY TEST THEM. So...disconnect them.
After the wires are removed, causing the elements to be removed from the electrical circuit, testing can begin. It is very simple. First turn your meter to the "Ohm" selection. Then all that is needed is to touch one lead end of the ohm meter to each side of the element connecter where you disconnected the wires.
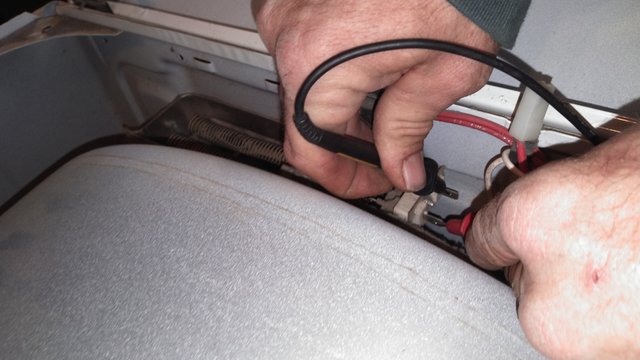
Take a look at the meter and it should give you a readout. Generally any result that shows between 5-20 ohms means that the element is good. If the meter reads "open" then it's time to head to the appliance store for a new one. On ours however, the meter showed that we had 11 ohms of resistance...so the elements are not my problem. Time to move on...
CHECKING FOR LINT BLOCKAGE
As I said, another common issue with dryers is that after a bit of age, they may begin to clog up with lint on the inside. So I will now check that.
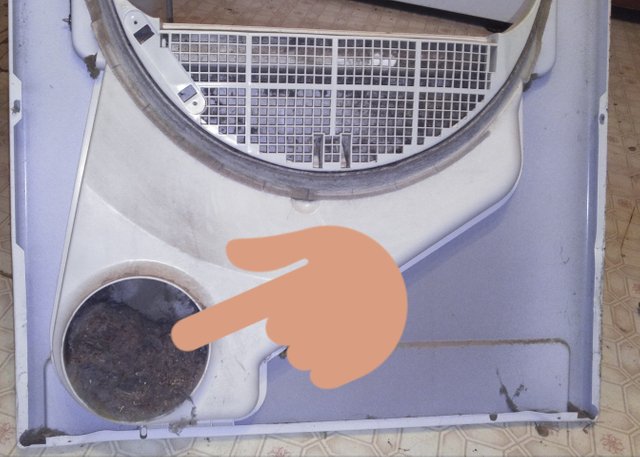
This may vary on models quite a bit, but the first step is to locate your lint trap. Now keep in mind that while the trap may catch the majority of the lint, some gets by it and will travel through the internal duct work before being expelled through the exhaust port. So I began by looking through the external pipework that sends the lint outside...it was clear.
This means that if there is a clog, it is on the inside of the machine. So, on my model the lint trap is attached to the front panel just inside the door of the dryer and so it must come off. It is held on by no more then two screws that were easily reachable.
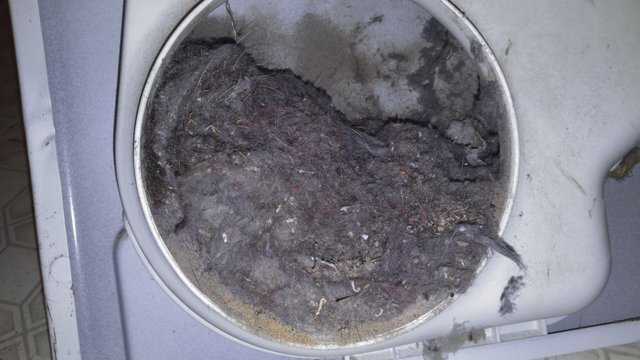
Once i dropped the front panel down, the root of my issue was easily discovered. We had a pretty big build up of lint in this section.
A QUICK CLEAN UP AND TEST RUN
I cleaned the lint out of the passage and reconnected everything I had removed and reinstalled all the panels. After moving it back into place, I plugged it in and put in two small blankets I had just washed as a test run. When the dryer buzzed indicating it was finished I was excited (and a little anxious) to see if the repair worked.(So, far it was a 0 dollar repair, and was hoping it would stay that way.) I opened the dryer door and felt the heat rush out...BIG SMILES FROM ME. And as I reached in to feel if they had completely dried...I was glad I didn't take the advice given by a friend to "just go buy a new one", for the blankets were as dry as they were warm.
Thanks for coming along for my dryer repair adventure and I hope it will be of use to you some time in the future.
All photos are mine taken with my Kyocera phone.
bravo bro, nice diy fix-'em=up!
Thanks my friend! How are you doing? Did you get your finance situation figured out? I hope all is going well!🤗
Not yet. But the situation got worse. That’s why I won’t be around here to post anything forna Long whole.
Good job!
It's amazing how someone could repair things without spending any money. Im the one who good on break things..not to fix and repair it 😂😂
😂🤣I can just see you fixing something...then your husband would to try to fix the extra stuff you broke.😂
You are a Jack-of-all-trades Sir @johndoer123 :D
It is really good to look at all angles first before calling for repairs to save us money.
We use a spin dryer here in my home for drying clothes and then hanging it out for the sun to finish out the drying job. :D
Thanks friend! I always try to fix stuff before buying new. This way i can keep more of my hard earned money.
Congratulations @johndoer123!
Your post was featured on our daily build newsletter! We've sent 100 liquid BUILD tokens to your wallet upon which you can sell, trade or buy on steem engine or SteemLeo. We've also shared your work on our Instagram, and Facebook pages for more exposure.
Keep sharing your awesome DIY and How-to tutorials together with the recommended tags #diy, #build-it, #how-to, #doityourself, #build as well as posting from our website
!ENGAGE 50
@johndoer123 you have received
50 ENGAGEfrom @rentmoney!View and trade the tokens on Steem Engine.