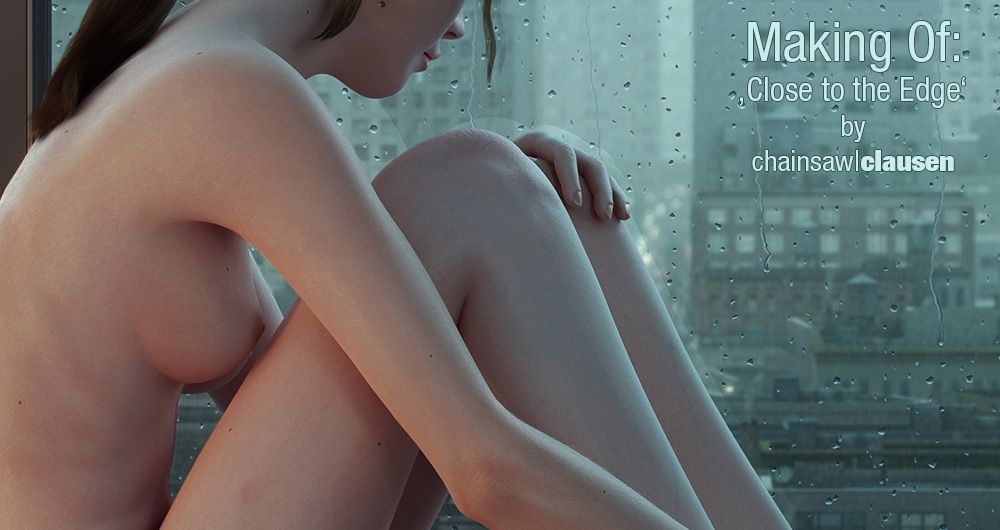
Making Of: 'Close to the Edge' by chainsaw|clausen
Hey steemians,
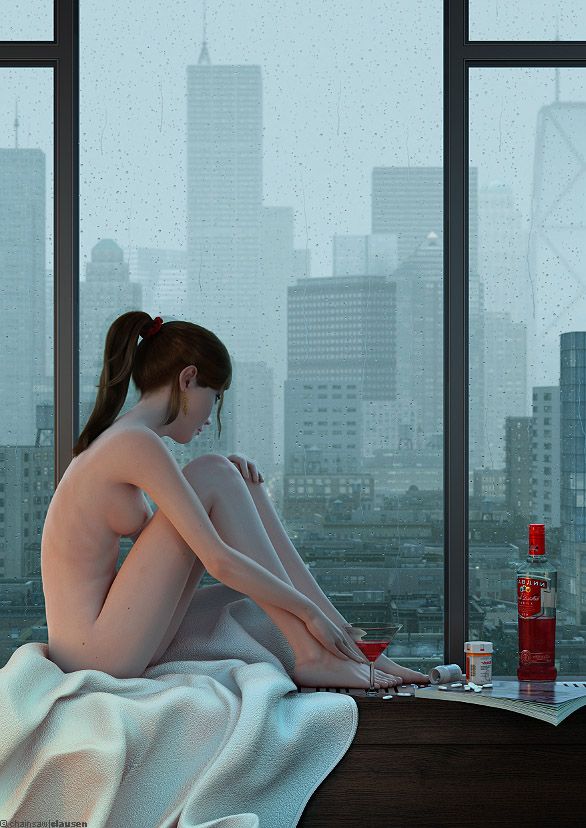
here is the announced Making of for my artwork 'Close to the Edge' I've posted last week (https://steemit.com/art/@chainsaw-clausen/close-to-the-edge-nudity-by-chainsaw-or-clausen)
Idea and Concept
My intention was to create an image with a girl which is sitting at the window on a rainy day. But that's only what you see at the surface. If you go much deeper into the image, you'll find a huge space for interpretation. I want to give viewers a wide range of possibilities to read the image.
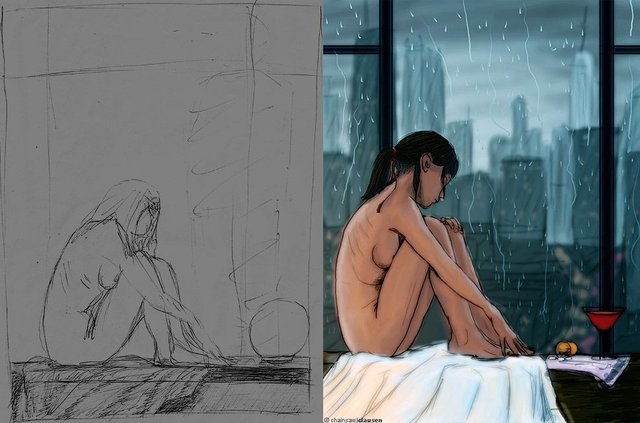
First of all I've made a simple sketch to bring my idea on paper. It was a really fast and simple sketch and... ok I'm not good in sketching. So I work out the concept in Photoshop and started with the modeling in 3ds max.
Modeling, texturing and shading
Background:
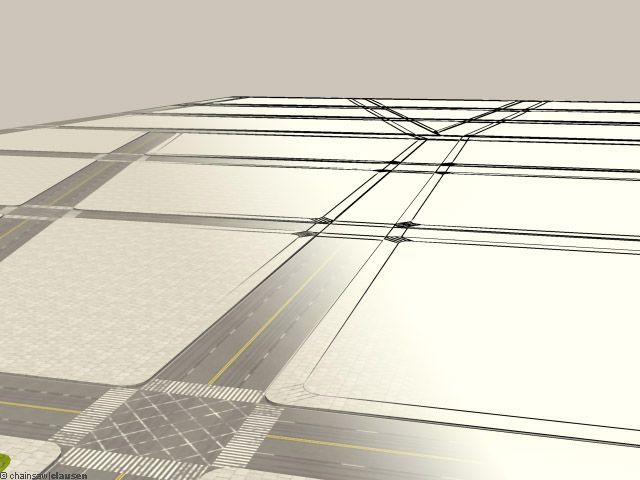
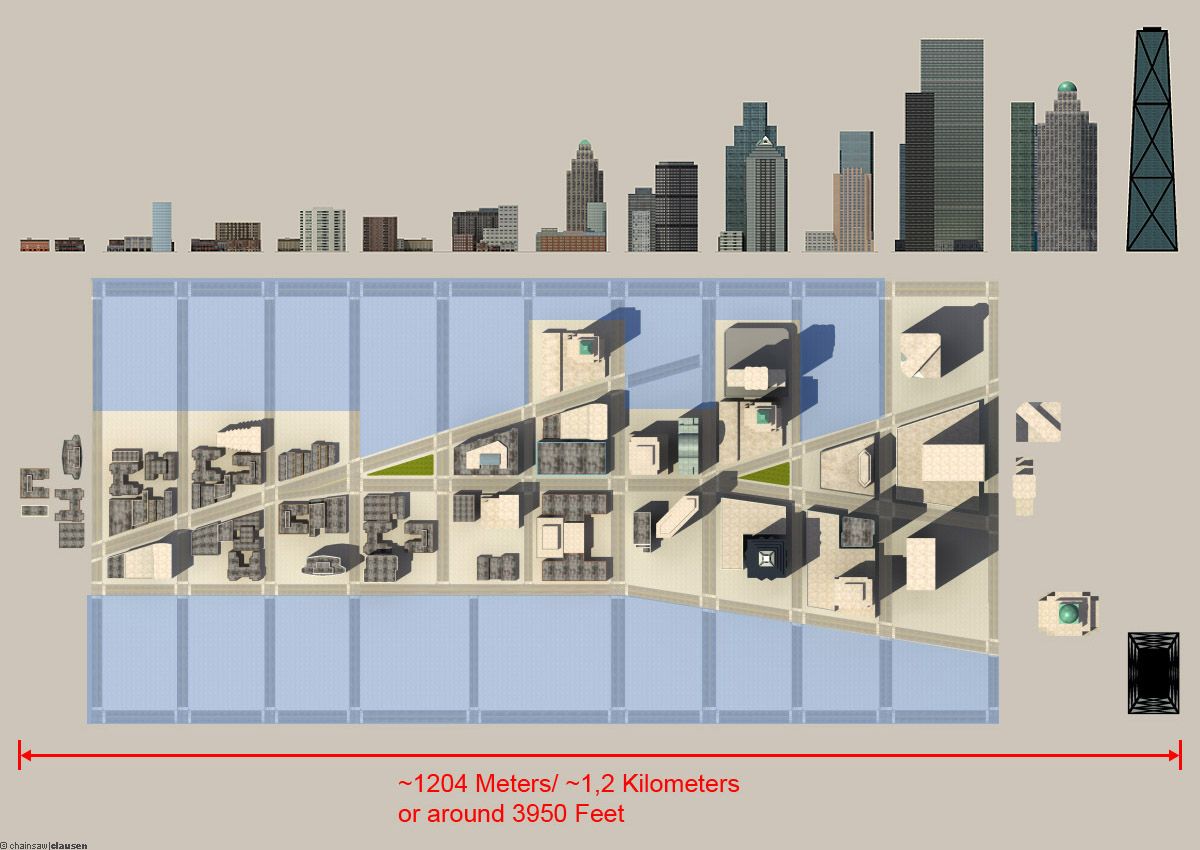
At an early stage I had decided to create the whole background in 3D. No photo or matte painting but rather a real 3D modeled background. I wanted to have the full control about lighting and depth effects so I needed to create a background that looks like a big American city but not especially like New York, Chicago or another one. I had used Google Earth to find an interesting street network, which I could use as reference and build up the ground/ base.
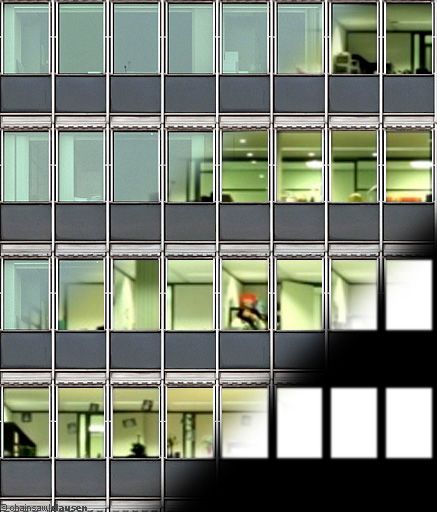
I had also used Google Earth and Street View to find some interesting building shapes and recreate them as 3D model but with different textures on it. I copied and divided most of the buildings and used a "random face selection" script to get separate window faces.

I made a diffuse texture for all buildings, for the most buildings a "window illuminated" diffuse texture and an opacity map that I also used as reflection color map. To have more control about texture sizes and quality, the most textures are tillable and not bigger than 512² pixel.
All in all over 40 different buildings in 3 categories. Low buildings with 2 to 4 floors, middle buildings with 10 to 20 floors and high buildings with up to 70 floors.

Finally I placed them on the ground. (The blue areas were filled with simple textured boxes for shadows and reflections.)
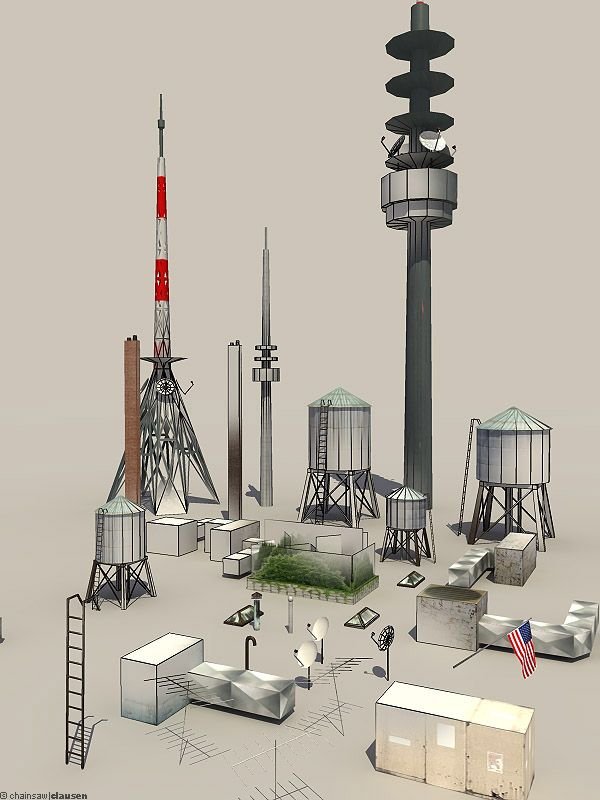
In the next step I filled the rooftops of the buildings with stuff like water tanks, air conditions, antennas and sat dishes, generator boxes, small gardens, smokestacks, rooftop windows and ladders.
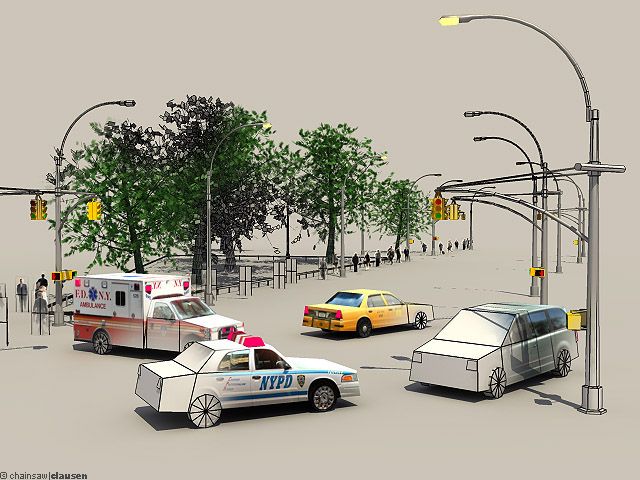
After that I filled the streets with life. That wasn't really important but funny. So I built 4 simple cars, streetlamps and traffic lights, placed some standard trees and mapped some people on planes.
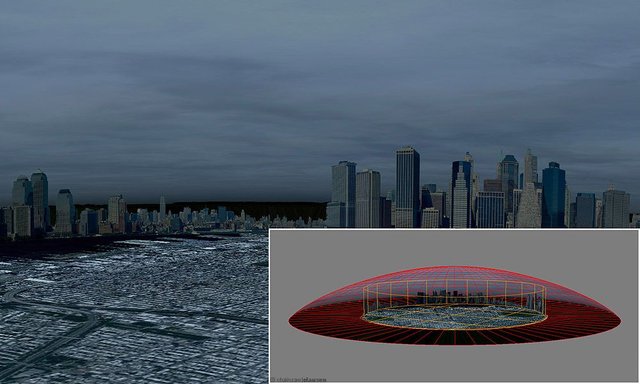
In the last step I created a simple environment (only for reflection) composed of a panoramic sky, a panoramic skyline and a ground plane with city top view texture, set a bunch of lights for illuminating the streets and a daylight system for lighting the whole scene.
Foreground:
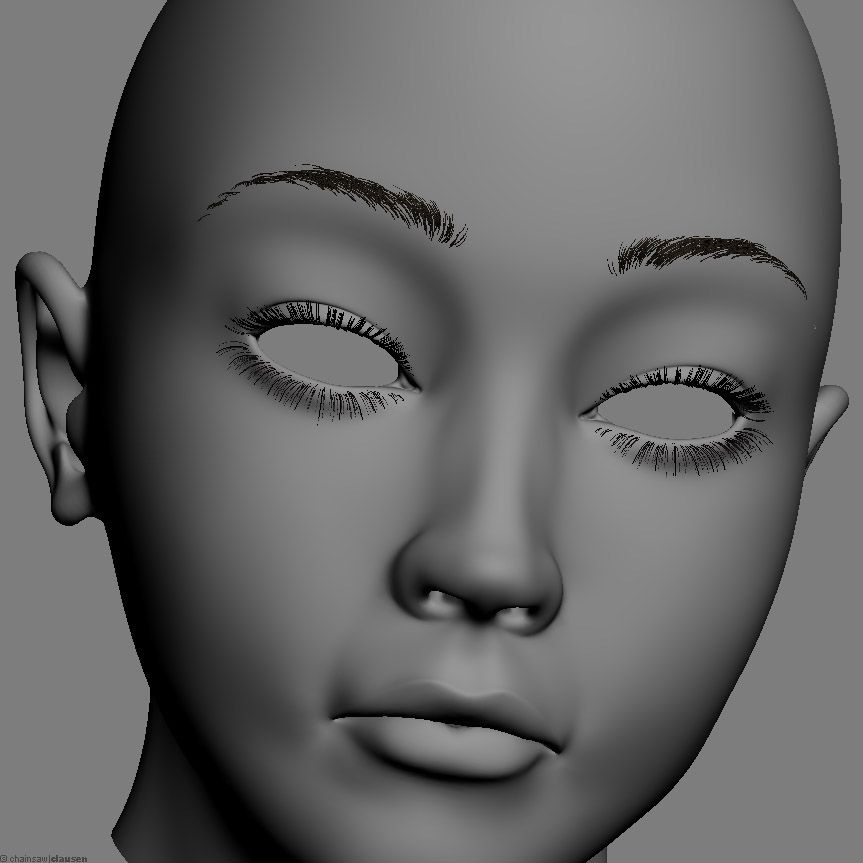
I started with the most important part, the girl. To save a bit time, I decided to used an old model which I used for my image "Michiko" (you can find it on my website). I had reworked her modeling, uv-mapping and rig. The rig was simple (Biped and skin modifier) but good enough to bring her in a sitting position.
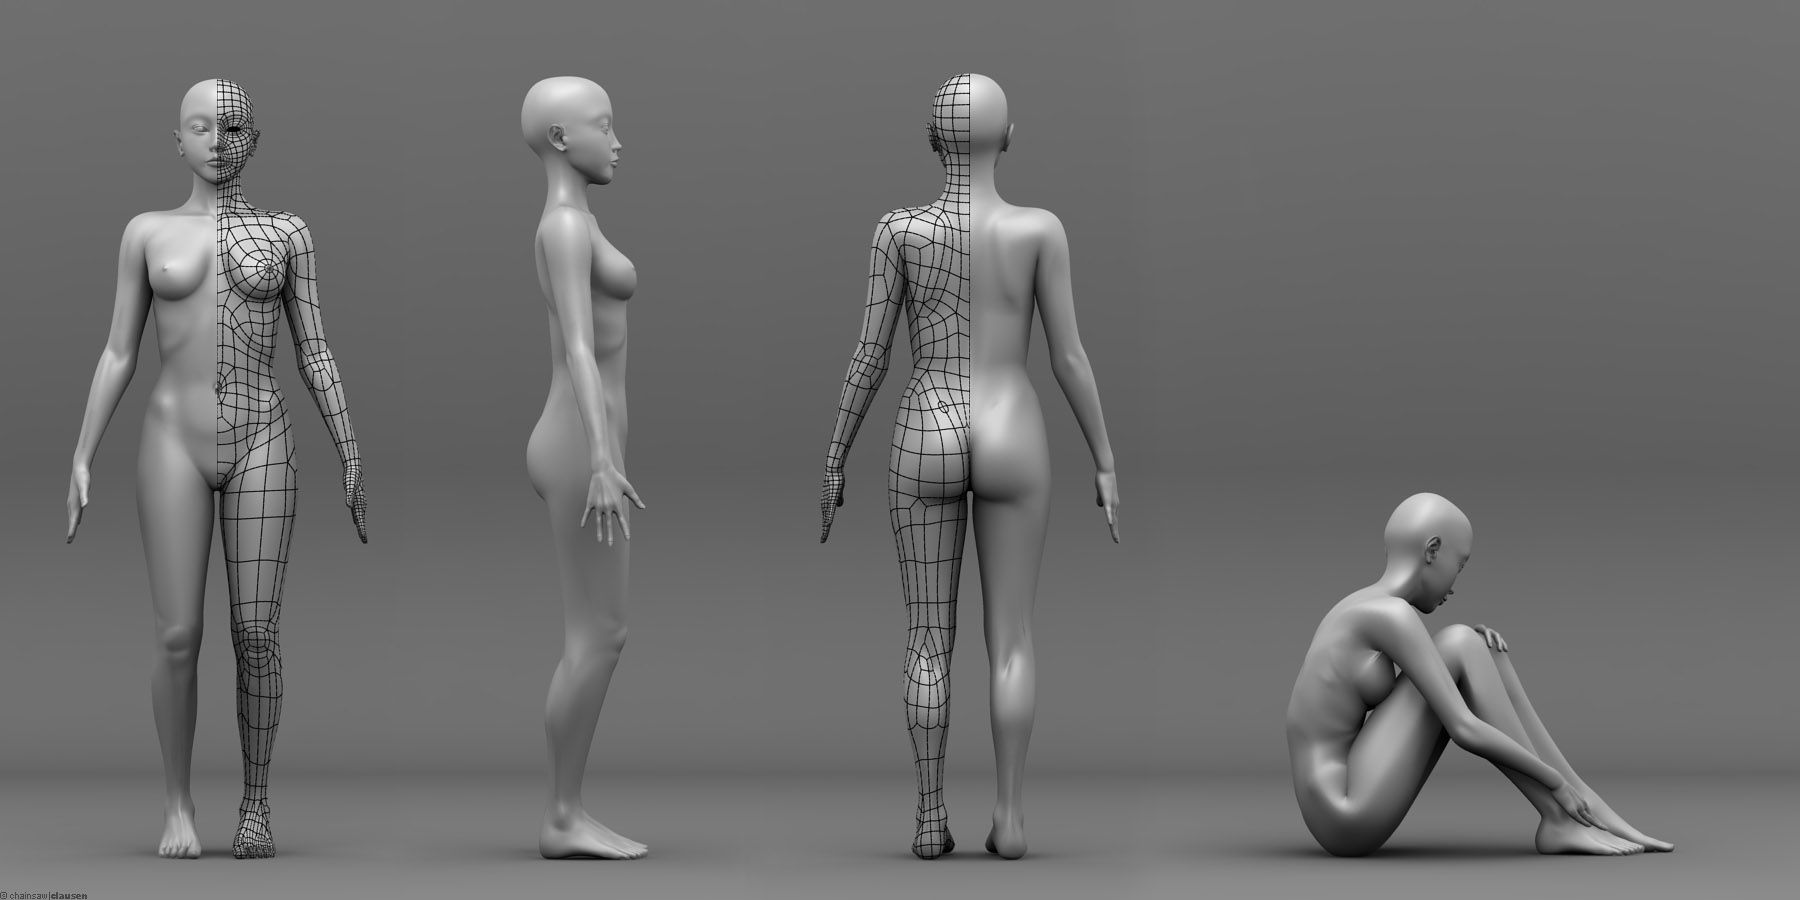
The next step was to export the mesh and work out all details in Sculptris. I'm a rookie in such sculpting-stuff but it works very well.

I really like the mental ray skin material and so the next part was to create the textures for the skin shader. I painted in Photoshop layer by layer my textures for overall diffuse color, unscattered diffuse color, epidermal color, back surface color, specular weight and bump/ normal map and put it all together in the skin material.
I played around with the settings to find the optimal-looking result.
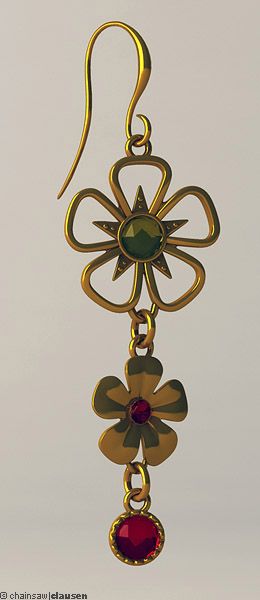
Finally I gave her an ear pendant.
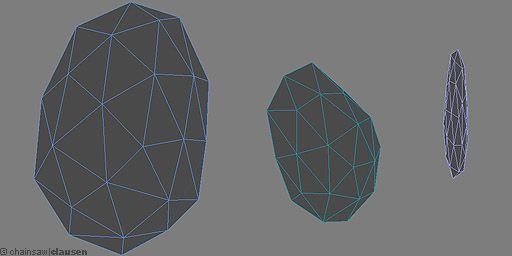
After that, I modeled the apartment and window. The apartment itself is just a box with different material ID's and one side open for the window part. The window was done in three parts, the window seat which got an arch & design material with a high res wood texture, the mullions and the window-glass with a thin border. They also got simple arch & design materials for blurry metal and glass.

I made a simple version as a collision-object to simulate a blanket with SimCloth on it. I had exported the result to Sulptris to fix some little defects from the simulation and folds with hard edges. After importing, I separate a small part from the mesh and create the blanket border.
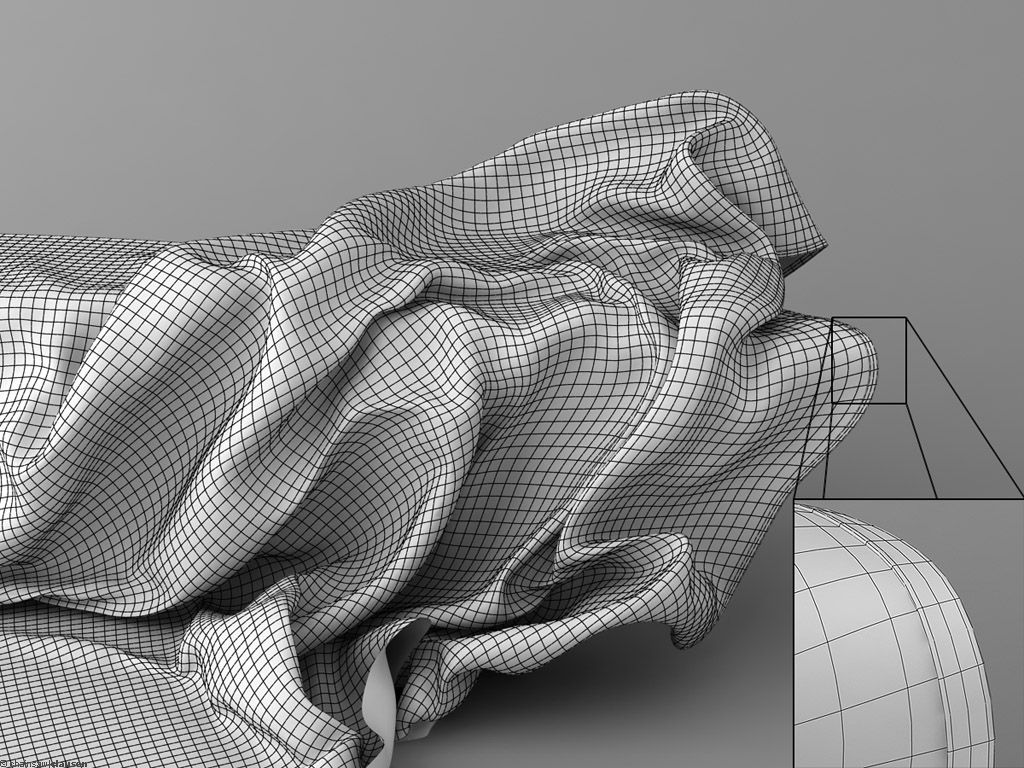
The tillable texture was made from a scanned part of one of my towels.

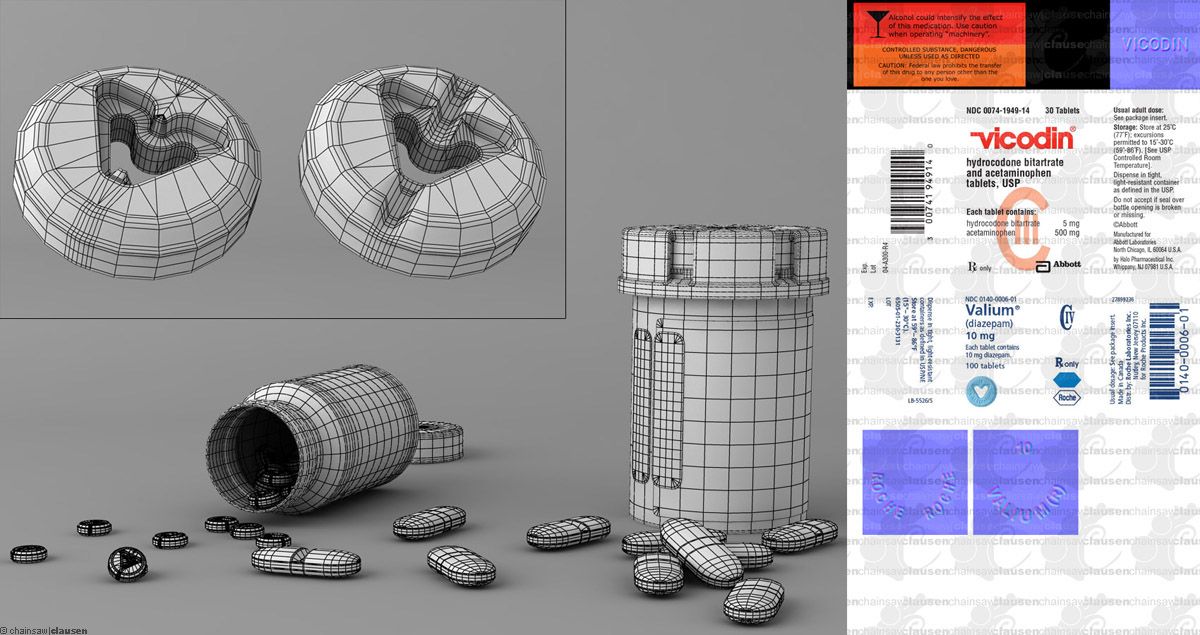
The stuff which is located in front of the girl was the next step on my to-do list. I searched for a while, to find the right references for the medication cans and pills, texture references and information's about the pill-size. I really like high detailed 3D models, so I modeled the pills and cans as detailed as possible.
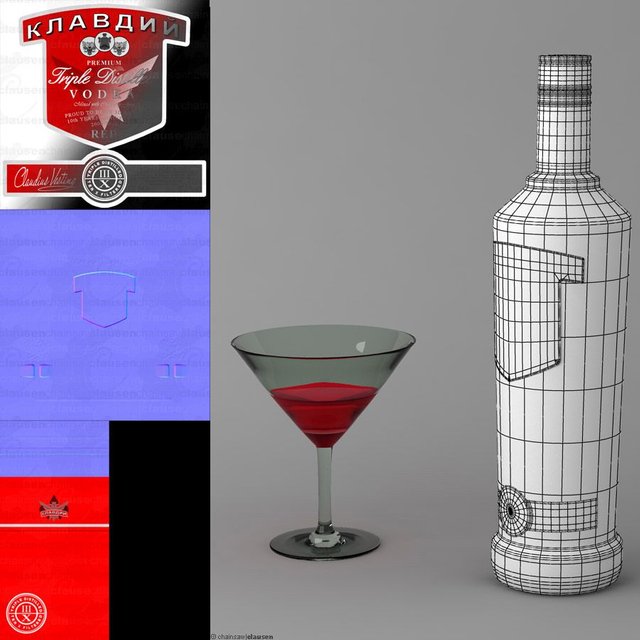
The cocktail glass and vodka bottle was simple lathe objects where I used some photo-references for modeling. The relief-like effects came from a normal-map I painted in Photoshop also the other textures.
The Last object was the fashion magazine. I'd used a stack of box-objects with different thickness for the pages and another poly object as cover.

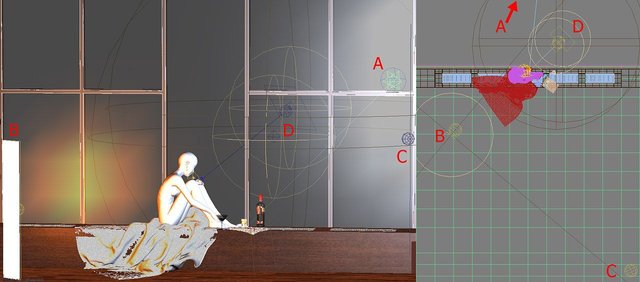
The lighting for the whole foreground was very basic. (A: A daylight system for lighting the scene and girl from the back. B: A yellow/orange area-light to lit up the back of the girl and simulate a floor lamp. C: A grey/bluish fill light. D: A bunch of lights to lit up a bit more the skin and nails.)
Rain on the window glass:
The rain on the window was the next thing I had to do. At first I had searched some reference material, made some photos and studied how water/ rain works on a planar glass surface.
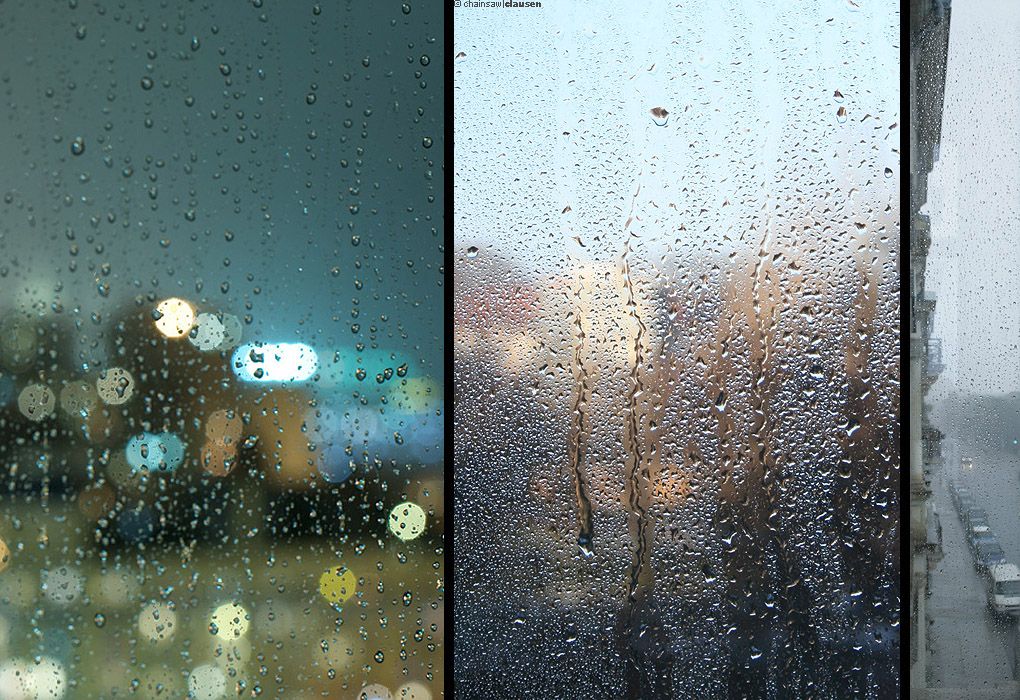
As I had understood how it works, I started to make some different sized drops. Small sized, middle sized and big sized drops.
To get a realistic looking result, I had started with a simple plane which I had divided randomly. Then I had used the scatter-tool to scatter the big and middle sized drops along the edges with a little variance on the X-Axis.
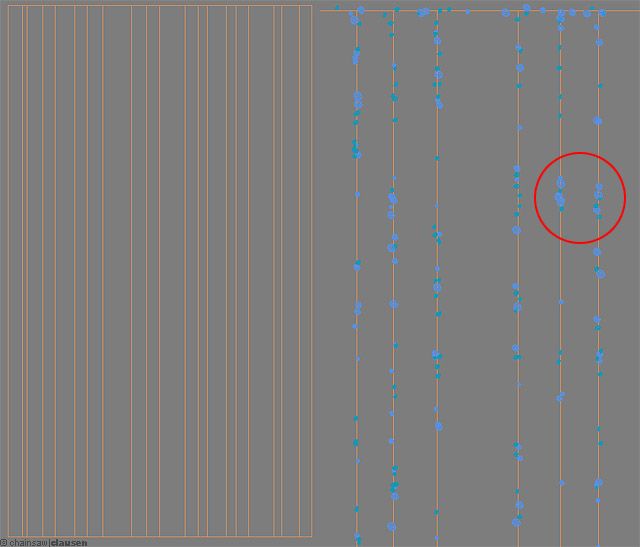
I had taken a second plane and divide them also but with a smaller distance between the edges and scatter the small drops along the edges also with a variance.

The scattering results I had converted to an editable poly to fix some parts which were buggy. (For example: The red circled part)
But I wouldn't have only hanging drops on my window. So I had created some drops which are currently weeping down.

Finally I split of the drops in 4 layers(red, green, yellow and blue) to have more control about the density in the post-work.
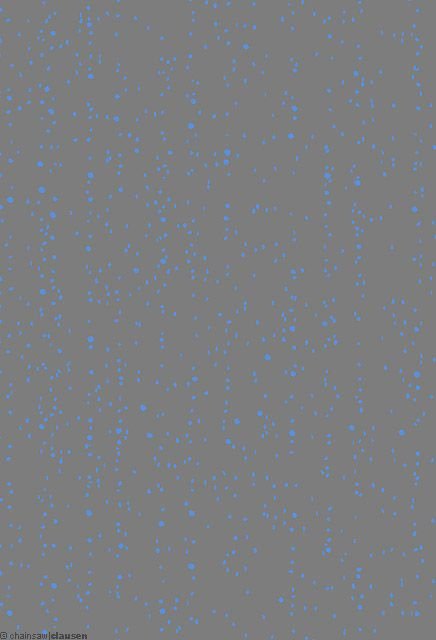
And made a fifth layer for the long weeping drops.
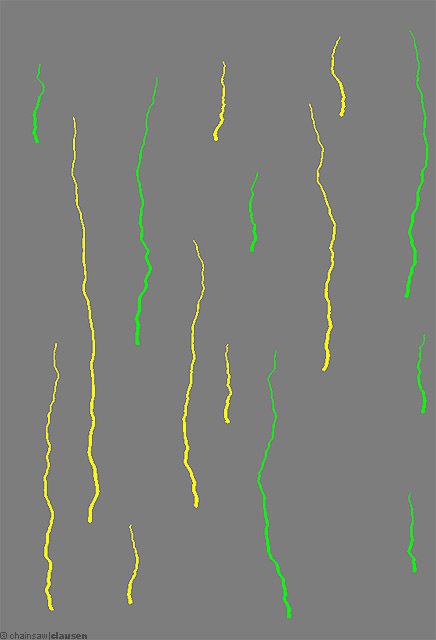
The material itself is just an arch & design shader with reflection, refraction and an IOR-Value of 1.33.
Hair:
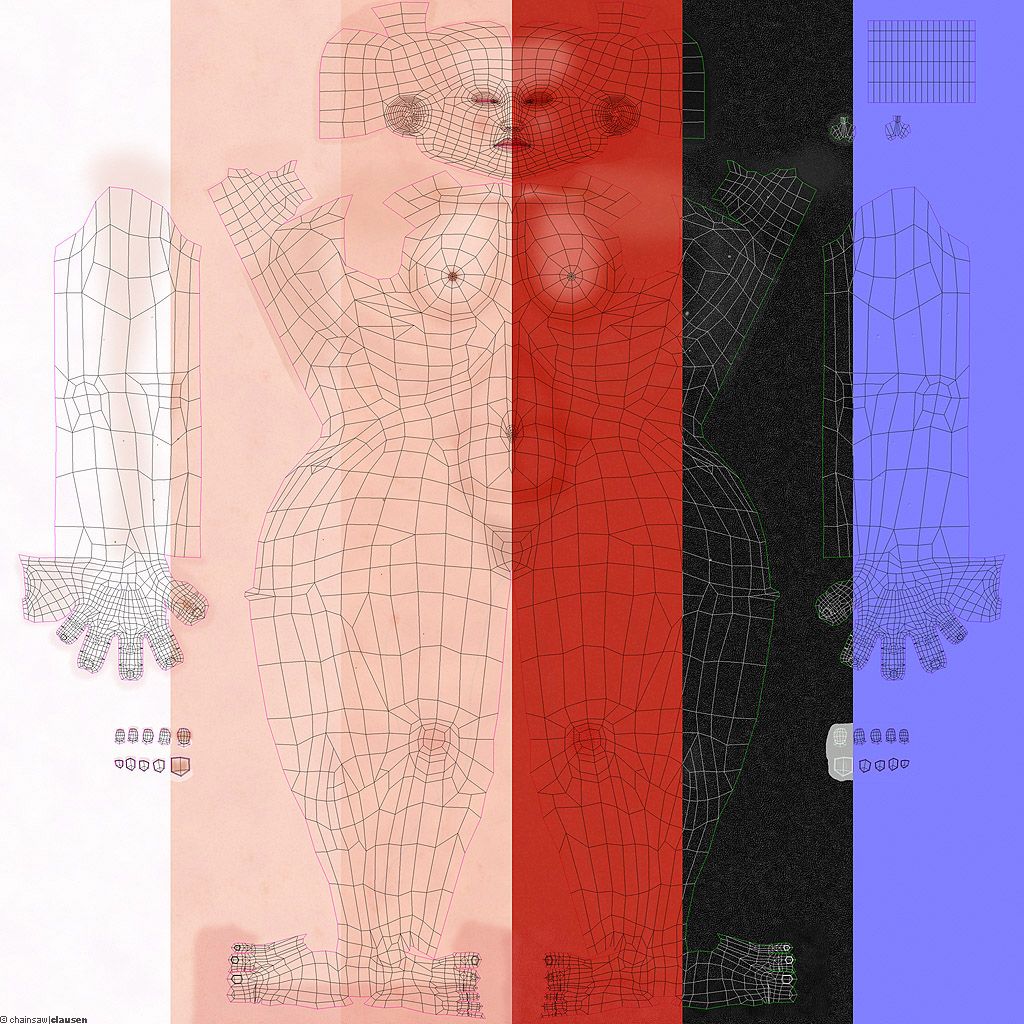
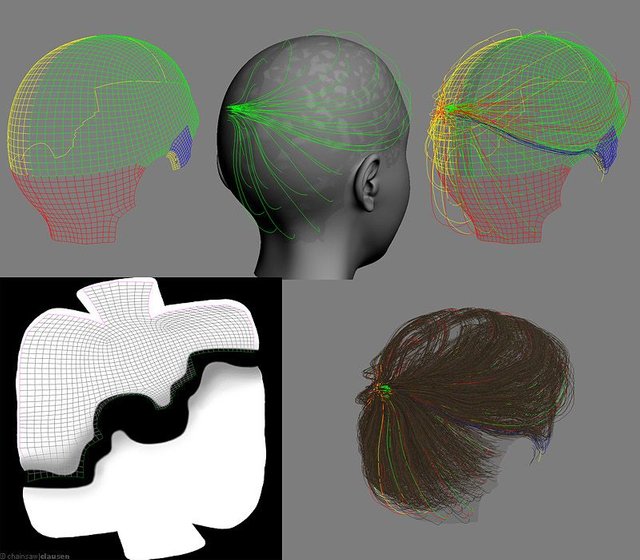
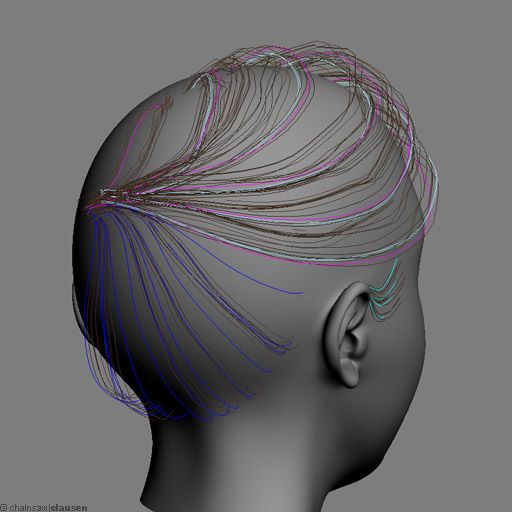
Last but not least I had created the whole hair stuff for my female character to finishing the modeling, texturing and shading stadium. I started therewith that I had selected polygons from the head, separated them, reworked the uv's and painted an black/white map for the hair density. I had split up the poly-object into five parts and added to every part the hair modifier. Part one for the upper right hair, part two for the upper left hair, part three for the back part of the head, part four and five for the sideburns hair. Then I had created the spline-cage to form and style the hairs on the right, left and backside. Also for the sideburns hair I had created two spline-cages.
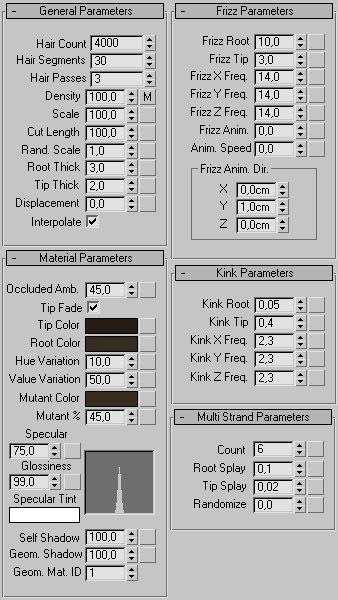
The following hair parameters I had used for all hair parts with some variations like hair count etc.
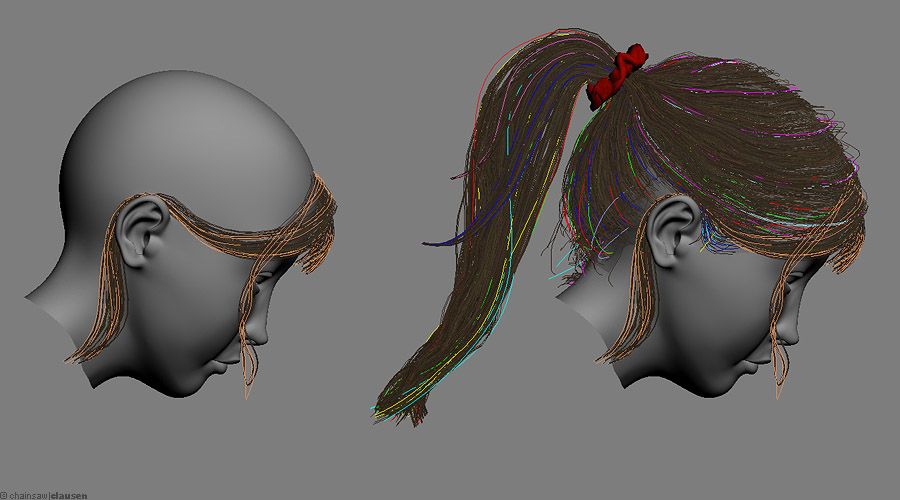
I had made a copy from my hair-poly-objects and split them also up, added the hair modifier and create spline cages to style the fluffy hairs for the back part of the head and the upper right side.
To get a little more variation I had added some hair wisps based on a spline-cage with hair modifier.
In the next step I had created the pony tail. I placed a round poly surface at the back part of the head and added hair. I used this as pony tail "core" hair. Around this strand I had placed a couple of spline-cages with hair to style the final look of the pony tail.
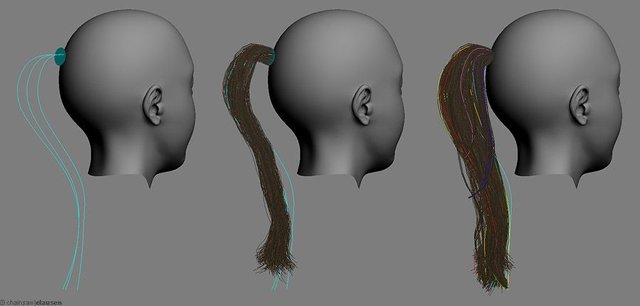
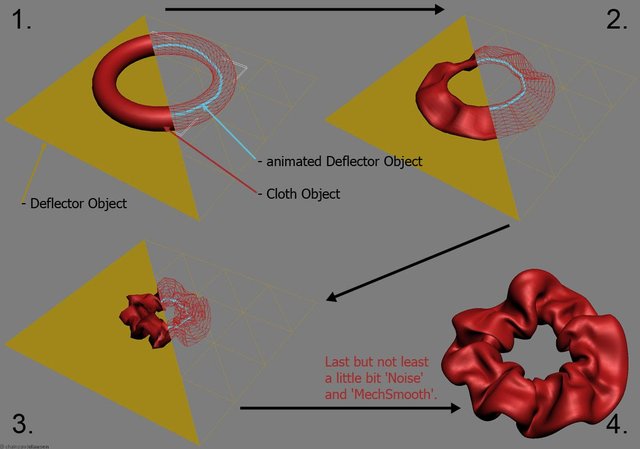
On the front part of the head I had placed some spline-cage based hair wisps and finished the hair style with a scrunchy
I had made with SimCloth.
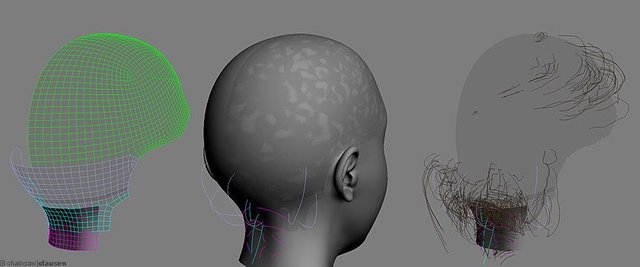
For the fine body hair I had paint a simple black/white map for the hair density, added the hair modifier to the body and controlled the length and direction with a simple spline-cage.
The hair for the eyelashes and eyebrows also be based on spline-cages and separated poly objects.
(Note: The whole hair was made with Hair&Fur. So I didn't use any special hair plug-in/ tool.)
Rendering and Post work
Background:
The final Size for the image was 3512 pixel to 4968 pixel. I'd used mental ray as render engine with basic settings so there was nothing special to talk about. I had rendered the whole background with all lights but without the illuminated windows. They were rendered in an extra pass also the specular highlight. Two more passes were rendered for the ambient occlusion. Both with different distance-settings. The last two passes were used for the fog and the z-depth I'd used for depth of field effect which was done in the post.
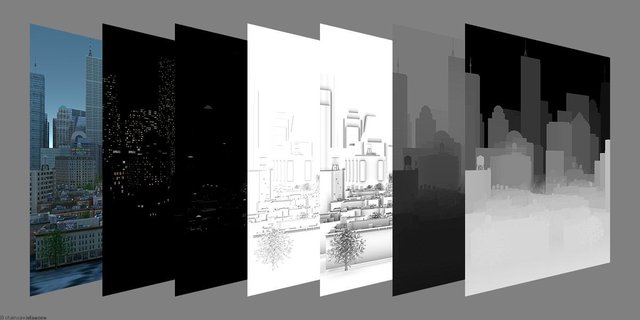
All the layers I had composed, added some extra layers for smoke and other little details and pre-color corrected. Last but not least I had added the depth of field effect. You can compare the before and after in the image below.

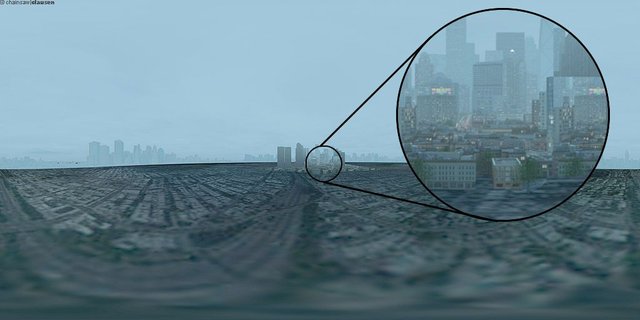
From my reflection environment (page 1 of this tutorial) I had rendered a 360° panoramic image and combined it with my final background layer to get an environment-map. So I could use it for the reflection and refraction in the foreground materials.
Foreground:
The next part in my compositing was to render the raindrops on the window. I had used the environment-map in the rain material for reflection and refraction and rendered the rain in 5 layers with mental ray. I had played around with the density of the drops to find the final look. To finishing my rain layer I had add a little bit wave-filter to get more variation to the drops and the edges of the drops.

Also for the other foreground render-layers I had used mental ray as render engine. Just the hair layers were rendered with scanline. I had put out layers for window-reflection, girl with the objects in front of her, extra light fall-off, extra skin-gloss, hair shadow, ambient occlusion and hair.
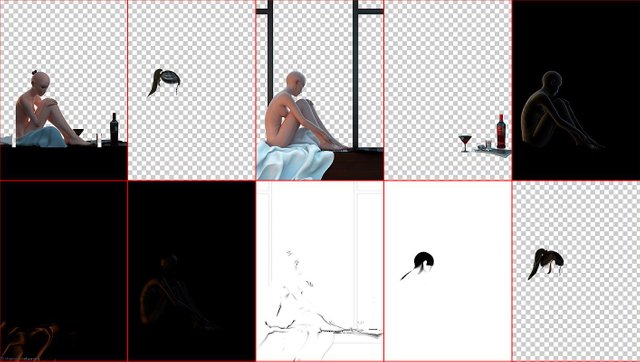
I had put all this layers together with the background and raindrops.
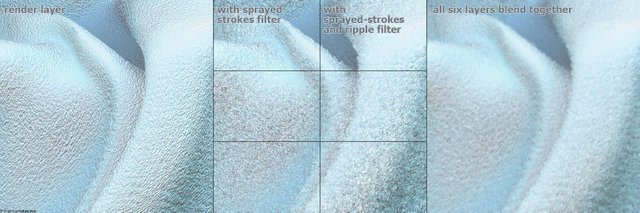
Then I had painted and fix some little details and added the fur to the blanket. That was a simple "trick" and I want to enable you a closer view to it. I had six times copied the blanket layer and used the sprayed-strokes and ripple filter effects to it, with different settings and directions. At the end I have blended these six layers together and had a nice fluffy blanket.
To finish my artwork I had use the color correction tools to get the final color scheme and contrast.
Some Info's and Facts
Project period:
I had begun to work at that image in October 2010 and finish it in March 2012. I hadn't worked continuously on that project. Most of the time I had worked in my spare time at the weekends and between March 2011 and October 2011 and made a creative break.
Polycount:
Around 3.5 million polygons for the background, raindrops and foreground together.
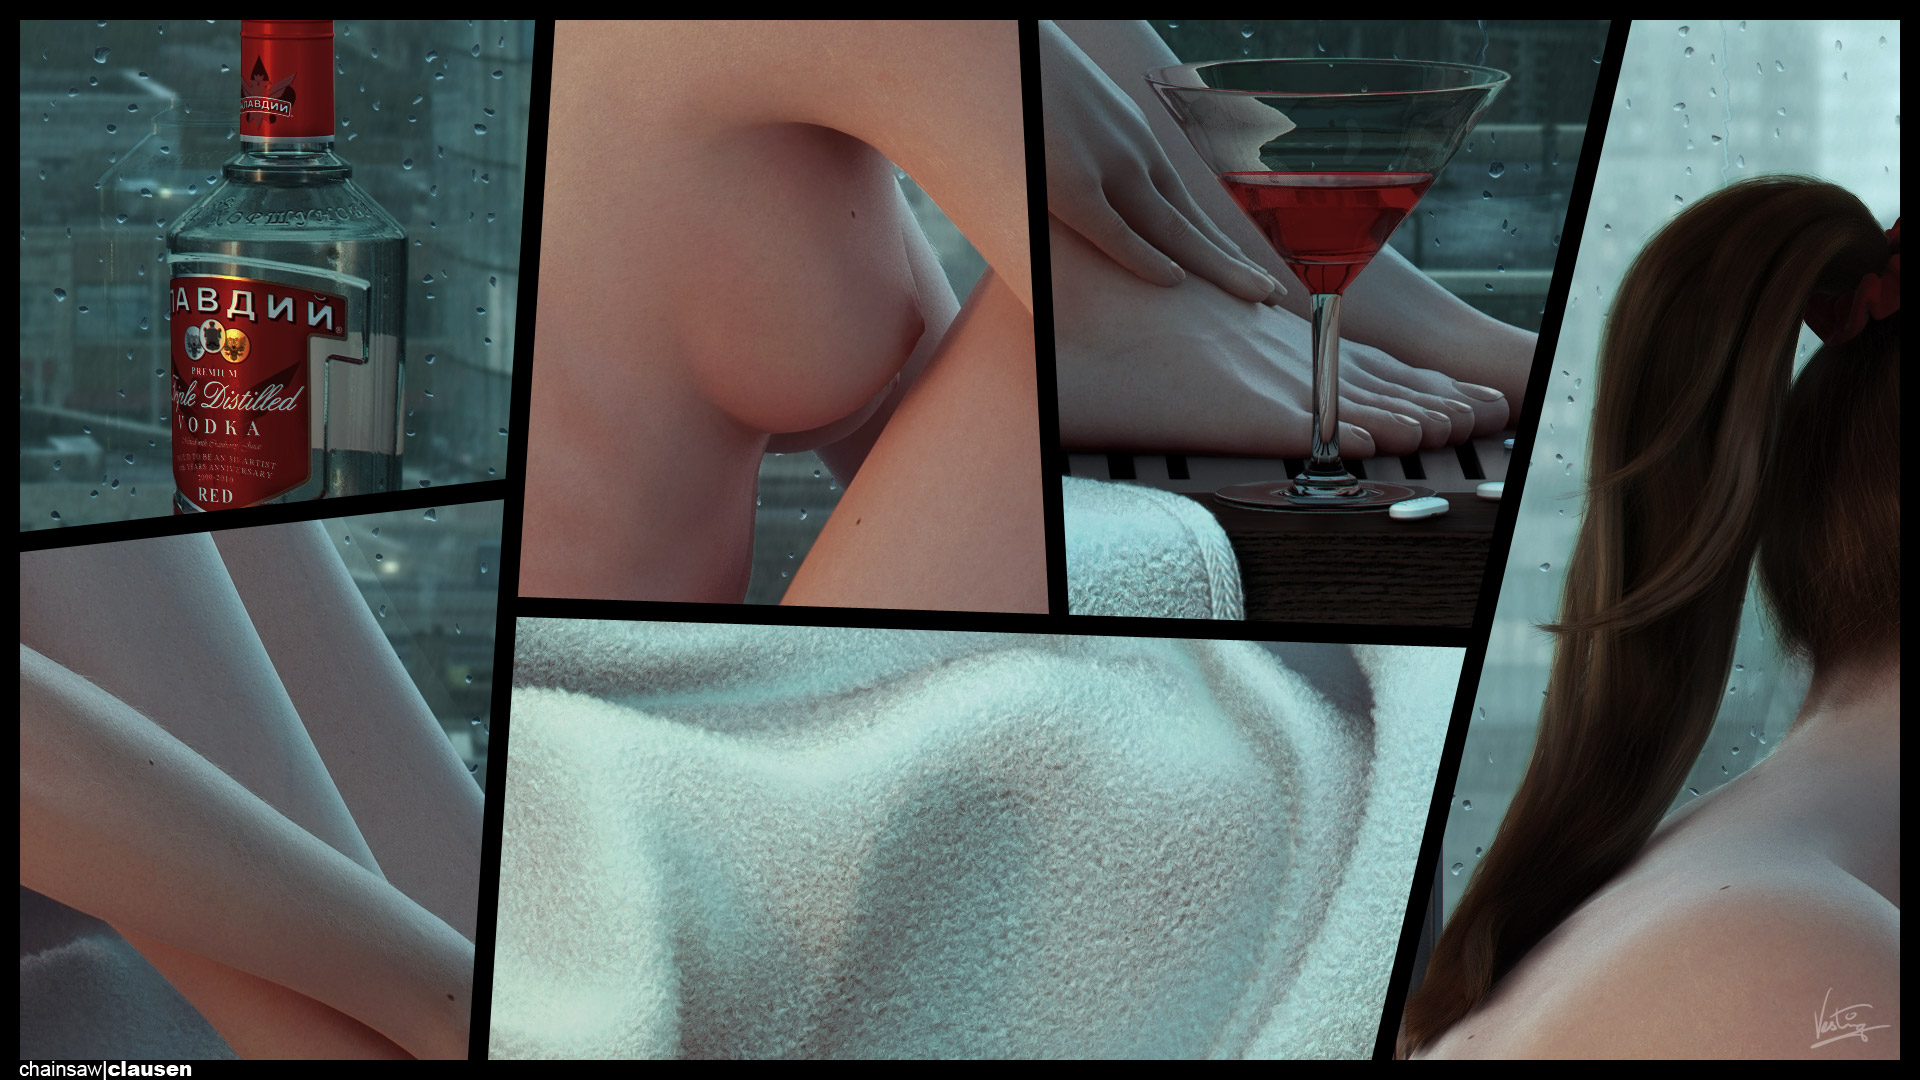
Some details in hi-resolution:
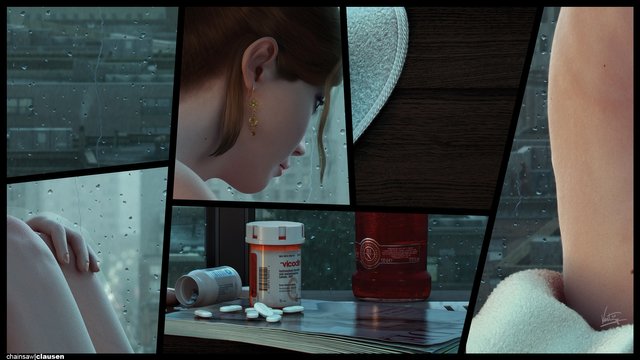
(Right-Click on the image and click 'View Image' for full resolution.)
(Right-Click on the image and click 'View Image' for full resolution.)
So, I hope you enjoyed the Making of 'Close to the Edge' and thank you for reading.
Feel free to comment, ask if you have questions, upvote and share.
very pretty!
thank you. :)
Nice work man, that is really cool! Never actually seen that sort of 3d graphical rendition. It is amazing how many steps there were.
P.S. This post should be NSFW.
thank you. I hope some other 3d artist will find the way to steemit in the near future to share there work.
p.s.: is there any option that a post will shown as NSFW? haven't actually found it.
I believe you make a tag NSFW. I am not sure though!
alrighty! next time I will do so. thank you.
Wow awesome digital renditions ... looks like SO SO much work!
thank you. so much feedback is overwhelming.
Mind Blown! Detail is Out of this World... You got Talent my friend...
thank you. :)
Looks great mate, rain drops look so realistic.
Awesome job.
thank you. the raindrops was one of the hardest parts in this image. I've researched and study for a week (maybe) or so too understand how water (especially rain) works on a window. and needed some tries to get it right.
Yes I bet, rain is very unpredictable and making it look real would be hard.
Wow! Really interesting to read and look through the process. Such a huge amount of details. Big job! I never done 3D but the process looks a bit similar to what I am doing while drawing illustrations in Photoshop.
thank you. I took a short view on your steemit profile and... you have a new follower now. :) I will take a closer look on your work in the next days. best wishes and happy new year.
Thanks you so much! So nice you like my works!
May Peace, Love, Awaken and Awareness be your guide.
Resteem your post at Steem/SBD 0.03
Fellow @jossylink and send steem/sbd 0.03 with your post url as memo
Waw!!!!
that's a wonderful job, you should not be here. you deserve to taste in 🧐 Marvel Studio.
Resteemed 🤓
haha thx buddy. yea working for Marvel would be really cool.
Good Work, i’ll followed you!!!
thank you. you're welcome.
Pretty cool stuff. Alot goes into an image the we take for granted.
thank you. maybe a lot but all this kind comments and response make that worth.
What a work and what a post! I resteem it.
thank you. and thx for resteem it.