Secure Your Linux Server with an Intrusion Detection System
So you got your server up, the SSH secure, the firewall on, and some monitoring filters for certain services in case someone tries to gain access through one of them.
What else can be done to secure your system?

source
This is a continuation from 4 previous parts:
- Secure Your Linux Server with Fail2Ban
- Secure Your Linux Server with a Firewall
- Setting Up A Linux VPS Securely (Pt.2)
- Setting Up A Linux VPS Securely (Pt.1)
Security Tangent - Disable Unused Services
One thing is to reduce the amount of running services to only be those services you need running.
Login to your server via SSH, and type:
sudo netstat -tulpn
Now, if you have a minimal installation with only the base server components, and you followed my previous "Securing Your Linux Server" guides, you will not have any more to do here, as you will see something like:

If you see that, then everything is good. Nothing to be done.
If you have more programs, you will need to look into securing them individually. But all unused services should be disabled.
To uninstall a service that is no longer needed in Ubuntu, do:
sudo apt-get purge package_name
Then do sudo netstat -tulpn again. The service name you removed, is no longer there.
Please go do more research into removing specific applications if you are unsure about them.
Intrusion Detection
With a server setup, there are still ways for intruders to get in, despite the feature already installed. Vulnerabilities exist and unauthorized access can allow someone to make changes to your system or take it down. They could even hijack your system, and use it to launch attacks on others, such as DDoS attacks.
Linux can secure your system in away that ensures you can detect and track all changes. One popular tool is AIDE, Advanced Intrusion Detection Environment. This is what we are going to install for some base IDS security. There are other more complex and comprehensive tools, like Tripwire and OSSEC.
* Note: use root login to install. I tried with sudo and don't have access to certain areas to create the DB. Don't waste your time, use root from the start.
1. Installation
apt-get install -y aide
2. Verify
aide -v
3. Create the AIDE database
Newer versions of Ubuntu after 14.04 use a newer manager for AIDE, called aide-common.
If you're not sure, try the old way:
aide --init
and if you get the error:
Couldn't open file /var/lib/aide/please-dont-call-aide-without-parameters/aide.db.new for writing
then that means you are on the newer version.
Configuration files are in different places, and we need to use the executables from "aide-common" instead:
aideinit
aide.wrapper
update-aide.conf
aide-attributes
AIDE files are located at:
/etc/default/aide - The AIDE general configuration file.
/etc/aide/aide.conf - The AIDE rules configuration file.
/etc/cron.daily/aide - Daily AIDE cron scripts.
Init Command
Instead of aide --init, use:
aideinit
This takes some time to run.
If you get asked:
Overwrite existing /var/lib/aide/aide.db.new [Yn]?
Type y and hit enter.
Error?
However, if inputing the aideinit cmd gives you an error about not being installed or not a recognized command, then you need to install aide-common:
apt-get install -y aide-common
Now try aideinit and it will work. But again, it takes time.
Result
When it completes, you should see:
Start timestamp: 2016-12-13 12:38:21 -0500
Verbose level: 6

Number of entries:      208403

---------------------------------------------------
The attributes of the (uncompressed) database(s):
---------------------------------------------------

/var/lib/aide/aide.db.new
  RMD160   : uyyN564Fdf446HHFHfh24Q/z6/4=
  TIGER    : 8G/Frmndfg76jhyN564Fdf4kRNQyqbB
  SHA256   : fgf564Fdf4fg5gfg4dfeDDGDG3sffGH5+D7q
             NVoi6RhnMUU=
  SHA512   : aRnSogD8PFdf4fg5Nysgs9oVf4yeuPaAMxHL
             Ce4lYsWuIQcBHHFHfh24Q/230uN3Vet+9l8
             yN564Fdf4IdriQogA==
  CRC32    : 564Fdf==
  HAVAL    : LRdNysgs9oVf48PFdf4fg57/RJDFHRe
             9TZxfWzXpwo=
  GOST     : zF8JRIaCyQ577UcUzF8JRIyVVIz
             JMx64Fdf4f=


End timestamp: 2016-12-13 12:44:52 -0500 (run time: 6m 31s)
Overwrite /var/lib/aide/aide.db [yN]?
The last line may not be there for you. If it is, type y and hit enter.
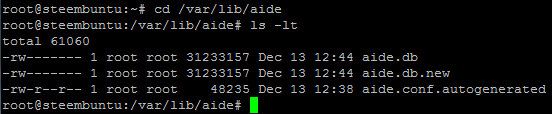
Jut check to make sure the db was created:
cd /var/lib/aide
ls -lt
and you should see:
aide.conf.autogenerated aide.db aide.db.new
4. Check aide
This is how to check the DB with the new "aide-common" package and command:
aide.wrapper --check
You can also do longer form as aide --config /var/lib/aide/aide.conf.autogenerated --check, or sudo /usr/bin/aide.wrapper -c /etc/aide/aide.conf --check, in case you have issues at some point these are alternatives.
It should give you the similar output from earlier with aideinit.
5. Create test file for AIDE to pick up
Just to make sure AIDE is working, create a dummy file:
touch /tmp/mytestfile.txt
Then check for changes:
aide.wrapper --check
You could see a lot of stuff after it finishes.
If you want to better manage what is displayed, instead of a limited scroll window, use aide.wrapper --check > /root/aidecheck.txt. Then open it with nano /root/aidecheck.txt.
If you are satisfied witht he results, then you can update the DB and forget about these changes:
update-aide.conf
6. Automate a schedule with a cron job
Create a file anywhere, for example:
nano /root/aide.sh
Add the following, and change the email at least, and the "tmp" file locations and names if you wish:
#! /bin/sh
MYDATE=`date +%Y-%m-%d`
MYFILENAME="Aide-"$MYDATE.txt
/bin/echo "Aide check !! `date`" > /tmp/$MYFILENAME
/usr/bin/aide.wrapper --check > /tmp/myAide.txt
/bin/cat /tmp/myAide.txt|/bin/grep -v failed >> /tmp/$MYFILENAME
/bin/echo "**************************************" >> /tmp/$MYFILENAME
/usr/bin/tail -20 /tmp/myAide.txt >> /tmp/$MYFILENAME
/bin/echo "****************DONE******************" >> /tmp/$MYFILENAME
/usr/bin/mail -s"$MYFILENAME `date`" [email protected] < /tmp/$MYFILENAME
Make it executable:
chmod +x /root/aide.sh
Edit crontab:
crontab -e
Add at the bottom:
00 01 * * * /root/aide.sh
Then ctrl+x and save.
This shell script will run each day of the week (*), every month (*), each day of the month (*), at 1am. You can change any of the parameters for the interval. Please consult additional help to know how to modify each parameter.
Well that's all folks! You now have a basic intrusion detection system setup.
See you next time for more on securing a Linux server!
Thank you for your time and attention! I appreciate the knowledge reaching more people. Take care. Peace.
References:
- FileIntegrityAIDE
- How To Install Aide on a DigitalOcean VPS
- How To Install Aide Intrusion Detection System on Ubuntu
If you appreciate and value the content, please consider:
 me for more content to come!
@krnel
2016-12-13, 7:36pm
This is on the agenda for The Kraken tonight. TY for posting previous posts. Boom Bip!
You're welcome, what's the Kraken other than the mythical monster?
My new refurbished workstation. It is where I'm learning Linux (Ubuntu) with VirtualBox VMs. Eventually I should get up to containers. A great way to learn a new OS and learn Blockchain
Great post! Thanks for sharing this!
This post has been ranked within the top 25 most undervalued posts in the first half of Dec 14. We estimate that this post is undervalued by $12.76 as compared to a scenario in which every voter had an equal say.
See the full rankings and details in The Daily Tribune: Dec 14 - Part I. You can also read about some of our methodology, data analysis and technical details in our initial post.
If you are the author and would prefer not to receive these comments, simply reply "Stop" to this comment.