Energi Masternode Setup and Guide
In this guide we will be using Vultr to host our Masternode.
However, it doesn’t matter which service you choose to use as the concepts should apply regardless of what service or software or platform you use.
Masternode Setup Overview:
- Deploy and set up a cloud server with at least 1 GB of RAM. This guide will use an Ubuntu 18.04 x64 cloud server hosted on Vultr.com
- Install latest Energi software on that server.
- Have 10,000 NRG in your local wallet ready to go to use as collateral (plus a bit extra to cover transaction fees)
- Configure your Masternode.
- Install and setup Sentinel to run every minute so your Masternode is always online.
NOTE: you will need SSH software in order to connect to your server remotely. On Mac and Linux, SSH comes with, but on Windows you will have to use a 3rd party SSH software, such as PuTTY. Alternatively, you can open an SSH console window from within Vultr.
1. Deploy and setup your server
Log on to Vultr.com and deploy a new server.
If you do not have a Vultr.com account, please use my referral link to sign up:
https://www.vultr.com/?ref=7513475
Choose a server location closest to you for less latency:
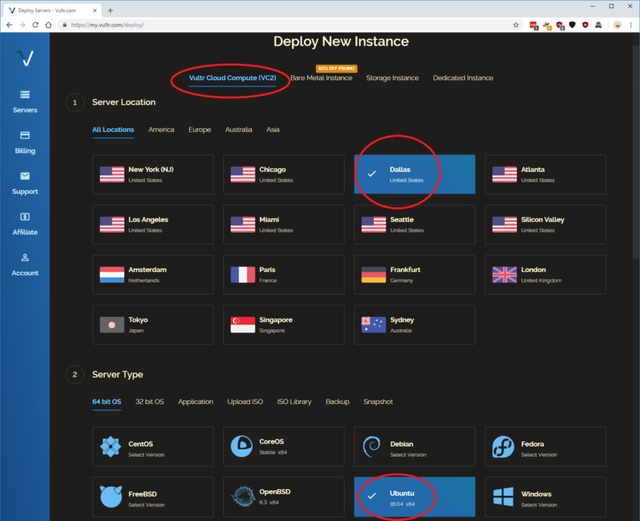
For this guide we will be using Energi version 18.04 for Ubuntu, so select a 64 bit version of Ubuntu, using version 18.04. If you are working with a newer version, please choose the Ubuntu version that matches the version of Energi.
Choose the server size with 1024 MB (1 GB) of Memory. On Vultr this comes with 25 GB of storage, 1 CPU and 1000GB bandwidth, for $5 per month, which is more than enough for our needs.
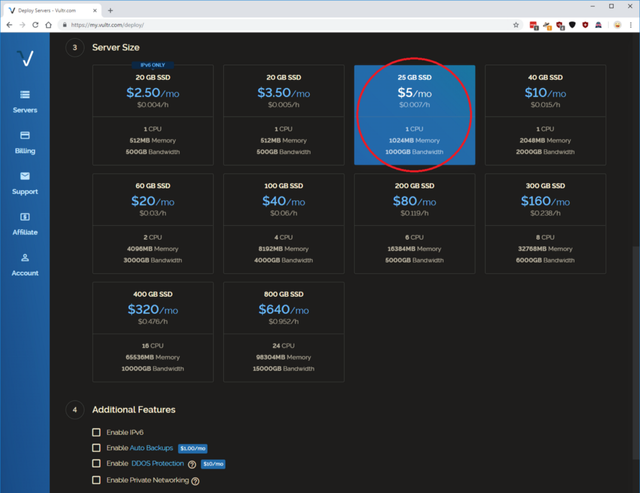
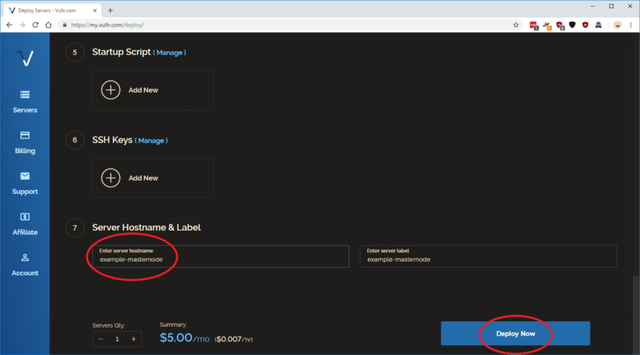
Leave IPv6, and the other additional features blank. Also, this guide will not use any startup scripts, so leave that alone as well.
NOTE: You can choose to set up an SSH key to make it easier to securely log into your server. Click add new and follow the tutorial for creating an SSH key. This step is optional, but highly recommended. Using an SSH key to login is not only easier than using a password, but much more secure.
Enter a hostname and label for your server and click “Deploy Now”
Wait for your server to install. It should only take a few minutes.
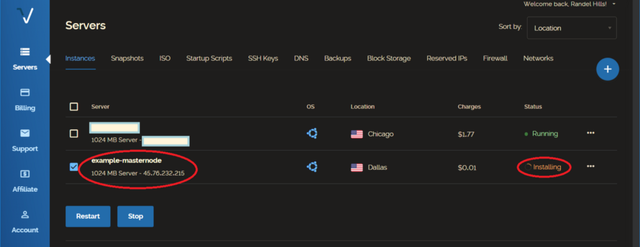
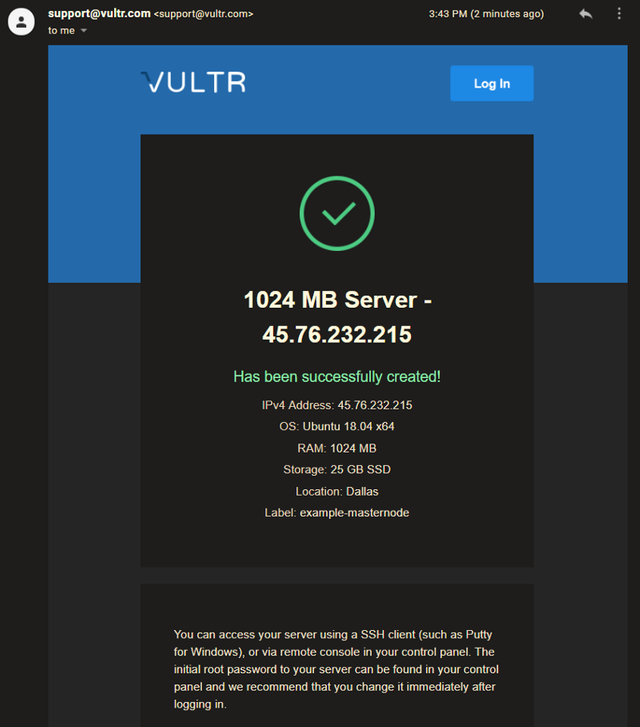
You will receive an e-mail confirming that your server has been created, with information on how to access it remotely.
2. Set up a sudo user account:
Once your server is installed, the first thing you will want to do is set up a new non-root user account with sudo access on your server. Your root account is the administrative account. While you can set up Energi as the root user, for security reasons it’s always best to login as a regular user whenever possible.
In the interest of not reinventing the wheel, Vultr has an excellent guide for setting up a sudo user:
https://www.vultr.com/docs/setup-a-non-root-user-with-sudo-access-on-ubuntu
The next step is optional, but recommended. If you chose to use an SSH key when setting up your server, you will want to install the SSH key as an authorized key for the new user you just created. Then, you will be able to login more easily and securely using the SSH key instead of entering a password.
From your local Mac or Linux terminal:
ssh-copy-id -i ~/.ssh/id_rsa.pub [email protected]
Log out and log back in as your new user.
3. Update your server and install the required dependencies to run a node:
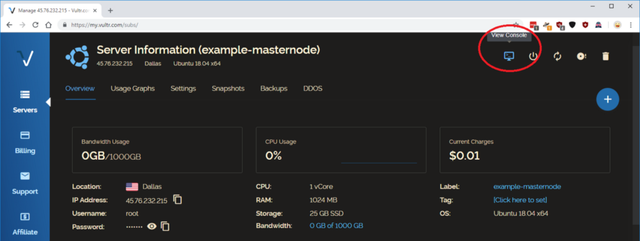
Open a Console window in Vultr, or connect to your server via SSH.
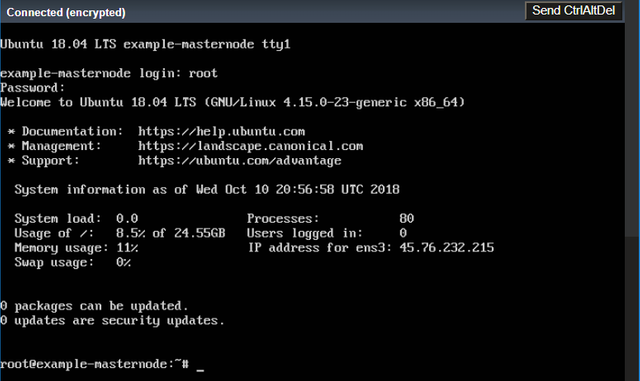
NOTE: I have logged in as root, which will work, but it’s safer to login as a new sudo user for the following steps. See the link above for a step-by-step guide to this
In the console, type the following commands to update your server:
sudo apt update
sudo apt upgrade
In the console, type the following commands to install the dependencies:
sudo apt-get install software-properties-common
sudo add-apt-repository ppa:bitcoin/bitcoin
sudo apt-get update
sudo apt install libboost-dev libboost-system-dev libboost-filesystem-dev libboost-program-options-dev libboost-thread-dev libevent-pthreads-2.1-6 libminiupnpc10 libzmq5 libdb4.8 libdb4.8++
4. Download and install the Energi software on your server
Energi Team Members instructions:
Download the latest pre-release build… from your home directory in the console type:
wget https://s3-us-west-2.amazonaws.com/download.energi.software/releases/energi/v1.1.1/energi-v1.1.1-ubuntu-18.04LTS.tar.gz
Public instructions: To download the latest version of Energi to your server, go to the downloads page and copy the link to the latest Energi Core for Linux, then, from the home directory in the console type
wget LinkToFile
Once downloaded, enter this command to unpack the wallet:
tar -xvzf energi.tar.gz
Then, move rename the wallet directory to "energi"
mv energicore-1.1.1 energi
Update your Environment Variables:
Add this line to the end of your ~/.bashrc file:
export PATH="${PATH}:${HOME}/energi/bin"
Then, log out of the console and log back in to update your environment variables that you’ve just specified in .bashrc
Test that the Energi Core software has been installed correctly. In the console, type the following command:
energi-cli
If everything is installed correctly, you should get a help menu, and no errors about missing dependencies. There will be a "too few parameters" error after the help menu displays. This is normal.
5. Configure your Masternode:
From your home folder (/home/username), create the .energicore directory:
mkdir .energicore
Create energi.conf
nano energi.conf
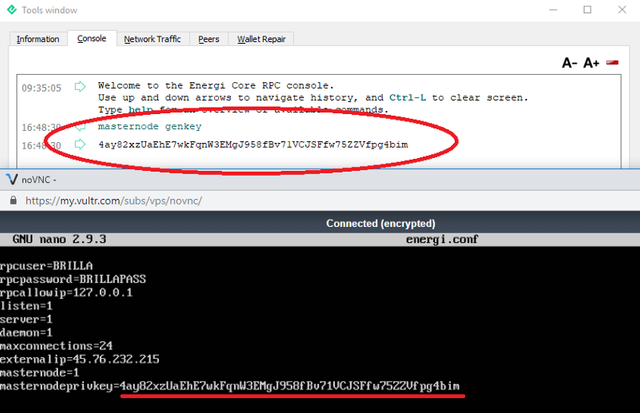
To obtain your Masternode Private Key, type the following command into the debug console of your local Energi wallet:
masternode genkey
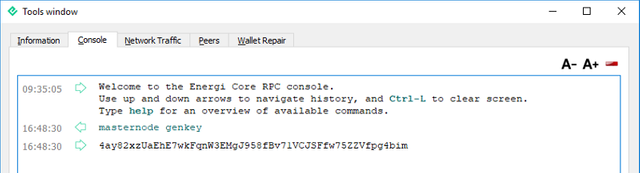
Back up this key somewhere safe, and have it available to use in the next step:
Add these lines to the energi.conf file:
rpcuser=USERNAME
rpcpassword=PASSWORD
rpcallowip=127.0.0.1
listen=1
server=1
daemon=1
maxconnections=24
externalip=SERVER_IP_ADDRESS
masternode=1
masternodeprivkey=MASTERNODE_PRIVATE_KEY
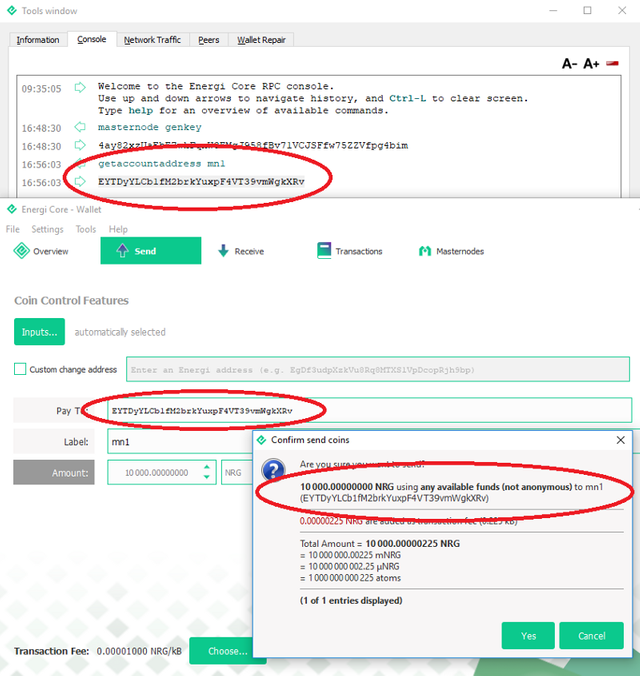
Now in the same debug console, obtain your masternode collateral address by typing the following command:
getaccountaddress AddressLabel
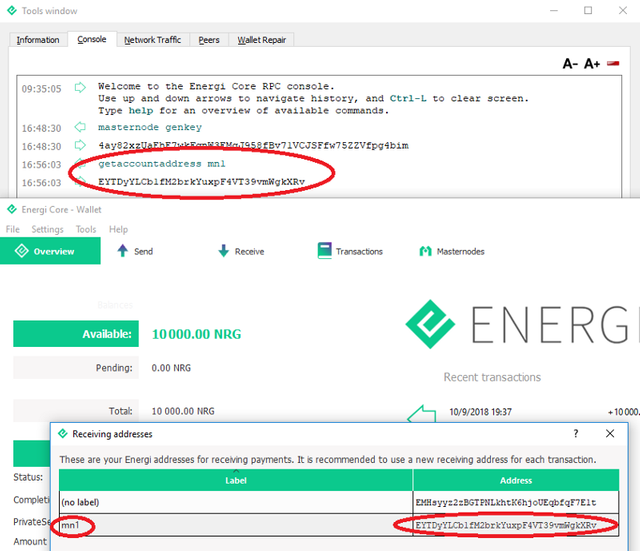
Use whatever label you want for this address.
Then, send exactly 10,000 NRG to this address.
You will also need the transaction ID and index for this transaction. To obtain that information, type the following command into the debug console:
masternode outputs
Open your local masternode.conf file and add the masternode information on a new line.
Follow the format of the example provided in masternode.conf:
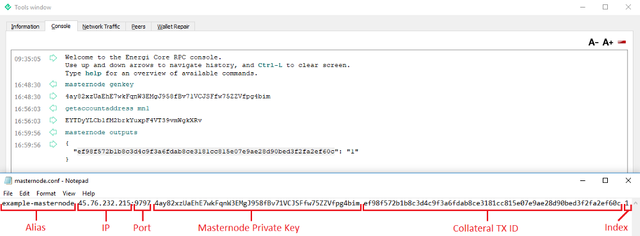
Alias is any name you want, be creative!
IP:Port is your Server’s IP address, and the port is 9797.
masternodeprivkey will be the key you received after entering the masternode genkey command in the debug console.
For the collateral_output_txid and collateral_output_index, enter the information you got from the masternode outputs command in the debug console.
It should look similar to the example! Save and exit.
6. Start your Masternode
In the console, type energid to start the server, and wait for it to sync. You can check the status by running this command on the server: energi-cli mnsync status
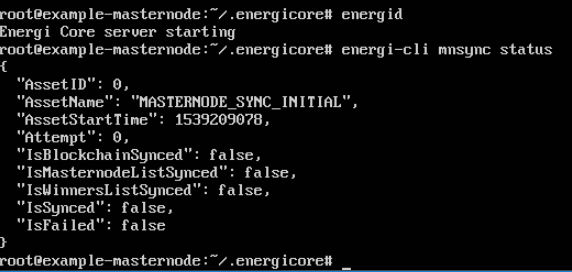
Wait for it to say “MASTERNODE_SYNC_FINISHED”
While this is happening, also restart your Energi wallet software on your local computer. Once restarted, you should also check the status in the debug console by typing mnsync status.
Wait for it to say "MASTERNODE_SYNC_FINISHED" also.
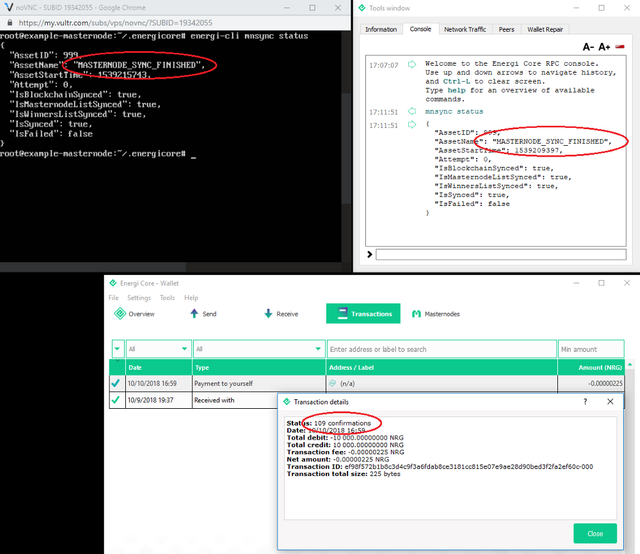
Once both your local wallet and server have synced and your collateral transaction of 10,000 NRG has at least 15 confirmations, you are ready to start the masternode!
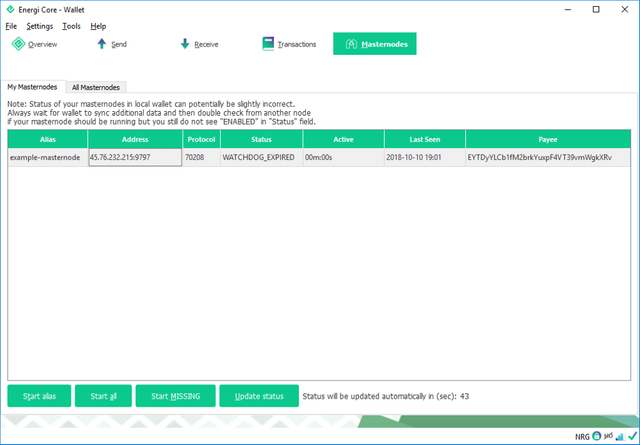
Within your local Energi wallet, in the masternodes tab, right click your masternode and select “Start Alias”.
NOTE: If you do not see the masternodes tab, you can enable it within the wallet options. (Click Settings, Options, then the Wallet tab).
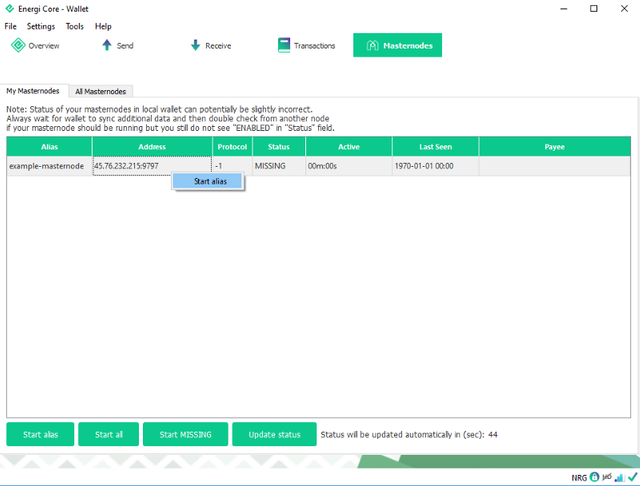

It will display as Watchdog Expired until you install and setup a sentinel and a cron job which will keep your masternode online 24 hours a day and let the network know your masternode is online every minute.
7. Install Sentinel
Sentinel lets the network know that your masternode is still online and functioning correctly.
From the ~/.energicore directory, run the following commands:
git clone https://github.com/energicryptocurrency/sentinel.git
cd sentinel
sudo apt install -yvirtualenv
sudo apt install -y python-virtualenv
virtualenv venv
venv/bin/pip install -r requirements.txt
venv/bin/python bin/sentinel.py
8. Add a cron job
A masternode is required to be online for a minimum amount of time per day to be considered a masternode. This cron job will let the Energi network know about the status of your masternode every minute.
In the console, type:
crontab -e
select a text editor, and on the last line of the file, paste this:
* * * * * cd /home/username/.energicore/sentinel && ./venv/bin/python bin/sentinel.py 2>&1 >> sentinel-cron.log
Make sure to replace "username" with the username you chose. /home/username should be your home folder.
press ctrl + X to save the file
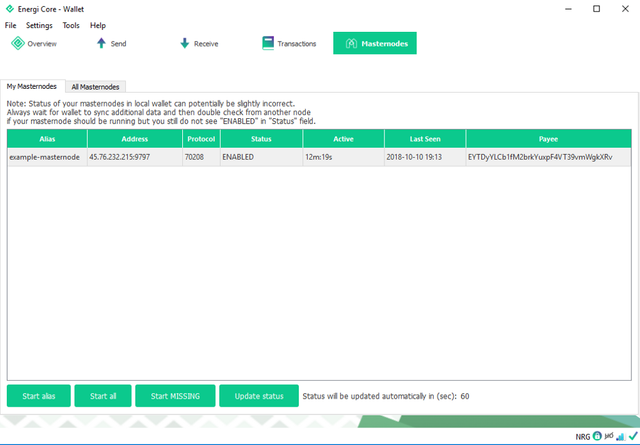
Now your masternode should be running correctly. To check the status, you can run this command on your server: energi-cli masternode status
… the masternode should say "Masternode started successfully" under status.
You can also check the status of your masternode from your local wallet. Wait for it to say "ENABLED". After finishing the setup, it may take some time for the local wallet to properly display the status.
For more information, please visit us at the official Energi website:
Home - Energi
Cryptocurrency for world adoption.www.energi.world