The 15 ETH Neon District Puzzle - Stage 1: The Terminal
Introduction
I created this article for anyone who is new to crypto-puzzles or anyone who doesn't have the time required to solve it but is still interested in the steps that lead to the solution. It should serve as a step by step guide through the 1st Stage of the Neon District Puzzle and also shares my experience and thought process. If you're completely new to crypto puzzles, you may want to start with an introduction to the topic:
The Neon District Puzzle
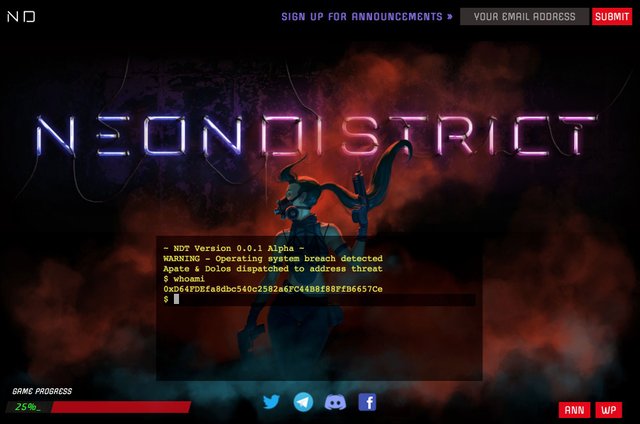
The Neon District Puzzle was created by cybourgeoisie who announced it on Twitter on January 29th, 2018. The announcement shows a screenshot of the Neon District website that features a terminal.
(Link to Tweet / Image Source).
The puzzle reward is 15 ETH and the puzzle seems to be structured in three stages:
- Stage 1: The Terminal
- Stage 2: The Gateway
- Stage 3: The Core
The reward is stored in the wallet shown in the screenshot above and is also the best indicator of whether the puzzle has been solved or not:
- Neon District Puzzle Wallet on Etherscan
- Wallet Address: 0xd64fdefa8dbc540c2582a6fc44b8f88ffb6657ce
If you consider joining the race, I highly recommend you to join the Neon District Discord Channel.
Stage 1: The Terminal
Welcome to the first stage of a seemingly never-ending journey down the rabbit hole, a race to win the 15 ETH.
Find The Terminal
Heading back to the Neon District website, I found a website without any terminal in sight. So I consulted the Whitepaper for eventual clues and indeed, there were some strange footnotes printed in white. I copied them to another document to find out that they assemble the following sentence:
- Footnote 1 - Find
- Footnote 4 - The
- Footnote 6 - Terminal
So the puzzle seems to be real, and the first step is to open the terminal on the Neon District Website. If this terminal exists, there must be a trace of it in the source code, which can be examined using the Developer Tools of Chrome (or other browsers - I favor the ones from Chrome). The source code of the index.js file contains some very promising lines of code:
    // Accept input for opening the terminal
    $(document).on('keyup',
        TerminalEntrance.sequence(38, 38, 40, 40, 37, 39, 37, 39, 66, 65, initTerminal)
    );
These lines basically mean that the whole document (the Neon District website) listens to "keyup" events and the Terminal will be initialized, when the defined sequence of events is received. It very much reminded me of how cheats in video games used to work. To figure out which keys to press, I searched for "JavaScript Key Code Table" and found several sources providing the information needed. You can find three of them listed below:
If translated to Keyboard Keys, the sequence to enter the terminal is:
- up - up - down - down - left - right - left - right - b - a
And there it is, the terminal! Little did I know about the real challenges that lie ahead.
Use The Terminal
Now that the terminal is found, it is about time to use it. The most obvious command to issue was the one from the screenshot "whoami", which returns the address of the Ethereum wallet, as expected:
$ whoami
0xD64FDEfa8dbc540c2582a6FC44B8f88FfB6657Ce
So far so good... let's try some other commands:
$ help
NDT shell, version 0.0.1-alpha (multics)
BASIC COMMANDS:
clear             clear terminal window
exit              close terminal window
help              view command list
ls                list files and folders in directory
open [name..]     open file
show [command..]  <?>
The show command looks interesting, let's try it.
$ show
Show you what?
Interesting... why not show us your private key? :)
$ show private key
I hold no private keys.
I guess that would've been too easy... let's try to show the public key, just for fun.
$ show public key
Ask yourself: who am I?
$ whoami
0xD64FDEfa8dbc540c2582a6FC44B8f88FfB6657Ce
So we found out, how one could figure out the "whoami" command... but still no additional information. Maybe the console can show a hint and or riddle.
$ show hint
Find Her, hidden.
$ show riddle
How The Times have changed and how they have not. Tell me the message when Pandora's box was opened.
Indeed it does! Time to try the ls command, which reminded me that files can be hidden as well, and since the command "ls" is also used in the Linux world, it might be an idea to try ls -a which is used to list hidden files on Linux systems.
$ ls
apate   dolos
$ ls -a
apate   dolos   pandora
It looks like we're on the right track since ls -a revealed a file called "pandora". Also, the console has an open command, let's try to open the box as the riddle suggested.
$ open pandora
https://s3.amazonaws.com/neon-district/1d000c1c011d18110b1c101114011508090405011a090900040511000719161f.jpg
Jackpot! There seems to be some link to a file stored on AWS S3! Opened it to get the following image:
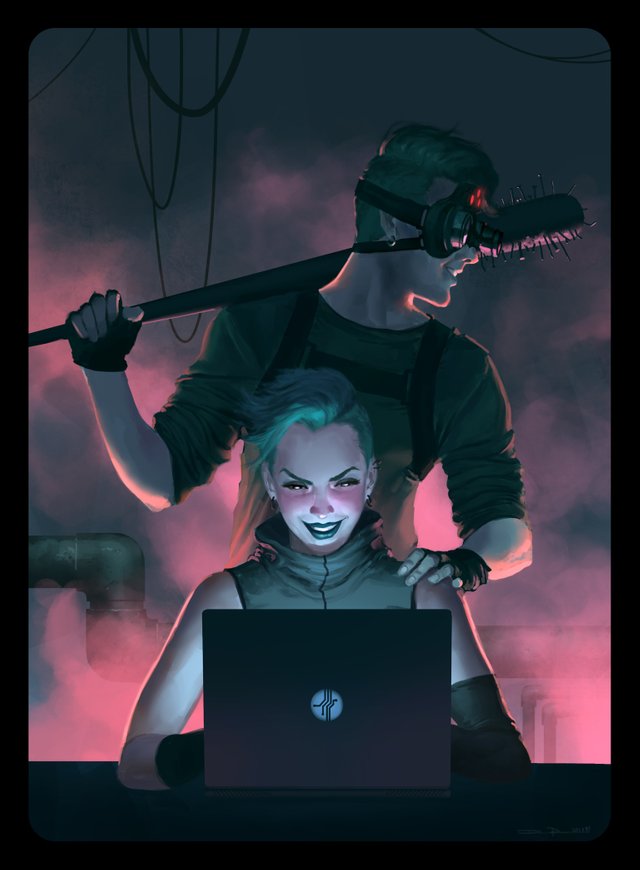
But what now? Is there something hidden in the image, and if yes how is it hidden and what exactly is hidden there? After some unsuccessful attempts to get information from the image, I went back to the terminal and re-issued the show hint and show riddle command - which to my surprise, revealed new information!
$ show hint
Command the Sphinx to show you the way.
$ show riddle
How The Times have changed and how they have not. Tell me the message when Pandora's box was opened.
Although the riddle is the same, the hint suggests that the Sphinx is now ready to take our command - whatever that means. Maybe the show command can help.
$ show sphinx
The Sphinx does not reveal Itself, but It can hear your command.
Not really, but it seems that it's all about commanding the sphinx. I was sure that I'm on the right track and the box of Pandora was opened properly, but this one got me stuck for a while. Eventually and also thanks to the Neon District Discord, I figured that The Times not only referred to time but also referred to "The Times" Magazine. Furthermore "How The Times have changed and how they have not" implies that despite the progress, some problems or circumstances persisted. By sheer luck, I stumbled upon the following article:
It seems that along with normal data, the bitcoin genesis block contains the following text/message: "The Times 03/Jan/2009 Chancellor on brink of second bailout for banks" which refers to an article published in "The Times" and also reflects the statement "How Times have changed and how they have not". So could this really be the message the sphinx is waiting for?
$ The Times 03/Jan/2009 Chancellor on brink of second bailout for banks
The Sphinx is pleased. Something has changed.
I almost couldn't believe it, but it actually was the message the Sphinx was looking for and I was at least as pleased as the Sphinx. Since the show commands seem to adapt, running them again might be a good idea.
$ show hint
Retrace your steps.
There we go! Let's retrace the steps by opening the pandora file again.
$ open pandora
https://s3.amazonaws.com/neon-district/7365637265746b657975736564746f72656163687468656c6173746c6576656c.jpg
Nailed it! The pandora file contains a new link to a new file also stored on AWS S3. Opening the link reveals the following image:
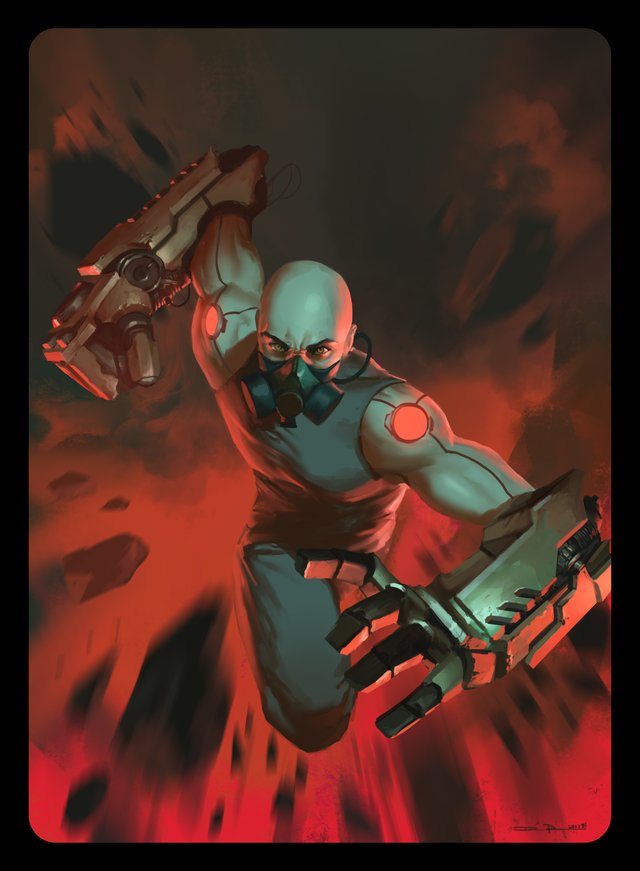
But what now? Why don't we just go back to the terminal and issue the show hint command again?
$ show hint
Either-or, but not both, leads you to the next phase.
"Either-or, but not both, leads you to the next phase." reminded me of the 1FLAMEN6 puzzle, where the bits of the flames were XORed with the bits of the key, so I figured that there is some XOR operation to be done. But what should the XOR operation process? It's not like I have a series of Bits which lead me to the question of where to obtain a series of Bits that could be processed through XOR. Although the aspect ratio of the images is the same, their size in pixels is different. So I turned down my idea where I wanted to XOR the pixels in some way and focused on the file names. To XOR the two file names, I converted the Strings, which are actually HEX-values, into their binary representation, ran an XOR over the two binaries and converted the resulting binary back into a HEX-value. The resulting HEX-value was:
- 6e656f6e646973747269637470757a7a6c6566696e616c6c6576656c626f7373
I decided to take the AWS S3 Links to the previous images and replace the hex value with the one that resulted from the XOR operation. Which turned out to be the right plan an pointed me to the 3rd image below:

Interesting, but also confusing and another one that got me stuck for a while. Although I failed to extract information from the first image, people on the Neon District Discord Channel suggested that there must be something hidden in the file and pointed to something that is called Steganography. Learning about Steganography, I found out, that it is possible to hide information or even a file within an image. Using a tool called steghide (Sourceforge Download) I was able to retrieve a file with the name "steganopayload8614.txt" from the image above.
To get a first impression of the file, I decided that a hex editor should give me the best insight. I didn't have one installed and stumbled over the following two options:
This is what the start file looks like when opened with HxD. The whole file consists of 2310 lines with a line width of 16 Bytes.
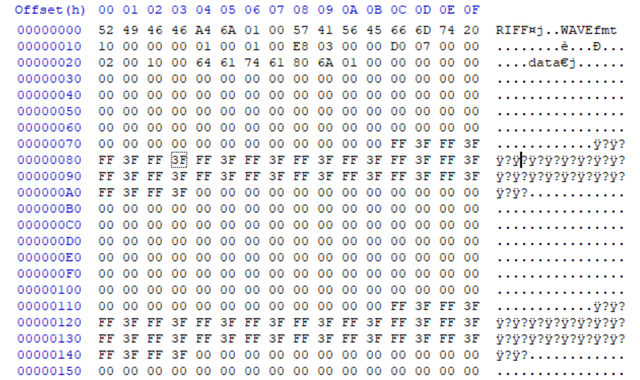
This reveals two possible options to continue. On one hand, the first line indicates that this is a wav file, on the other hand, the "FF 3F"-pattern looks too got to be neglected. I chose to follow the wav path and changed the file extension from txt to wav and opened the file with audacity which revealed another pattern that almost demanded to be transformed into a binary string.
Which is exactly what I did, unfortunately, this turned out to be a dead end. I got kind of stuck with my worthless binary and some "FF 3F" I didn't know what to do with. Some people in the Neon District Discord channel were way ahead and started to release hints for people in the early stages. Now I was sure that the "FF 3F" route is the way to go, furthermore, I learned that there is some sort of ASCII art that can be extracted from the steganopayload8614. After some time without any idea how to get the ASCII artwork, I reached out for help in the Neon District Discord channel. Luckily, a nice person decided to give me an additional hint:
- Convert the ff3f to 1 and 0000s to 0 in blocks of 20
- Word wrap and set “ width” of your doc to 10 cols
This was one of these mindblowing "why didn't I think of this" scenarios. So I went back to HxD and followed the instructions, except that I chose to replace the FF 3F blocks with "X" (Hex 58) and the 00 00 blocks with " " (Hex 20) for better readability of the ASCII Art. After replacing FF 3F blocks of 20 with X and 00 00 blocks of 20 with " ", I adjusted the line width to 10 et voilà, there was my ASCII Art

The further its zoomed out, the easier you can read the URL which is:
- s3.amazonaws.com/neon-district-easter-egg/gateway.jpg
And this, ladies and gentleman, is the end of Stage 1 - The Terminal.
Welcome to the gateway (of hell).
Closing words
I learned a lot by solving the steps required to finish the first stage of this puzzle and I also experienced a very helpful and friendly community in the Neon District Discord. I hope that you could learn something from this post and also I hope for this to be a way to give something back to the community.
Let me know what you think and leave your questions, feedback, and comments below.
If you want to find out more about Neon District, the Team behind, or Crypto-Puzzles in general, feel free to check out my blog post on this topic:
Thanks for reading and happy Crypto-Puzzling!
Cheers
Sources and additional Information
You can find additional information in the resources linked below:
Great post! Btw you could've also XORed the hex values directly without back-and-forth binary conversion via: http://xor.pw/
amazing and quite hard!
Indeed. The reward of 15ETH is still up for grabs. 😎
So what is thew answer to the hint:
$ show hint
Either-or, but not both, leads you to the next phase.
Hey @dxhtml! Thanks for your reply. Like I wrote in the blog post, the answer is to take the filenames (excluding the file extension) of the first two images and xor them. You can either do it by manually converting both to binary, xor them, and convert the result back. Alternatively, you can use the website suggested by @tarekskr: http://xor.pw/
I hope you found this information helpful, if you have any further questions, just let me know.
Wao! gracias por todo este contenido que nos has compartido! Soy nueva en la comunidad! espero que disfrutes de mis contenidos!!
Some astute fans found th… twitter.com/i/web/status/9…
Disclaimer: I am just a bot trying to be helpful.
Thank you for this great explanation, i am new to puzzle solving and find your article well organized and easy to understand, but i tried to extract the hidden ASCII art with hex editor but failed, could you please explain how you did it ?
What do you think if I say Nexty is the best platform today, better than BTC & ETH? The reason I say this is because of the outstanding features of
Nexty - instant transfer & zero transfer fee. Please join @Nextyio for more. #crypto #nexty #bitcoin