MasterNode VPS Security - The Basics - Part 1
Introduction
TL;DR: Example security measures to help keep your Linux-based VPS masternode running, and earning.
Who's this guide for?
You've carefully accumulated enough coins to stake a masternode. Time to get started with a VPS, and get that masternode up and running.
But, you've never run a Linux-based server before. Or, perhaps you have, but only at home on your local network - never a server out by itself on the Internet at large.
The Narrow View - Why do *I* need to secure my VPS?
The Internet's a dangerous place - any publicly available server will, at the very least, be subjected to a constant 'background noise' of automated hacking attempts.
Bots will routinely test your defences, and report back any vulnerabilities to their masters. They may even automatically exploit a vulnerability and subvert your VPS for their own ends there and then.
Common exploits include co-opting your VPS for sending spam, hosting malware, or participating in DDoS (Distributed Denial of Service) attacks on unlucky third parties.
All of the above are likely to get your VPS blacklisted and shut down by your provider. It's possible they may even drop you as a customer, and deny you access to your VPS and its data.
A masternode that's offline, is a masternode that isn't earning.
Looking for another VPS provider after a security issue and setting up all of your masternode software from scratch is presumably not how you'd like to invest your time.
Wider Considerations
If naked self-interest isn't sufficient motivation for you, consider the following:
How successful can a PoS cryptocurrency be if many of its masternodes are run insecurely?
What will happen to that currency if the mass shutdown of significant numbers of its masternodes can be orchestrated by a bad actor?
How do vulnerable masternodes increase the likelihood of a successful '51%' attack?
Sleep Soundly
A good night's sleep can be hard to come by in crypto-land. A little effort at the outset when setting up your VPS masternode can go a long way to protecting it and will ensure that you can lie in bed at night, in a cold sweat, worrying about more important issues.
This article will show you, step by step, some simple security measures you can take to significantly reduce the risk of your VPS being security compromised.
Disclaimer
The information in this article is provided in good faith as a list of examples of some simple best-practice security measures that can be applied to a Linux-based server. It is not designed to be fully comprehensive or exhaustive and by no means constitutes a complete security strategy. This information is provided without warranty, express or implied, and can be used only at the reader's own risk. Best effort has been made to ensure the accuracy of all information provided, but no guarantee of accuracy is provided. By using this guide, in part or in totality, you indemnify the author against any liability for any and all losses arising from, or connected to, usage of the content contained herein.
Be careful. Use at your own risk.
Assumptions
This guide is written under the assumption that you're using Ubuntu 16.04 as the version of Linux on your VPS (as it seems to be popular among the crypto community) but I've tried to include variations in commands for CentOS 7 where applicable.
In the event that you haven't actually chosen a VPS provider yet, here's a $10 credit referral link for 'Digital Ocean'. You could do worse than them, and I get some sort of credit too if you use that link. Which is nice.
I'm assuming also that you have gained SSH access to your VPS, which will allow you to type the commands listed below.
If you're using Linux or Mac OS on your own machine, this will likely be via their respective command lines (usually via an application labelled 'Terminal').
On Windows, I expect you'll be using the 'putty' application which provides SSH capability.
Step 1 - Change The Root Password - 'Change The Front Door Locks'
Your VPS provider likely sent you an e-mail with the IP address of your new VPS, and the password for the all-powerful 'root' user.
There's only one person that should know the root password for your VPS, and that's you!
As e-mail should be considered an insecure method of communication, the first priority is changing the password for the root user.
The new password should be strong, long, random, and unique. Never, ever, re-use a password you've already used elsewhere. If you have difficulty keeping track of hundreds of strong, long, random and unique passwords in your head, consider using a password manager (which can both store, and generate passwords for you) such as:
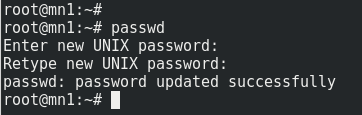
To change the password, SSH into your VPS as the 'root' user and run the following command:
passwdYou'll then be prompted to enter a new password, and then re-enter it as confirmation.
You should see the message 'password updated successfully' as per the screenshot below:
Tip: It's probably easiest to copy/paste this new value (from your password manager program) rather than trying to type it out manually.
Step 2 - Change The Default SSH Port - 'Hide The Door Handle'
The default port assigned to SSH is 22 and your VPS will sit and listen on this port for incoming connections.
Unfortunately, malicious users ('hackers', 'script kiddies', whatever) know this and there does exist a 'background noise' of automated attack malware on the Internet that will scan random IP addresses to see if port 22 is open, and if it is, attempt a barrage of automated SSH logins using common, weak, guessable passwords.
Seeing as you've already completed 'Step 1' above and have selected a strong, long, random and unique password you've already protected yourself somewhat against this attack vector, but the aim here is to avoid even appearing, on cursory inspection, to be a VPS running SSH.
A burglar can't check if your door is locked if he can't find the door handle.
To change the port SSH is running on, SSH into your VPS as the 'root' user. We're going to edit the configuration file '/etc/ssh/sshd_config' using the 'nano' text editor. To do so, type:
nano /etc/ssh/sshd_configIf you receive the error message 'nano: command not found' it just means that the nano text editor hasn't been installed on your VPS. To install it, run:
apt-get updateapt-get install nanoor if you're using CentOS 7 instead of Ubuntu:
yum updateyum install nanoYou should see the configuration file opened inside nano:
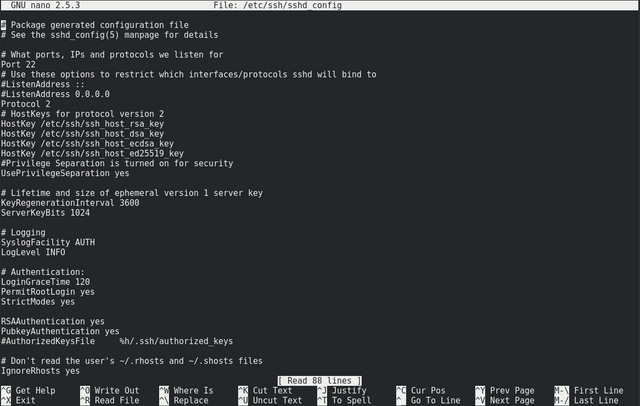
About the fifth line down should be:
Port 22
We're going to change this to something else. Any value in the range 1000-49151 is probably a good value, as long as it's not already well known as being used for something else (see this list of known ports for guidance).
Let's choose, say, 9707. Change the line to read:
Port 9707
Then, hit Ctrl-O to save the file and Ctrl-X to exit the nano editor.
Now, we have to restart SSH on the VPS so that it'll re-read the configration file and switch to the new port. To do this, type:
service ssh restartNow, let's test that actually worked. Don't log out of your existing SSH session. Instead, attempt a fresh login on the new port.
MacOS/Linux
If your home computer is running Mac OS or Linux, you'd use:
ssh [email protected] -p 9707(where 'xxx.xxx.xxx.xxx' is the IP address of your VPS) instead of your usual:
ssh [email protected]Windows
In putty in Windows, change the 'port' box to contain the new value, like so:

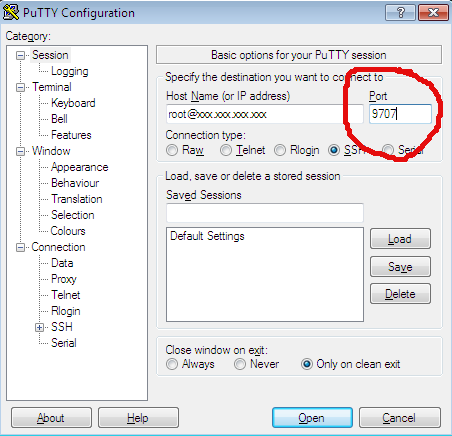
From now on, this is the port that you will log into SSH with. Connections using port 22 will no longer function.
If for some reason you can't get the new login to work on the new port, use the existing SSH session that you left open to reverse the change above (edit with nano back to 'Port 22', save, and restart SSH).
Step 3 - Use Key-Based SSH - 'Build Another Front Door With A Dead Bolt'
At present, anyone with the password to your VPS can log in with root privileges (i.e. with complete and total control). As such, your VPS is only as secure as your storage of that password.
Key-based authentication adds an extra layer of security. A public encryption key is placed on the server. To be able to SSH into that server, a user must possess the corresponding private (secret) key.
That is to say, ownership of the VPS is 'proven' by possession of the private key in question.
If this sounds familiar, it's because it is - public-key cryptography is the basis of cryptocurrency. Only, in this case we're using it to prove ownerhship of a server rather than Bitcoin, Litecoin, or Doge.
Furthermore, the private key can only be used once it is unlocked via a passphrase (just like unlocking a Bitcoin wallet).
The end result will be a server that can only be accessed by a user who has both the secret key, and the corresponding passphrase for that secret key.
This removes any possibility of an attacker brute-forcing access by simply guessing the password for the server. If they don't have the key, they can't log in.
I'll detail first how to set this up on Windows, and then describe how to do it if your Desktop/Laptop is running Mac OS or Linux.
Key Generation - Windows
First, we need to generate your public and private keys. This can be done using the putty companion program, 'PuttyGen' which you can find as a direct link here or in the list of all putty programs.
On running that program, let's choose 'RSA' as the key type and indulge in some healthy paranoia by upping the number of bits in the key to 4096 as shown:
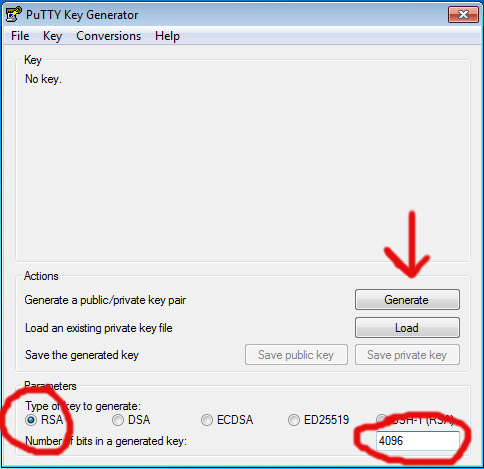
Then hit 'Generate' and move your mouse around in the grey window for a while to generate some randomness until the progress bar reaches completion. This may take a few minutes. It's all in the wrist.
You'll see the top box populated with what looks like gibberish when the process completes. Now choose a 'Key comment' (your name or something to identify the key) and a passphrase (strong, long, random and unique) as per:
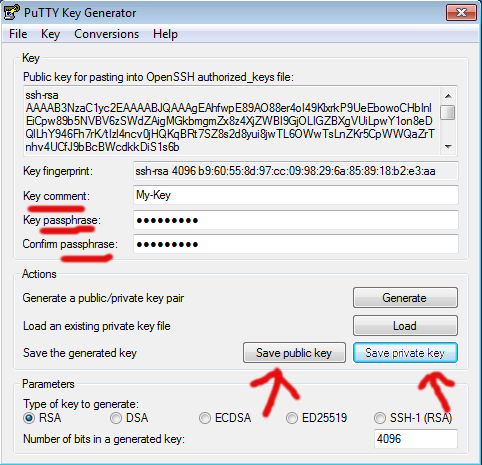
Do not forget the passphrase! Perhaps use a password manager program for storage of such, unless you have a more secure way to hand.
Hit 'Save public key' and call it, say 'putty_public_key'. Hit 'Save private key' and call it 'id.ppk'.
Finally, highlight all of the text in the top box (make sure you scroll all the way to the bottom!) copy it, paste it into 'notepad' and save it as 'id_rsa.pub' as per:
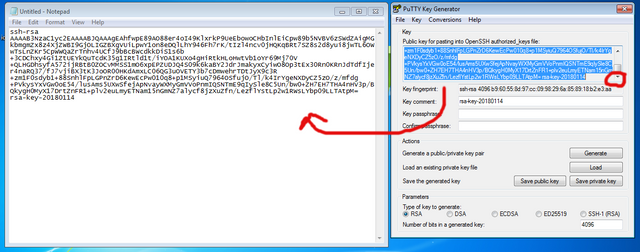
So, you should now have three files:
putty_public_key
id.ppk
id_rsa.pub
Treat 'id.ppk' very carefully and store it only where it needs to be used. This is your private key.
'id_rsa.pub' is the public key we're going to drop off on the server.
'putty_public_key' is also the public key, but in weird putty format. It's for backup purposes only.
Key Generation - Mac OS/Linux
To generate public and private keys you can just open a terminal on your home computer and type:
ssh-keygen -t rsa -b 4096This will generate two files:
id_rsa
id_rsa.pub
in your own, local, '.ssh' directory. For example:
/home/bob/.ssh/
if 'bob' is your username on your home computer.
'id_rsa.pub' is the public key you want to place on the VPS as per the following instructions.
Key Installation - All Systems
SSH into your VPS as normal.
Make sure you're in your home directory by typing:
cd ~Then, create the '.ssh' directory to store the key in:
mkdir .sshYou can run the following to check it created OK:
ls -lahtrIt should look like this:
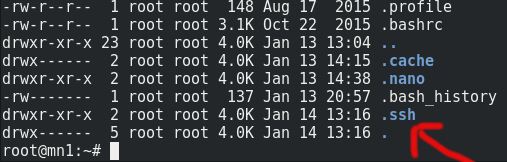
Now, change the permissions of this directory so only 'root' has access to it (SSH logins will fail if this is set incorrectly):
chmod 700 .ssh/If you now run:
ls -lahtragain, you'll see the permissions have changed:

Now, let's get into that directory:
cd .sshand open a new file which we're going to call 'authorized_keys' (the name must be exact):
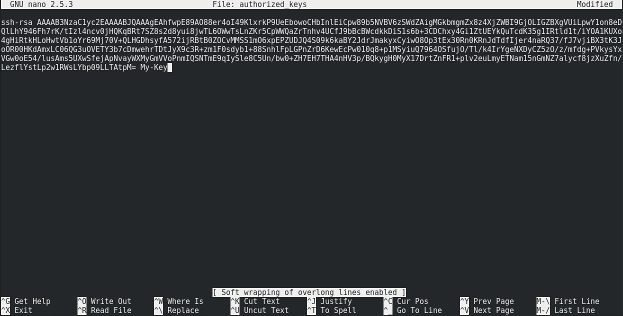
nano authorized_keysCopy the text of the 'id_rsa.pub' file (which you probably still have open in notepad if you're a Windows user, or open it in your text editor of choice for Linux/Mac users) and paste it into nano window. Take care not to clip the beginning or the end of the key as this will render it useless - it must be the entire text.
You'll probably only be able to see the end of it when you've pasted it in as it's effectively one really really long line. To get a better view of it in nano, type:
Escand then:
$(i.e. shift-4)
This'll enable soft line wrapping and you should see something like this:
Now, hit:
Ctrl-OTo save the file, and:
Ctrl-Xto exit nano.
You can verify it saved correctly by typing:
cat authorized_keys(this should print out the contents of the authorized_keys file, which should match what you have in notepad on your Windows machine).
Finally, we tighten up the permissions of the authorized_keys file:
chmod 600 authorized_keys(Again, SSH logins will fail if you skip this part).
Testing Key-Based Authentication
Right, now let's make sure it works.
Windows
Open 'Putty'. On the left hand side, expand the 'SSH' '+' sign and select 'Auth' as per:
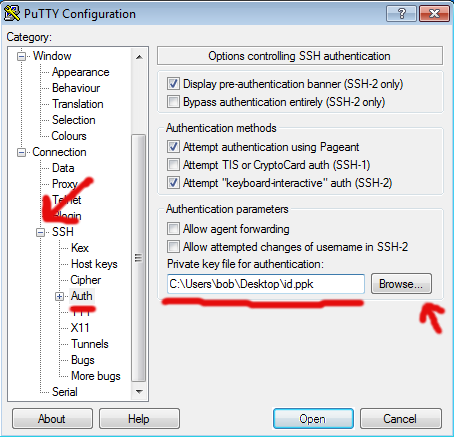
Hit 'Browse' and select the 'id.ppk' file you generated above. This example shows it has having been saved on the Desktop, but you'll probably have saved it somewhere more secure and organised than that, won't you?
Now, on the left hand side scroll up and select 'Session' as per:
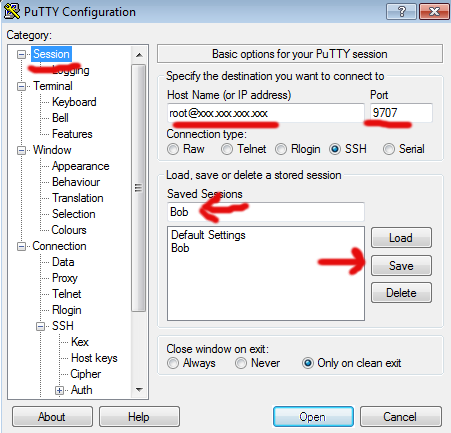
Type your connection string in the 'Host Name' box as usual. This example uses 'xxx.xxx.xxx.xxx' instead of your real IP address.
Enter your port number (as per the above, we changed this to '9707').
Give the profile a name in the 'Saved Sessions' box (I've used 'Bob' for this example) and hit 'Save'.
Now, when you load putty you can just click on 'Bob' and hit 'Load' and it'll be primed to connect to your VPS with all of the details populated and your private key ready to go.
Click on 'Open' and see if the connection goes through. If all is well, you'll be asked to type your passphrase as per:
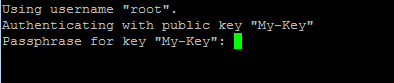
Type in your passphrase (the one you created above when creating the key, not the password for your VPS) and you should be logged in.
If not, the most likely issue is incorrect permissions on the '.ssh' directory or 'authorized_keys' file on the VPS (see above for correct settings) or a messed up copy/paste of the public key (clipping at either end is usually the cause).
Mac OS / Linux
To test the login, you can just open a terminal and type:
ssh [email protected] -p 9707(where 'xxx.xxx.xxx.xxx' is the IP of your VPS). When you created the keys via 'ssh-keygen' above, it'll have put all the local files in the right location for you).
Now that we can log in using key-based authentication, it's time for the next steps.
In Part 2 of this guide, I'll cover turning off password-based authentication entirely and installing a firewall before covering further steps in Part 3.
Buy Me A Beer
If you find this guide at all useful, feel free to buy me a beer. Or part of a beer. Or a keg. Or two:-
LTC: LcorMkmmMpbVn2vBy5dUCGNDytnmHSW5vy
DOGE: D8PUDKoF7ZkHN43ELdRZZGNUv6iZ9xLScL
BCH: bitcoincash:qq2u2tcmwefpwh5lz5x9pndz30jathm93539m42dkj / 12z7QcbwYXirNj8EhzXHsuDMz6BjY9An6e
Coins mentioned in post:
Congratulations @docdagbjort, you have decided to take the next big step with your first post! The Steem Network Team wishes you a great time among this awesome community.
The proven road to boost your personal success in this amazing Steem Network
Do you already know that awesome content will get great profits by following these simple steps, that have been worked out by experts?