The making of a dust shoe for my cnc mill.
I am getting there with my pipeline regarding the cnc mill. This leads to me discovering all the stuff I lack.
One of the absolutely necessary things when milling wood and in particular MDF, is some kind of effective dust management. My first step towards solving this was building an enclosure for the mill. This works great and keeps the dust inside the machine, but it doesn't solve the problem of the rails and rollers clogging up.
For that I need something more elaborate, something like a dust shoe (as they are called).
A dust shoe is an enclosure that follows the router around and covers the volume where the cutting is done. Often it has some kind of suction to remove the dust as it is generated.
There are several ways of handling this and it would probably only be a matter of minutes to find something on thingiverse or a similar site, that I could print or mill, but that was never my way. I have this thing with making everything from scratch and so I set about designing my own dust shoe.
Even though I have figured out how to make full 3D stuff for cnc milling, having a 3 axis mill makes it a lot easier to do layered 2.5 d projects. That is projects where essentially 2D shapes are combined to create something 3 dimensional, and that was also the approach I chose for this project. I drew out the basic shapes that I wanted in inkscape Which has turned out to be great for cnc projects. The only downside of doing it this way is, that I have to be careful not to make mistakes in the overlap between layers, since inkscape doesn't visualize the layering explicitly, like a 3D cad program would.
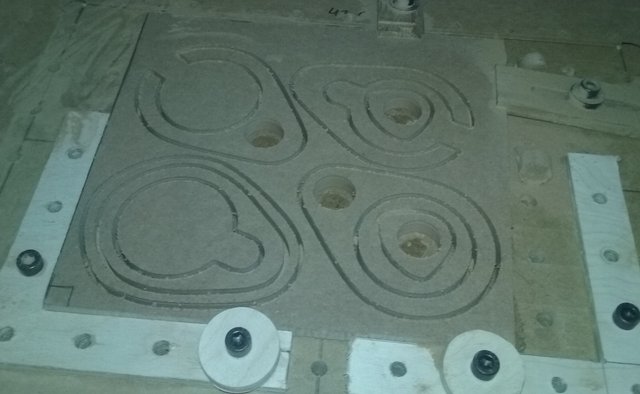
I then opened the svg file in carbide create, which comes with the mill and set the tool paths, saved it to 3 gcode files. Since I have had problems with the controller program, I like to keep the jobs split up so it is easier and less time consuming to restart. If everything is in one file I have to start all over and wait while the mill goes through the entire path that it has already cut. By splitting it up I can save some times if that happens. I should probably just switch to using e.g. universal gcode sender instead of carbide motion, to give me more control, but that is yet another program I need to learn how to use so it will have to wait.
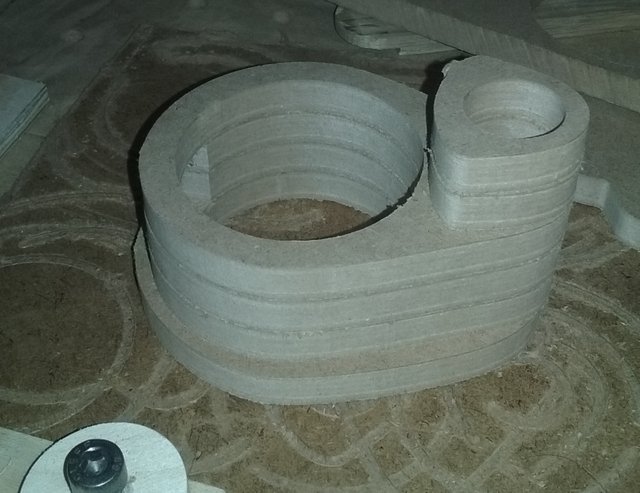
After I had the parts milled I stacked them to check that I hadn't made any mistakes in the design, and then I glued them together. well I did do some adjustments to the way the suction would connect, it turned out it had to be turned away from teh machine for the vacuum to be connected, but it was an easy fix on the belt sander.
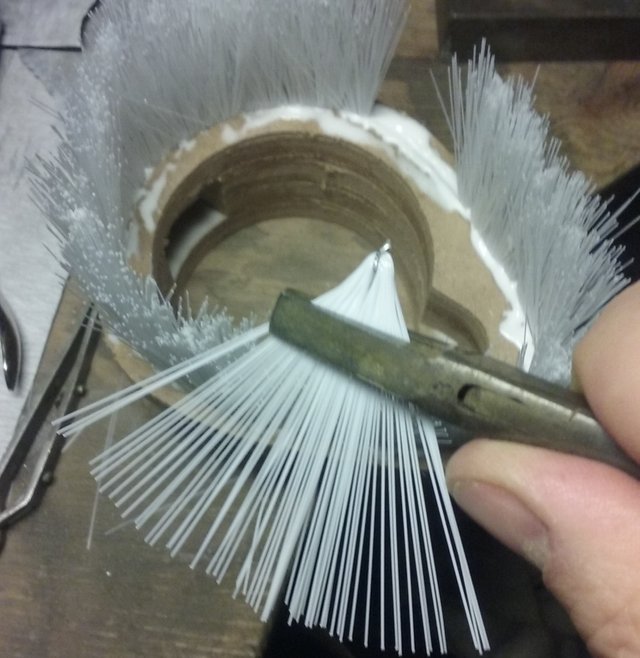
I had bought a cheap brush in our local grocery store and the next step was to pull out the individual brushes and glue them into the premilled slot I had made on the dust shoe. I admit that I had pretty much eyeballed my way out of choosing the size for the slot, and ended up making it the size of my endmill simply because it was the easiest, but as it turned out it was the perfect size for the brushes. they slipped in with just a little resistance. Just enough that they were held in place until the glue dried. Sometimes you get lucky :-)
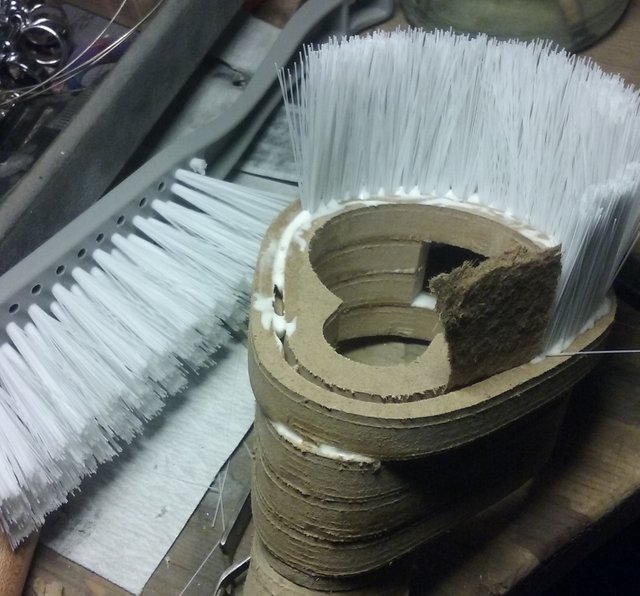
The first few brushes I cut of, but then i found out that I could simply pull them out using a pair of pliers. this made it a lot easier and had the added advantage that the brushes was held together with a small piece of metal wire. this will add to hte durability of the finished brush rim.
The final thing I needed to do was mount the tube that would connect to the vacuumhose. I did this using a small piece of aluminium tube That i had lying around and which fitted right inside the hose. with that in place I was ready to mount it on the mill.
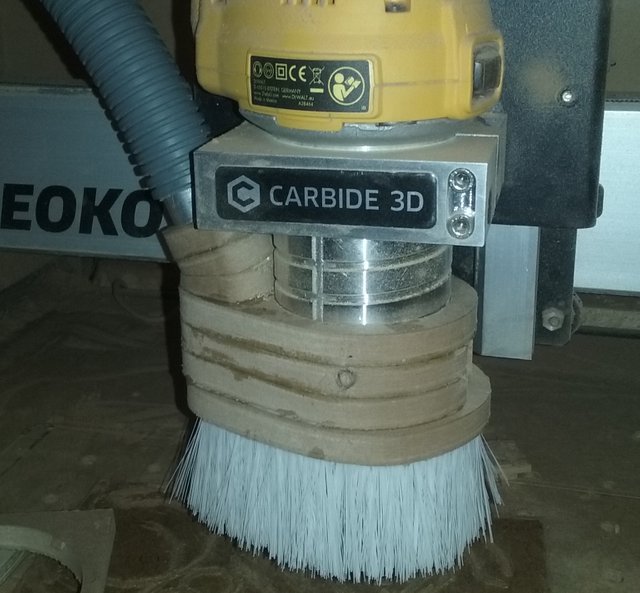
One of the great things about machining like this is the precision with which I can make parts that fit onto something existing. it is a joy to see how the dustshoe just slides over the mill and sits there.
I have more or less ignored the design and toolpath setup in this post, focusing on the actual milling and assembly, but i do plan to make some posts for those of you who are interested in the cad-cam part.
Until then.

Im EvilHippie, a compulsive creative and jack o' trades. If you want to know more about me, check out my introduction post here
If you like what you see, feel free to upvote, follow and resteem
or you can check out my accounts on these sites:
This post was shared in the Curation Collective Discord community for curators, and upvoted and resteemed by the @c-squared community account after manual review.
@c-squared runs a community witness. Please consider using one of your witness votes on us here
Hello @evilhippie, thank you for sharing this creative work! We just stopped by to say that you've been upvoted by the @creativecrypto magazine. The Creative Crypto is all about art on the blockchain and learning from creatives like you. Looking forward to crossing paths again soon. Steem on!
Wow, this is great. Awesome solution!
Congratulations!
very good solution, tebrik ederim👌