Painting a Dramatic Seascape - Part 2 - Building Up the Detail and Final Details
Hello Steemers
Welcome to Part 2 on 'Painting a Dramatic Seascape'
Check out the link to the Part 1 on how to paint this seascape.
I am currently making a video on how to paint this which I will upload to my YouTube and DTube channels in which this blog will accompany the video so stay tuned for that.
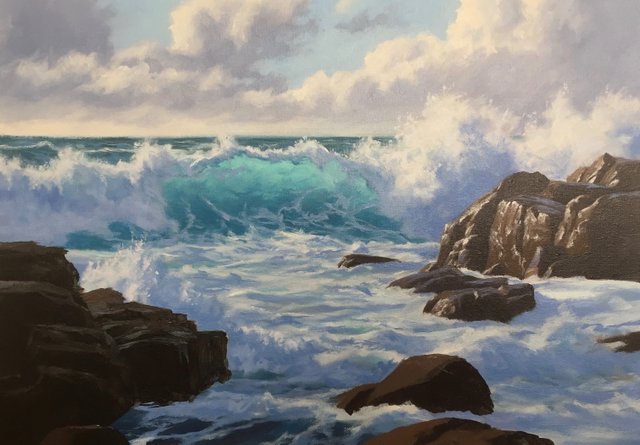
BUILDING UP THE DETAIL
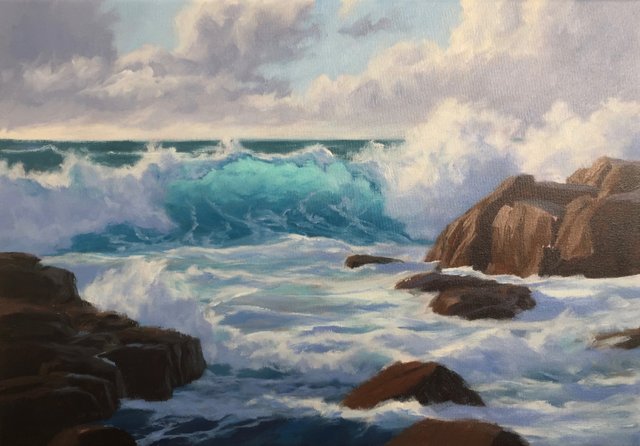
So now that the painting is dry I start adding detail ton the sky and clouds and refining their shapes. Many areas need repainting and I use the colours in the sky that I used in the blocking in process.
I add more highlight into the clouds with titanium white but still dropping the tone a little by mixing in a tiny amount of ultramarine blue, burnt umber and quinacridone magenta. Using a flat bristle brush I add wispy bits to the cloud edges to make it look like turbulent cloud you get in bad weather.
Using a flat bristle brush I begin working on the areas of light on the wave crest, foam burst and white water. I am not using pure titanium white as I need to keep the tone darker so I can paint highlights and sparkles at the end, so I add a little ultramarine blue, burnt umber and quinacridone magenta into the mix.
I start to add highlights to the rocks by mixing burnt umber and titanium white to the mix. I ultimately want to give the illusion of wet rocks.
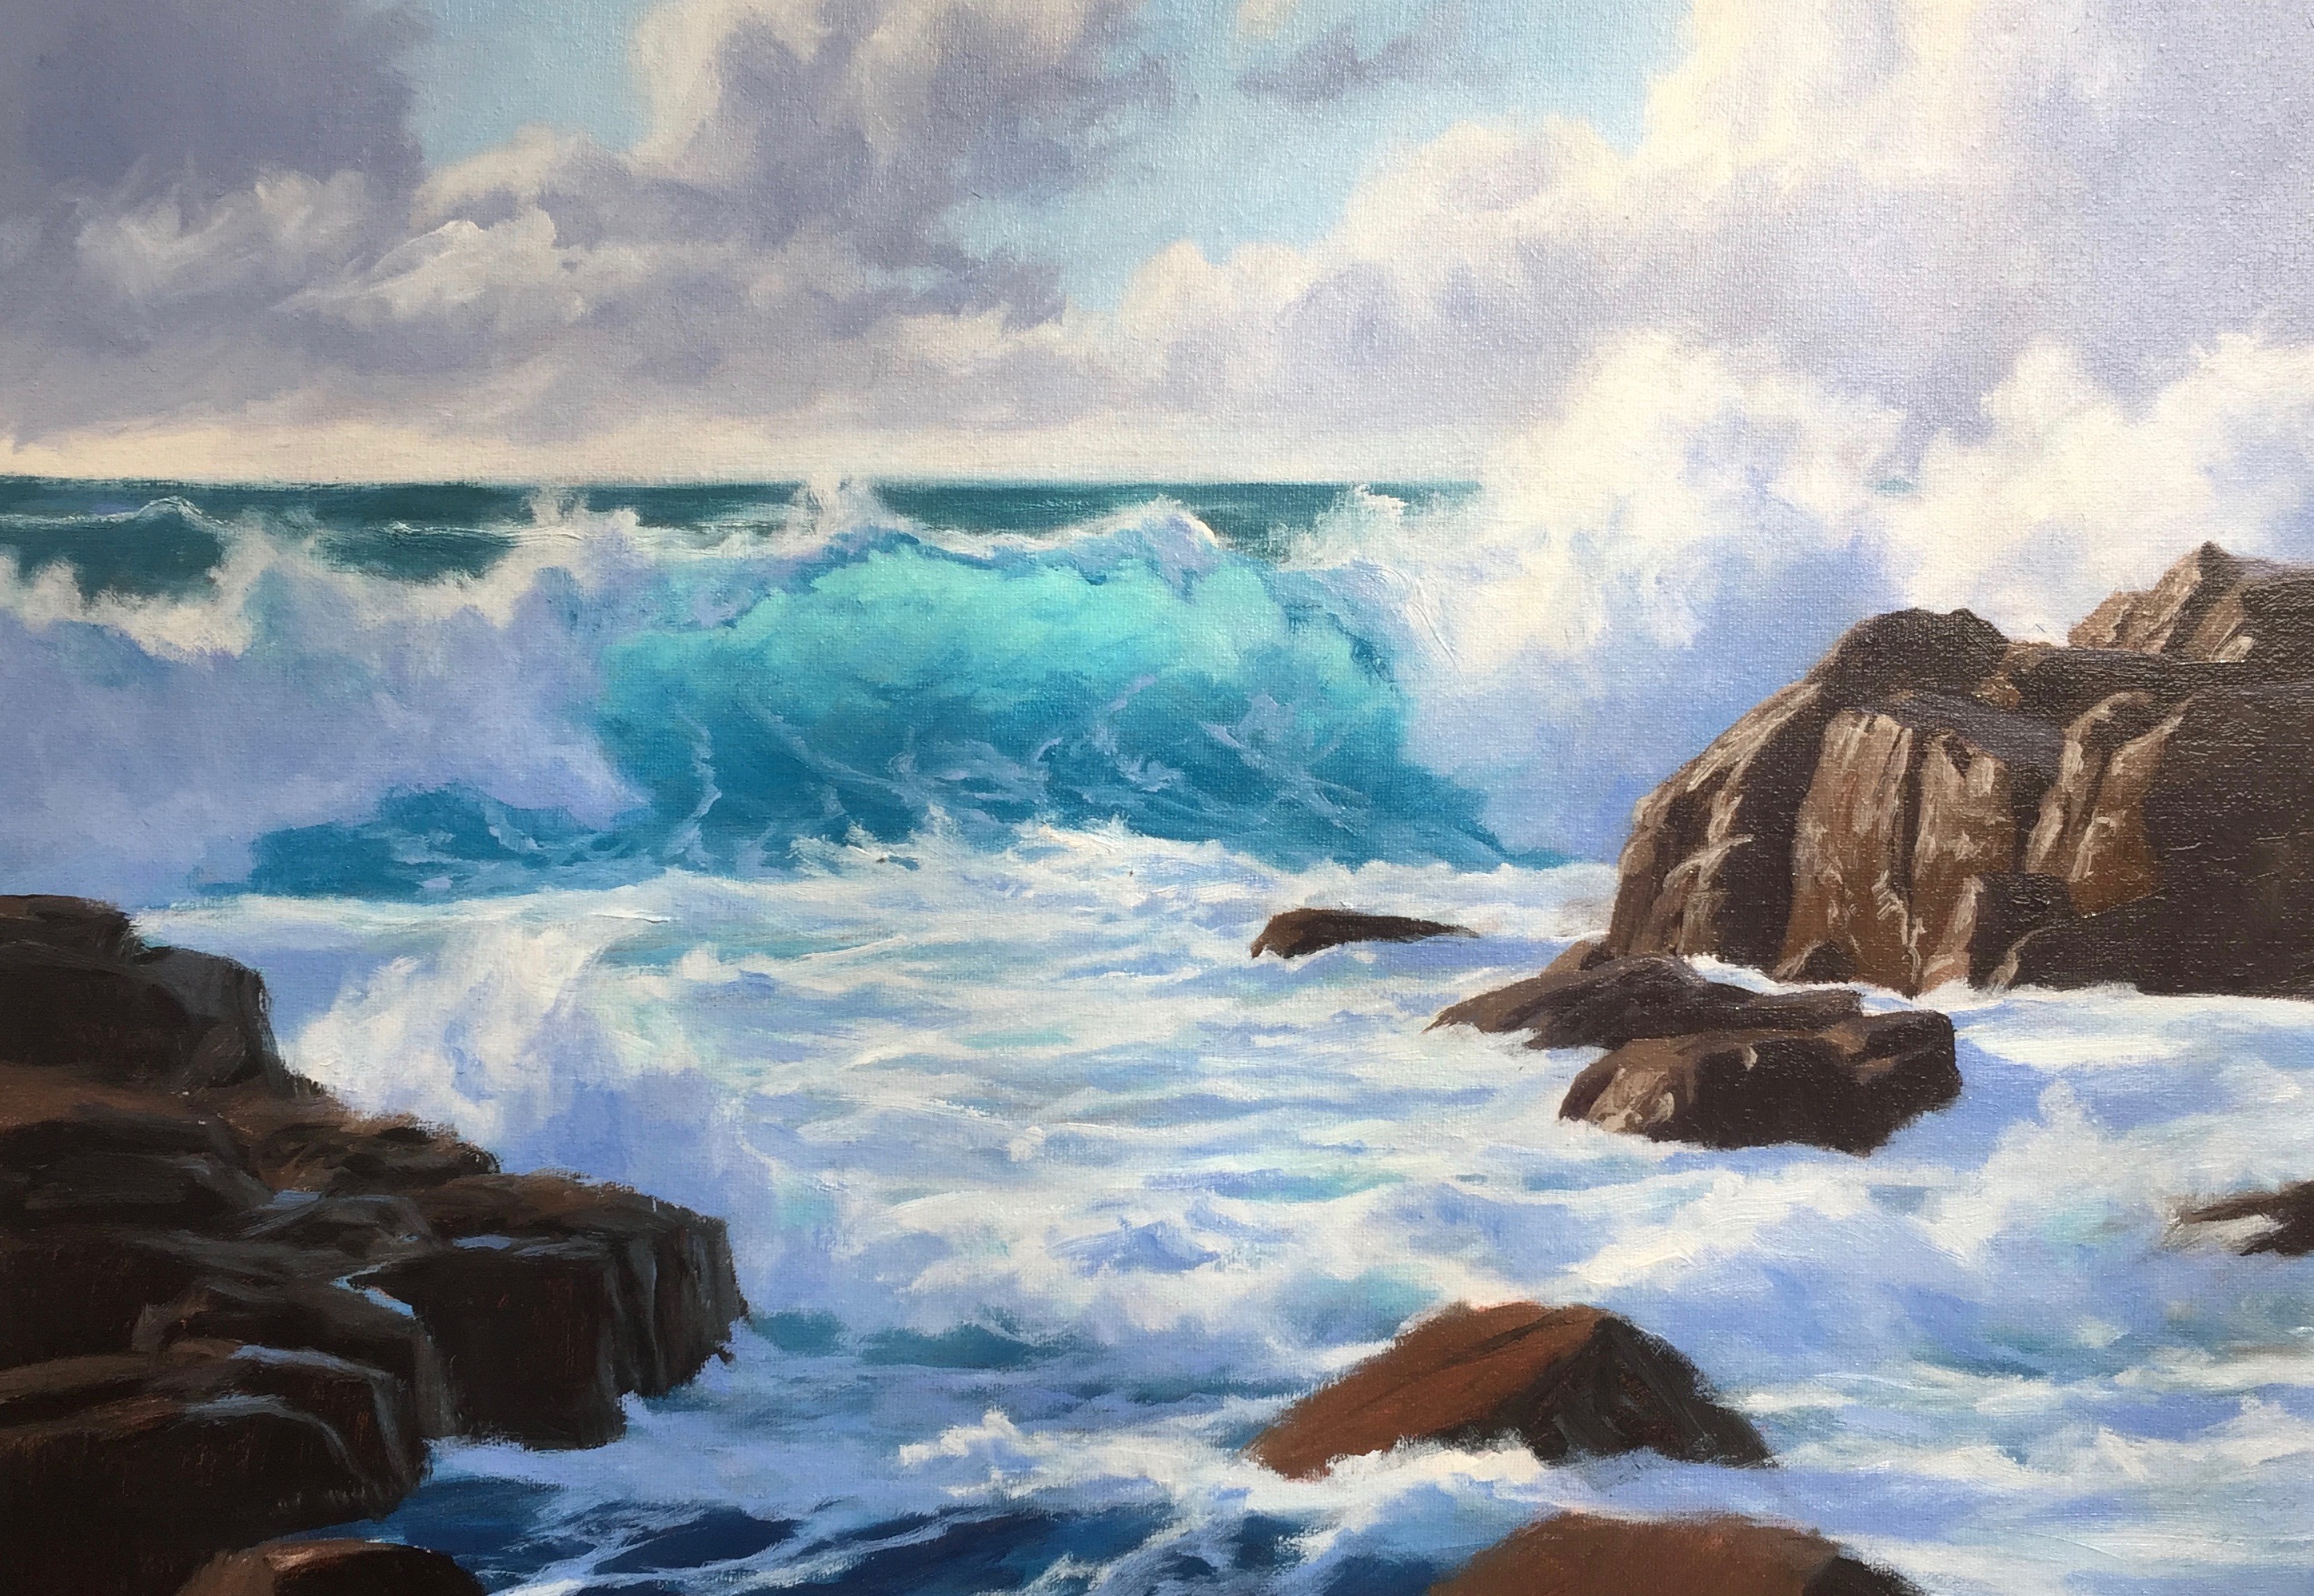
I define the shapes of the rocks in the foreground on the left side in preparation for adding more details when they are dry. I felt these rocks need to occupy more space in the composition so I made them bigger.
I introduce foam patterns in the breaking waves by mixing ultramarine blue, quinacridone magenta and titanium white. This is also the same colours I am using for the foamy water in the breaking wave.
At this stage of the painting I am refining the highlights in the white water in the foreground taking care not to make it completely white as I still need to keep it tonally a little darker so that when I add the highlights at the end with pure titanium white it will really pop.
Using a dagger brush I paint the shadows in the white water using the same colours I used in the shadow areas of the foam in the breaking wave.
I paint the glistening water in the rocks on the right of the painting using titanium white with a tiny amount of burnt umber mixed with it.
Using an old fan brush where I had removed some of the bristles with some scissors I paint water droplets in the foam burst on the right side of the painting.
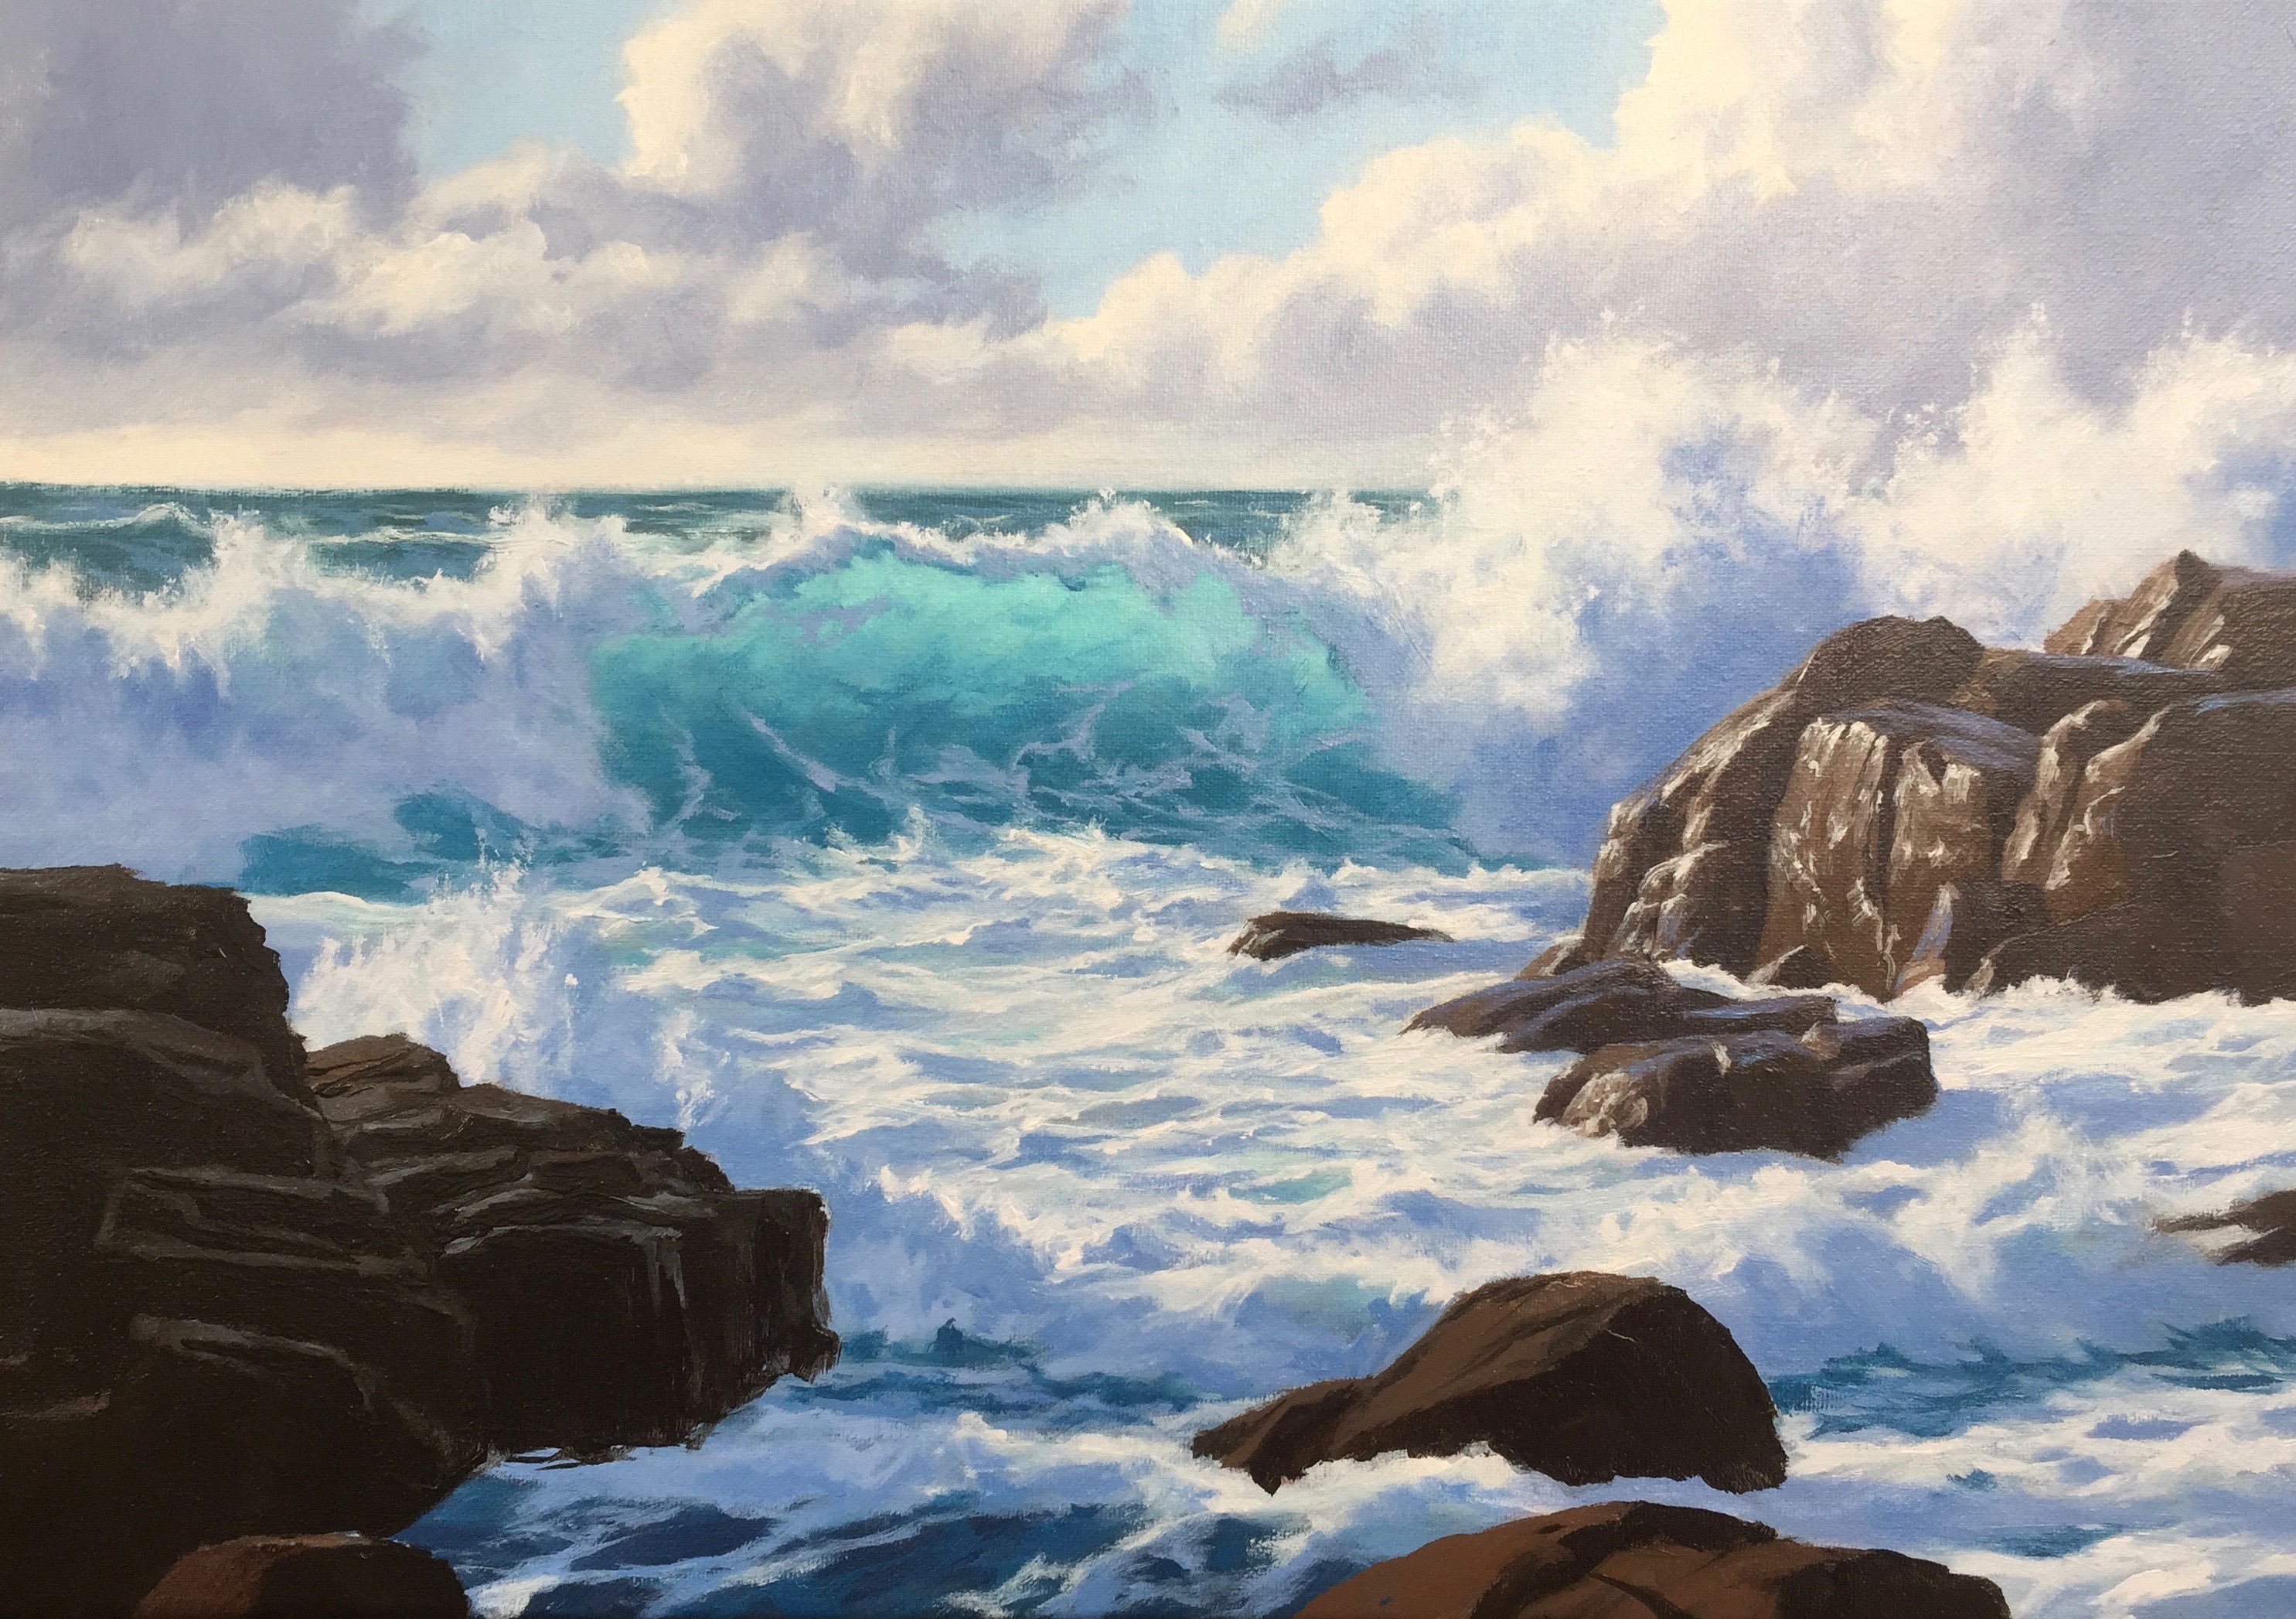
Next, I focus on painting the reflect light on top of the rocks but also in a manner that gives the illusions that the rocks are wet. To do this I mix cobalt teal with quinacridone magenta and titanium white which creates a really nice violet hue, I round of the mixture with cobalt blue and desaturate the mix a little by mixing in some burnt umber.
Using a dagger brush I mix ultramarine blue with burnt umber and define the shape of the rocks in the foreground in preparation for adding the areas in light. I make marks to indicate cracks in the rocks.
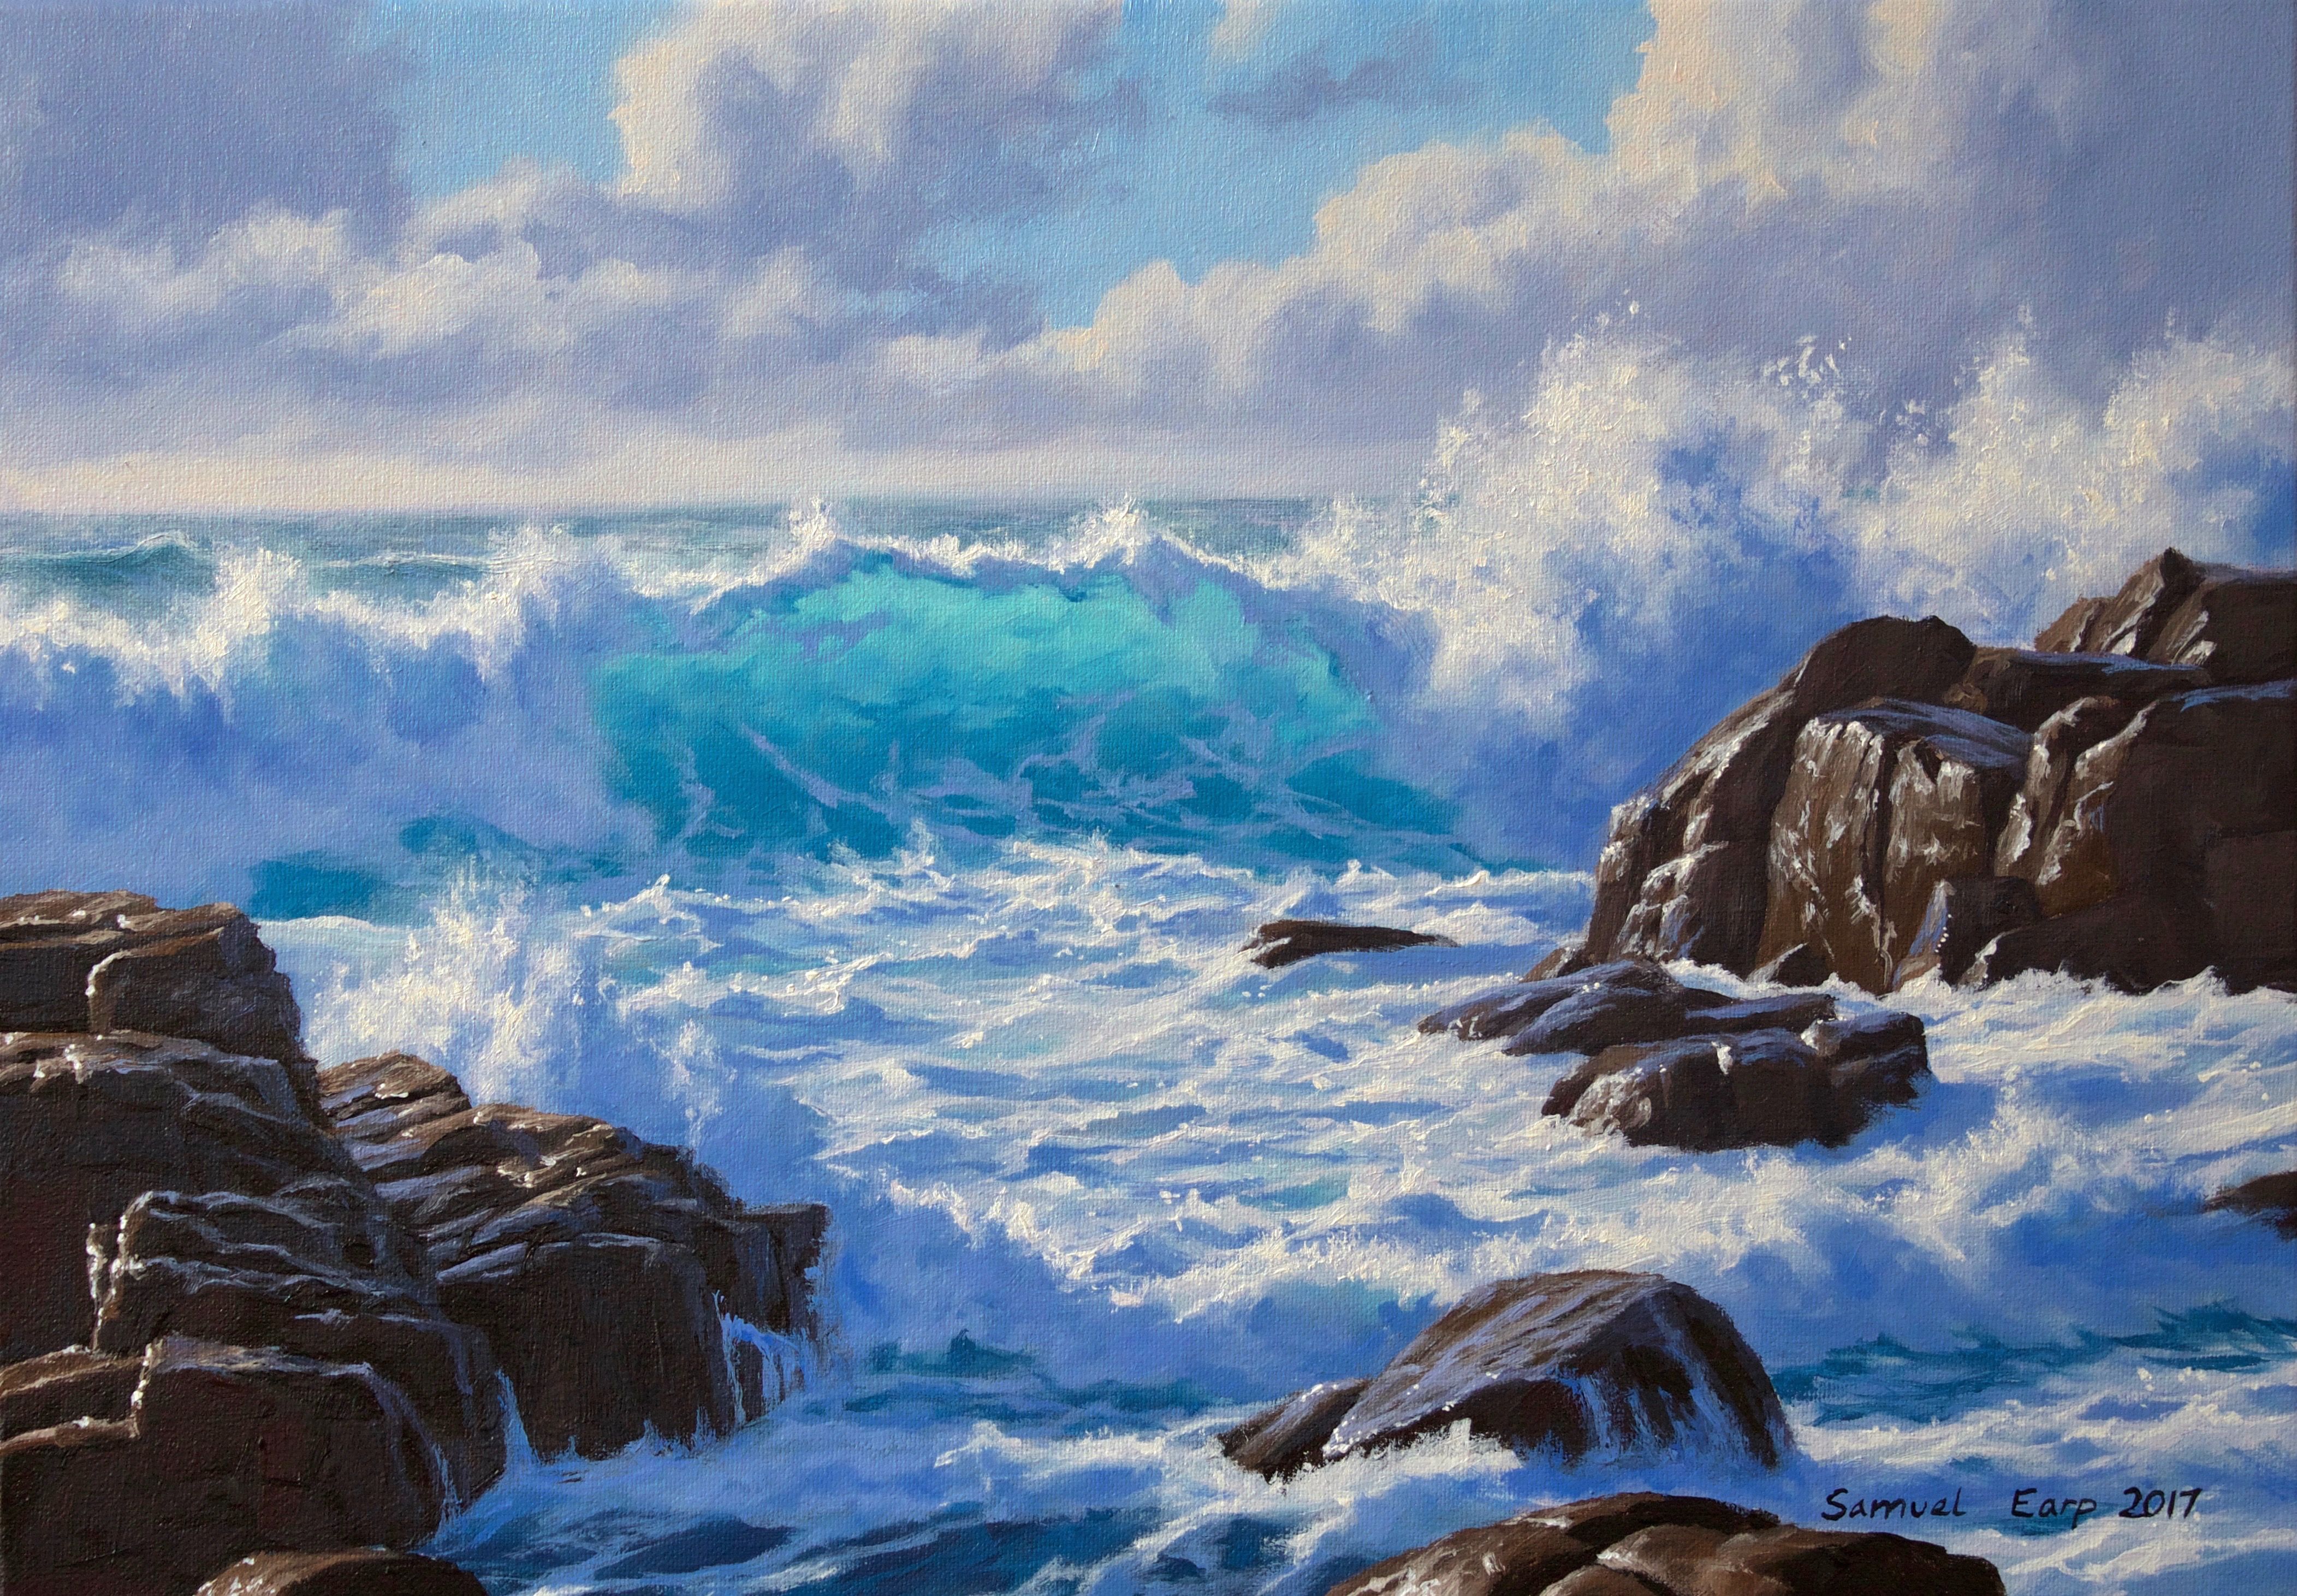
FINAL DETAILS
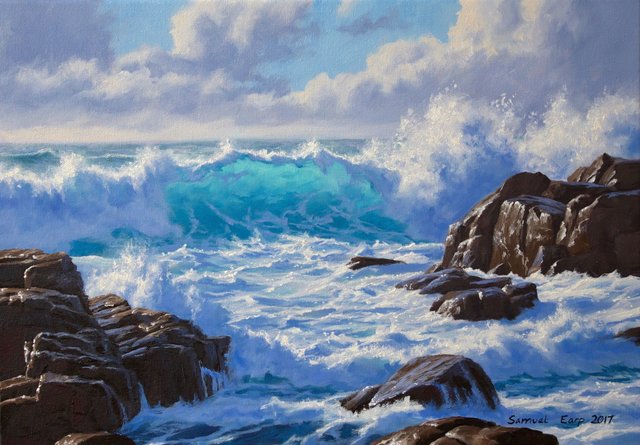
To complete this painting I add sparkles and highlights to the white water and foam bursts in the sea by using pure titanium white straight from the tube. As this is my lightest tone in the whole painting, it pops when juxtaposed against anything behind that is darker.
I focus my attention on adding the final details to the rocks in the foreground, painting the reflected light in the shadow areas using the same colours I used in my other rocks to create the illusion of wet rocks.
Using burnt umber mixed with titanium white and a little yellow oxide I paint the areas of the rocks that are in full sunlight and then add pure titanium to give the illusion of glistening wet rocks.
I give the illusion of a little heat in the shadow areas of the rocks by mixing burnt umber, quinacridone magenta and a little cadmium red light.
I complete the painting by adding spills on the rocks, something which always adds more drama to a seascape.
I hope you enjoyed this blog post and if you found this blog post interesting and helpful and you like what I do, any tips to help support my art career would be greatly appreciated.
Bitcoin: 15gYGgeLeBdeSvZmYoZ5GwrabWNjvXi5hL
Litecoin: LYzNsMfSHjSPn5V6gK6jTJB74L6ydbA3rM
Dash: XmHqFwzmyhax3zm2Q3hVhqAYfMZ2AqaZ3f
Check out my website for more painting demos and my art: samuelearp.com
Subscribe to my mailing list for news, new paintings and art tips and receive a FREE DIGITAL ART PRINT DOWNLOAD of one of my seascape paintings suitable for printing an image of any size: https://www.samuelearp.com/subscribe/
Really beautiful painting! Wish I would have a talent like you have!
I think you have a special talent. You only need is to enhance that talent. You can be a star with your own talent.
Now that is what I call some fine art! Water is so elusive to paint, but you nailed it.
Thanks @joechiappetta :)
Great work! I really like the way you explained each step until it is brought to life. There is so much talent on Steemit, I'm trying to help out my friend (support her career like you) by putting some of her illustrations together with a story, so hard to get notice. I will subscribe to your mailing list as well
Beautiful!
Love, love that wave!!! ♥
Thanks @realmeandi :)
Very beneficial #tutorial ♦♦ That is, it is of personal interest to me, as I Love the ocean & like to paint.
It is fascinating to me ..about the use of Titanium White + the sparkles to create those highlights.
Look forward to seeing that #Video !! Soon, please. This is a type of landscape I've not tackled yet -- will BE FUN
Gracias ! ☻☻
P.S. ==> My UNCLE, in Santa Barbara, used to #paint the ocean & many gathered to examine {and buy } his oil paintings. He was one colorful uncle, I can tell you ♦♦ Just like many artists, he had a Flair for the dramatic & loved to keep company w/ young ladies even when in his 60's [ha - kept him young ]
Jan A.
Thanks for commenting @janashby, I am literally in the process of editing the video that will accompany this blog as we speak. I hope to have it uploaded to my YouTube channel in the next few days with any luck.
Check out my website blog for more of my painting tutorials. https://www.samuelearp.com/new-blog/
Very informative! Thank you.
Thanks @deemarshall :)
Wow @samuel-earp-art. This is outstanding work. Following you now and definitely looking forward to more.
Thanks @stanhopeofficial :)
How wonderful. Thank you for sharing!
Thanks @timelady420 :)
Beautiful sceneries. Nice photos.
Thanks @nicksongarcia :)
👏👏
Thanks