Teenage Duck (Huey, Dewey, Louie fanart) | step-by-step making-of
I've always been a fan of Donald's nephews ever since I was a little kid. The new looks they received in Quack Pack and their portrayal as teenagers with distinct personalities made them cooler than ever. And now that I have laid my hands on Blender, I couldn't resist the idea of recreating them in 3D :)
Modeling
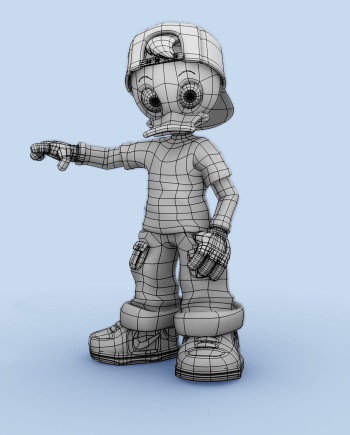
I started looking for some reference pictures of the trio on the web. Louie was the one that resembled my view of what a teenager is like the most, so I decided to model him. I couldn't find perfectly matching front and side profiles and, to be honest, I was too lazy to draw them myself. So I decided to go with what I had. I fired up Blender and started modeling the head from a simple cube, subdivided it twice and converted it into a sphere using the To Sphere tool in the Edit Buttons (F9). Then I made the eye sockets by extruding a couple of faces inward. The beak was modeled using a poly-by-poly approach starting from a simple plane. The T-shirt, pants and cap where all modeled by starting with circles, then extruding, moving and merging vertices as necessary. I then added some loopcuts [Ctrl+R] to the T-shirt and pants and moved the vertices to create the folds and wrinkles. To model the hands, I started by making the fingers and worked my way backwards from there. Then I made a duplicate of one hand, deleted the fingers and scaled it up a bit to make the glove. I had absolutely no idea how to make his shoes, so I looked for some reference photos. I found some nice looking sneakers from Nike, so I modeled one of them and scaled it somewhat to give it a cartoony shape that fits the look of the character.
Rigging & Posing
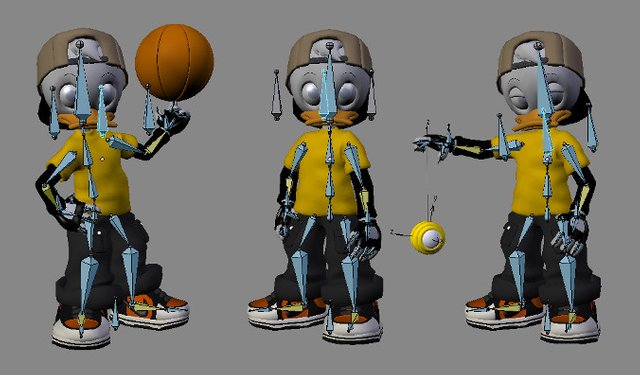
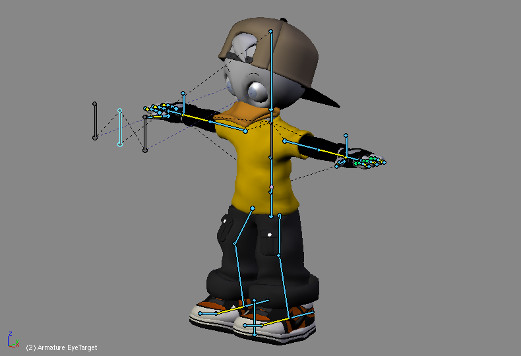
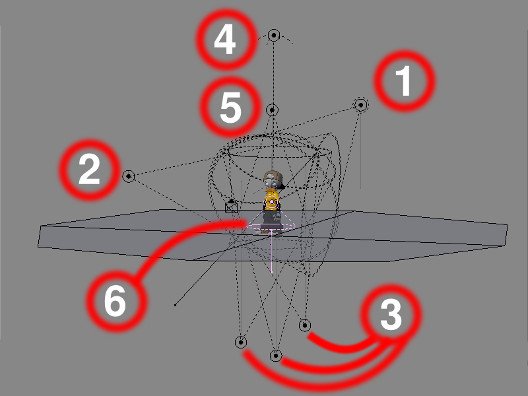
This is the part that I enjoy the most, despite my modest rigging skills I must say. I went for a simple rig as I wasn't planning on animating this character at that time. The arms and legs were rigged using IK chains. The hands were rigged in the same way that was used in Emo & Proog's rigs (the characters from Elephants Dream, the first open movie project). I also added two bones to function as Track To targets for the eyes. The two bones were parented to a third bone that was used to control the eyes. Since I didn't have to cover a wide range of facial expressions, a couple of shape keys that control the position of the eyebrows were more than enough. I must admit this was one of my first complete rigs and it had many errors that nearly drove me nuts while posing the character. I guess I'll have to redo this rig when I start learning animation.
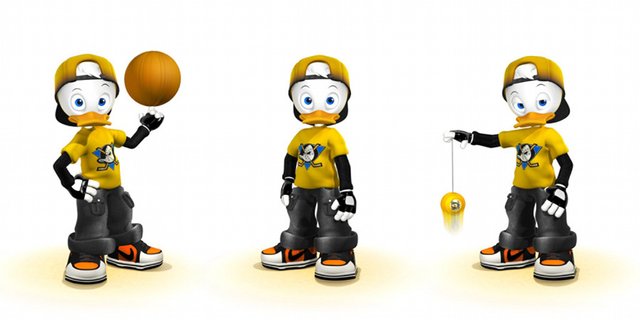
I had planned since the beginning that I would put him in different poses against a white background. The poses had to be cool, show character, and have clear silhouettes that make the character instantly recognizable. I made seven different poses, two of which have never seen the light, as I didn't like how they turned out. Another two poses I was told didn't look good enough. So, I settled for the three that you see in the final render.
Lighting
The lighting setup I used was fairly simple:
- Key light (Spot) from an upper right angle – Buffer shadows enabled.
- Fill light (Spot) from the left, a little bit lower than the key light.
- Bounce lights (Spots). Those were used to simulate light rays bouncing from the ground on the character.
- This Hemi light was used to light the ground. It had it's energy level finely tuned so that the degree of white on the ground matches the color of the background.
- This light (Spot) was used to produce the orange spot on the ground. Of course the ground was already fully lit by the Hemi light, so a normal orange light source wouldn't work. The only way to produce the orange spot was to get rid of the complementary color (blue). So this light source was negative with a blue color to subtract the blue and leave the orange.
- Shadow Only spot light to produce the shadow on the ground. This was important to show that the character's feet had a firm contact with the ground.
Materials & Shading
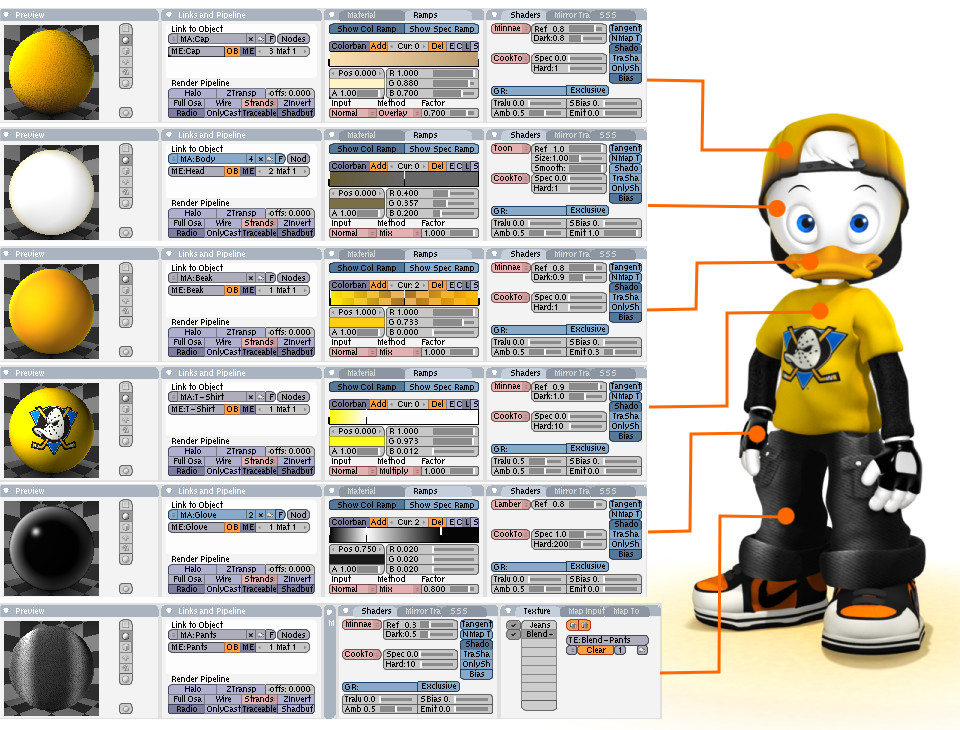
It was tempting at first to see how he would look like with 3D shading. I have to admit it was a lousy idea. Sometimes you just have to let the classics be the classics, if the term applies. So I decided to use a Toon shader for his body. What I don't like about the way people use the Toon shader in Blender is that they like to have those sharp transitions between lit and shaded areas. What people just don't seem to realize is that they can get nice looking toon characters by the exact opposite, a highly smooth transition between lit and shaded areas. It also helps if you give the shader a medium-to-high “Size” value to make the shaded area as small as possible, especially if your character is in front of a light background. The other shaders I used were mainly Lambert for the glove and Minnaert for the clothes and the beak. It's really just a matter of playing with the settings to see which combination works best. Nearly all the materials I used had a ramp shader, which gives a nice looking, peach-like color falloff. For the body material, the ramp shader didn't only serve the aesthetics of the image, but it also helped separate the character from the background, as they had the same color. The only textures I used were a jeans texture that I found on the web and the Mighty Ducks logo that you see on his chest, of course after some color adjustment so that it matches with the color of the T-shirt. Both textures were mapped using the basic texture mapping modes available in Blender, so no UV mapping was needed. The figure below shows the material settings I used.
Compositing
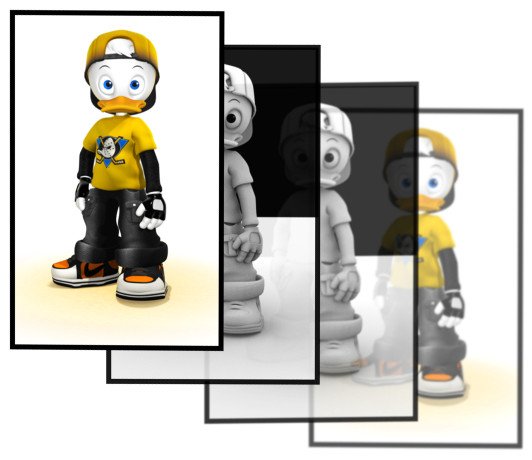
Not much was going on at this stage, except for an ambient occlusion pass I rendered to enhance the lighting of the image, and the motion blur effect for the yo-yo and the basketball. It's a shame that some potentially great renders fall flat just because they need a little bit of AO. Even if you are making a cartoony render, a little bit of AO always helps, unless you are planning on making your render super-stylized and 2D like. But just enabling AO and rendering doesn't help very much, as it comes out multiplied and results in a grainy render, even with a maximum number of samples. It's always better to render it as a separate pass and then combine it with your rendered image using the Node Editor or your favorite 2D editing program. To render the pass, first enable Ambient Occlusion in the world settings, then go to your Scene settings (F10) and make sure Ray and Do Composite are enabled. Also make sure AO is enabled in the Render Layers tab. Finally go to the Node Editor, switch to Composite Nodes, hit Use Nodes and connect the AO output of your render layer to the Composite node. Once you have your AO pass, try combining it with your rendered image using different blending modes. For this image I used two layers of AO, one set to Overlay and the other one set to Burn. You should also blur the pass a bit and play with the opacity to get rid of the noise. As a final touch I added the motion blur effect. To do this I used Blender's Vector Blur node, after animating the yo-yo and the basketball. Again this is just a matter of playing around with the settings and the animation speed to see which combination works best.
Well, I guess this pretty much wraps it up. I hope you guys like it :)
Note: This article was first published on BlenderArt magazine
Congratulations @huielbashir! You have completed some achievement on Steemit and have been rewarded with new badge(s) :
Click on any badge to view your own Board of Honor on SteemitBoard.
For more information about SteemitBoard, click here
If you no longer want to receive notifications, reply to this comment with the word
STOPwow your work is nice. i love it. but my advice is that before you post on any other site maybe you shoud post it on steemit. other sites will not pay you for your works but steemit will. next time you have an amazing work like this, please notify me
Thanks. I've only recently heard of steemit but from now on I will make sure to post my stuff here first.
Cool. When next yhu make a nice work just let me know
Dude please do not copy/paste the work of other authors and claim it as your own. Consider this a friendly warning - thanks. @carlgnash / @humanbot
Well, thanks for the advice - I wouldn't say that this is a warning :)
I'm actually the author of that article on BlenderArt. I've just joined steemit and I'm working on porting my artwork, articles over here.
Would appreciate it if you had some faith in your fellow steemers and gave people the benefit of the doubt.
Cool that is awesome. Please understand that your username here and the author name in the article are not the same, and I see people copying/pasting other people's content all day long. Best practice here on Steemit would be to provide a link or at least mention you published previously elsewhere when you are reposting material, or you will definitely find people assuming you are a plagiarizer. Glad to have you on board, your work is very impressive. Cheers - Carl
Thanks man. I'm new here so I apologize if I seem to have broken any unspoken rules. It'll take a while for me to find my way around here I guess.
Took your advice and added a link to the original article.