To See Another Day... (A Study Of Painting With PS Brushes)
Hi all! Excited to start posting again after a bit of a break. I decided on doing one more future soldier image before switching to something new for next week. My goal was to get a few futuristic military images together and a few fantasy ones. I really got attached to the military renders, because I'm a big Sci Fi fan, and the Atlas armour from DAZ3D.com for my G8 characters... along with some older models I made fit the newer ones... became my go to for a bit.
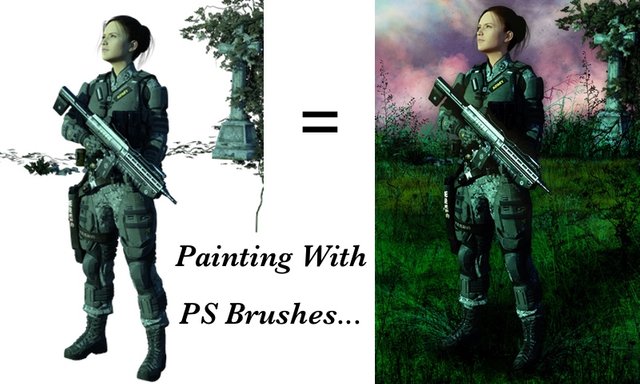
Here we have, "To See Another Day..." image. I created this image using DAZ Studio, DAZ3D Models, and my trusty Pixelmator image editor for MAC (which is PS brush compatible).
As always, or at least most times, I started with the DAZ 3D Models I wanted to use, creating a scene within DAZ Studio...

DAZ Studio is a free program, and has a massive amount of options for the price. Like "Blender" does for the modelling aspect of 3D object creation and video editing, DAZ Studio allows for the use of imported models from DAZ3D.com (well known in 3D circles) and other sources. Once imported, they can be used within the program to create scenes. Usually, Male/Female character models are imported, dressed, posed, animated, and placed within a scene where it will be lit and rendered with Iray, producing a film or still image according to need.
Here is a link if you think you might wanna try: DAZ3D.com
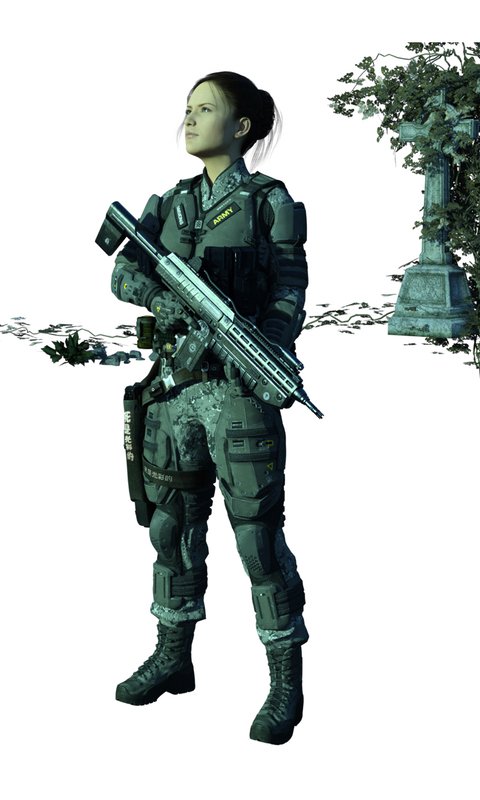
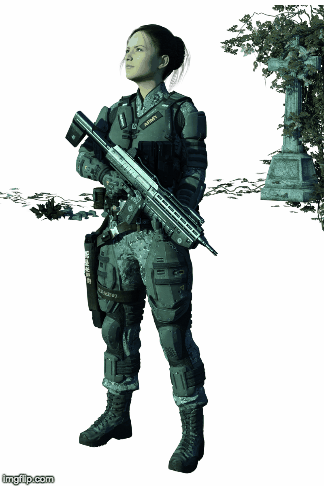
First I import the character I want, play with the skin tones, expressions, eye colour, outfits, hair, weapons, and so forth. (I used a few older models on this one, like the holster and such. The trick is to fit them manually to the character, since older models can have incompatibility issues.) Once done, you then have to play with lighting to assure a good realistic render (lighting will make or break an image) and try to get a good camera angle. Then, you render the scene. This is like taking a photograph, if a photo took from several minutes, to several hours to finish processing. After a few hours, I came out with this:
Not bad,... I liked the tones, and the lighting that I had worked on for hours seemed to actually work well this time. But, now what? I have a basis of an image, but how do you make it worth posting? I decided to create a painted feel for this image, using colour correction, colour pickers, and PS, or photoshop brushes, to create the scene. The first thing to do is make the character pop by creating 3 layers. I duplicate the soldier layer and then go to the one in back of the colour layer. I then use black and white setting and colour levels to make the soldier image completely black,... gaussian blur is also applied and the layer's opacity setting played with a bit. This will create a shadow effect around the soldier layer on top of it and the other objects in the scene. The middle layer is the colour layer. I play with the colour levels to achieve a richer tone, and then duplicate, creating a new top layer that I set to overlay blending and reduce opacity to get a good deep colour result. Next is to pick out some colours for the painting. I find I can go to google and looked up sunset colour codes and other colour codes easily. These colours I'll use for the background and the brush colours. Just have to paste the code into the colour picker and you're off to the races.
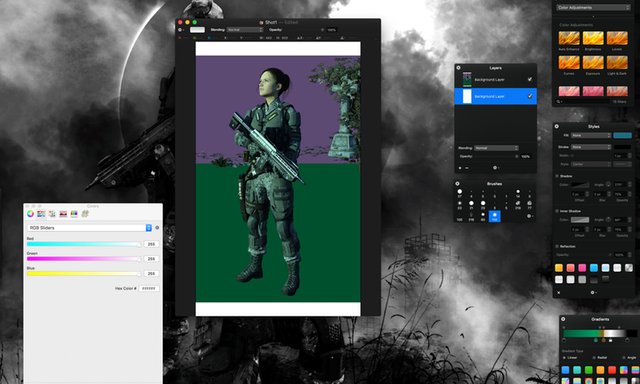
Once I have the background, (two backgrounds actually, since the ground and sky need to be separated so that when clouds are painted later, they don't cover the ground), I start creating layers to add smoke brush presets to the ground for texture, colour, depth, and shadow effect.
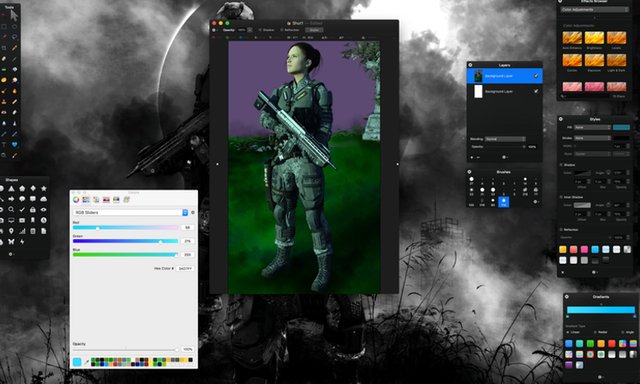
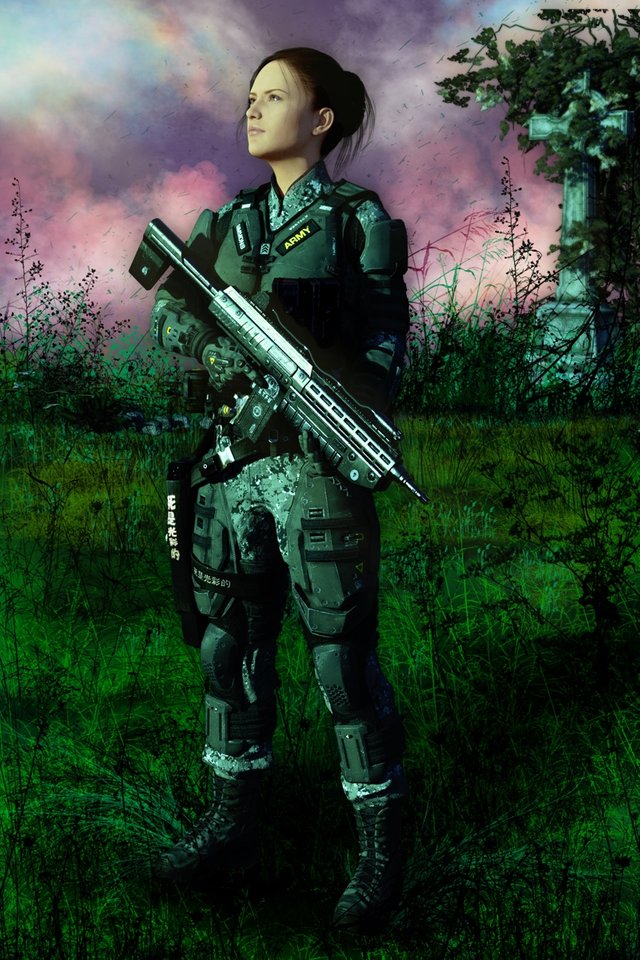
Once done, I can start using more layers and Photoshop brush effects to paint in the field and clouds. I chose a colour for each brush, like a grass brush, then highlight with a black brush, either grass or smoke, to bring out shades, shadows and depth of field. Playing with opacity and blending options help as well. A little blur brush helps with depth of field too, blurring back objects, which in turn, pops the foreground. After lots of trial and error, you get a painted feel to your image. Might not be the greatest, but I liked the overall result, even though the grass might be a little over saturated... still I like it. Then, its just a matter of merging all layers and playing with the colour tones to get the image just right. And,... there you have it. I created this gif to help make the process more visual:
It is fun creating these pieces, hope you like the little breakdown. Below, you'll find the finished image, feel free to let me know what you think and have a great day!
If you are interested in where I get most of my PS brushes, here is a link: Deviney Actually, looks like I need to go shopping, he apparently developed a few more. lol.
If you're into great art, I did a couple posts about the following, check them out:
Looking for great art prints on metal? Try: Displate.com
Looking for Great Prints, statues, and toys for movies, gaming, and comics? Try: Sideshow Collectibles
Finally, I've been playing Steemmonsters for the past few days..... If you haven't tried yet, head over and give it a go. Yeah, you gotta put some money in for a few cards, but I'm having a blast with this game and I never really thought I would.
Sponsored ( Powered by dclick )

wow - the colors in this one... really unique! it almost looks like a sunrise picture with the light reflected in her face and the sky behind her!
love your work :)
Yeah, it got vibrant. Sunrise was the effect I was looking for, so I guess I got it, lol. Never tried a mostly painted one before, I usually compose most of the stuff in 3D, so I got a few tweaks to make in future projects, but it was fun. Glad you liked it!
Yes hehhee you got it!
I sent you a DM.. you already had the epilogue lol you probably just didn't know it was the epilogue. Lolol
Hello @dutybound, thank you for sharing this creative work! We just stopped by to say that you've been upvoted by the @creativecrypto magazine. The Creative Crypto is all about art on the blockchain and learning from creatives like you. Looking forward to crossing paths again soon. Steem on!
This is awesome, thanks!
Congratulations @dutybound! You have completed the following achievement on the Steem blockchain and have been rewarded with new badge(s) :
You can view your badges on your Steem Board and compare to others on the Steem Ranking
If you no longer want to receive notifications, reply to this comment with the word
STOPDo not miss the last post from @steemitboard:
Sup Dork?!? Enjoy the Upvote!!!
Hi @dutybound, thank you for this digital work it is very impressive and looks really complicated as I am working with simple traditional tools that is why that computerized digital Art is something new and amazing.
I do not know if you heard about @NTopaz community that supports artists, you should upload your works via their app, otherwise they are not able to see. Only those works that uploaded there will be supported. Here is the link for site and posting guidelines:
http://www.artisteem.com/
https://steemit.com/ntopaz/@ntopaz/update-ntopaz-posting-guidelines-related-to-some-changes-in-the-voting-policy
Excellent, thanks! I'll check them out. Glad you like the work. It can be a little complicated, but I love doing it. Have a great day!