Bitcoin Mining Using Raspberry Pi

Want to mine some bitcoins? Want to earn for free?
Have a pi not being used?
Then lets mine some bitcoins!
Step 1: What Is BitCoin?

If you don’t know already, Bitcoin is a virtual currency set up in 2009.
Bitcoin has grown in reputation over the past few years becoming a very
popular as a method to pay for services over the internet.
The value has rocketed recently thanks to the huge coverage in the media,
for both positive and negative reasons.There are two ways to get Bitcoin:-Buying
them from an exchange, which is the process of converting local currency to Bitcoin.
-Mining them. Mining is the process of verifying transactions in the blockchain.
As the whole of the Bitcoin system is decentralised, every transaction is publically viewable
within what is called the blockchain. This blockchain contains every
bitcoin exchanged between users so, as there is no central server,
it has to be self governed. This is the job of the miners.
Step 2: Requirements
In order to mine Bitcoin, you will
A pool account
Bitcoin Wallet
Raspberry Pi Raspbian
image SD card
USB Bitcoin miner
Step 3: Creating an Account


There are two things you need to do:
Download a bitcoin wallet
Create a pool account
Set up payment
Set up workers
Download a Bitcoin Wallet
A wallet is a program that sits on your computer and gives you a wallet address,
this is a unique string of numbers and letters that you will use to receive bitcoins.
Download the client for your computer from https://bitcoin.org/en/download
After installation, you will have to save a file called wallet.dat, keep this file safe,
as this contains your unique wallet address within it, including all bitcoins that you will gain.
If you lose this file, you cannot recover any bitcoins it contained.
Create a Pool Account Once you have a wallet address, create a pool account.
A pool is a huge collection of other people working towards gaining bitcoins.
Due to the complexity of mining a bitcoin, it has become unrealistic
to solo mine–the act of processing millions of numbers to solve the block problem.
Working as a group, or pool, lets everyone have a chance of earning some Bitcoin.
There are many pools around, in this tutorial I’ll be using one called Slush’s pool: https://bitcoin.org/en/download
Set Up Payment
Once you have created a pool account,
you'll need to enter your unique wallet address into the Bitcoin payout address.
Create Worker Account
Next step is to create a worker login account.
Within your pool account you have the ability to create something
called a worker for each of your bitcoin miners,
so you're able to monitor them all separately just in case one should fail.
Each worker has its own login name and password.
Whilst you are on My Accountclick Register New Worker and give it a name, for example;
worker, and a password. Now you're ready to set your Raspberry Pi mining for Bitcoin.
Step 4: Setting Up the Raspberry Pi

Start with a fresh Raspbian install, if you don’t know who to do this, read the tutorial How to
Install NOOBS on a Raspberry Pi With a Mac. If you plan on running
more than one Bitcoin miner at the same time, it is best to use a powered USB hub.
Take into account the power rating as mining will need a lot of power,
as much as one mp per miner.With your USB miner attached to your Raspberry Pi,
let’s get everything installed.
Step 5: Installing Required Libraries
The miner to be installed comes as source files, which means that the program
must be compiled into a binary before it can be run. To make a program,
in this case BFGMiner, many dependencies are required.
Dependencies are additional software, or libraries the program needs in order
to compile properly, as it has been developed using them to make the software more efficient.
Hopefully you will be seeing the Raspbian desktop,
so double click on LXTerminaland type in the following:
1) sudo apt-get update
2) sudo apt-get install autoconf autogen libtool uthash-dev libjansson-dev libcurl4-openssl-dev libusb-dev libncurses-dev git-core –y
This process will take a few minutes to complete.
Step 6: Installing BFGMiner

Once all the dependencies have been installed, now it is time to download and
install BFGMiner, so type the following into LXTerminal.
It’s normal for these to take a few minutes to complete so some patience is needed.
git clone https://github.com/luke-jr/bfgminer.git
cd bfgminer
./autogen.sh
./configure make
You will be greeted with a screen that looks similar to the following:
Step 7: Start Mining Bitcoin


Now you’re ready to start mining. To do this, providing you're using Slush’s pool,
you’ll use the following command:
./bfgminer -o stratum.bitcoin.cz:3333 -O username.worker:password -S all
The username section is composed of two parts, the username that you use
to login to the pool, and worker which is the worker name you gave when
you registered the worker. Finally, the password that was set when you
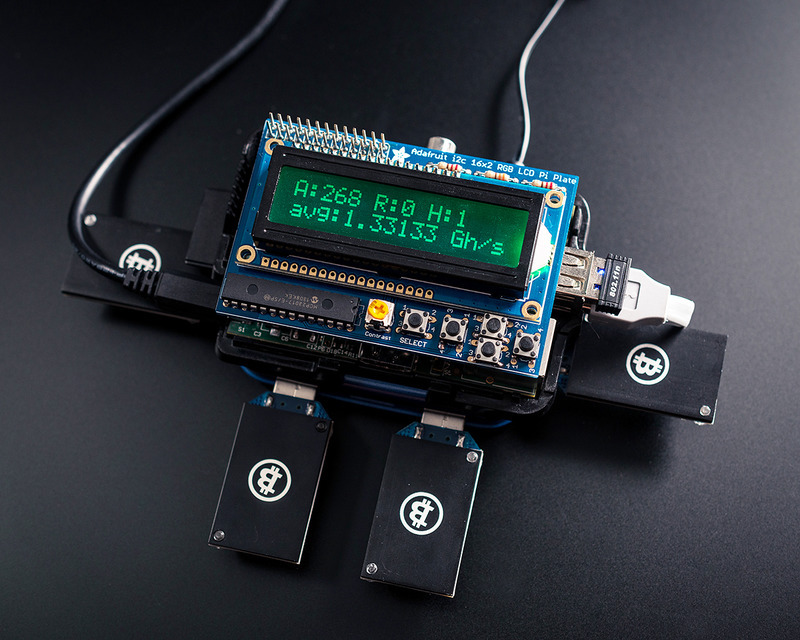
created the worker.That’s a lot of numbers, so I’ll make some of them a bit clearer.
Current mining speed, typically calculated in megahashes or gigahashes.
The number of hashes a second that can be calculated the better.
A hash is an algorithm of converting numbers and letters into an undecryptable set of characters.
So a miner is used to process millions of numbers in an effort to match the hash to guess the original number.
The more hashes that can be processed the faster it is able to solve the problem.
Number of accepted shares. A share on a pool is to show the miner has successfully
worked out a given problem, so the more shares you can process the better your reward from the pool.
Detailed information on accepted shares and pool updates. This is a running
log of what is currently happening with the miners and basic pool information,
such as messages of updates and when new blocks are found.
More information can be found at the BFGminer github site
Step 8: Conclusion


Following these steps will leave you with a very energy efficient bitcoin miner,
as a Raspberry Pi only uses four watts of power, and a miner is typically 2.5W.
Mining used to be done with computers consuming over 700W for
the same process so to make a jump in savings helps repay the cost of the hardware
we are using.All there is to do now is to sit back and watch the money slowly build up.
Though it is important that you understand that Bitcoin value fluctuates wildly,
it is extremely volatile, so invest at your own risk. You can also put up LCDs.
Connect more Pis for getting better speed :D
For more information there are a number of websites and forums available,
such ashttps://bitcointalk.org/,to help get you started.
FINISH
source : http://www.instructables.com/id/Bitcoin-Mining-using-Raspberry-Pi/
Very good instruction , Thank you for sharing
your welcome ^_^
How much BTC/Satoshi you can mine per day ?
Congratulations @rezactive! You have completed some achievement on Steemit and have been rewarded with new badge(s) :
Click on any badge to view your own Board of Honor on SteemitBoard.
For more information about SteemitBoard, click here
If you no longer want to receive notifications, reply to this comment with the word
STOPNice post, thank's for sharing the instructions with us. However, I wonder, is it really profitable?