Viewfinder Steemzine Vol. 1 — Inspiration, Reviews, How To's, Behind The Photo, and more!
Volume I — WORLD OF MACRO
Sep 21 2016
The Viewfinder Steemzine is a bi-weekly (every two weeks) ezine available exclusively on Steemit.com. In these volumes we will highlight the work of some of the best photographers and writers on photography currently using the platform.
Submissions are always open at [email protected]
Hope you enjoy!
@jamtaylor
Editor
In This Volume:
Photo Inspiration
Photographs by @lscottphotos, @avtzis.petros, @condra, @yzomri
How To / DIY
Introduction to Focus Stacking for Macro Photography by @shieha
Make ANY Lens a Macro Lens for Under $15 + Quick Tips for Crisp Close-ups by @randyclemens
Behind The Photo
Learn how this shot was created in the studio by @runrudy
Featured Article
“Five Affordable Ways To Get Stuck Into Macro Photography” by @condra
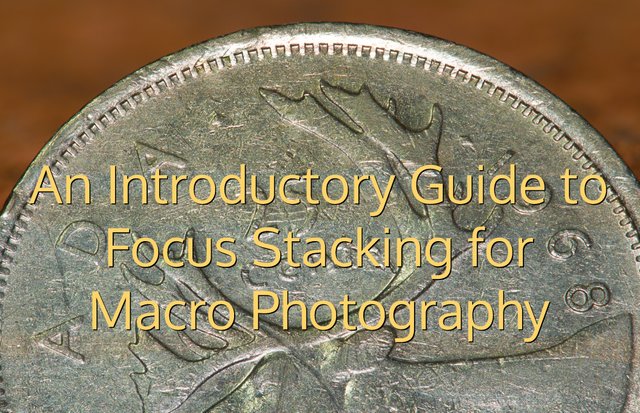
Why focus stack and not just step down my lens to f/22?
Written by @shieha
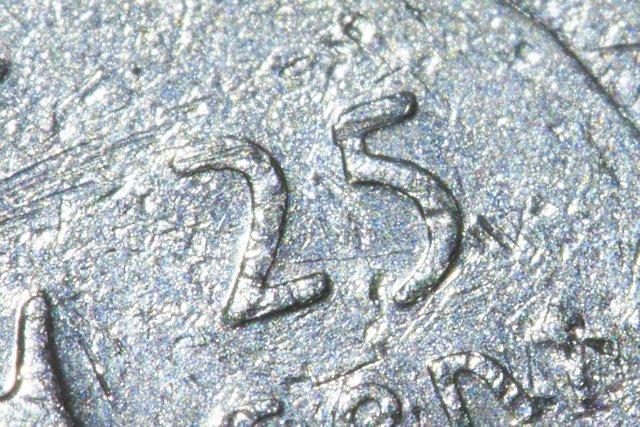
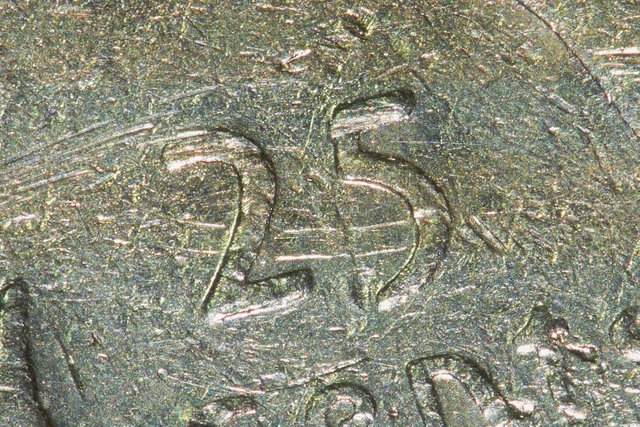
Focus stacking allows for better image quality than just closing the lens aperture down, since at such small apertures, the image starts to suffer from diffraction and loses sharpness. Examples below show the difference between a single image taken at f/16 and a stacked image from 4o source photos. As you can see, the stacked image is clearly sharper.
Things you will need
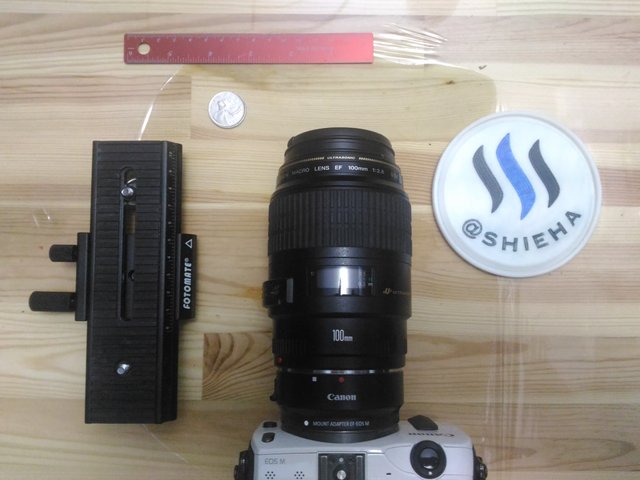
- Camera, preferably one with interchangeable lens system
- Macro lens, in this example I'll be using the 100mm 2.8 macro lens
- Subject to photograph, in this example I'll be using a coin
- Ruler
- Macro slider focus rail
- Tripod
- Cable release (optional)
- Flash or continuous light source (optional)
- Zerene Stacker software, free trial available at http://www.zerenesystems.com
Step 1
Begin by setting up your camera onto the macro slider, then onto the tripod. Place the subject in a position and composition you want to shoot from and roughly adjust focus on your subject. Adjust exposure according to the flash settings and ambient light conditions.
Step 2
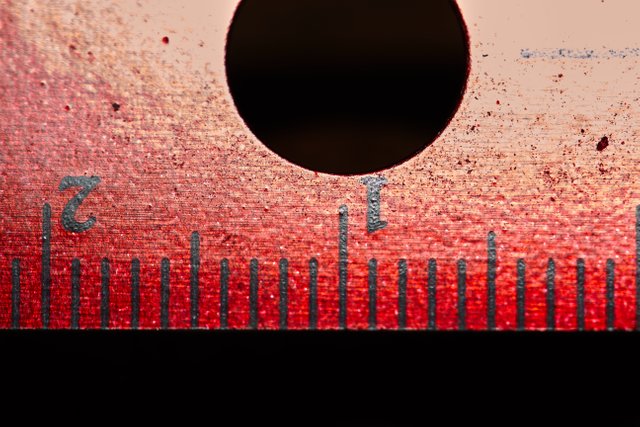
Replace the subject with the ruler, line it up horizontally with the frame so that the markings are in focus with one reference marking aligned with either side of the frame. Take the photo and count the distance captured by the camera. In the example above I see about 22 mm. We will calculate the magnification factor by taking the long edge sensor size of our camera and dividing it by this number. Note that different cameras may have different sensor sizes so be sure to check up your sensor size if you're not sure. For my camera the calculation is 22.3 mm divided by 22 mm, which is close to 1.
Step 3
Now head over to http://zerenesystems.com/cms/stacker/docs/tables/macromicrodof and look at table 2-A, find the row matching your calculated magnification factor, in this case 1. Then select an aperture that lies in the bold range in that row, in this case the values for f/4, f/5.6, and f/8.0 are in bold for magnification ratio of 1. For cameras with aps-c sized sensors select apertures that are left in that range, for full frame, select right in that range. In my case I chose f/5.6 as a middle ground. I then see that at magnification 1, at f/5.6, that my step size should be about 0.28 mm. This means that at the current magnification ratio of 1, at f/5.6, I should move my macro slider 0.28 mm between each shot to ensure I have enough overlap to stitch up the final image.
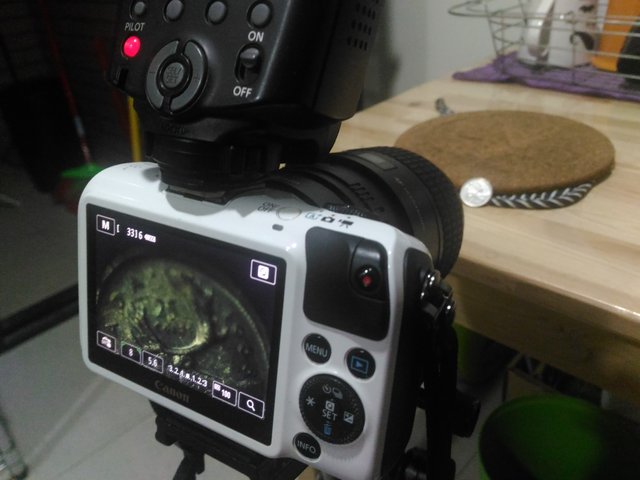
Step 4
Now we can start shooting, place the subject back into place, recomposing if necessary. You can start the stack from either the front or back of the object. Once you start, be sure not to bump into the tripod or subject. Starting at either the front or back, using a delayed shutter or cable release, take the first shot. Then move the slider forward or back (depending on if you start at the front or back of the subject) by the amount calculated in step 3. If you have live-view, you can also eye the plane of focus and shift the macro slider accordingly. Take the second shot. Repeat this process until you have taken enough photos to cover the entire depth of your subject and the places that you want to be sharp in the final image.
Step 5
Prepare your files for stacking by putting them into a folder, with sequentially-named files, such as IMG_0001, IMG_0002, IMG_0003. They can be in JPG or TIFF, I like to use TIFF since I shoot in RAW and want to maintain maximum image quality.
Step 6
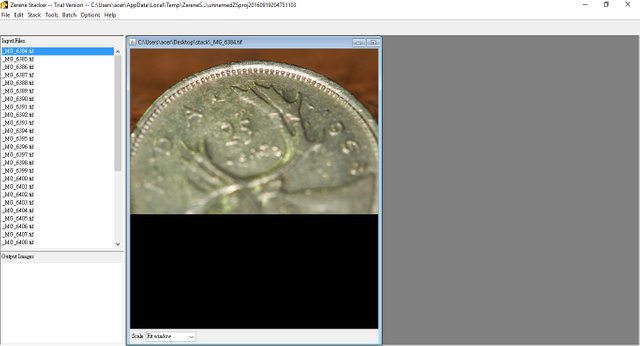
Start the Zerene Stacker application, then drag and drop your prepared folder with all the images into the left panel labeled "Input Files".
Step 7
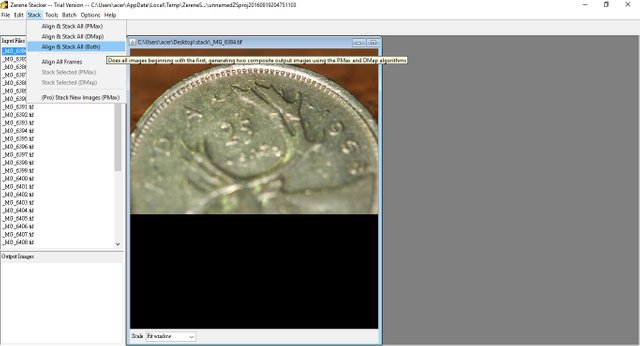
Next, go to the menu, select Stack, and click on Align and Stack All (Both).
Step 8
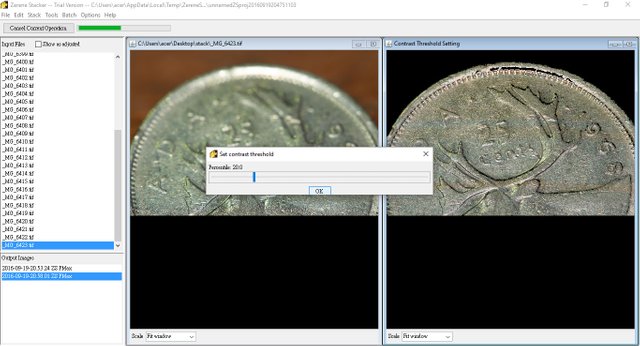
Half-way through the process, a window will pop-up asking you to set contrast threshold. Moving the slider you will notice that the preview image on the right shift more or less into black. The black areas represent areas with no noticeable sharp details. So adjust the slider until you get most of the background blurred areas shown as black and not too much black in the important details of your image. Then click OK.
Step 9
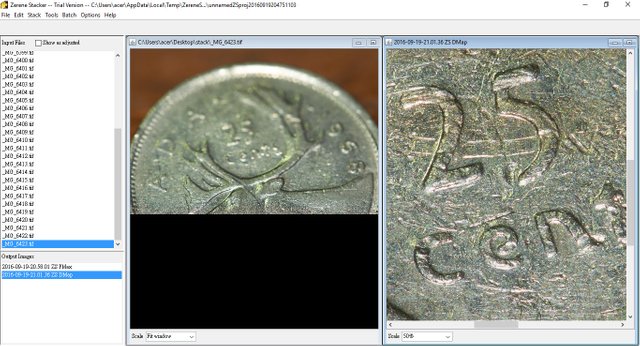
Once the processing is done, you can see that two images appear at the bottom left, under Output Images. You can select each to see the result.
Step 10
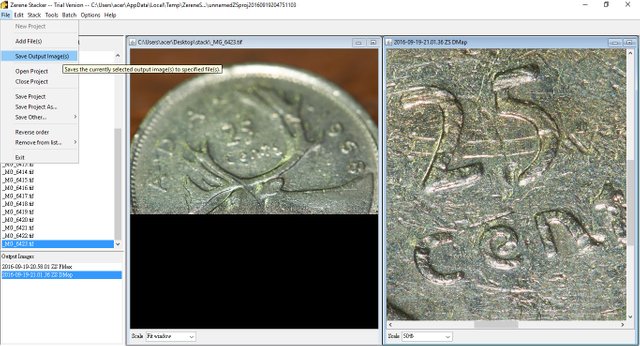
After zooming in and inspecting the output images, I liked the DMap result better, so to save go to menu and select File and click Save Output Image(s). You can also save both PMax and DMap files for layer blending in Photoshop. That is a little more advanced and is out of the scope of this tutorial.
Final image
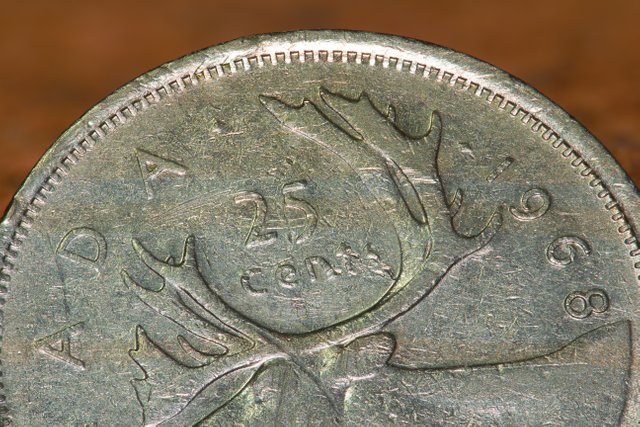
Enjoy your super sharp and crisp stacked image!
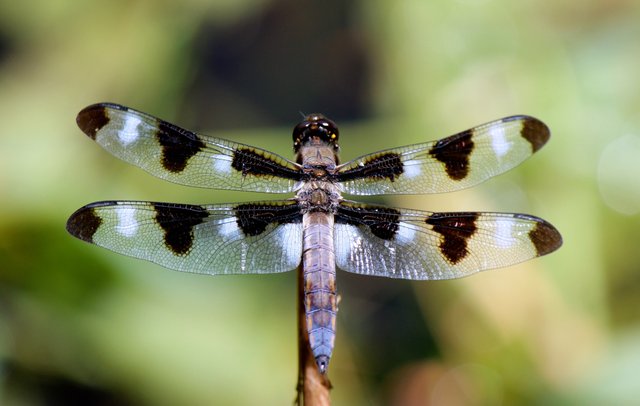
Dragonfly
Image by @lscottphotos
This is a behind the scenes of how I put this picture together.
Written by @runrudy
I plan and start every project with an idea.
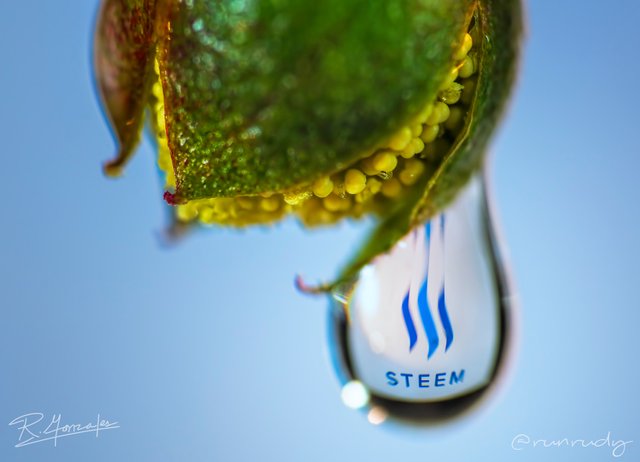
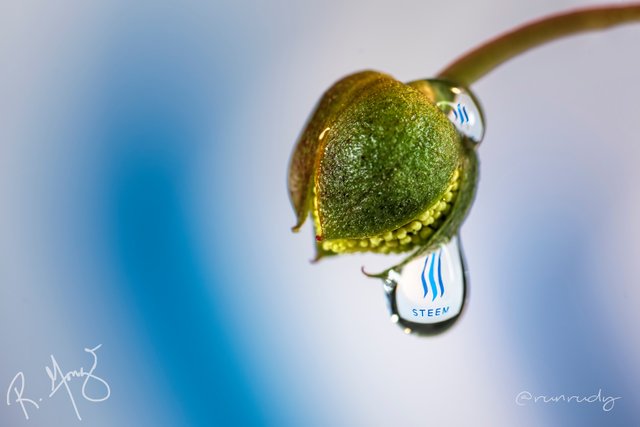
I wanted to step up to @jamtaylor's macro challenge. What better way to do so by capturing the reflection of the Steem logo in a water droplet.
I went out and searched for some flowers and plant bits in my kid's school parking lot. Other parents waiting in their cars looked on suspiciously.
We took it all back into the studio and setup the shot.
Here are the elements that we used:
- Sony A7RM2 with 90mm macro lens
- 3 x PCB Einstein Strobes
- Raynox M-250 Macroscopic Lens
- School plants
- Water, small bowl and water dropper
- Helping hand
- Print of Steem Logo
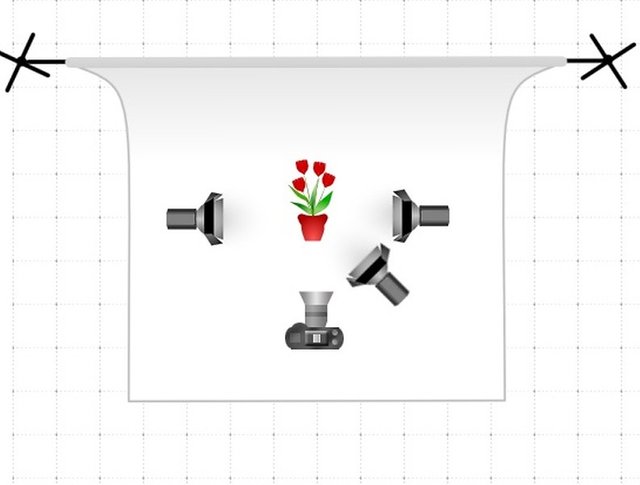
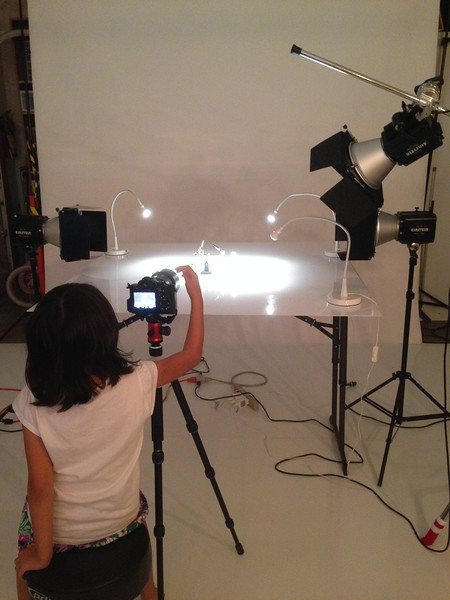
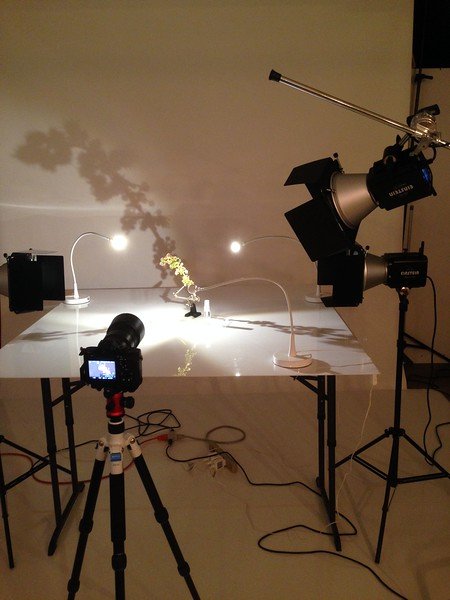
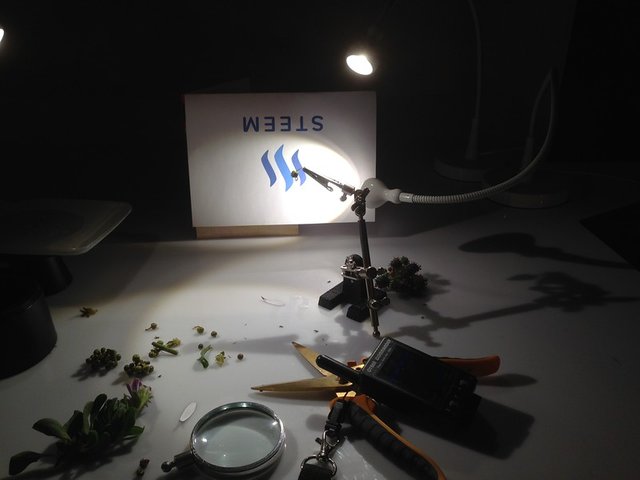
Here is my setup:
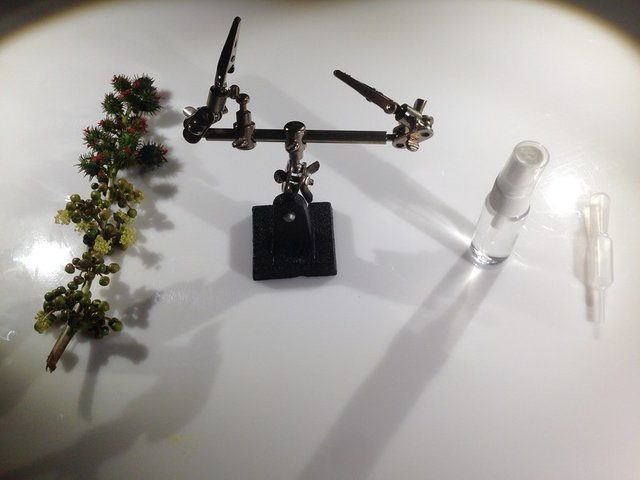
I started out testing a few different plants and flowers.
I really wanted to use these spiky bulbs for the image.
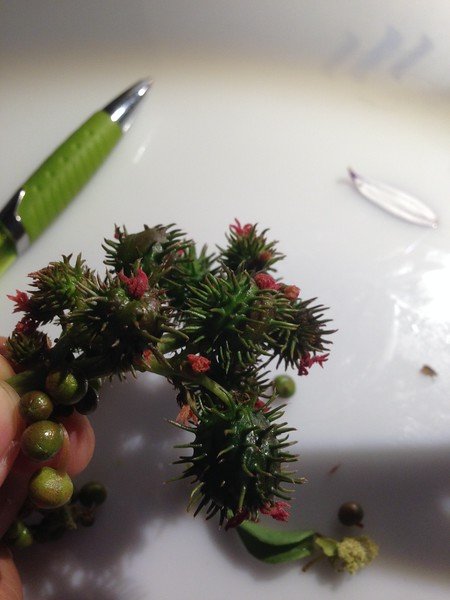
The water was not playing well with the texture of the spikes.
I cracked open one of the smaller round bulbs on the same plant and found tiny yellowish seeds inside.
I decided that the detail of the seeds and the peel just coming off would be best for the image.
Here is a perspective image of how small the subject was compared to a pen tip.
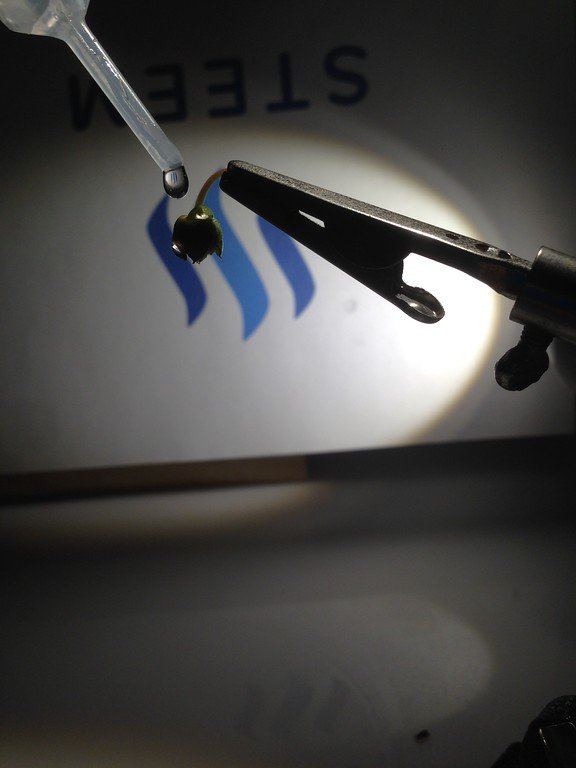
You can already see the Steem logo in the water drop.
Those with a keen eye, may have noticed that the sheet of paper with the Steem logo is actually placed upside down. Yet, the corresponding image in the water drop is right side up.
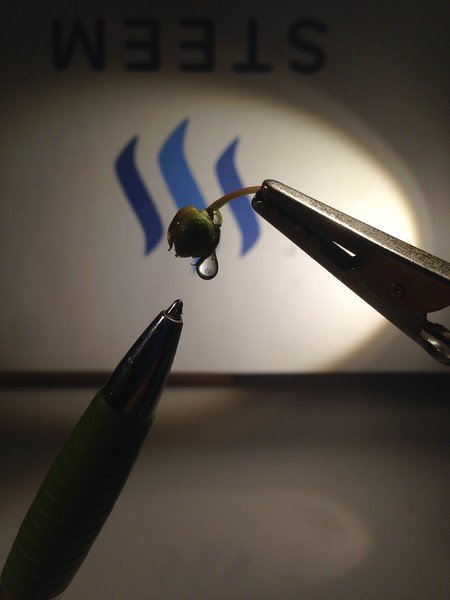
This is called refraction. Refraction is the bending of light. Light travels in straight lines. However, when light passes from one transparent substance to another, it refracts or bends. The water drop acts just like a lens, focusing the light that passes through into an image on the other side. The resulting image is upside down and reversed right to left.
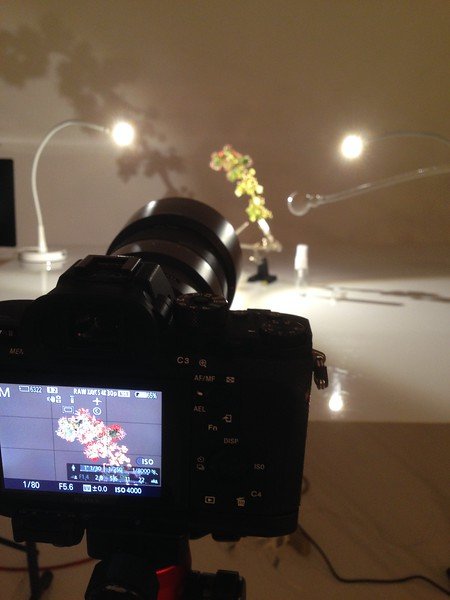
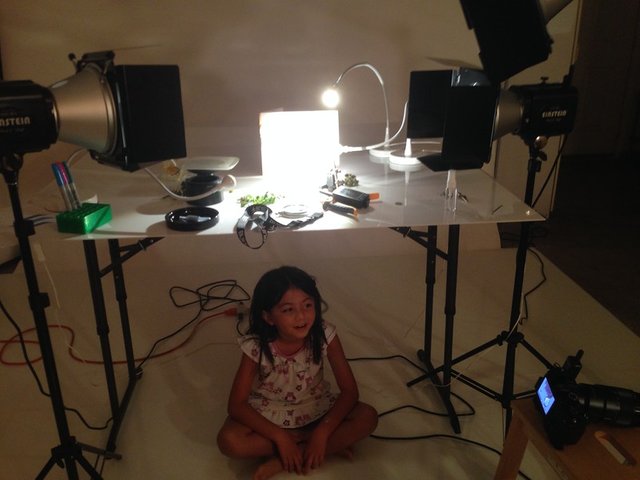
Here we are, finishing up the session. My second helping hand is under the table.
I only take photos in the RAW image format.
Every RAW image has to go through post processing to extract out all the lovely unicorn pixels captured in each 42 Megapixel RAW file.
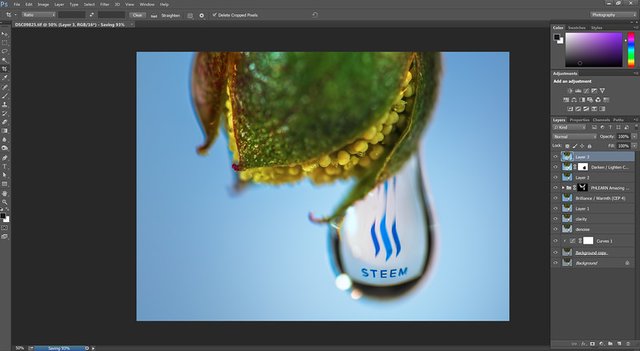
This entire process took 6 hours to complete.
I really love macro photography. It is just another world down there that is amazing and beautiful.
You just have to stop, slow down, have patience and look for it.
Here are the final images and timelapse video showing the entire process.
Five Affordable Ways To Get Stuck Into Macro Photography
Written by @condra
Macro photography, perhaps more than any other photographic discipline encourages experimentation with different gear and techniques, and these can be as affordable or expensive as your wallet can manage. The topic of this item has changed a few times since it's initial inception. One could list different macro len ses for DSLRs, but macro photography can be achieved by many different methods. Aside from that, most dedicated macro lenses are very sharp indeed, and it is more important to find one that fits your budget.
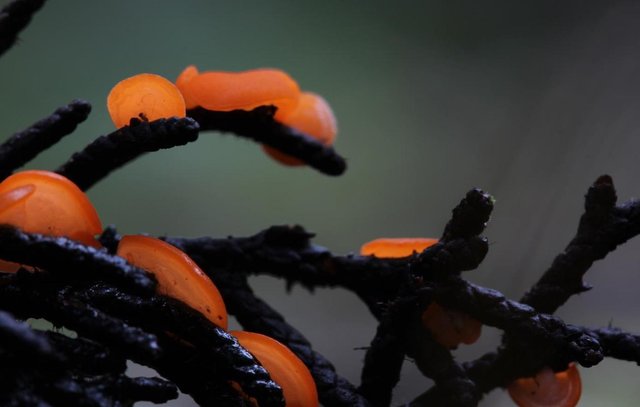
Fungus
Image by @avtzis.petros
Here are five affordable ways to get stuck into macro photography…
Lens Bong
A "lens bong" is special piece of glass lens which clips on to your cellphone or compact camera and allows close-up focussing without any conceivable loss of image quality. Over time, they have become very affordable, and some of them have superb, sharp optics. You can buy them from China from as little as a dollar, but there are more expensive models with better optics. Many Steemit users will have heard of the lensbong from the very prolific @trisnawati, who takes stunning macro shots with nothing more than a cellphone and lensbong.
Pros: Easy to use. Cheap. Tiny.
Cons: Taking macros on a cell phone can be difficult. No aperture control.
Results depend on having a cell phone with a good camera.
Close Up Filters
Close Up Filters are like lengbongs for DSLRs. Also known as diopters, they are a great way to quickly turn any camera lens into a macro lens, by simply screw ing one on to the front of the lens. They range in price but start off for as little as around 15 dollars on eBay. For about 50 dollars, you can get a very high quality set from a brand like Hoya.
Check out this video by Mike Browne to see them in action.
Pros: Affordable. Light weight. No light loss (which happens with extension tubes)
Cons: Very limited focus range. They must be an exact fit for your lenses filter thread.
Stacking them degrades image quality.
Reverse Ring
The physics of macro photography mean most lenses are in fact capable of focussing very close up, the only catch being, they have to be placed back-to-front on front of your camera. A reversing ring allows you to do this. Ideally you would use a lens with manual aperture control, such as older Nikon lenses. Don't be put off by the hacky DIY aspect of reversing a lens with an adapter. [The results speak for
themselves.](https://www.flickr.com/search/?s=int&w=all&q=reversed+le
ns&m=text)
Pros have been doing this for years. Indeed many macro professionals use reverse rings with 50mm lenses. You could get a great vintage 50mm lens, plus reversing ring
combination for under 100 dollars.
Pros: Allows for extreme macro magnification. Affordable. Light weight.
Cons: They must be an exact fit for your lenses filter thread.
Extension Tubes
Extension tubes, like reverse rings and close up filters, are another way to adapt a normal lens to enable close up focussing. Essentially, extension tubes simply move your regular lens away from the camera sensor, thus allowing you to focus extremely close. You can buy "dumb" versions which don't communicate electronically with the mounted lens, but the more expensive versions with electronic contacts are preferable as you will still be able to use your aperture settings via camera control. Check out some example shots on Flickr.
Pros: Turn any lens into a macro lens without any loss in image quality.
Cons: Can add a lot of length. Extension tubes suck up light, making
it harder to focus.
Dedicated Macro Lens
There are dozens of dedicated macro lenses available. Considering depth of field is such a problem with macro photography, you are unlikely to be shooting wide open very often. With that in mind, you can rest assured that even cheaper, older macro lenses are capable of very sharp results in the f8-f22 range. My advice for the best bang for your buck is to save on modern features such as autofocus and image stabilization where possible. Many pro macro shooters will focus manually, and optical stablization is irrelevant once you're using a tripod or strobe lights. Nikon, Canon,Tamron, Sigma, Tokina and others. They all make superb macro lenses. Canon users could do a lot worse than Canons own 100mm Macro ("non-L") at around 450 dollars, and more discerning Nikon users could save money on VR, and go for the older "2.8D Nikkor Micro", a stunning lens which can be found on eBay for around 2 50 bucks.
Pros: Dedicated macro lenses offer unmatched optics, versatility and convenience
Cons: For less serious macro photographers, buying a dedicated macro lens (instead of adapting an existing lens) will be an unnecessary expense.
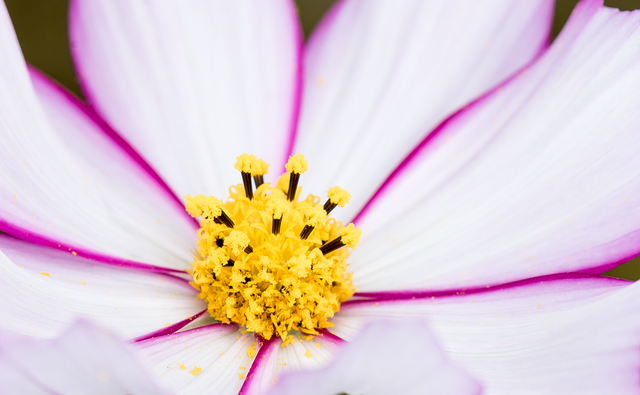
Image by @condra
Camera Hack: Make ANY Lens a Macro Lens for Under $15 + Quick Tips for Crisp Close-up Photography
Written by @randyclemens
Macro extension tubes are a great camera hack that can help you get super-crisp close-up photography without shelling out big bucks for a new lens! (The extension tube I bought was under $15!) And they work with just about any prime or zoom lenses you already have, though quality suffers with some wide-angle lenses.
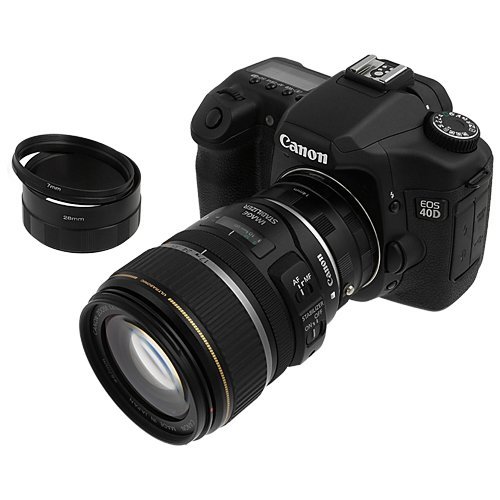
How Extension Tubes Work
Extension tubes are not optical devices, so they don’t have any glass. They are simply hollow, light-proof cylinders that fit between your existing lens and camera body. This extra distance moves the focus sensor in the camera farther from the subject, allowing you to move your lens much closer to the subject while still maintaining focus.
Different Kinds of Macro Extension Tubes
Because I’d not done much macro photography and had never used an extension tube before, I decided to try the least expensive one. It also happened to be the best seller, with good reviews!
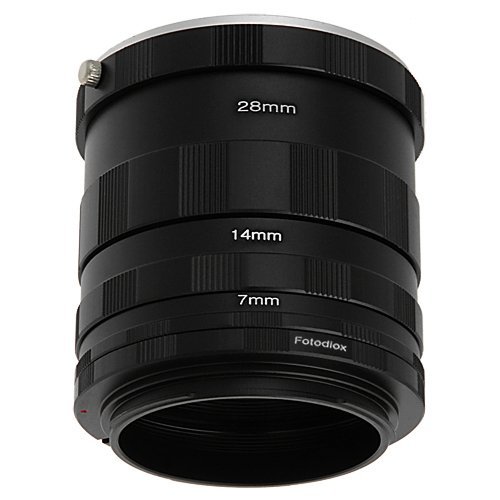
I shoot with a Canon Rebel T3i, so I got the Fotodiox Canon EOS Macro Extension Tube Set. For Nikon fans, there’s also a Fotodiox Nikon Macro Extension Tube Kit. (Less than $15 each!)
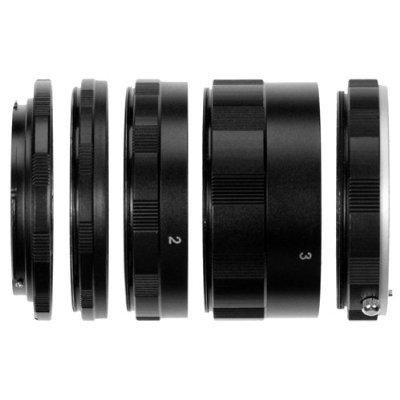
These are actually made up of three extension rings: one 7mm, one 14mm, and one 28mm, which you can use individually or stack in various combinations to add up to 56mm.
The only “drawbacks” to these particular extension tubes? There are no electrical components connecting the lens to the camera body, so there’s no autofocus. Not a problem, really... just an extra step whenever you—or your subject—moves. And if your aperture is controlled on the camera body (not manual aperture rings on the lens) then the lens will stay open at the widest aperture, which gives you less depth of field to play with.
Macro Extension Tubes with Autofocus and Autoexposure
Thankfully, there are “active” extension tubes that do carry the electrical connection from the camera to the lens, so you can use autofocus and control aperture from the camera. These can range from $35-150, still a great value compared to buying a new macro lens.
Extra Tips for Getting the Crispest Macro Photos
Steady your camera! Even the slightest movement at these magnification levels will cause motion blur. A tripod is your best friend, but you can also just place the camera down on a flat surface.
If manually focusing, use the zoom buttons on the camera to see 5x and 10x magnification to make sure you’re on point.
Even using a tripod, your finger pressing the shutter button to take the picture will jiggle the camera slightly and reduce the sharpness of your image. Remote shutter buttons can solve that problem for under $10, but you can also just set your camera to shoot 2 seconds after you’ve pressed the shutter button, which solves the problem for free! Look ma, no hands! :)
(Product images via Amazon)
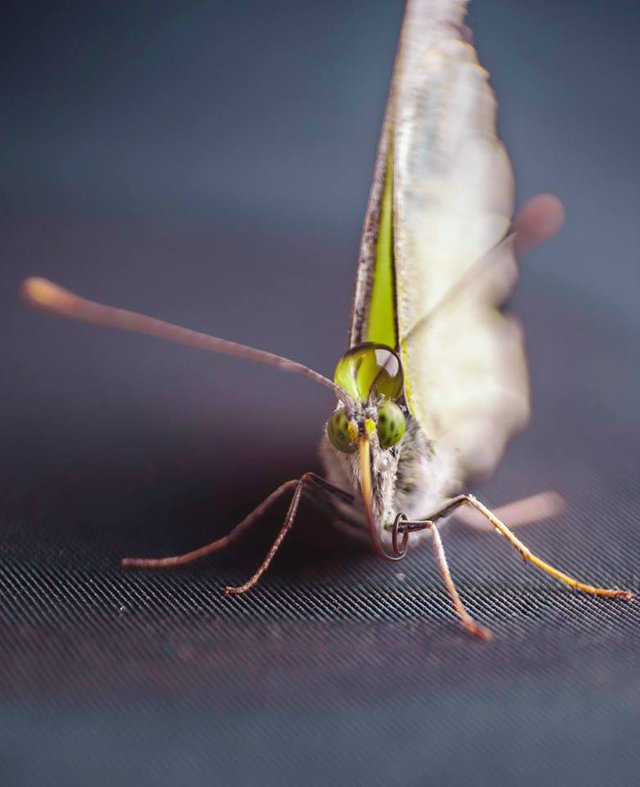
Butterfly with water droplet
Image by @yzomri
Payments (based on SD rewards) for this volume will be:
Photographs: 10% x4 Send to [email protected] - include your username in the message body. All submissions are checked for plagiarism. By submitted to this zine you acknowledge that you own the rights to the photographs and articles and agree to allow me to repost them in exchange for agreed upon compensation.
Writing: 15% x3
Behind The Photo: 15%
Editor: 0% (SP Only)
Seeking submissions for Volume 2 - undecided topic, anything goes. Looking for articles and photographs.
Ideally I'd like Volume 2 to go out on Oct 4th, so submissions in by Oct 2nd.

Wow there is some absolutely top notch info in here. I for one am trotting off to eBay to get me a lens bong for my smartphone!!
don't forget you can also make your own by extracting a lens from an older point and shoot film camera
I will give that a try actually first. Cheers!!
Impressive work, article and quality offered by your information and experience. Thank you so very very much for sharing. All for one and one for all! Namaste :)
Congratulation @jamtaylor on an incredible and inspiring first edition. The amount of information in here is astounding. I've never done macro photography but after reading this, I want to give it a shot (pun intended).
Thank-you too all the authors involved for putting in so much time and effort, and making me want to take more photos! :)
Thanks! Always good to inspire people to pick up the camera and head outside.
Loved it , so much information here. Book marked it
💋 @halo 💋😇
It is very difficult to
Awesome work ezine # 1! This is such a great resource to share with steemit photographers and the community as a whole! Well done
Great 1st issue @jamtaylor Thank you for selecting my submission for the Behind the Photo section. Congrats to all the other writers and contributors. There is a lot of useful information for all skill levels. You got something good here. It was fun making those images. Thank you again for sharing my work with the community. I just did my first resteem!
Well done to the authors, very interesting read
So inspiring!
wow. excellent.