How to Make "Magical" Photographs Like They Did 170 Years ago
Almost 170 years ago, the most "magical" photographic process was invented. Learn how you can make amazing photographs using this technique.

This video and article will show you how to create a Tintype (also known as a melainotype or ferrotype), which is a photograph displayed on a metal plate (black aluminum plates are widely used today).
A Tintype is a direct positive, so it's a unique image that can not be used for contact printing (unlike a negative). You will also find some basic information about Ambrotypes and historic printing processes as well.
(Article continues below the video)
What is it?
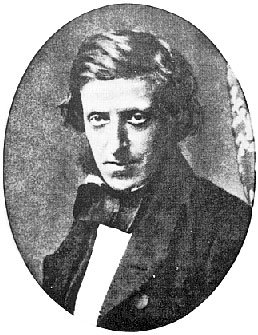
Frederick Scott Archer - Inventor of the Wet Plate Collodion process
Wet plate collodion is a fascinating historical photographic process from the very beginning of photography. The process was invented in 1851 by Frederick Scott Archer and was the most used photographic process between 1851 and 1880.
It is called wet plate collodion because you have to make the photograph on a plate (metal or glass) while the emulsion is still wet. This emulsion is called (sensitized) collodion. Collodion is a sticky fluid that is poured on the plate and then made light sensitive in a silver bath. Wet plate collodion is not an easy process to master, but it is not difficult to produce results once you know what you need. You will most likely run into problems at some point, but you can usually solve them with some minor tweaking.
Cameras and Lenses
You will, of course, need a camera with a suitable lens for your purposes (even though you can make pinhole images as well with wet plate collodion). This article is not about cameras and lenses, but I will give you some tips to point you in the right direction.
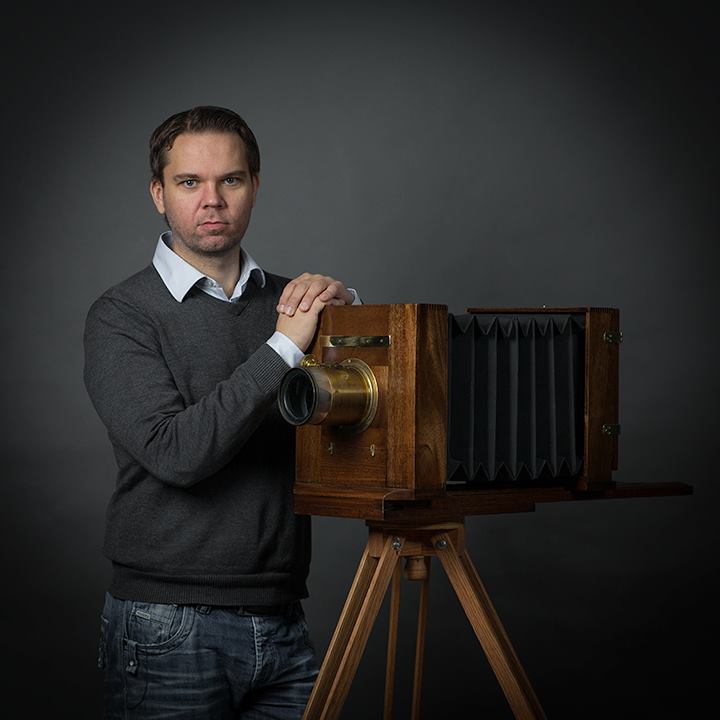
Me and my 8" x 10" camera
Cameras
To get started you need a large format camera with a plate holder (note that regular film holders can be used for aluminum plates but not for glass plates since they are too thick). There are plenty of large format cameras on Ebay that should work fine. You can also buy handmade wooden cameras from camera builders around the world (or you can build a camera if you have some woodworking skills).
The camera size depends on how big plates you want to make. For beginners, a 4x5" would be a good choice. 4x5" large format cameras at reasonable prices are quite easy to find, and there should be no problem to find lenses that will cover that size. It is important to keep in mind that you need a plate holder for a wet plate as well. If you want to go a little bigger, an 8x10 would be a good choice.
If you want to start cheap, you can modify a Kodak Brownie to become a wet plate camera.
Lenses
You will also need a lens that will cover your plate size. You can find lenses on Ebay as well. Search for "brass lens," "large format lens" or "Petzval lens." Note that many sellers claim to sell Petzval lenses, but that might not be the case. Petzval lenses are known for their center sharpness and swirly bokeh, and they are best suited for portraits. It is critical that the lens will cover your plate size.
Early Makers & Dealers of Petzval type Portrait Lenses
1840's
- Voigtlander (Austria/Germany)
- Ross (UK)
- Lerebours & Secretan (France)
- Horne & Thornthwaite (UK)
- Grubb (Ireland)
- CC Harrison (US)
1850's
- Jamin (France)
- Holmes, Booth & Hayden (US)
- Derogy (France)
- Hermagis (France)
- Gasc & Charconnet (France)
- Busch (Germany)
- Suter (Switzerland)
- Dietzler (Austria)
- Wray (UK)
1860's
- Darlot (France)
- Dallmeyer (UK)
- Steinheil (Germany)
Chemicals and Darkroom/box
In wet plate collodion, you make your film by hand. For that you need chemicals. Several online suppliers offer both pre-mixed solutions and complete kits to get you started.
You can also buy raw chemicals and mix the solutions yourself. Keep in mind that these chemicals can be dangerous if not handled correctly. Your silver bath can last for years if you maintain it properly (will also depend on how much you use it of course), this is good because silver nitrate is expensive.
You can use your Fixer for quite some time. However, a bottle of Fixer is cheap, so it's not a big expense. Collodion and developer don't have long shelf life and spans from 3-6 months. Old collodion will turn red. It will work after six months but several issues can occur, and your image will most likely dissolve when you varnish your plate.
You can bring your collodion "back to life" by adding a few drops of acetone (not sure about the ratio), but I would not trust it enough that I would varnish the plate with a classic varnish formula, since it may dissolve the photograph.
I have done plates with old collodion that turned out great, but once I coated the plates with varnish, they simply disappeared. To avoid this problem, I now do a small plate and pour on varnish to see if it can handle the varnish. I don't want to throw collodion away, so I rather coat the plates with a spray varnish. Spray varnish works well and will protect the photo, but I don't know the long-term effects. Photos can also dissolve even if you use fresh collodion, and this usually means that your varnish contains too much alcohol, which you can fix by adding a couple of drops distilled water. Notice if you add too much water your varnish will become matte and not have the beautiful gloss surface it should have. A rule of thumb should be that you always test your varnish on small plates that you can sacrifice
You will also need a darkroom or dark box with a red light to handle your light sensitive plates. A standard darkroom lamp will work fine. You can also by cheap red filters to use.
Ready to use chemicals should contain:
- Collodion
- Silver bath
- Developer
- Fixer
- Varnish
Below are some typical recipes. Do have in mind that these chemicals are very toxic, so be careful and make sure you use protection gear. If you are going to handle these chemicals separately, you should use a respirator mask with a carbon filter, especially if dealing with cadmium bromide which is a carcinogen. Also, keep in mind that some of these chemicals are extremely flammable (Ether is even explosive).
Collodion
- USP Collodion - 94ml
- Ether - 78ml
- Ethanol - 78ml
- Cadmium bromide - 0.6g
- Ammonium iodide - 2.0g
- Ammonium bromide - 0.5g
Silver Bath
- Silver Nitrate - 100g
- Distilled Water - 900ml
- Nitric acid (optional) - 2-3 drops
Developer
- Iron (Ferrous) Sulfate - 15g
- Distilled Water - 355ml
- Glacial Acetic Acid - 20ml
- Alcohol 190 Proof (95o) - 20ml
- White Sugar - 20ml
Fixer
- Rapid Fix (Ilford) - 200ml
- Distilled Water - 800ml
Sandarac Varnish
- Sandarac - 57g
- Alcohol - 415ml
- Oil of Lavender - 47ml
The Process
Once you have prepared your chemicals, you can start taking photographs. I have divided the process into eleven steps.
- Cleaning your plate (ambrotypes)
- Pour collodion on the plate
- Sensitizing the plate
- Focus your camera
- Load the plate holder
- Expose the plate
- Develop the plate
- Rinse in water
- Fix the plate
- Rinse in water
- Coat the plate with varnish
Step 1: Cleaning your plates
Clean plates are one of the most important factors for making sharp and clean photographs. If You are using black aluminum, this is not an issue because they contain a thin plastic film which you must remove before you pour the collodion on your plate. Avoid dust and don't touch the surface. Everything that's on the plate will show on your photograph.
If you are going to create an ambrotype (glass plate), there will be a lot more work with the cleaning. It is surprisingly difficult to get perfect clean glass plates, and it takes an effort to get them perfect. There are several different ways of doing this, but this is the method I found works quite well:
The first thing I do is to put all my glass plates in the dishwasher at the highest temperature possible, then I use some clean gloves and put all the plates in a box (keeping them separated to each other).
Now I have relatively clean glass plates, but they are not quite ready yet. The next step is to rub the plates with grain alcohol (or denatured alcohol) and Rottenstone (a fine powder used for furniture polishing. You can find Rottenstone on Ebay).
I just put a little powder on the plate and pour some denatured/grain alcohol over and start rubbing with a lint free paper (remember to use gloves).When rubbing the plate is done I clean up the excess Rottenstone with some more alcohol. Now the plate should be clean.
Dirty glass plates are one of the main reasons for failure when creating ambrotypes.
So before checking your chemicals make sure your glass plates are clean enough.
Step 2. Pouring Collodion on the plate
Pouring collodion is also an important technique to master if you want to create clean and beautiful plates. Hold the plate with your fingertips like a serving tray, then pour a puddle of collodion in the middle of the plate (watch my video above). Gently rock the plate to spread the collodion evenly over the plate. I go from middle to top right, top left, bottom left and finally bottom right to pour off the excess collodion into a separate drain bottle. Do not pour the excess back in your fresh collodion as this will pollute your collodion with dust and particles over time.
If you use a drain bottle, make sure you filter the collodion through a funnel with a cotton filter or unbleached coffee filters before you use it to make new photographs.
Step 3 and 4. Sensitizing the plate and focus the camera
Let the collodion set on the plate for a few seconds and then put it in your silver bath in one smooth motion. While the plate is sensitizing, I make sure the camera is ready and properly focused. After 3-5 minutes your plate should be light sensitive and ready to load in the plate holder.
Step 5. Loading the plate holder
Make sure your safe light (red) is on, then pull the plate out of the silver bath. Hold the plate a couple of seconds over the silver bath to drip off the excess silver nitrate.Now load the plate in your plate holder and wipe off the excess silver nitrate on the backside of the plate with a paper towel. You are now ready to expose the plate.
Remember that you need to do everything while the plate is wet, but there is no reason to panic, you usually have plenty of time. I have heard of successful exposures up to 10-15 minutes long.
Step 6. Exposing the plate
Exposing the plate is, of course, also a critical step to a successful plate. Determining exposure is done by an educated guess. Exposure times depends on your chemicals, lens and of course available light. I usually count rather than using a timer. If you have controlled and stable light, a timer can get you consistent results, but it can be harder when using natural light because it changes from minute to minute. Doing small test plates are usually a good idea.
Remember that Wet Plate Collodion is most sensitive to UV light. On sunny days the best place for making portrait plates are in the shadows with the sitter (model) facing the northern sky.
Step 7 and 8. Develop and rinse the plate
Once you have exposed the photograph, you must get back in your dark box or darkroom and develop the plate. Developing is done by pouring the developer across the plate in one sweeping motion, and then gently agitate the plate for 15-20 seconds. Now you must rinse the plate in water. Your plate is now light safe, and you can place it in the fixer bath.
Step 9 and 10. Fixing the plate and rinsing
The final step in the developing process is to fix the plate. Just put the plate in a fixer bath and wait til it clears up, this usually takes anywhere from 30 seconds to 2-3 minutes.
Finally, rinse the plate for at least 15-20 minutes in water (distilled preferably).
Step 11. Coat the plate with varnish
You must always coat your plates with varnish. An excellent finish requires practice and can be quite hard to do well. Always test your varnish on a smaller test plate to avoid dissolving pictures. Nothing is more frustrating to see a beautiful plate "melt" away in seconds.
Varnish is poured on in a puddle in the middle of the plate, much like the way you pour on collodion. However, you must do it a bit slower and try to flow it as even as possible. Before you begin, you should slightly warm up the plate a little. When your varnish is on the plate, you should heat the plate until it dries.
Note that this is not a complete guide to wet plate photography, but it will hopefully push you in the right direction. Use the comment field if you have questions or comments, and I'll do my best to answer.
Printing Wet Plate Collodion Photos
There are several ways of printing wet plate collodion photographs, and by printing, I don't mean inkjet prints (just to make that clear). Many printing processes can be extremely time consuming, and you need to shoot your photographs on glass plates to make negatives.
Common Historic Printing Processes
- Cyanotypes
- Salt Prints
- Albumen Prints
- Van Dyke Prints
All of these techniques can give you some beautiful unique prints. Please follow me for more articles on these subjects in the future.
I hope you enjoyed this article. Comments and upvotes are of course highly appreciated :)
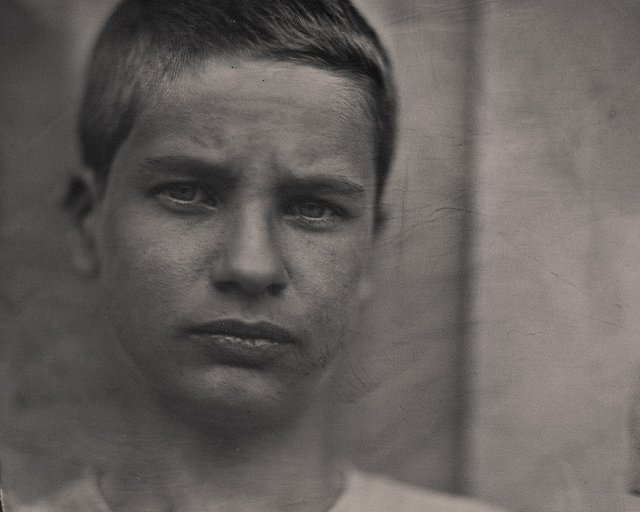
8x10 Tintype - Exposure time: 6 seconds in bright daylight

5x7 Tintype - Exposure time: 12 seconds in bright studio light
wonderful beautiful pictures. @dieterschneider
Thanks @anthea
One word: wonderful
Thank You Sir!