How to integrate HTML content into a native Android app
What Will I Learn?
In this tutorail, I'll show how to integrate HTML content into a native Android app in a way that is different from writing a PhoneGap application.
Requirements
Difficulty
Intermediate
Tutorial Contents
- Adding a WebView to the Layout
- Setting the Background of the Web View Component
- Displaying a Progress Bar While Loading
- Taking Control of the Download Process
How to integrate HTML content into a native Android app
All mobile development platforms offer an excellent support for integrating HTML into native apps. While frameworks like PhoneGap seem to suggest that HTML (and JavaScript and CSS) can ultimately replace native development, or at least keep it away from developers, native apps can be often built around some HTML content. The HTML content can be dynamically downloaded from some remote server via HTTP or it can be even read from the local storage (including application's resources) and just rendered through an ad hoc view.
Especially when cross-platform development is concerned, the use of HTML is an excellent way to cut development time. In this tutorial, I'll show how to integrate HTML content into a native Android app in a way that is different from writing a PhoneGap application. A PhoneGap application is entirely built using HTML and is then packaged as a native app. In this article, I'll show a native app that contains a web-based view. The great news is that HTML content can be merged effectively with the surrounding graphics simply blurring differences.
Adding a WebView to the Layout
The following code shows how to arrange a layout file for an activity that includes a WebView component. You use the WebView element to add the widget. You typically set only width and height in the resource file and leave every other setting to code.
<LinearLayout xmlns:android="http://schemas.android.com/apk/res/android"
android:orientation="vertical"
android:background="#d02430"
android:layout_width="fill_parent"
android:layout_height="fill_parent">
<!-- Title -->
<RelativeLayout style="@style/captionBar" android:orientation="horizontal">
<TextView style="@style/app_name" android:text="@string/html_name" />
</RelativeLayout>
<LinearLayout style="@style/html_buttonBar">
<WebView xmlns:android="http://schemas.android.com/apk/res/android"
android:id="@+id/webview"
android:layout_width="fill_parent"
android:layout_height="fill_parent"
/>
</LinearLayout>
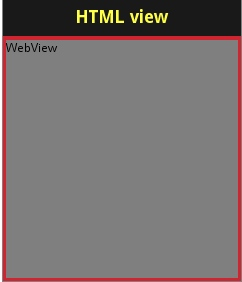
</LinearLayout>Figure 1 provides a preview of the activity.
Figure 1: The layout of the activity at this time.
Here's instead the initial source code for an activity class that uses the WebView widget.
public class HtmlActivity extends Activity

{

    private WebView webView;

    private String url;

    @Override

    public void onCreate(Bundle savedInstanceState)

    {

        super.onCreate(savedInstanceState);

        requestWindowFeature(Window.FEATURE_NO_TITLE);

        setContentView(R.layout.html);

    }    :

}
As you can see, the WebView is not configured and doesn't point to any URL. The minimal code you need to turn it to life is shown below. You can append this code to the current body of the onCreate method:
webView = (WebView) findViewById(R.id.webview);

webView.loadUrl(url);
As first thing, you retrieve the reference to the widget and then make it point to a given URL. The URL can be a static constant or it can be received from another activity that displays the web view. If another activity is invoking the activity with the web view and the URL is being passed as an argument then you will retrieve it with the following code:
Bundle extras = getIntent().getExtras();

if(extras == null)

   return;

String url = extras.getString("url");
The "url" string is simply the arbitrary name of the parameter through which the two Android activities exchange data. Also this code goes to the body of the onCreate method. At this point, everything is set and the HTML activity is ready to display any content it receives from the remote URL. If the URL doesn't exist the classic HTTP 404 Page Not Found user interface is shown. If the URL originates a HTTP 500 internal error, the page configured on the server for unhandled exceptions is displayed. If there's no Internet connection, the browser's specific ugly page for lack of connectivity is displayed.
Finally, even when the page is correctly displayed, it doesn't react to user's clicking by default. This is to say that there's a bit of additional work to do on the web view component to make it work as you may expect.The first aspect you want to configure of the web view component is the support for JavaScript. The following code makes the web view component sensitive to any JavaScript code you may have in the displayed page:
webView.getSettings().setJavaScriptEnabled(true);
This line is critical to enable client-side logic, including the ability to perform Ajax calls. All lines shown so far go in the body of the onCreate method.
Setting the Background of the Web View Component
The WebView element in the XML layout file features a background property. If you set the background property in the hope of changing the background color of the web view, though, you get an unpleasant surprise: it just doesn't work. This doesn't mean, however, that you can't set the background color of a WebView object. Here's how to do it:
webView.setBackgroundColor(Color.parseColor("#d02430"));
The setBackgroundColor method takes a Color object and uses that to paint the background of the web view. Nicely enough, you can get a Color object from an HTML color string.
Displaying a Progress Bar While Loading
The web view component may take a while to download the requested resource. During all this time, the web view component displays a blank screen of the color set via the setBackgroundColor method. There's no feedback, however, for the user that let her know what's going on. Displaying an indeterminate progress bar may be a very good idea. Let's see how to do that.All you need is adding a newly created instance of the ProgressBar widget to the activity that contains the web view. Here's some code:
final ProgressDialog progressDialog = new ProgressDialog(HtmlActivity.this);

progressDialog.setMessage("Loading ...");

progressDialog.setCancelable(false);

progressDialog.show();
You can deal with a ProgressBar in two ways. You can insert the progress bar widget in the XML layout of the activity or you can create it on the fly and hide and display it as appropriate. The benefit is that you can control where the progress bar will be placed in the user interface. You can customize quite a few aspects of a progress bar including the text and title being displayed, the drawable used for the animation.
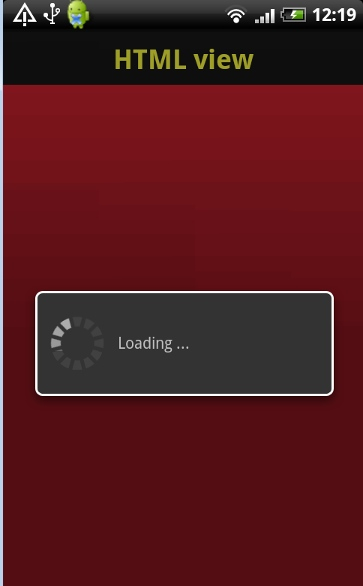
The ProgressBar widget can be configured to display a generic and indeterminate message such as "Loading..." or a progressive percentage, number or whatever you like. When indeterminate, the user interface of the progress bar cannot be changed dynamically to reflect a change of state in the application. Typically, for an indeterminate progress bar you don't even use a Cancel button. However, the widget allows total control over this aspect too.The code shown earlier demonstrates how to create a ProgressBar widget on the fly and display it within a system provided dialog window, as in Figure 2.
Figure 2: A progress bar within a system dialog box.
If your application needs to display an indeterminate progress bar in various moments but you don't want them to be specifically bound to a physical location in the screen, then you can create a global instance of the widget and hide and show it as needed.
To customize the look-and-feel of the progress bar you simply define an animation and bind it to the widget. In Android, an animation can be as simple as a sequence of images:
<!-- File name arbitrarily set to loading.xml -->

<animation-list xmlns:android="http://schemas.android.com/apk/res/android">

    <item android:drawable="@drawable/step1"           android:duration="150" />    <item android:drawable="@drawable/step2"           android:duration="150" />

    :

</animation>
Then you add the following line to previous configuration code:
dialog.setIndeterminateDrawable(getResources().getDrawable(R.anim.loading));
Other customizable aspects are colors and overall theme of the system dialog that contains the animation. You can check this out on the Android documentation site: http://developer.android.com/reference/android/app/ProgressDialog.html.
Taking Control of the Download Process
To display HTML content downloaded from a remote server, using a progress bar is a must. You display the progress bar just before loading the URL into the web view
final ProgressDialog progressDialog = new ProgressDialog(HtmlActivity.this);

progressDialog.setMessage("Loading ...");

progressDialog.setCancelable(false);

progressDialog.show();

String url = extras.getString("url");

webView = (WebView) findViewById(R.id.webview);

webView.getSettings().setJavaScriptEnabled(true);

webView.setBackgroundColor(Color.parseColor("#d02430"));

webView.loadUrl(url);
What about hiding the progress bar once the page has finished loading? As the download takes place asynchronously, you need an event handler to hide the progress bar and, more in general, decide what to do with the downloaded content.
You can associate the web view widget with a client module that enables you to control the interaction with the hosting activity. Among other things, the client module allows to detect download errors and termination. Here's a client module that hides the progress bar and handles a few errors.
webView.setWebViewClient(new WebViewClient() {
@Override
public void onPageFinished(WebView view, String url) {
super.onPageFinished(view, url);
progressDialog.hide();
};
@Override
public void onReceivedError(WebView view,
int errCode, String description, String failedUrl) {
String html1 = "<html><body><br><br><div><h3>An error occurred.</h3><hr>";
String html2 = "<p>Check your Internet connection!</p></div></body></html>";
String mime = "text/html";
String encoding = "utf-8";
view.loadData(html1+html2, mime, encoding);
}
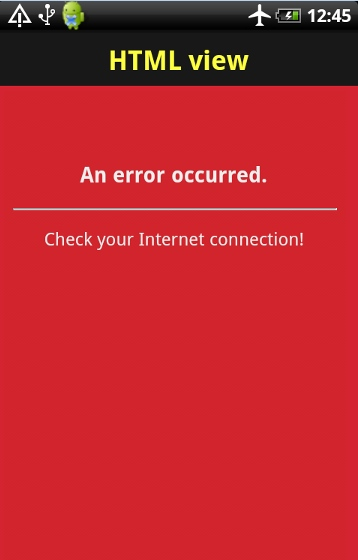
});The client module is an instance of the WebViewClient class that can override a couple of internal methods such as onPageFinished and onReceiveError. In the sample code, when the download is finished you simply hide the progress bar. In case of errors, instead, you can do a number of things, including hiding the web view widget. It is fairly common, however, that you just want to display an error message. In this case, you can arrange a bit of static HTML text and pass it to the same web view component. The final effect is shown in Figure 3.
Figure 3: A download error managed by the web view component.
It should be noted that onReceiveError doesn't handle well 404 HTTP status codes. If the requested URL doesn't exist, then the web view simply shows whatever the web server returns. In other words, the web view displays any response it gets and fires onReceiveError if it doesn't receive anything from the web server.
Summary
HTML plays a much more important role in mobile than many seem to think. The most common association between HTML and mobile comes through HTML solutions and a framework like PhoneGap. However, there's much more you can do with HTML. You can, for example, arrange segments of the user interface in HTML and display them quite effectively through a web view component. The web view is like the WebBrowser component of old Visual Basic applications, but unlike that can receive HTML as a string, which makes it really a powerful tool.
Posted on Utopian.io - Rewarding Open Source Contributors
Thank you for the contribution. It has been approved.
You can contact us on Discord.
[utopian-moderator]
Hey @wyn I am @utopian-io. I have just upvoted you!
Achievements
Suggestions
Get Noticed!
Community-Driven Witness!
I am the first and only Steem Community-Driven Witness. Participate on Discord. Lets GROW TOGETHER!
Up-vote this comment to grow my power and help Open Source contributions like this one. Want to chat? Join me on Discord https://discord.gg/Pc8HG9x