Git to manage your Online Tutorials
tags: education technology git learning tutorial
Goal of this Tutorial: Better manage learning resources for a step-by-step tutorial with Git.
Thanks to StackBlitz.com, a Live Demo of the application covered by this tutorial is available!

But what is GIT?
According to Merriam Webster Dictionary:
Definition of git:
[British] a foolish or worthless personExamples of git in a Sentence:
That git of a brother of yours has ruined everything!
oh, don't be such a silly git, of course your mates want you around
Ooooops... Not what I was looking for! 😜
OK, if you don't know what are Git, GitHub or GitFlow, I strongly advice you to have a look at Atlassian - Getting Git Right.

It will save you time, prevent a lot of stress and, well, make your life as a Developer much more enjoyable.
In this post, we see how to harvest the power of GitHub and GitFlow to manage tutorial resources.

If you do not have an account on GitHub, Sign up! It's free!
And, if you are just started with GitHub or even Git, check their Hello World! Tutorial. It's a 10 minutes read where you will learn a lot about Git and GitHub, the code hosting platform for version control and collaboration.
Why should you use GitHub for your tutorials?
The main reason is trivial: People following your tutorial want access to the full source code of the tutorial.
And GitHub is the best Social Coding Platform available! You will directly benefit from powerful GitHub Collaboration Tools:
Branches
Issues Forum
Pull Requests
Let's see how these can help you better manage your tutorials assets!
Branches
If your Tutorial has more than a few steps, releases are a must and will really be appreciated by your followers.
Usually, branches are used to manage:
- Development (multiple new features in parallel)
- Releases
- Maintenance (Bug fixes on previous releases)
In our case, each Release will correspond to the starting point of a Step in our Tutorial.
Issues Forum
As soon as you put your work out there, it's open for crticism. And, yeah, we love positive critisism. That's how we learn, everyday. People following your Tutorials will discover bugs or typos in your code, they will come with new and better solutions. These are all precious inputs to improve your Tutorial and probably also to improve the way you work on your projects.
Some of your followers might even go one step further... Pull Requests!
Pull Requests
Pull requests will let your followers tell you about changes they want to push to your repository on GitHub. Once a pull request is opened, you will have the opportunity to discuss and review the potential changes with your followers and follow-up commits before merging the changes into the tutotial repository.
A few words about GitFlow
GitFlow is a Git Workflow that was first published in 2010 by Vincent Driessen at nvie.com : A successful Git branching model
GitFlow Workflow centers on the concept of Releases.
Oversimplifying the Workflow, here is the process of the GitFlow Workflow:
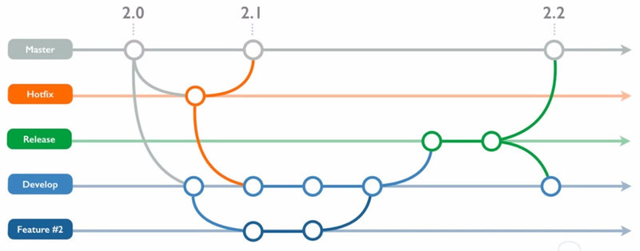
masterbranchIt contains the History of all the official releases. Every commit in this branch is tagged with a version number.
developbranchIt contains the complete history of the project.
featurebranchesEach contains the development history of a feature. It will always be forked from
developand merged back todevelop.
Usually, for big teams, you will have severalfeaturebranches in parallel.releasebranchesEach contains the preparation of a release, such as: bug fixing, documentation generation. No new features! Any feature currently under development will be postponed to the next release.
Like thefeaturebranches,releasebranches are forked fromdevelopand merged back intodevelop.hotfixbranchesEach contains a bug fix or security fix on the latest version of the
masterbranch.
These branches are forked frommasterand merged back tomasteranddevelop.supportbranchesMissing in the diagram and the post on Atlassian, these branches are used to maintain previous versions of the software. We will cover them in our process.
Getting started
Let's make sure you have the tools needed to use GitHub and GitFlow.
Git
You can install Git on Linux/Unix, Mac OS X and Windows.
On Ubuntu, it's as easy as:
➜ apt install git
GitHub
If you do not have an account on GitHub, Sign up!.
You might also want to setup SSH for GitHub. Otherwise, Git will keep asking for your password when running push and pull from your local machine.
Git + Hub
hub is a command line tool that wraps git in order to extend it with extra features and commands that make working with GitHub easier.
Here are a few examples:
➜  hub clone thierrydd/grooviz-tuto-hello-world
Cloning into 'grooviz-tuto-hello-world'...
remote: Counting objects: 45, done.
remote: Compressing objects: 100% (39/39), done.
remote: Total 45 (delta 3), reused 42 (delta 3), pack-reused 0
Receiving objects: 100% (45/45), 112.22 KiB | 601.00 KiB/s, done.
Resolving deltas: 100% (3/3), done.

➜  hub browse
Created new window in existing browser session.
hub cloneonly requires the name of the repository and (if the repository is not yours) the name of the owner of the repository.hub browseopen the current repository inside a new tab in your default browser.
You willl find all the instructions on seting up hub on your platform in GitHub: https://github.com/github/hub
On Ubuntu, I did the folllowing
Install hub
I installed from source:
➜  git clone https://github.com/github/hub.git
➜  cd hub
➜  make install prefix=/usr/local
Prerequisite for installation:
make, Go 1.8+, Ruby 1.9+ with bundlerYou may also install directly from compiled binaries.
Alias hub as git
Using hub feels best when it's aliased as git. This is not dangerous; your normal git commands will all work. hub merely adds some sugar.
The command
hub aliasprovides instructions for your current shell:➜ hub alias # Wrap git automatically by adding the following to ~/.zshrc: eval "$(hub alias -s)"After you configure your shell, you may use
hubfunctions directly with git:➜ git --version git version 2.14.1 hub version 2.3.0-pre10-136-g1e5bb95Shell tab-completion
We also recommend configuring auto completion for hub.
Example:
➜  git cl
clean -- remove untracked files from working tree
clone -- clone repository into new directory
Check more details about hub API in its manpages:
➜  man hub
HUB(1)                                                                           Hub Manual                                                                           HUB(1)

NAME
       hub - make git easier with GitHub

SYNOPSIS
       hub [--noop] COMMAND [OPTIONS]
       hub alias [-s] [SHELL]
       hub help hub-COMMAND

DESCRIPTION
       Hub is a tool that wraps git in order to extend it with extra functionality that makes it better when working with GitHub.

COMMANDS
       Available commands are split into two groups: those that are already present in git but that are extended through hub, and custom ones that hub provides.

   Extended git commands
       [...]
   New commands provided by hub
       [...]

CONFIGURATION
   [...]

BUGS
       https://github.com/github/hub/issues

AUTHORS
       https://github.com/github/hub/contributors

SEE ALSO
       git(1), git-clone(1), git-remote(1), git-init(1), https://github.com/github/hub

GITHUB                                                                           April 2018                                                                           HUB(1)
Extended git commands: am, apply, checkout, cherry-pick, clone, fetch, init, merge, push, remote, submodule
New commands provided by hub: alias, browse, ci-status, compare, create, fork, pull-request, issue, release, sync
GitFlow (AVH edition)
Let's get ready to work with GitFlow!
⚠ Vincent Driessen project on GitHub seems to be abandonned. Instead, we will use Peter van der Does gitflow-avh which is much more recent.
gitflow-avh is available on Linux, BSD, Mac OS X, Windows. Check the Installation Instructions for your platform. On Ubuntu, I went for the manual installation because the version packaged with Ubuntu is an old one:
$ wget --no-check-certificate -q https://raw.githubusercontent.com/petervanderdoes/gitflow-avh/develop/contrib/gitflow-installer.sh && sudo bash gitflow-installer.sh install stable; rm gitflow-installer.sh
OK! Let's get back to our topic for the day: Git for Tech Tutorials!
Git for your Tutorials
Let's see how to work with these branches with a minimal tutorial: Hello Angular!
This Tutorial is useless but easy to follow:
Section 0 - Initialization
- Step 0.1 - Generate basic Angualr Application
Section 1 - Hello World
Step 1.1 - Display "Hello, World!"
Step 1.2 - Beautify "Hello, World!"
Section 2 - Goodbye World
- Step 2.1 - Display "Goodby, World!"
We will prepare all the steps of this Tutorials using master, develop, feature, release and support branches.
Thanks to StackBlitz.com, a Live Demo of our application is available!
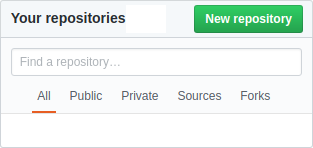
Create Repository
From your homepage on GitHub, click on New Repository:
Then, fill the Repository Creation Form:
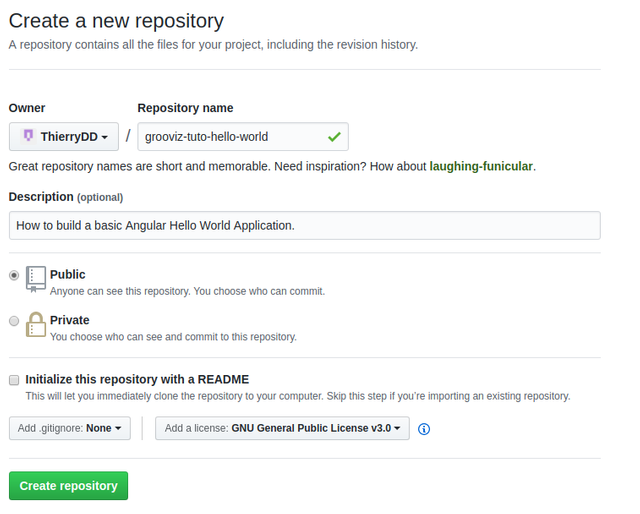
We defined the name of the Git Repository as grooviz-tuto-hello-world and the description as How to build a basic Angular Hello World Application. The README and .gitignore files will be generated by AngularCLI.
As a common practice for Tutorials, you want to clearly state that whatever you develop in the Tutorial can be freely reused, thanks to an Open Source License Agreement such as the GNU General Public License 3.0.
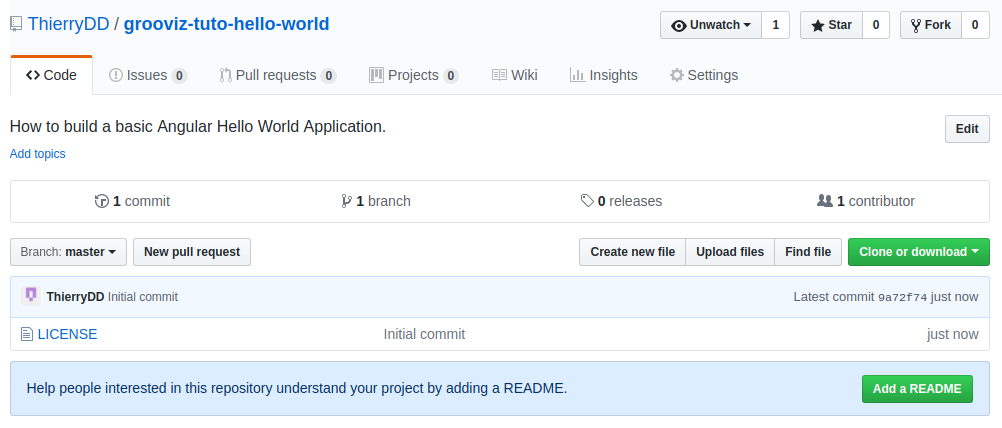
Click Create Repository and you get your initial repository.
Now, that the repository is ready, let's clone it to our local dev machine:
I like to use SSH:
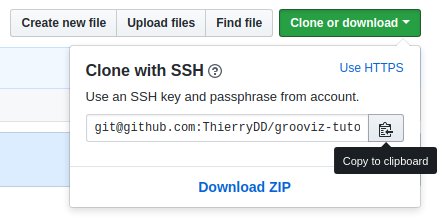
➜  Grooviz git clone ThierryDD/grooviz-tuto-hello-world
Cloning into 'grooviz-tuto-hello-world'...
remote: Counting objects: 3, done.
remote: Compressing objects: 100% (2/2), done.
remote: Total 3 (delta 0), reused 0 (delta 0), pack-reused 0
Receiving objects: 100% (3/3), 12.42 KiB | 6.21 MiB/s, done.
➜  Grooviz  cd grooviz-tuto-hello-world
➜  grooviz-tuto-hello-world git:(master) █
Open your repository in Code VS:

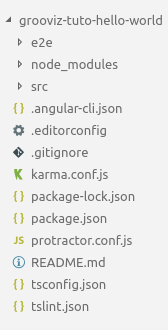
Your current repository just contains the LICENSE file generated by GitHub.
Initialize GitFlow
Launch the initialization of your GitFlow (AVH version) Workflow with git flow init, keeping all the default parameters.
➜  grooviz-tuto-hello-world git:(master) git flow init

Which branch should be used for bringing forth production releases?
   - master
Branch name for production releases: [master]
Branch name for "next release" development: [develop]

How to name your supporting branch prefixes?
Feature branches? [feature/]
Bugfix branches? [bugfix/]
Release branches? [release/]
Hotfix branches? [hotfix/]
Support branches? [support/]
Version tag prefix? []
Hooks and filters directory? [/home/thierry/Projects/Grooviz/grooviz-tuto-hello-world/.git/hooks]
➜  grooviz-tuto-hello-world git:(develop) █
As you see, the initialization switched to the develop branch, used for the next release development.
We are ready to start implementing our Tutorial Application step-by-step!
Step 0.1 - Initialization
In Section 0, we prepare the Tutorial Environment. In this tutorial, we have just one Step for Section 0. This Step is used to perform all the preparation tasks that are not part of the core learning topic of our Tutorial.
In this basic Hello, World! tutorial, our preparation will consist in:
Generating a skeleton Angular Application
Normalizing and resetting the CSS
Our goal now is to perfoirm this and release the v0.1.0 as the result of Step 0 and the starting point of Section 1.
Create an Angular App
Let's generate a new default Angular Application on our local dev machine, from the parent of the new grooviz-tuto-hello-world directory:
➜  Grooviz npx -p @angular/cli ng new grooviz-tuto-hello-world --prefix grooviz
[...]
added 1267 packages in 33.177s
Project 'grooviz-tuto-hello-world' successfully created.
➜  Grooviz cd grooviz-tuto-hello-world
➜  grooviz-tuto-hello-world git:(develop) ✗ █
We used The Executor as described in Global Node Modules without sudo. This enabled us to use ng command even without installing Angular CLI.
Open your new Projet in VS Code:
You can start your application with:
➜  grooviz-tuto-hello-world git:(develop) ✗ ng serve
ng not found. Trying with npx...
** NG Live Development Server is listening on localhost:4200, open your browser on http://localhost:4200/ **
Date: 2018-04-06T09:40:08.664Z
Hash: c7360808e955be76890c
Time: 4973ms
chunk {inline} inline.bundle.js (inline) 3.85 kB [entry] [rendered]
chunk {main} main.bundle.js (main) 17.9 kB [initial] [rendered]
chunk {polyfills} polyfills.bundle.js (polyfills) 554 kB [initial] [rendered]
chunk {styles} styles.bundle.js (styles) 41.5 kB [initial] [rendered]
chunk {vendor} vendor.bundle.js (vendor) 7.42 MB [initial] [rendered]

webpack: Compiled successfully.
█
And open it: http://localhost:4200 :

Normalize and Reset CSS
One of the main problems with CSS is the default rules used by each browser. But, thanks to Nicolas Gallagher, we have normalize.css.
Normalize.css makes browsers render all elements more consistently and in line with modern standards. It precisely targets only the styles that need normalizing.
...as used by Twitter, TweetDeck, GitHub, Soundcloud, Guardian, Medium, GOV.UK, Bootstrap, HTML5 Boilerplate, and... Grooviz!
Let's install normalize.css and save it in the project's dependencies.
➜  grooviz-tuto-hello-world git:(develop) ✗ npm install normalize.css --save
npm WARN optional SKIPPING OPTIONAL DEPENDENCY: [email protected] (node_modules/fsevents):
npm WARN notsup SKIPPING OPTIONAL DEPENDENCY: Unsupported platform for [email protected]: wanted {"os":"darwin","arch":"any"} (current: {"os":"linux","arch":"x64"})

+ [email protected]
added 1 package in 6.377s
And, add the CSS to the Application Styles:
{
  [...]
  "apps": [
    {
      [...],
      "styles": [
        "../../node_modules/normalize.css/normalize.css",
        "styles.scss"
      ],
      [...]
    }
  ],
  [...]
}
⚠ ng serve is not watching changes on angular-cli.json. You should restart ng serve before continuing.
Then, in the main CSS Styles, reset the box-sizing default and use Open Sans font from Google Fonts:
@import url('https://fonts.googleapis.com/css?family=Open+Sans');

html {
    font-family: 'Open Sans', sans-serif;
    box-sizing: border-box;
}

html, body {
    height: 100%;
}

*, *:before, *:after {
    box-sizing: inherit;
}
Now, padding and border-width are included in the total width and height of each element. And our website will be displayed full screen.
Let's change the default HTML Template of our Angular Main Component:
<h1><i>Hello, World!</i> Tutorial</h1>

<p>Ready to start with Step 1!!!</p>
The Angular Application is now clean, fresh and... ugly! 😢

Let's push everything to GitHub. We will try to make it look better with the next steps of the Tutorial.
Push to GitHub Repository
Check what should be committed::
➜  grooviz-tuto-hello-world git:(develop) ✗ git status
On branch develop
Untracked files:
  (use "git add <file>..." to include in what will be committed)

        .angular-cli.json
        .editorconfig
        .gitignore
        README.md
        e2e/
        karma.conf.js
        package-lock.json
        package.json
        protractor.conf.js
        src/
        tsconfig.json
        tslint.json

nothing added to commit but untracked files present (use "git add" to track)
Commit everything to the develop branch:
➜  grooviz-tuto-hello-world git:(develop) ✗ git add .
➜  grooviz-tuto-hello-world git:(develop) ✗ git commit -m "Step 0.1 - Preparation Step"
[develop 7da0e98] Step 0.1 - Preparation Step
 30 files changed, 13292 insertions(+)
 create mode 100644 .angular-cli.json
 create mode 100644 .editorconfig
 create mode 100644 .gitignore
 create mode 100644 README.md
 create mode 100644 e2e/app.e2e-spec.ts
 create mode 100644 e2e/app.po.ts
 create mode 100644 e2e/tsconfig.e2e.json
 create mode 100644 karma.conf.js
 create mode 100644 package-lock.json
 create mode 100644 package.json
 create mode 100644 protractor.conf.js
 create mode 100644 src/app/app.component.css
 create mode 100644 src/app/app.component.html
 create mode 100644 src/app/app.component.spec.ts
 create mode 100644 src/app/app.component.ts
 create mode 100644 src/app/app.module.ts
 create mode 100644 src/assets/.gitkeep
 create mode 100644 src/environments/environment.prod.ts
 create mode 100644 src/environments/environment.ts
 create mode 100644 src/favicon.ico
 create mode 100644 src/index.html
 create mode 100644 src/main.ts
 create mode 100644 src/polyfills.ts
 create mode 100644 src/styles.css
 create mode 100644 src/test.ts
 create mode 100644 src/tsconfig.app.json
 create mode 100644 src/tsconfig.spec.json
 create mode 100644 src/typings.d.ts
 create mode 100644 tsconfig.json
 create mode 100644 tslint.json
And push it to GitHub:
➜  grooviz-tuto-hello-world git:(develop) git push origin develop
Counting objects: 35, done.
Delta compression using up to 8 threads.
Compressing objects: 100% (34/34), done.
Writing objects: 100% (35/35), 98.92 KiB | 2.67 MiB/s, done.
Total 35 (delta 1), reused 0 (delta 0)
remote: Resolving deltas: 100% (1/1), done.
To github.com:ThierryDD/grooviz-tuto-hello-world.git
 * [new branch]      develop -> develop
Now is the time to create our first release: the result of Step 0.1 and starting point for Section 1!
Let's discuss about the Release Versioning Strategy.
Semantic Versioning
We will use Semantic Versioning to handle our releases.
Semantic Versioning for Software Projects
Semantic versioning uses x.y.z tags for versions.
0.y.z is the Initial Development Phase
During this phase, anything may change at any time. When we reach version 1.0.0, then we will have a public API well defined and we will handle x, y & z as follows.
x.y.Z is te Patch version
Z MUST be incremented if only backwards compatible bug fixes are introduced. A bug fix is defined as an internal change that fixes incorrect behavior.
x.Y.z is the Minor version
Y MUST be incremented if new, backwards compatible functionality is introduced to the public API.
X.y.z is the Major version
X MUST be incremented if any backwards incompatible changes are introduced to the public API.
Let's see how we will use Semantic Versioning for our Tutorials:
Semantic Versionning for Tutorials
Initial Development Phase
Often, you have some ground preparation work to be done before reaching the meaty part of the Tutorial. This preparation work might be useful for some followers, especially beginners. However, a lot of your followers will want to jump right into the heart of your Tutorial.
We will use the Initial Development Phase for all the steps being part of the preparation work.
Major version for the sections of your Tutorial.
Minor version for the steps in each section.
Patch version for fixes on the steps.
When checking out the resources for a Tutorial, your followers should not target a specific Patch version. They should instead target the last Minor version of the Step.
As you will see, we will open GitFlow support branches for the fixes on the steps of the Tutorial.
For this Hello World Tutorial, we will have:
| Steps | Tags | Branch |
|---|---|---|
| Section 0 - Initialization | - | - |
| Step 0.1 - Prepare default Angular Application | 0.1.z | support/step.0.1.x |
| Section 1 - Hello World | - | - |
| Step 1.1 - Display "Hello, World!" | 1.1.z | support/step.1.1.x |
| Step 1.2 - Beautify "Hello, World!" | 1.2.z | support/step.1.2.x |
| Section 2 - Goodbye World | - | - |
| Step 2.1 - Display "Goodby, World!" | 2.1.z | support/step.2.1.x |
Now that we know our strategy, let's see how to finalize our Section 0 by creating the official release!
Release Section 0, Step 1
So far, we have been working on develop branch
Let's start a new branch for our release 0.1
➜  grooviz-tuto-hello-world git:(develop) git flow release start 0.1.0
Switched to a new branch 'release/0.1.0'

Summary of actions:
- A new branch 'release/0.1.0' was created, based on 'develop'
- You are now on branch 'release/0.1.0'

Follow-up actions:
- Bump the version number now!
- Start committing last-minute fixes in preparing your release
- When done, run:

     git flow release finish '0.1.0'
➜  grooviz-tuto-hello-world git:(release/0.1.0)
As you see, by starting this release, GitFlow moved us to the new branch release/0.1.0.
The only task we will carry on this branch is to update the README.md file:
# Grooviz Hello World Tutorial
<sub>Step 0.1.0</sub>

This basic (and probably useless...) tutorial has been created as a use case of a post about Using GitFlow Workflow to manage Tutorials of GitHub.

## Goal of the Tutorial

We will say Hello and Goodbye to the World!

## History

### Release 0.1.0 - Preparation Step

In this release 0.1.0, we have the initialization work for the Tutorial:

* Default Angular We Application

* Normalized and Reset CSS

## References

* [GitFlow to manage Online Tutorials](https://steemit.com/blockchain/@thierrydd/gitflow-to-manage-online-tutorials)
We commit this new README.md:
➜  grooviz-tuto-hello-world git:(release/0.1.0) git status
On branch release/0.1.0
Changes not staged for commit:
  (use "git add <file>..." to update what will be committed)
  (use "git checkout -- <file>..." to discard changes in working directory)

        modified:   README.md

no changes added to commit (use "git add" and/or "git commit -a")
➜  grooviz-tuto-hello-world git:(release/0.1.0) ✗ git add .
➜  grooviz-tuto-hello-world git:(release/0.1.0) ✗ git commit -m "Preparing Release 0.1.0 README file"
[release/0.1.0 0bdc1d2] Preparing Release 0.1.0 README file
 1 file changed, 18 insertions(+), 27 deletions(-)
 rewrite README.md (99%)
Now, we are ready to finish the release:
➜ grooviz-tuto-hello-world git:(release/0.1.0) git flow release finish 0.1.0
When you launch this command, you will be asked for:
- a commit message to explain why you merge
release/0.1.0tomaster - a message to describe the tag
0.1.0 - a commit message to explain why you merge
release/0.1.0todevelop
After you confirm these three messages, GitFlow will proceed with the termination of the Release:
Switched to branch 'master'
Your branch is up-to-date with 'origin/master'.
Merge made by the 'recursive' strategy.
 .angular-cli.json                    |    61 +
 .editorconfig                        |    13 +
 .gitignore                           |    44 +
 README.md                            |    18 +
 e2e/app.e2e-spec.ts                  |    14 +
 e2e/app.po.ts                        |    11 +
 e2e/tsconfig.e2e.json                |    14 +
 karma.conf.js                        |    33 +
 package-lock.json                    | 12595 ++++++++++++++++++++++++++++++++++++++++++++++++++++++++++++++++++++++++++++++++++++++++++++++++++++++++++++++++++++++++++++++++++
 package.json                         |    49 +
 protractor.conf.js                   |    28 +
 src/app/app.component.css            |     0
 src/app/app.component.html           |     3 +
 src/app/app.component.spec.ts        |    27 +
 src/app/app.component.ts             |    10 +
 src/app/app.module.ts                |    18 +
 src/assets/.gitkeep                  |     0
 src/environments/environment.prod.ts |     3 +
 src/environments/environment.ts      |     8 +
 src/favicon.ico                      |   Bin 0 -> 5430 bytes
 src/index.html                       |    14 +
 src/main.ts                          |    12 +
 src/polyfills.ts                     |    79 +
 src/styles.css                       |    10 +
 src/test.ts                          |    20 +
 src/tsconfig.app.json                |    13 +
 src/tsconfig.spec.json               |    19 +
 src/typings.d.ts                     |     5 +
 tsconfig.json                        |    19 +
 tslint.json                          |   143 ++
 30 files changed, 13283 insertions(+)
 create mode 100644 .angular-cli.json
 create mode 100644 .editorconfig
 create mode 100644 .gitignore
 create mode 100644 README.md
 create mode 100644 e2e/app.e2e-spec.ts
 create mode 100644 e2e/app.po.ts
 create mode 100644 e2e/tsconfig.e2e.json
 create mode 100644 karma.conf.js
 create mode 100644 package-lock.json
 create mode 100644 package.json
 create mode 100644 protractor.conf.js
 create mode 100644 src/app/app.component.css
 create mode 100644 src/app/app.component.html
 create mode 100644 src/app/app.component.spec.ts
 create mode 100644 src/app/app.component.ts
 create mode 100644 src/app/app.module.ts
 create mode 100644 src/assets/.gitkeep
 create mode 100644 src/environments/environment.prod.ts
 create mode 100644 src/environments/environment.ts
 create mode 100644 src/favicon.ico
 create mode 100644 src/index.html
 create mode 100644 src/main.ts
 create mode 100644 src/polyfills.ts
 create mode 100644 src/styles.css
 create mode 100644 src/test.ts
 create mode 100644 src/tsconfig.app.json
 create mode 100644 src/tsconfig.spec.json
 create mode 100644 src/typings.d.ts
 create mode 100644 tsconfig.json
 create mode 100644 tslint.json
Already on 'master'
Your branch is ahead of 'origin/master' by 3 commits.
  (use "git push" to publish your local commits)
Switched to branch 'develop'
Your branch is up-to-date with 'origin/develop'.
Merge made by the 'recursive' strategy.
 README.md | 29 ++++++++++-------------------
 1 file changed, 10 insertions(+), 19 deletions(-)
Deleted branch release/0.1.0 (was 0bdc1d2).

Summary of actions:
- Release branch 'release/0.1.0' has been merged into 'master'
- The release was tagged '0.1.0'
- Release tag '0.1.0' has been back-merged into 'develop'
- Release branch 'release/0.1.0' has been locally deleted
- You are now on branch 'develop'
Now that release 0.1.0 is ready on local, let's push develop and master on GitHub:
➜  grooviz-tuto-hello-world git:(develop) git push origin --all
Counting objects: 5, done.
Delta compression using up to 8 threads.
Compressing objects: 100% (5/5), done.
Writing objects: 100% (5/5), 930 bytes | 930.00 KiB/s, done.
Total 5 (delta 2), reused 0 (delta 0)
remote: Resolving deltas: 100% (2/2), completed with 1 local object.
To github.com:ThierryDD/grooviz-tuto-hello-world.git
   b21859f..4b4f068  develop -> develop
   1bcef32..fbbe970  master -> master
Let's also push the new tag 0.1.0:
➜  grooviz-tuto-hello-world git:(develop) git push --tags
Counting objects: 1, done.
Writing objects: 100% (1/1), 168 bytes | 168.00 KiB/s, done.
Total 1 (delta 0), reused 0 (delta 0)
To github.com:ThierryDD/grooviz-tuto-hello-world.git
 * [new tag]         0.1.0 -> 0.1.0
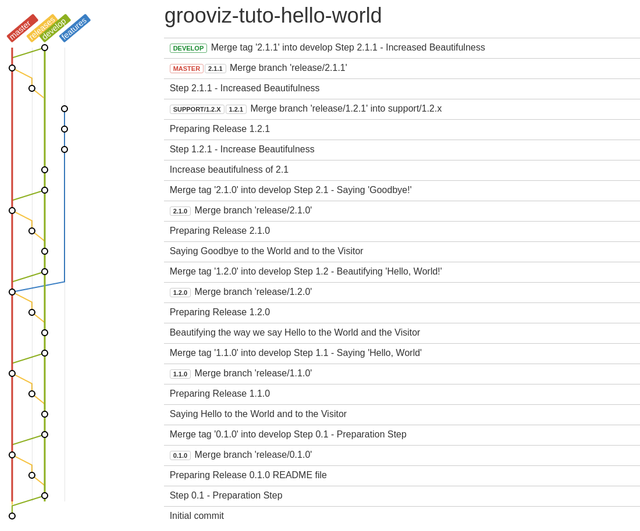
Here is a quick overview of what we did so far: (begining of the project is at the bottom of the graph...)
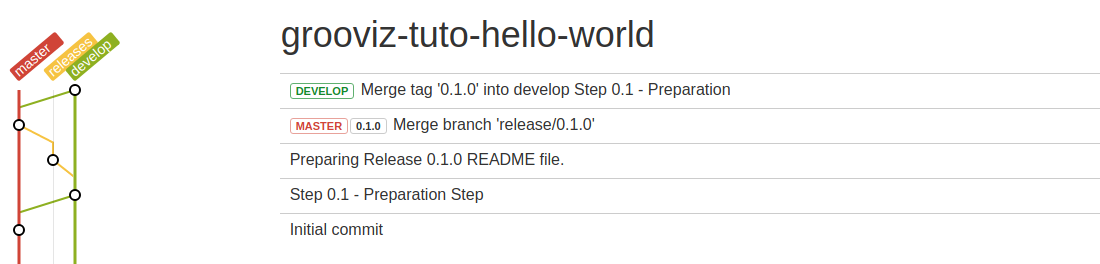
Now that the tag for release 0.1.0 is ready, you may use it as a Git Checkpoint in your tutorial.
How to Checkout a Git Checkpoint?
Your followers have two ways of getting this checkpoint:
Easy but tedious : Download a ZIP File for 0.1.0
This is the easy way. You just include a link to the ZIP File: https://github.com/ThierryDD/grooviz-tuto-hello-world/archive/0.1.0.zip
This is tedious...
Your students will have to download a new ZIP for each Checkpoint they want to use.
They also will have to download a new ZIP file if you update the tutorial. (0.1.1, 0.1.2, 0.1.3, ...)Less easy but much more convenient: Use Git or, better, Git+Hub
Correct, you might have to teach Git / GitHub to your followers. If needed, you may redirect them to my post explaining How to get a Tutorial Checkpoint! That's the post I refer to in my own tutorials.
The idea is to fork the project once and then, checkout the checkpoint they need.
Forking can be done directly from GitHub by clicking fork in the top right corner of the repository page:

Then, from their local machine:
➜  git clone grooviz-tuto-hello-world
➜  cd grooviz-tuto-hello-world
➜  git checkout 0.1.0
🛈 This clone shortcut requires
hub. With just git, you would have to use the complete repository path such ashttps://github.com/ThierryDD/grooviz-tuto-hello-worldInstead of using GitHub website and then command line, you could do everything from command-line:
➜  git clone thierrydd/grooviz-tuto-hello-world
➜  cd grooviz-tuto-hello-world
➜  git fork
➜  git checkout 0.1.0
Now, the student can continue to work on Section 1, Step 1. With the fork, they can even commit their changes to their own repository. This might be useful if they want to, for example, deploy the Tutorial's application to Heroku.
Let's continue with Step 1.1!
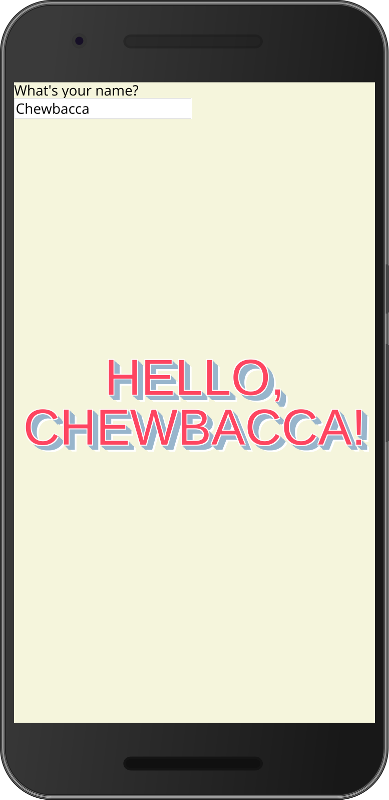
Step 1.1 - Display 'Hello, world'
⚠ Make sure you work on your Tutorial and not on a fork of the tutorial if you generated at the end of previous step.
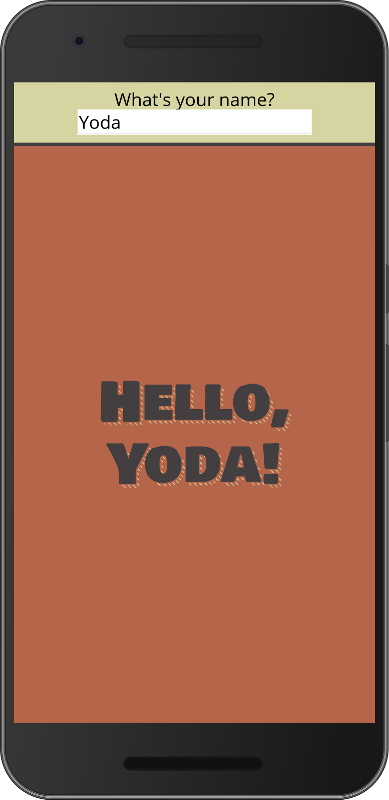
This useless application will just say hello to the user, after asking a name.
For Section 0, we worked directly on develop branch. Usually, it's not a good idea. You don't want every single commit to be on the develop branch. It would cluster the project history with implementation details you don't need. We will instead implement Step 1.1 in a feature branch:
From within the develop branch, let's create a new feature branch to say Hello to the User:
➜  grooviz-tuto-hello-world git:(develop) ✗ git flow feature start saying_hello
Switched to a new branch 'feature/saying_hello'

Summary of actions:
- A new branch 'feature/saying_hello' was created, based on 'develop'
- You are now on branch 'feature/saying_hello'

Now, start committing on your feature. When done, use:

     git flow feature finish saying_hello
➜  grooviz-tuto-hello-world git:(feature/saying_hello)
GitFlow moved us to the new feature/saying_hello branch.
We add a name variable on the Component on line 🅰:
import { Component } from '@angular/core';

@Component({
  selector: 'grooviz-root',
  templateUrl: './app.component.html',
  styleUrls: ['./app.component.css']
})
export class AppComponent {
  title: string = 'grooviz';
  name: string = ''; // 🅰
}
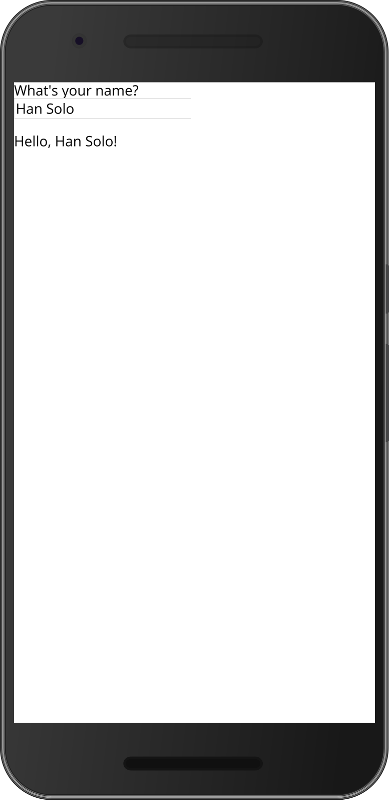
And modify the HTML Template by adding an input field and data binding it to the greeting:
<form>
    <div>What's your name?</div>
    <div><input type="text" [value]="name" (input)="name = $event.target.value;"></div>
</form>
<p>Hello, {{ name || "World" }}!</p>
Step 1.1 is done, we commit our changes:
➜  grooviz-tuto-hello-world git:(feature/saying_hello) ✗ git add .
➜  grooviz-tuto-hello-world git:(feature/saying_hello) ✗ git commit -m "Saying Hello to the World and to the Visitor"
[feature/saying_hello eb08d9b] Saying Hello to the World and to the Visitor
 2 files changed, 7 insertions(+), 4 deletions(-)
Our feature is implemented and we finish our feature branch:
➜  grooviz-tuto-hello-world git:(feature/saying_hello) git flow feature finish saying_hello
Switched to branch 'develop'
Updating 083f122..eb08d9b
Fast-forward
 src/app/app.component.html | 8 +++++---
 src/app/app.component.ts   | 3 ++-
 2 files changed, 7 insertions(+), 4 deletions(-)
Deleted branch feature/saying_hello (was eb08d9b).

Summary of actions:
- The feature branch 'feature/saying_hello' was merged into 'develop'
- Feature branch 'feature/saying_hello' has been locally deleted
- You are now on branch 'develop'
As for Step 0.1, we will now work on releasing the Step 1.1:
➜  grooviz-tuto-hello-world git:(develop) git flow release start 1.1.0
Branches 'develop' and 'origin/develop' have diverged.
And local branch 'develop' is ahead of 'origin/develop'.
Switched to a new branch 'release/1.1.0'

Summary of actions:
- A new branch 'release/1.1.0' was created, based on 'develop'
- You are now on branch 'release/1.1.0'

Follow-up actions:
- Bump the version number now!
- Start committing last-minute fixes in preparing your release
- When done, run:

     git flow release finish '1.1.0'
The README.md becomes:
# Grooviz Hello World Tutorial
<sub>Step 1.1.0</sub>

This basic (and probably useless...) tutorial has been created as a use case of a post about Using GitFlow Workflow to manage Tutorials of GitHub.

## Goal of the Tutorial

We will say Hello and Goodbye to the World!

## History

### Release 1.1.0 - Saying 'Hello, World'

In this release 1.1.0, we say 'Hello' to the World and to the Visitor:

* Add the Visitor's name as a variable on the Angular Component

* Add an `<input>` for the name of the Visitor

* Display either 'Hello, World!' or 'Hello, name!', depending whether we know the Visitor's name or not.

### Release 0.1.0

[...]

## References

* [GitFlow to manage Online Tutorials](https://steemit.com/blockchain/@thierrydd/gitflow-to-manage-online-tutorials)
After commiting the README file:
➜  grooviz-tuto-hello-world git:(release/1.1.0) ✗ git add .
➜  grooviz-tuto-hello-world git:(release/1.1.0) ✗ git commit -m "Preparing Release 1.1.0"
[release/1.1.0 de2fb96] Preparing Release 1.1.0
 1 file changed, 11 insertions(+), 1 deletion(-)
We finish the Release for Step 1.1:
➜  grooviz-tuto-hello-world git:(release/1.1.0) git flow release finish 1.1.0
Branches 'develop' and 'origin/develop' have diverged.
And local branch 'develop' is ahead of 'origin/develop'.
Switched to branch 'master'
Merge made by the 'recursive' strategy.
 README.md                  | 12 +++++++++++-
 src/app/app.component.html |  4 ++--
 src/app/app.component.ts   |  3 ++-
 3 files changed, 15 insertions(+), 4 deletions(-)
Already on 'master'
Switched to branch 'develop'
Merge made by the 'recursive' strategy.
 README.md | 12 +++++++++++-
 1 file changed, 11 insertions(+), 1 deletion(-)
Deleted branch release/1.1.0 (was 509a20b).

Summary of actions:
- Release branch 'release/1.1.0' has been merged into 'master'
- The release was tagged '1.1.0'
- Release tag '1.1.0' has been back-merged into 'develop'
- Release branch 'release/1.1.0' has been locally deleted
- You are now on branch 'develop'
As for Step 0.1, we push both branches as well as the new Tag to GitHub:
➜  grooviz-tuto-hello-world git:(develop) git push origin --all
Counting objects: 11, done.
Delta compression using up to 8 threads.
Compressing objects: 100% (11/11), done.
Writing objects: 100% (11/11), 1.40 KiB | 1.40 MiB/s, done.
Total 11 (delta 7), reused 0 (delta 0)
remote: Resolving deltas: 100% (7/7), completed with 5 local objects.
To github.com:ThierryDD/grooviz-tuto-hello-world.git
   7c5e44e..6a4d40a  develop -> develop
   c85af99..c729e3b  master -> master
➜  grooviz-tuto-hello-world git:(develop) git push --tags
Counting objects: 1, done.
Writing objects: 100% (1/1), 177 bytes | 177.00 KiB/s, done.
Total 1 (delta 0), reused 0 (delta 0)
To github.com:ThierryDD/grooviz-tuto-hello-world.git
 * [new tag]         1.1.0 -> 1.1.0
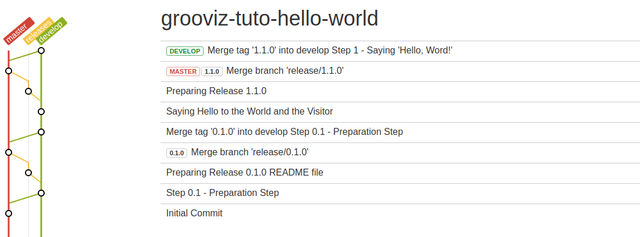
So far, our GitHub Repository history looks like this:
Step 1.2 - Beautify 'Hello, world'
The process will be exactly the same as for Step 1.1.
Let's just review the list of command we will issue:
➜ grooviz-tuto-hello-world git:(develop) git flow feature start beautify_hello
Then, we update the styles.css:
[...]

:root {
    --beige: rgb(245, 245, 220);
    --red: #fe4560;
    --blue: #98b5cc;
}

html, body {
    background: var(--beige);
    width: 100%;
    height: 100%;
}

p {
    text-align: center;
    font-family: 'CoreCircus', sans-serif;
    text-transform: uppercase;
    font-size: 14vw;
    text-align: center;
    line-height: 1;
    font-weight: normal;
    margin: 0;
    top: 50%;
    left: 50%;
    transform: translate(-50%, -50%);
    position: absolute;
    color: var(--red);
    text-shadow: -1px -1px 0 white, 1px -1px 0 white, -1px 1px 0 white, 1px 1px 0 white, 1px 0px 0px var(--blue), 0px 1px 0px var(--blue), 2px 1px 0px var(--blue), 1px 2px 0px var(--blue), 3px 2px 0px var(--blue), 2px 3px 0px var(--blue), 4px 3px 0px var(--blue), 3px 4px 0px var(--blue), 5px 4px 0px var(--blue), 4px 5px 0px var(--blue), 6px 5px 0px var(--blue), 5px 6px 0px var(--blue), 7px 6px 0px var(--blue), 8px 7px 0px white, 9px 8px 0px white;
}
It looks much nicer! We may now release version 1.2.0:
➜  grooviz-tuto-hello-world git:(feature/beautify_hello) ✗ git add .
➜  grooviz-tuto-hello-world git:(feature/beautify_hello) ✗ git commit -m "Beautifying the way we say Hello to the World and the Visitor"
➜  grooviz-tuto-hello-world git:(feature/beautify_hello) git flow feature finish beautify_hello
➜  grooviz-tuto-hello-world git:(develop) git flow release start 1.2.0
Update the README.md:
# Grooviz Hello World Tutorial
<sub>Step 1.2.0</sub>

This basic (and probably useless...) tutorial has been created as a use case of a post about Using GitFlow Workflow to manage Tutorials of GitHub.

## Goal of the Tutorial

We will say Hello and Goodbye to the World!

## History

### Release 1.2.0 - Beautifying 'Hello, World!'

In this release 1.2.0, we say make our 'Hello' to the World and to the Visitor more beautiful:

* Using another font

* Adding some shadow effects

* All this using CSS Custom Variables for the colors

### Release 1.1.0 - Saying 'Hello, World'

[...]

## References

* [GitFlow to manage Online Tutorials](https://steemit.com/blockchain/@thierrydd/gitflow-to-manage-online-tutorials)
We are ready to release Step 1.2:
➜  grooviz-tuto-hello-world git:(release/1.2.0) ✗ git add .
➜  grooviz-tuto-hello-world git:(release/1.2.0) ✗ git commit -m "Preparing Release 1.2.0"
➜  grooviz-tuto-hello-world git:(release/1.2.0) git flow release finish 1.2.0
➜  grooviz-tuto-hello-world git:(develop) git push origin --all
➜  grooviz-tuto-hello-world git:(develop) git push --tags
That's one more step in the good direction:
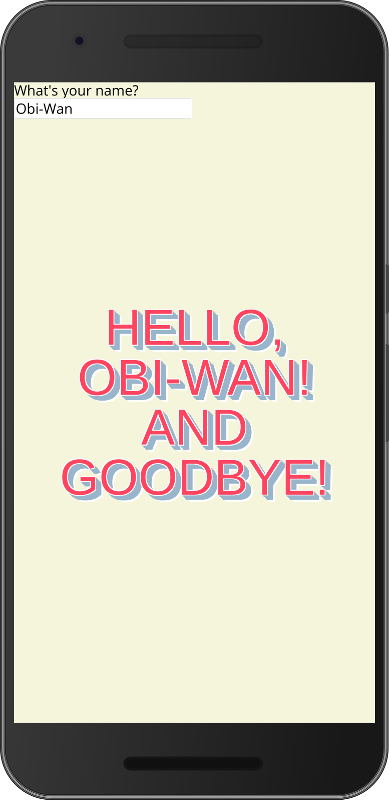
Step 2.1 - Display 'Goodbye, world'
Though we switch to another section in our Tutorial, the process is just the same!
➜ grooviz-tuto-hello-world git:(develop) git flow feature start display_goodbye
Then, we update the app.component.html:
<form>
    <div>What's your name?</div>
    <div><input type="text" [value]="name" (input)="name = $event.target.value;"></div>
</form>
<p>
    Hello, {{ name || "World" }}!<br />
    and<br />
    Goodbye!
</p>
It looks great! We may now release version 2.1.0:
➜  grooviz-tuto-hello-world git:(feature/beautify_hello) ✗ git add .
➜  grooviz-tuto-hello-world git:(feature/beautify_hello) ✗ git commit -m "Saying Goodbye to the World and to the Visitor"
➜  grooviz-tuto-hello-world git:(feature/beautify_hello) git flow feature finish display_goodbye
➜  grooviz-tuto-hello-world git:(develop) git flow release start 2.1.0
Update the README.md:
# Grooviz Hello World Tutorial
<sub>Step 2.1.0</sub>

This basic (and probably useless...) tutorial has been created as a use case of a post about Using GitFlow Workflow to manage Tutorials of GitHub.

## Goal of the Tutorial

We will say Hello and Goodbye to the World!

## History

### Release 2.1.0 - Saying 'Goodbye!'

In this release 2.1.0, we say 'Goodbye' to the World and to the Visitor.

### Release 1.2.0 - Beautifying 'Hello, World!'

[...]

## References

* [GitFlow to manage Online Tutorials](https://steemit.com/blockchain/@thierrydd/gitflow-to-manage-online-tutorials)
We are ready to release Step 1.2:
➜  grooviz-tuto-hello-world git:(release/2.1.0) ✗ git add .
➜  grooviz-tuto-hello-world git:(release/2.1.0) ✗ git commit -m "Preparing Release 2.1.0"
➜  grooviz-tuto-hello-world git:(release/2.1.0) git flow release finish 2.1.0
➜  grooviz-tuto-hello-world git:(develop) git push origin --all
➜  grooviz-tuto-hello-world git:(develop) git push --tags
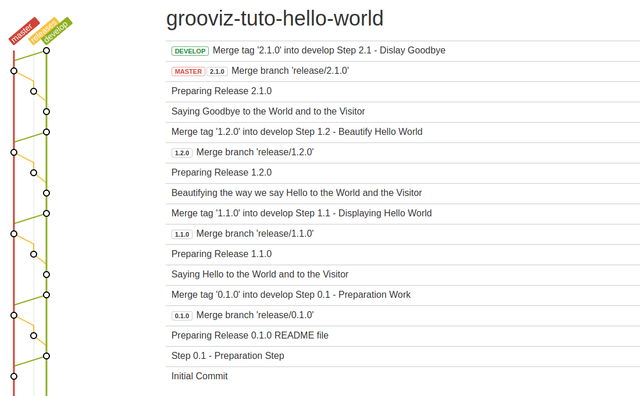
Voilà! The Application is ready and the Tutorial is complete.
OK, it seems that we could (or should?) improve the level of beauty for this Application... We sent our UI Designer on training and he came back with some nice ideas!
Increasing the level of Beautifulness!
To implement the changes we have to go back in time and modify Step 1.2.
For this, we will generate a new Support Branch, support/1.2.x. The command to create this new branch is:
git flow support start 1.2.x 1.2.0
With '1.2.X' being the nmae of the support branch and 1.2.0 the tag from which we should branch.
We run de command:
➜  grooviz-tuto-hello-world git:(develop) git flow support start 1.2.x 1.2.0
Switched to a new branch 'support/1.2.x'

Summary of actions:
- A new branch 'support/1.2.x' was created, based on '1.2.0'
- You are now on branch 'support/1.2.x'
We will work on a feature branch on the support branch:
➜  grooviz-tuto-hello-world git:(support/1.2.x) git flow feature start increase_beautifulness support/1.2.x
Switched to a new branch 'feature/increase_beautifulness'

Summary of actions:
- A new branch 'feature/increase_beautifulness' was created, based on 'support/1.2.x'
- You are now on branch 'feature/increase_beautifulness'

Now, start committing on your feature. When done, use:

     git flow feature finish increase_beautifulness
⚠ Note that we had to specify the base branch as support/1.2.x. By default, GitFlow-AVH will base feature branches on develop.
Now, on this feature branch, we will modify the App Component HTML Template and move/modify the CSS Styles from styles.css to the App Component.
<form>
    <div>What's your name?</div>
    <div><input type="text" [value]="name" (input)="name = $event.target.value;"></div>
</form>
<div class="wrapper">
    <div data-shadow="Hello," class="shadow">
        Hello,
    </div>
    <div attr.data-shadow="{{ name || 'World' }}!" class="shadow">
        {{ name || "World" }}!
    </div>
</div>
We clean the styles.css:
@import url('https://fonts.googleapis.com/css?family=Open+Sans');

html {
    font-family: 'Open Sans', sans-serif;
    box-sizing: border-box;
}

html, body {
    height: 100%;
}

*, *:before, *:after {
    box-sizing: inherit;
}
We implement the new styles:
@import url('https://fonts.googleapis.com/css?family=Bowlby+One+SC');

:host {

  --background-color: #B4654A;
  --foreground-color: #433E3F;
  --shadow-color: #D6D4A0;

  height: 100%;
  width: 100%;
  background-color: var(--background-color);
  display: flex;
  flex-direction: column;
}

form {
  background-color: var(--shadow-color);
  padding: 2vw;
  border-bottom: 1vw solid var(--foreground-color);
}

form div {
  font-size: 5vw;
  text-align: center;
}

.wrapper {
  height: 100%;
  flex-grow: 1;
  display: flex;
  flex-direction: column;
  justify-content: center;
  align-items: center;

}

div.shadow, div.skewed {
  position: relative;
  z-index: 1;
  display: inline-block;
  font-family: 'Bowlby One SC', cursive;
  font-size: 15vw;
}

div.shadow {
  color: var(--foreground-color);
  text-shadow: .02em .02em 0 var(--background-color);
}
div.shadow:after {
  content: attr(data-shadow);
  position: absolute;
  top: .06em; left: .06em;
  z-index: -1;
  text-shadow: none;
  background-image:
    linear-gradient(
      45deg,
      transparent 45%,
      var(--shadow-color) 45%,
      var(--shadow-color) 55%,
      transparent 0
    );
  background-size: .1em .1em;
  -webkit-background-clip: text;
  -webkit-text-fill-color: transparent;
  animation: shad-anim 30s linear infinite;
}

@keyframes shad-anim {
  0% {background-position: 0 0}
  0% {background-position: 100% -100%}
}
Much better!!!
Now, we may finish our feature:
➜  grooviz-tuto-hello-world git:(feature/increase_beautifulness) ✗ git add .
➜  grooviz-tuto-hello-world git:(feature/increase_beautifulness) ✗ git commit -m "Step1.2.1 - Increase Beautifulness"
[feature/increase_beautifulness 1671f0b] Step 1.2.1 - Increase Beautifulness
 3 files changed, 94 insertions(+), 44 deletions(-)
 rewrite src/styles.css (80%)
➜  grooviz-tuto-hello-world git:(feature/increase_beautifulness) git flow feature finish increase_beautifulness
Switched to branch 'support/1.2.x'
Updating ba3ecbb..1671f0b
Fast-forward
 src/app/app.component.css  | 72 +++++++++++++++++++++++++++++++++++++++++++++++++++++
 src/app/app.component.html |  9 ++++++-
 src/styles.css             | 29 ---------------------
 3 files changed, 80 insertions(+), 30 deletions(-)
Deleted branch feature/increase_beautifulness (was 1671f0b).

Summary of actions:
- The feature branch 'feature/increase_beautifulness' was merged into 'support/1.2.x'
- Feature branch 'feature/increase_beautifulness' has been locally deleted
- You are now on branch 'support/1.2.x'
We are now back on the support/1.2.x branch and may release this increased beautifulness as tagged version 1.2.1:
➜  grooviz-tuto-hello-world git:(support/1.2.x) git flow release start 1.2.1 support/1.2.x
Switched to a new branch 'release/1.2.1'

Summary of actions:
- A new branch 'release/1.2.1' was created, based on 'support/1.2.x'
- You are now on branch 'release/1.2.1'

Follow-up actions:
- Bump the version number now!
- Start committing last-minute fixes in preparing your release
- When done, run:

     git flow release finish '1.2.1'
⚠ Same as with the feature branch, we have to specify the base branch as support/1.2.x. By default, GitFlow-AVH will base release branches on develop.
Updated Readme File:
# Grooviz Hello World Tutorial
<sub>Step 1.2.1</sub>

This basic (and probably useless...) tutorial has been created as a use case of a post about Using GitFlow Workflow to manage Tutorials of GitHub.

## Goal of the Tutorial

We will say Hello and Goodbye to the World!

## History

### Release 1.2.1 - Increased Beautifulness

* Improved beautifulness of UI Design

* Migration of styles to app.component.css

### Release 1.2.0 - Beautifying 'Hello, World!'

[...]

## References

* [GitFlow to manage Online Tutorials](https://steemit.com/blockchain/@thierrydd/gitflow-to-manage-online-tutorials)
We finalize the Release:
➜  grooviz-tuto-hello-world git:(release/1.2.1) ✗ git add .
➜  grooviz-tuto-hello-world git:(release/1.2.1) ✗ git commit -m "Preparing Release 1.2.1"
➜  grooviz-tuto-hello-world git:(release/1.2.1) git flow release finish 1.2.1
➜  grooviz-tuto-hello-world git:(support/1.2.x) git push origin --all
➜  grooviz-tuto-hello-world git:(support/1.2.x) git push --tags

Remember to update your Tutorial with the new Tag for Step 1.2.
Now, how do we migrate these changes to Step 2.1?
Cherry Picking the changes
We will now cherry-pick the changes we made on our application and apply them to Step 2.1
Cherry Picking in Git means to apply a commit made on one branch to another branch.
Here, we want to apply the change of style to Step 2.1 where we added the Goodbye! greetings.
Let's have a look at our Git Log to find the commit hash.
You can find the commit hash signature on http://beta.gitflowchart.com/ or using Git Command Line:
Make sure you still are on the support/1.2.x branch, where you made the changes to improve the look and feel of your application:
➜  grooviz-tuto-hello-world git:(support/1.2.x) ✗ git log
commit f1c1231307566e067c9453295bae8d02b1062ae2 (HEAD -> support/1.2.x, tag: 1.2.1, ori
gin/support/1.2.x)
Merge: 1671f0b 0ab1ccb
Author: Thierry <[email protected]>
Date:   Wed Apr 11 17:39:28 2018 +0200

    Merge branch 'release/1.2.1' into support/1.2.x

commit 0ab1ccbfb76ba05454569e53834a25ee5601c566
Author: Thierry <[email protected]>
Date:   Wed Apr 11 17:39:19 2018 +0200

    Preparing Release 1.2.1

commit 1671f0b80018ac8782c00fab906e6f1488983857
Author: Thierry <[email protected]>
Date:   Wed Apr 11 17:33:45 2018 +0200

    Step 1.2.1 - Increase Beautifulness

commit ba3ecbbf2be3eb947af63c56d65ec7c15af449c6 (tag: 1.2.0)
Merge: 546c4f0 4b0ca1d
Author: Thierry <[email protected]>
Date:   Wed Apr 11 17:11:33 2018 +0200

    Merge branch 'release/1.2.0'
The Hash code we want is 1671f0b80018ac8782c00fab906e6f1488983857, the one corresponding the the commit of the feature branch "Step 1.2.1 - Increase Beautifulness".
Now that you have the hash signature of the commit you want to cherry-pick, quit the log with :q, move to the develop branch and cherry-pick the commit.
➜  grooviz-tuto-hello-world git:(support/1.2.x) git checkout develop
Switched to branch 'develop'
➜  grooviz-tuto-hello-world git:(develop) git cherry-pick 1671f0b80018ac8782c00fab906e6f1488983857
error: could not apply 1671f0b... Step 1.2.1 - Increase Beautifulness
hint: after resolving the conflicts, mark the corrected paths
hint: with 'git add <paths>' or 'git rm <paths>'
hint: and commit the result with 'git commit'
Argh! An error! It failed!!!
Did it really failed? No, we just have a conflict to fix. If you check your project under Visual Studio Code, you see that there is a conflict on app.component.html:
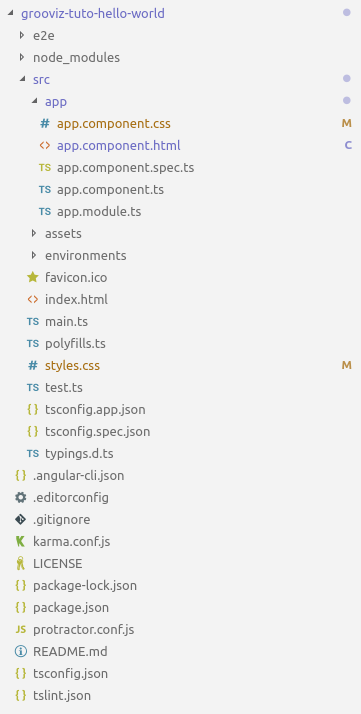
Two files have been [ M ]odified by the Cherry Picking. But one is in [ C ]onflict, app.component.html. Indeed, that file has been modified in both the changes we did to improve the look and feel of the application (change of structure) and in the Step 1.2 (addition of 'and Goodbye!').
Opening the file app.component.html you get
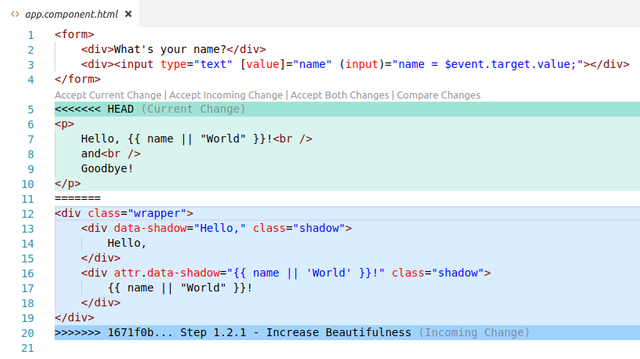
Fortunately, this conflict is easy to handle. Still within VS Code, click on Accept Incoming Change (the new structure) and add the 'and Goodbye!' greetings:
<form>
    <div>What's your name?</div>
    <div><input type="text" [value]="name" (input)="name = $event.target.value;"></div>
</form>
<div class="wrapper">
    <div data-shadow="Hello," class="shadow">
        Hello,
    </div>
    <div attr.data-shadow="{{ name || 'World' }}!" class="shadow">
        {{ name || "World" }}!
    </div>
    <div data-shadow="and" class="skewed">
        and
    </div>
    <div data-shadow="Goodbye!" class="shadow">
        Goodbye!
    </div>
</div>
We also introduced a new skewed style to emphasize the 'and' in 'Hello, World! and Goodbye!':
[...]
div.skewed {
  position: relative;
  z-index: 1;
  display: inline-block;
  font-family: 'Bowlby One SC', cursive;
  font-size: 10vw;
  margin: 10vw 0;
  transform: skew(0, -15deg);
  color: var(--shadow-color);
  border-top: 2px solid var(--shadow-color);
  border-bottom: 2px solid var(--shadow-color);
}
Et voilà!

Our Application, though it won't fundamentaly change the World, is ready for production!
Let's commit our changes as release '2.1.1':
➜  grooviz-tuto-hello-world git:(develop) ✗ git add .
➜  grooviz-tuto-hello-world git:(develop) ✗ git commit -m "Increase beautifulness of 2.1"
➜  grooviz-tuto-hello-world git:(develop) git flow release start 2.1.1
We update the README.md:
# Grooviz Hello World Tutorial
<sub>Step 2.1.0</sub>

This basic (and probably useless...) tutorial has been created as a use case of a post about Using GitFlow Workflow to manage Tutorials of GitHub.

## Goal of the Tutorial

We will say Hello and Goodbye to the World!

## History

### Release 2.1.1 - Increase Beautifulness

Increased beautifulness of our Application Look-and-feel.

### Release 2.1.0 - Saying 'Goodbye!'

[...]
Finish the Release 2.1.1:
➜  grooviz-tuto-hello-world git:(release/2.1.1) ✗ git add .
➜  grooviz-tuto-hello-world git:(release/2.1.1) ✗ git commit -m "Step 2.1.1 - Increased Beautifulness"
[release/2.1.1 45f6aee] Step 2.1.1 - Increased Beautifulness
 1 file changed, 15 insertions(+)
➜  grooviz-tuto-hello-world git:(release/2.1.1) git flow release finish 2.1.1
➜  grooviz-tuto-hello-world git:(develop) git push origin --all
➜  grooviz-tuto-hello-world git:(develop) git push --tags
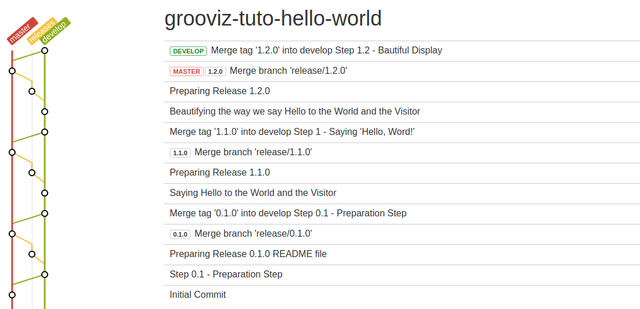
We're back on develop branch and our Repository history now looks like:
At the end of this Tutorial Prepartion, we have 6 releases:
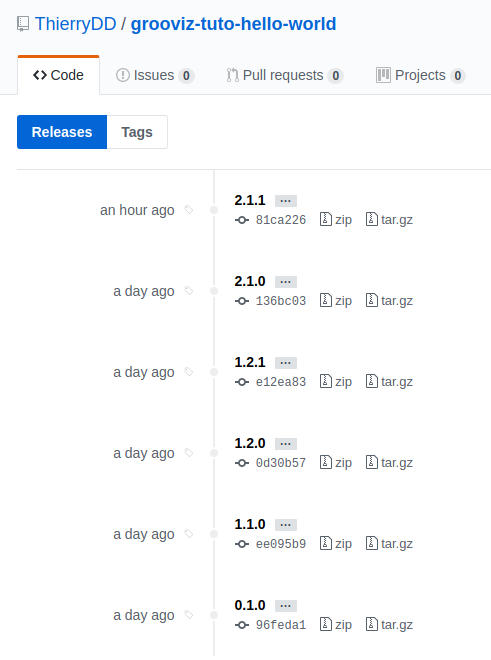
Out of which we will keep 4 for our Tutorial Checkpoints:
0.1.0 - Checkpoint after Dev Environment Preparation, begining of Step 1.1
1.1.0 - Beginning of Step 1.2
1.2.1 - Beginning of Step 2.1
2.1.1 - End of Tutorial
I hope this may be useful to some of you. Let me know what you think in the comments!