What you need to know about before getting involved with gimp
So if you have just started with GIMP, and now you are completely lost as to what to do next? There are windows and buttons everywhere and nothing makes sense? If so, this is the tutorial for you if you aren't lost try improving your knowledge .
The idea is for you to get going with a quick run-through of setting up a vanilla install of GIMP, followed by you doing your first little image in the program. From then on you can head on to more advanced tutorials, Whereas this tutorial is mainly aimed at complete newbies in GIMP, also veteran users might find a useful idea or two.
INSTALLATION
GIMP exists for many different computing platforms, including Linux, Windows and Mac.
linux,mac and windows users can download from: http://www.gimp.org/downloads/
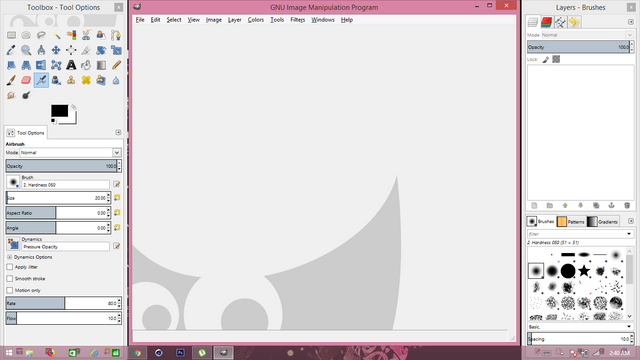
After installation it opes up like this

We have the 3 tabs
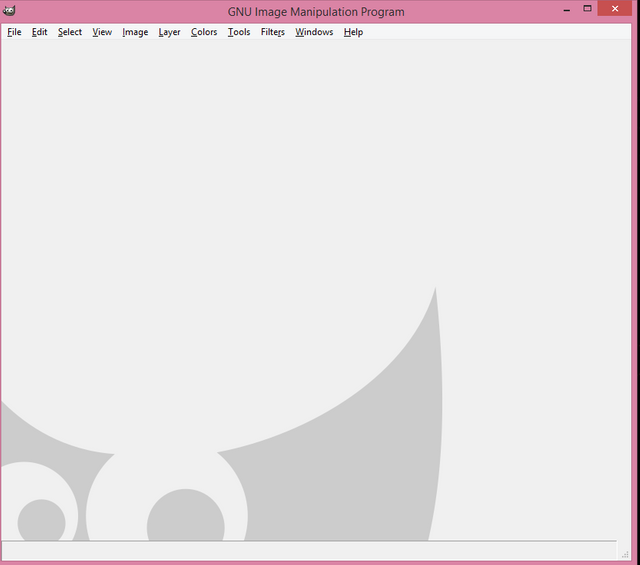
GNU image manipulation program in the middle

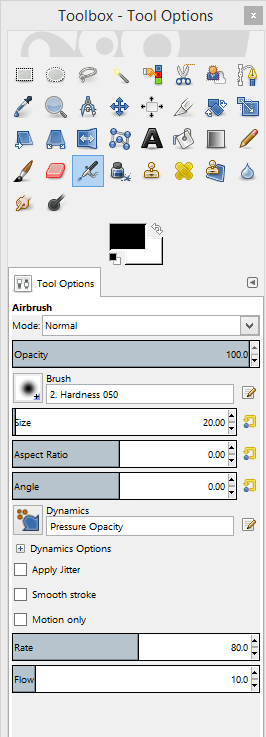
toolbox -tool option at the left

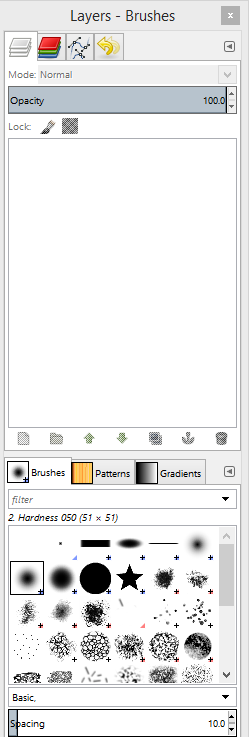
layer-brushes at the right

It should be remembered that GIMP's interface is extremely flexible.you can increase the tab size to your choice
To the top left you have the Tool box. This contains the most commonly used functions of the program, quite literally the artist's box of utilities. These tools are in fact so often used that almost all of them also have default keyboard shortcuts for even faster access
Attached to the bottom of the tool box is the Tool options dock. This shows the settings for each tool and thus changes depending on which tool is currently active. In the image we see the tool options for the paintbrush tool.
To the far right we have a dock that contains several things in one. What we see at the moment is the empty Layer list
window. As we start creating a new image, this list will start to fill with layers
Below the layer list, another box is attached, containing the list of brushes usable by GIMP. Brushes are, quite like their real-world counterpart, things you use to mark down things on the canvas. They can be used to emulate actual paint brushes, but also be used as "stamps" for creating nice effects, as well as be animated.
In the center you find the main dock window(GNU manipulation program , this is actually called the Empty Image window. This is the main work area. It starts out small, but it will resize to hold your image when you create or load one. It also is also here you find the menu. To close GIMP you can either close this window or close the tool box (or use the menu File->Quit).
The first row of the toolbox deals solely with selecting various parts of your image in clever ways. Think of a selection as if you were placing a paper with a hole in it over your image. You can then only paint on that part of your image which is visible in the hole. By shaping the hole neatly you can create all sorts of effects, and also not have to worry you will mess up other parts of your image.
The art of selecting is crucial for many tasks in GIMP, and many of GIMP's functions only works on selections. They are also the way to easily paint forms like squares, circles and polygons. We will try a few later.
A VERY common mistake made by newbie is the problem of creating a selection somewhere and forgetting about it -- you will then not be able to paint outside it at all and it looks like the paint tools does not work. The menu option Select->All or Select->None will solve that for you. These two are so useful that you are wise to learn their keyboard shortcuts: Shift+A and Shift+Ctrl+A.
By holding Shift or Ctrl down, you can also add/remove from an existing selection. Use Esc to abandon a selection in progress, and Return to quickly finish it.
Rectangle select tool (R ): Creates a square selection. When using this, you get the chance to pull handles to adjust it. Press Return or click inside it to finalize the selection.
Elliptical region select tool (E): Circular selection.
Freehand select tool (F): Free-hand selection is done by holding the mouse button and dragging. If you instead click the mouse you will get to place nodes linked by straight lines. You can combine the two modes as you like as well as adjust the polygon nodes after you made them. Tie the ends together or press Return to finalize the selection. A very, very useful tool.
HERE ARE SOME USEFUL SHORTCUTS AND USES
Continuous region select (Magic wand) (Z): Selects connected areas. Click and drag to include more areas.
Colour select (Shift + O ): Selects areas of similar colour. Click and drag to include a wider range of colours.
Select Shape from image (Intelligent scissors) (I): Selects along an edge. Can be very useful to select and cut out parts of an image, the results can be a bit unpredictable though.
(foreground select, path tool, colour picker, zoom, measurer, move tool)
Foreground select tool: An advanced algorithm intended primarily for cutting out items and people from photos. Rather involved and not for newbies. Refer to the manual for how to use this.
Path tool (B ): Creates "paths", mathematical objects possible to be perfectly adjusted and modified to any shape and form. The paths can be saved and also converted to selections, making this the most advanced but also most involved way to create a selection.
Colour picker (O): Picks colour from the image and makes it your active colour. This tool is often not accessed directly -- holding Ctrl when using a paint tool will temporarily switch to the colour picker. By default the picker only selects from the current layer, an often useful option for this tool is to set "Sample Merged", which means you pick the colour you "see", not just what is on the current layer (once you understand layers, that will make sense).
Zoom tool: This tool is very useful, so much so that it should mostly be used by keyboard shortcut. The default keys are + and -, we will learn how to change that and other keys later.
Measure tool: Measure pixel distances and angles on the canvas.
Move tool (M): Move layers and selections around. To avoid newbie frustration during this tutorial, it is recommended that you set this tool's option to "Move active layer".
Align tool: This is used for aligning or distributing layers relative to each other. Most useful for text, but can be used whenever things need to be distributed and placed neatly.
Crop tool (Shift + C): Used for cutting away unneeded parts of an image. Primarily a photo manipulation tool.
Rotate (Shift + R): Rotate a selected area or layer.
Scale (Shift + T): Scale a selected area or layer.
Shear (Shift + S): Skew a selected area or layer.
Perspective (Shift + P ): Works as if you took a 2D-part of your image and "tipped" it down into the
Flip tool (Shift + F): Flips your selection from one side to the other.
Text tool (T): This allows you to place text in your image, using any fonts available to GIMP.
Bucket fill (Shift + B ): Fill parts of the image with a colour or pattern. It can be used to replace particular colours or parts of the image.
Gradient fill (L): Fill parts of the image with a gradient.
Pencil tool (N): This is the first of the Brush paint tools, that is, tools that use brushes to paint on the canvas. The pencil creates "pixellated", jagged lines, that is, lines that are not smoothed. It is best used for create very small images where each pixel matters, like icons and smileys and similar.
Paint brush (P): This tool emulates a real paint brush by smoothing the edges of brush strokes to create smooth, "realistic" lines. This means that cannot place individual pixels as precisely as you can with the Pencil tool, but the result looks much nicer for larger works. This is the primary tool for digital painters.
Eraser tool (Shift + E)[/size]: This, as expected, erases the colour from an image/layer. What it really does is "paint with transparency". Since GIMP has an Undo function (Ctrl+Z), this tool is less used to correct mistakes than a real-life eraser and just as often used to adjust minor details or as a paint tool in its own right.
Airbrush (A): This emulates an airbrush or paintbrush to create the a more fuzzy "sprayed" effect than the paintbrush does.
Ink tool (K): Emulates a fountain pen or steel nib; useful for comics, calligraphy and other situations when dynamic lines are important.
Clone tool (C ): Allows to clone parts of an image (also from another layer or a completely different image) to where you want it. Ctrl-click sets the point which should be cloned, from there on, painting will cause that part of the image to appear (also different brushes can be used to apply it). Very useful for adding structure and for realistically modifying photos.
Healing tool (H): Specialized tool for removing small blemishes in photographs.
Perspective clone : Advanced tool for cloning parts of an image into a plane different to the screen. Could for example be used to clone a face-on image of a window onto a wall seen from below.
(Blur/sharpen tool, smudge, burn/dodge tool)
Blur tool (V): Used to soften or sharpen coloured edges and blend colours together.
Thanks for reading
Posted on Utopian.io - Rewarding Open Source Contributors
Your contribution cannot be approved because it does not follow the Utopian Rules.
Your contribution is far too trivial for us to accept.
You can contact us on Discord.
[utopian-moderator]