USB부팅하는 라즈베리파이 서버 만들기

1.
라즈베리파이는 SD카드를 기본적인 저장장치로 사용합니다. OS와 관련한 기본 데이타도 SD카드에서 보관합니다. 대용량 저장장치가 필요하면 USB로 SSD나 HDD를 연결하여 사용합니다. 사실 불편합니다. 그래서 확장보드는 이용하여 SSD 혹은 HDD를 내장하였습니다. 이제 남은 것은 SD카드가 아니라 USB로 연결한 HDD로 부팅하는 일입니다. 이와 관련한 글은 여럿이지만 기본적인 개념은 동일합니다. img 형식으로 배포하는 파일을 SD카드와 동일한 방식으로 HDD에 복사(복원)합니다.
라즈베리파이용 OS로 선택한 리눅스는 Ubuntu Mate입니다. 우선 라즈베리파이 서버를 조립한 후 SD카드로 Ubuntu Mate를 설치 동작하였습니다. 작업의 편의성을 위해 마우스와 키보드를 공유하는 Synergy를 설치하려고 했습니다. Raspberian으로 빌드한 실행파일을 Synergy 1 에서 받아서 설치하였지만 libqt5corea오류가 발생하더군요. 어쩔 수 없이 Compiling - Instructions on how to compile Synergy Core from source.을 따라 소스를 이용하여 빌드하였습니다. 시간이 걸렸지만 성공적으로 실행하여 편하게 작업하였습니다. Intro: What is Synergy?을 보면 Raspbian에서 컴파일을 하는 방법을 자세히 소개합니다. 어느 쪽을 참고하셔도 무난히 빌드할 수 있습니다.
이제 본격적으로 HDD에 OS에 설치하는 작업입니다. 우선 준비물입니다. 처음 HDD만 준비하면 되는 줄 알았는데 SD카드가 필요합니다. 설치하면서 알았지만 img 파일은 두개의 파티션으로 이루어졌습니다. 첫째는 vFAT(FAT32)영역이고 둘째는 일반적인 리늑스 포맷인 ext4입니다. 또한 Raspberry Pi는 SD 카드를 통해서만 부팅이 된다고 합니다. FAT32에 들어있는 bootloader와 Kernel을 담은 SD카드가 필요한 이유입니다.
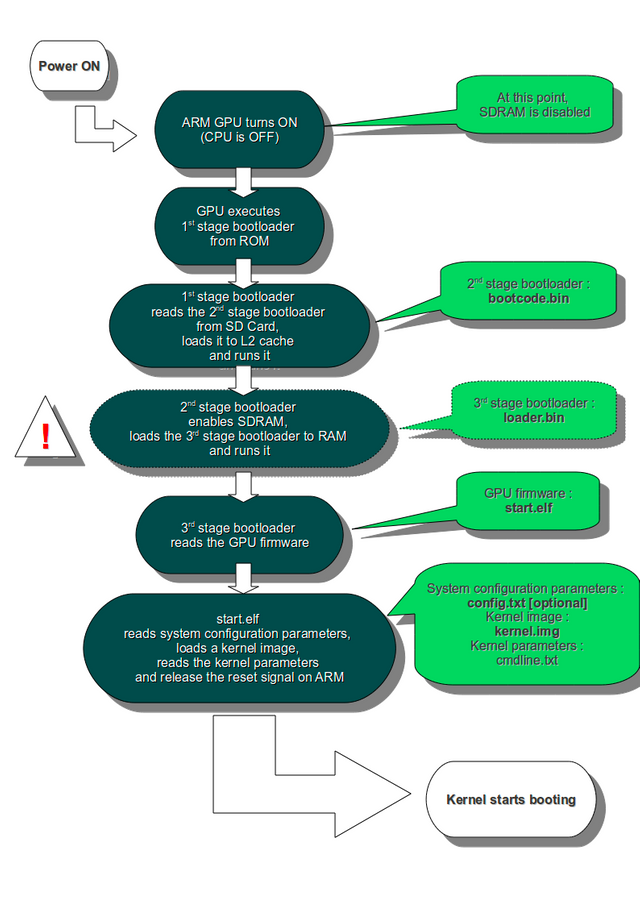
좀더 자세히 삺펴보면 Raspberry PI Boot Sequence 의 도표가 그 이유를 잘 보여줍니다. 이를 글자로 표현하면 아래와 같습니다.
When the Raspberry Pi is first turned on, the ARM core is off, and the GPU core is on. At this point the SDRAM is disabled. The GPU starts executing the first stage bootloader, which is stored in ROM on the SoC. The first stage bootloader reads the SD card, and loads the second stage bootloader (bootcode.bin) into the L2 cache, and runs it. bootcode.bin enables SDRAM, and reads the third stage bootloader (loader.bin) from the SD card into RAM, and runs it. loader.bin reads the GPU firmware (start.elf). start.elf reads config.txt, cmdline.txt and kernel.img
좀더 자세한 내용은 Raspberry PI bare metal Part 1: The Boot Process을 참고하세요. 단, 이상이 절대적이지 않습니다. Raspberry Pi도 계속 진화하기 때문에 SD Card가 필요없는 것도 나오고 있습니다.
이제 시작합니다. Install Ubuntu Mate for Raspberry Pi on an external USB drive and active SWAP partition은 HDD와 같은 대용량 저장장치를 이용하여 부팅하는 방법을 소개합니다. 이를 따라하면 큰 문제없이 누구나가 할 수 있습니다. 다만 Ubuntu Mate 버전이 16.04.2라 파티션 크기가 다릅니다. 제가 사용한 파일입니다.
smallake@ElementaryOS:~/Downloads$ fdisk -l ubuntu-mate-16.04.2-desktop-armhf-raspberry-pi.img Disk ubuntu-mate-16.04.2-desktop-armhf-raspberry-pi.img: 4.7 GiB, 5000000000 bytes, 9765625 sectors Units: sectors of 1 * 512 = 512 bytes Sector size (logical/physical): 512 bytes / 512 bytes I/O size (minimum/optimal): 512 bytes / 512 bytes Disklabel type: dos Disk identifier: 0x1d8c09f0Device Boot Start End Sectors Size Id Type
ubuntu-mate-16.04.2-desktop-armhf-raspberry-pi.img1 2048 131071 129024 63M c W95 FAT32 (LBA)
ubuntu-mate-16.04.2-desktop-armhf-raspberry-pi.img2 131072 9764863 9633792 4.6G 83 Linux
위를 보시면 img파일이
ubuntu-mate-16.04.2-desktop-armhf-raspberry-pi.img1 ubuntu-mate-16.04.2-desktop-armhf-raspberry-pi.img2
로 만들어졌음을 알 수 있습니다. 이후 과정은 파티션사이즈를 정확히 계산해서 img1은 SD카드, img2는 HDD에 설치(dd명령어 사용)하면 됩니다. img1을 위해 필요한 SD카드의 용량이 63M입니다. 혹시 남는 1G를 찾아보니까 없어서 16G로 구입해서 남은 용량은 별도의 파티션을 만들어서 저장공간으로 이용하고 있습니다. 저장장치를 준비하고 파티션도구를 이용하여 파티션을 설정한 후 듣보잡 명령어인 kpartx가 나옵니다. 생소한 명령어라 찾아보았습니다.
kpartx - Create device maps from partition tables This tool, derived from util-linux’ partx, reads partition tables on specified device and create device maps over partitions segments detected. It is called from hotplug upon device maps creation and deletion.ex) # kpartx -a /dev/mapper/mpath
명령이 성공적으로 수행되면, 출력값이 표시되지 않습니다. 성공 여부를 확인하고 정확한 파티션 이름을 보려면, 이러한 명령어를 사용하여 지정된 전체 파티션 이름을 볼 수 있습니다.cd /dev/mapper
ls
usage : kpartx [-a|-d|-l] [-v] wholedisk
-a add partition devmappings
-d del partition devmappings
-l list partitions devmappings that would be added by -a
-p set device name-partition number delimiter
-v verbose
번역도 그렇고 설명도 그렇고 너무 기술적입니다. 다른 설명을 보면 디스크가 아닌 디바이스의 파티션을 읽을 때 사용하는 명령어라고 합니다. 즉, img 디바이스에 있는 파티션을 읽을 수 있도록 하는 명령어입니다.
Ever wondered why for normal disk devices (eg /dev/sda), device files for the contained partitions are usually available (eg /dev/sad1 etc.), while for other non-disk devices (eg, disk images, LVM or software RAID volumes) there are no such device files? How to access such partitions? A typical scenario is an LVM logical volume that is used as virtual disk by a guest VM, and the guest OS creates partitions on it. On the host, you just see, say, /dev/vg0/guestdisk, yet it does contain partitions: (중략)Anyway, in all these cases, it sometimes happens that one needs to do "something" with the inner partitions (eg, mount them, or recreating or resizing a file system, etc.). That obviously needs a device node to use, to avoid losing sanity. Here's where the neat utility kpartx saves the day. Basically, what kpartx does is to scan a device or file and apply some magic to detect the partition table in it, and create devices corresponding to those partitions. Since it uses the device mapper, the devices it creates go under /dev/mapper, which may be somewhat confusing because that's also where other devices created using the device mapper (LVM volumes, SAN multipath devices), and against which kpartx may be run, live.
Access partitions in non-disk block devices with kpartx중에서
명령어를 실행한 결과가 아래와 같습니다.
smallake@ElementaryOS:~/Downloads$ sudo kpartx -av  ubuntu-mate-16.04.2-desktop-armhf-raspberry-pi.img
[sudo] password for smallake:
add map loop0p1 (253:0): 0 129024 linear 7:0 2048
add map loop0p2 (253:1): 0 9633792 linear 7:0 131072
SD카드에 파일을 복사할 때 사용하는 명령어를 보면 위의 결과를 사용합니다.
sudo dd if=/dev/mapper/loop0p1 of=/dev/sdX1 bs=512 conv=notrunc,noerror
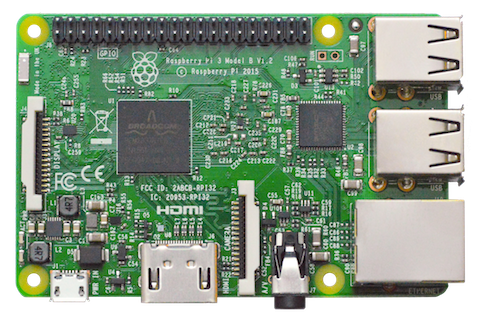
HDD도 위와 같은 절차를 반복합니다. 마지막에 부팅할 때 start.elf가 config.txt, cmdline.txt 및 kernel.img 순서로 읽습니다. 그래서 cmdline.tx와 fstab에 있는 정보를 SD카드와 HDD를 인식할 수 있도록 수정해주어야 합니다. 마지막에 있는 부분입니다. 이상을 실행한 결과입니다. 케이스안에 라즈베리파이 보드와 내장하드 및 확장보드가 있습니다. 전원스위치가 있어서 On/OFF를 펀하게 할 수 있습니다.
디음은 Redmine을 설치합니다.현재 사용하고 있는 Redmine 환경은 Centos 6.4이고 Bitnami Redmine으로 설치하였습니다. [라즈베리파이-Ubuntu] redmine 설치하기을 쓰신 분도 저와 비슷한 목적으로 라즈베리파이를 선택한 듯 합니다. 설치할 때는 편안했지만 이후에 DBMS를 다른 용도로 사용하려고 하니까 번거롭더군요. Apache 대신에 NGinx를 사용해보고 싶어서 하나씩 설치하는 방향을 잡았습니다. Ubuntu 16.04를 기준으로 설치를 안내하는 글들이 무척 많습니다. 이것저것 시도를 해보았습니다. Nginx와 Passenger를 설치할 때 헷갈렸습니다. apt 명령어로 설치하였더니 의도한 결과가 나오지 않았습니다. 그래서 rvm을 이용하는 방법으로 마무리하였습니다. 개인적으로 How to Install Redmine on Ubuntu 16.04을 기준으로 하고 Redmine installation on Ubuntu 16.04를 참조하였습니다.
설치하면서 Ruby와 관련한 부분이 복잡했습니다. 개인계정으로 설치할 때와 Root권한(sudo)로 설치할 때 결과가 달랐습니다. 결론적으로 반드시 sudo 명령어를 사용하여 ruby와 관련한 패키지를 설치하여야 합니다. 또한 설치이전에 OS를 설치할 때 깔린 Ruby가 있다고 하면 제거해주어야 합니다. 그래야 Nginx와 Passenger를 설치할 때 새로 설치할 ruby를 인식합니다. 아래의 명령어로 진행하였습니다.
root@ium-desktop:~#sudo apt-add-repository -y ppa:rael-gc/rvm
root@ium-desktop:~#sudo apt update
root@ium-desktop:~#sudo apt -y install rvm
root@ium-desktop:~#sudo -i
제가 설치한 Ruby 입니다.
redmine@ium-desktop:~/redmine$ ruby -v
ruby 2.5.1p57 (2018-03-29 revision 63029) [armv7l-linux-eabihf]
이제 bundler와 Passenger를 설치한 후 passenger-install-nginx-module 명령어를 sudo로 실행합니다. 이 때 시간이 많이 걸립니다. 컴파일환경을 확인하고 소스를 받아서 컴파일을 하기때문입니다. 컴파일할 때 라즈베리파이가 먹통이 되는 느낌입니다. 리소스의 대부분을 컴파일에 할당하기때문에 다른 명렁어를 처리하지 못하는 듯 합니다.
redmine@ium-desktop:~/redmine$sudo gem install bundler
redmine@ium-desktop:~/redmine$sudo gem install passenger
redmine@ium-desktop:~/redmine$sudo passenger-install-nginx-module
NGinx를 설치한 경로는 /opt/nginx입니다. NGinx를 설치한 후 passenger를 인식하고 Root의 위치를 설정하는 작업을 해야 하는데 How to Install and Configure Redmine on Ubuntu 16.04와 달리 /op/nginx/conf/nginx.conf 파일을 수정하여야 했습니다. Introduction to configuring Passenger + Nginx의 안내에 따라 아래를 추가합니다.
server { server_name yourserver.com; root /var/www/myapp/code/public; passenger_enabled on; passenger_ruby /usr/bin/ruby2.0; passenger_sticky_sessions on; }
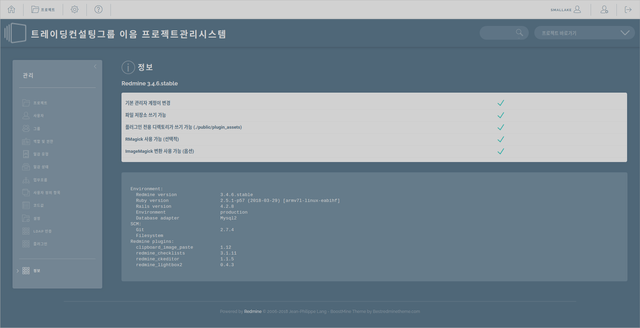
그리고 Nginx를 설치하고 이후에 설치확인을 할 때 Installing Passenger + Nginx를 참조하였습니다. 이제 Redmine을 설치합니다. 워낙 많은 자료들이 있기때문에 어떤 것을 참고로 하여도 설치할 수 있습니다. database.yml에서 DB접속환경을 정확히 입력하는 것이 무척 중요합니다. 이상의 결과입니다. 테마는 유료로 구매하였습니다. 여러가지를 시험해본 결과 가장 좋은 것이라서 Centos때부터 사용하던 제품입니다.
어제 작업을 마무리하고 mysqldump를 이용하여 DB데이타를 이관하였고 files밑에 있던 파일들도 옮겨서 새로운 레드마인서버를 개통하였습니다. 이전보다 빨라졌다고 합니다. 아마도 다른 용도로 사용하지 않기때문이 아닐까 합니다. 무엇보다도 5V의 행복을 누릴 수 있습니다.
Posted from my blog with SteemPress : http://www.smallake.kr/?p=26714


