SIZ Tutorials || How To Make 3D Mockup of any logo In Adobe Photoshop || 20% Payout to SIZ
Hey steemian's.
I hope that you all are doing good and having good health.
In the world of technology, we need to move fast. We need to learn about it. Its uses. I really like this theme of siz-tutorials. It helps us learning a lot of new stuff.
Today I am going to post about
How to make 3D-Logo Mockup in Adobe Photoshop
First I want you guys know about Adobe Photoshop
What is Adobe Photoshop?
Adobe Photoshop is a raster base and pixel base software. You can edit, replace, transform or do much more in this software. You can set resolution for display of your own choice. It gives you a wide range of making new layers and working on it.
This software can make new ways to give your picture a new look. You can change background of any picture you want to. This allows you a wide range of working on layers.

Let's start our Tutorial
Step 1: Selecting Mockup Style
First, go to website on mentioned link:
https://www.freepik.com/search?dates=any&format=search&page=1&query=3d%20Mockup&sort=popular
Choose any one of them and click on it, that you liked.
If selected this one
.png)
Click on download a zip file will download.
Step 2: Zip file will open.
Click on the Blue Photoshop Mockup file. Photoshop file will open:
.png)
Step 3: Click on the the marked layer twice
The Photoshop will open file directly. Now click on this red marked area twice
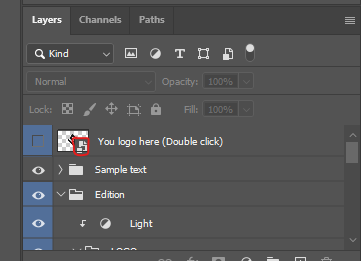
After that this new file will open, Please check screenshot
.png)
Step 3: Now Place your logo here
When this file will open, Now you have to place your logo instead of already placed logo.
After placing logo don't forget to Save or Shortcut key for this is: CRTL+J
.png)
Step 4: Final Look in Adobe Photoshop
After saving you have a final look on the main file from where second file was opened.
Here's my Logo Final look:
.png)
Step 5: Exporting as PNG:
Go to New, then scroll down to Export, then click on Export As PNG, as shown in screenshot.
.png)
Then this window will open in front of you, select folder and edit name of file you want to add, click on OKAY. The desired file will be saved in folder you have chosen.
#Step 6: Final look
Here's the final look of 3D- Mockup Logo
![]()
Tutorial Complete
In this tutorial, we got to know to make a 3D-Mockup Of Your Logo
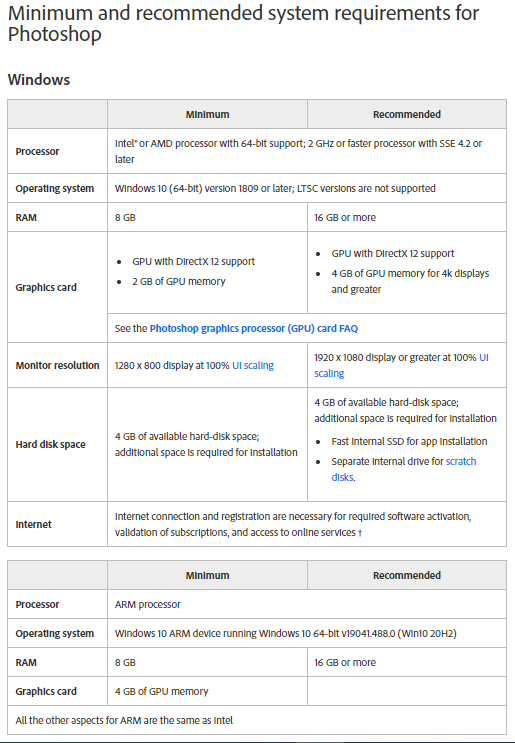
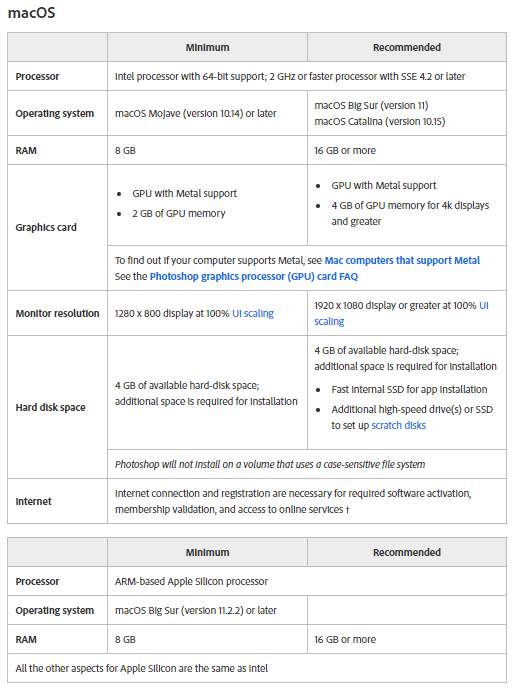
System Requirement for this Software
I have taken this requirement table from the attached link:
https://helpx.adobe.com/photoshop/system-requirements.html
I hope, that you guys got this tutorial to be helpful.
Don't forget to Reteem it and Upvote this.
@cryptokraze
THANKS FOR VISITING MY POST
Thank you for allocating 20% to siz-official. You got a 100% vote from the curation account.
Thanks @siz-official for support
Good one tutorial dear friend you make a very good post thanks for sharing a good information with us.
wow, the tutorial you made was amazing, thank you my friend, I wish you success in the future.