Brand Used Mazda II: Plugs and Coils on a 2006 Mazda 6
After I fixed the fuel pump on the Mazda, it ran great on the test drive, so I parked it and we went on vacation the next day for two weeks. When we came back, after a couple days, I decided to fire it up and drive it around since one of the worst things for a car is to sit for months on end without being driven. Well, apparently with this car, that number is only two weeks because when I turned on to the on ramp for the expressway, the engine started missing with the engine light flashing, and it didn't stop until I got it home. I did some diagnostics using an old laptop with free computer software called FORScan which gives me many of the capabilities of the scan tools they have available at the dealership. Regardless, even the cheapo scanners could be used for this particular diagnosis, because they all pick up misfires, and this one was a misfire on cylinder #4.
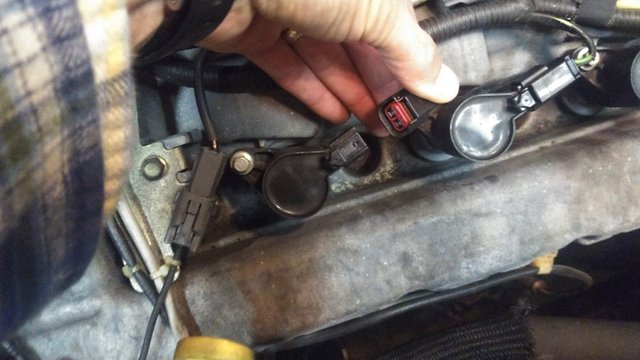
Lucky for me cylinder number 4 is right here on the front of the engine and it was easy to get to. First thing to check is the easiest and most common to fail, the coil-on-plug. You can easily do this diagnosis by switching the coil out with one from another cylinder and see if the misfire moves to the cylinder you moved the coil to. In this case, I switched 4 with 5, and lo-and-behold, 5 started missing. Bad coil.
I hopped online that evening and ordered a new set of coils. It's amazing how inexpensive these have become. They used to be over $100 a piece when OEM's first went to them and now you can get a whole set for like $30 if you're brave enough to do home quality control. Since this car is a bit of a beater, I opted for a set of the cheap ones since all of the coils are pretty old, maybe original to the engine. I figure I can keep the old ones that hadn't failed yet as spares in case one of the cheap ones goes out. I've done this before and I've had pretty good luck with it. On my V10 Ford pickup I only had one go out, and that was after 2 years, which is pretty good for COP's. The expensive ones are kind of failure prone too anyway, so I don't see the benefit of spending the extra money when it's still a crap shoot. I also ordered some new plugs (the good stuff) because the ones in the engine also look like they might have been originals too and the gaps had grown to grand canyon proportions, which probably had something to do with burning out that old coil.
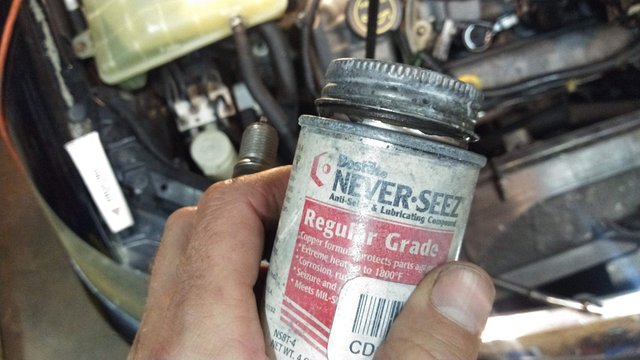
Whenever I do spark plugs on an engine with aluminum heads, I like to use a little bit of anti-seize on the threads so it doesn't gall the aluminum threads inside the head. This Never Seez brand uses copper as the anti-seizing agent, so it's good for an electrical application like this where the threads will ground out the plug to the engine. I've heard if you use too much of this stuff it can cause issues though, so a little dab will do ya on this one. The platinum plugs I installed are gapped at the factory, so I just pulled out the old ones, put on some of this grease and threaded the new ones in. Note, if you do spark plugs on aluminum heads like this, it is very easy to over torque them and rip the threads right out of the head, which is a really bad day. If you're a newb on this job, you might even want to look up the torque specs and use a torque wrench just to make sure you're not looking at $1000+ head work on a $3 fix.
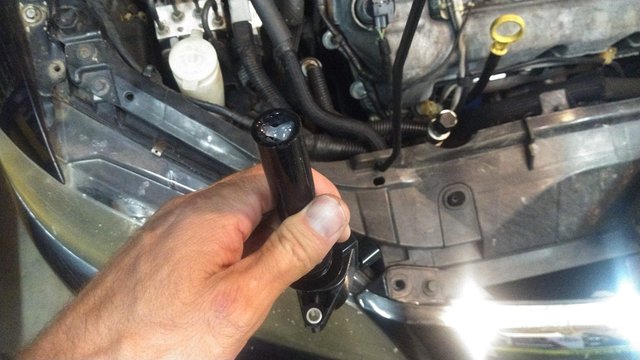
As for the plug boots on the coil, it's a good idea to use this silicone-based dielectric grease, which will help seal the top of the plug from weather and therefore keep out any moisture that could corrode the contacts. With the coils, it's also really simple. Just pull out the 8mm hex hold-down bolt, disconnect the electrical connector, pull out the old, pop on the new (with the grease) and screw it back down.
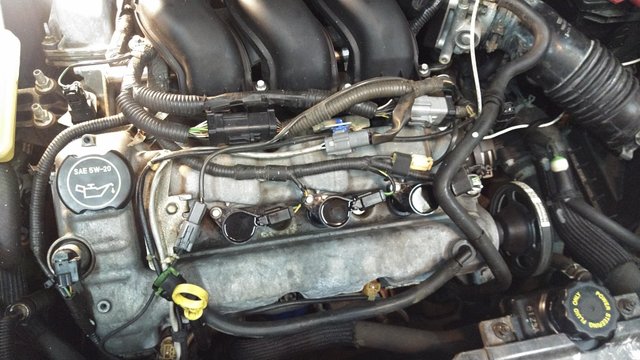
These fronts are easy peasy. With them right there out in front of the engine compartment, you can just simply lean in and get to work. I think changing these is easier than doing an oil change.
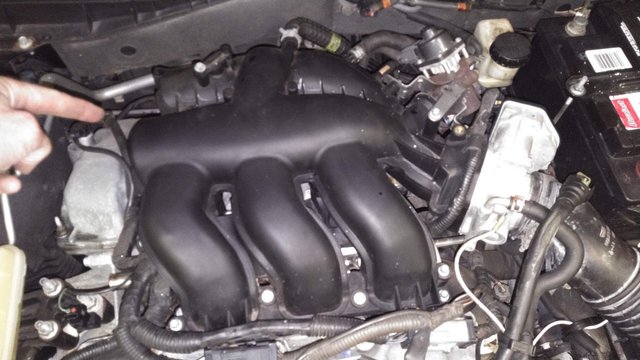
The rears on this engine, not so much. You have to remove this thing, which is your intake manifold, to get to the coils and plugs. While you may think it's ridiculous that you have to remove the upper intake to get to the spark plugs, and I would agree with you, it's not that hard to pull this one off. I used to own a Ford Fusion with this same motor in it, and so I knew how quick it was to whip it off of there. I think there are 8x 8mm hex bolts holding the intake itself, 4x 10mm hex bolts holding the throttle body on, and 3x 8mm hex bolts holding the EGR on. Other than hoses, wire connectors and wire looms, once all the bolts are free, the whole intake can be wiggled to the passenger side and slid out. I left the EGR still attached to the exhaust and just slid the intake off of it. I've found this to be the quickest way to get it done.
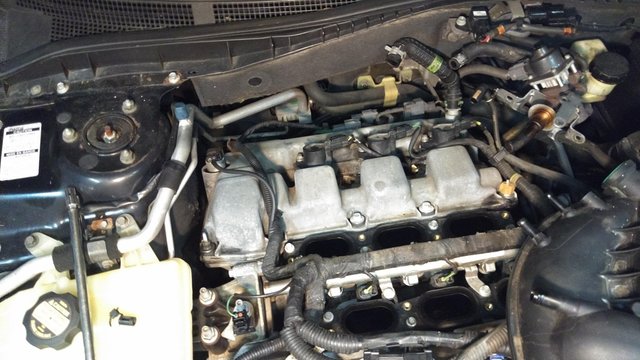
Other than making sure I didn't drop anything down into those holes I just opened up, this part was just as easy as the fronts. Pop off old coil, unscrew old plug, pop in new plug, pop on new coil, repeat twice more, done. The rubber gaskets on the intake are reusable, so the intake can be bolted right back into place. Do note though that the factory manual says to replace these every time the intake comes off. I've never had any trouble with reusing them though.
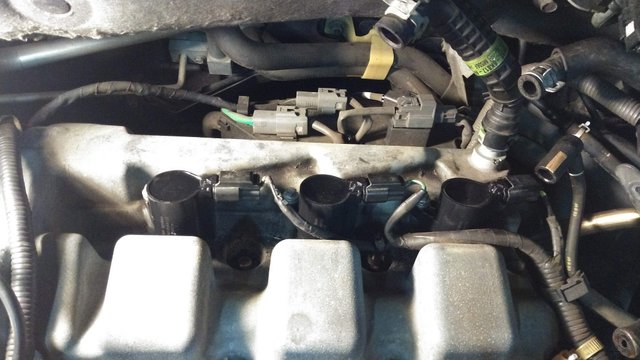
And there you go, pretty new coils all lined up in their new homes. I made sure to go on an extra long drive on this latest test drive too just to be sure there aren't any more gremlins lurking inside. The car ran great the whole time. I have a weird throttle delay issue that I think might be related to the throttle body, or maybe these cars are just tuned that way from the factory with the drive-by-wire, but other than that the car has good power and feels nice and smooth as it accelerates, idles and cruises. I'm sure I'll be working on this old beater again soon though. Until then, Steem on!
Wow, you're one ✋ dy guy! Nice write-up. I'm calling you next time I have car trouble. :)
Thanks 🤙
Posted using Partiko Android
Questo post è stato condiviso e votato dal team di curatori di discovery-it.
This post was shared and voted by the curators team of discovery-it