A Newbies Guide to ICO Participation & Purchasing Your First Cryptocurrency
So, you want to get involved with an initial coin offering (ICO) like Hash Rush, but you’ve never explored the world of Cryptocurrency before? Well fear not, this guide was made with you in mind! We will be walking you through every step from creating an account with an exchange (a place where you can buy cryptocurrency) to taking part in your first ICO!
This is what we will help you learn:
- Why Coinbase?
- Preperation and Registration
- Setting up your account (verification)
- Purchasing Ethereum
- Final steps — Ethereum Wallets and getting your Rush Coins
Why Coinbase?
We chose Coinbase for this article because of its ease of use and straightforward no-nonsense registration. You can use it via the dedicated mobile app or through your browser. Currently it allows you to buy three different Cryptocurrencies: Bitcoin, Ethereum and Litecoin. For the sake of this guide, we will be walking you through your first Ethereum purchase, but all 3 cryptocurrencies can be purchased in the same way.
Preparation and Registration
You’ve just made the decision to take part in the Hash Rush ICO (or another ICO) and purchase yourself some (Rush Coin) tokens, but it does look a bit tricky and you’re not sure what to do. Don’t worry we will help you get through it all! A useful thing to do now would be to find your Photo ID (Passport, ID Card or Driver’s License) as you will need it in order to verify your account. More information on why you need to do this step can be found here.
Registering an account is simple, just go to the Coinbase homepage: https://www.coinbase.com/signup, fill out your details and hit ‘Create Account’.

Setting up your account (verification)
Now that your account is created, we’ll need to set it up correctly and have it verified so that you can purchase some Ethereum. This is split up into four steps.
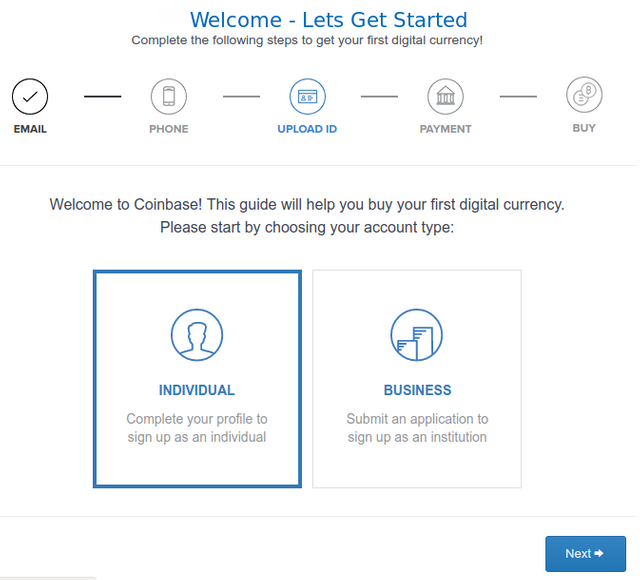
Step 1: E-mail
For this part, you will need to make sure that you first activate your account via the e-mail that you will receive from Coinbase, and then you select what type of account you want to have: individual or business. We’ll go ahead with the individual account.
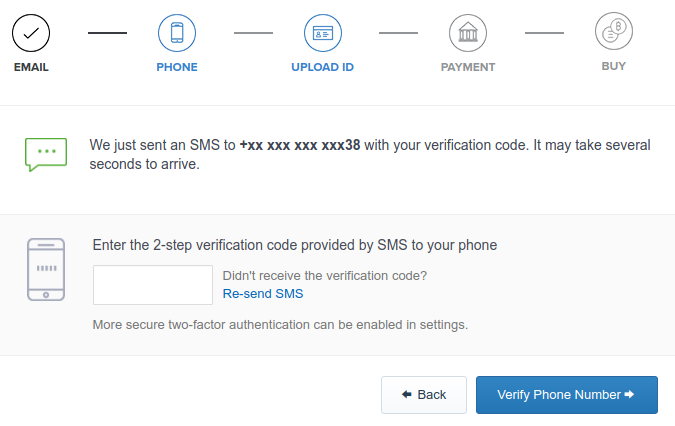
Step 2: Phone Number
Next up, you will need to provide a working phone number. Once you’ve done so, you will be sent an SMS with a verification code.
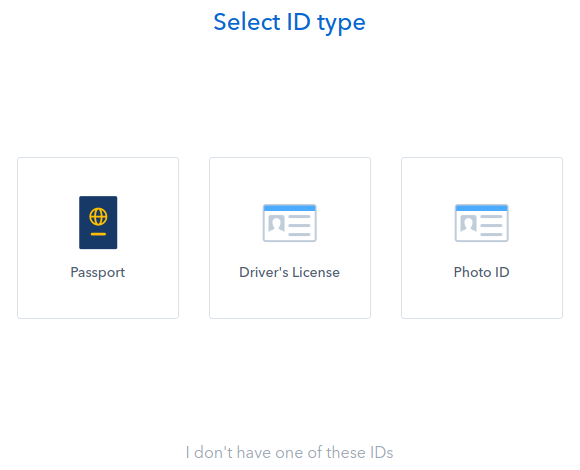
Step 3: Identity
Now we need to tackle the identity verification part. In order to complete this section, you will need to submit a form of identification, this can be your Passport, Driver’s License or a Photo ID. In case you do not have any of these on hand, you can find what to do here.
Whichever form of ID you choose, you will have two ways to take and upload the pictures. The first is via your webcam (if you have one). Selecting this will take you to a page that will connect to your webcam and provide instructions on what to do next. The second is via your mobile camera. If you choose this option, you will be sent an SMS with a link to a special site that will prompt you to take photos of your ID and then upload them.
Once you have done this step, you will need to wait for Coinbase to check your submission. Normally this step only takes a few minutes, but in some cases you will have to wait longer. If for any reason the submission is declined, you may either try again or you can contact their support for further assistance.
Step 4: Adding a payment type
Once your account is verified, you simply need to add a payment method and you’ll be ready to make your first Ethereum purchase! Depending on your location, you will see different payment options. For instance, Europeans will see Credit/Debit Card or SEPA Bank Account. If you choose the SEPA Bank Account, you will need to send a small amount of money (unspecified, but this can be 1 cent) to the Coinbase bank account for verification purposes, before you can use that method to make purchases. This process usually takes around 1–2 days.
If you’ve made it this far, congratulations on having a working account with Coinbase!
Purchasing Ethereum
Now that you have a fully functioning account, it’s time to make your first purchase. This part of the guide will be written as if you were going to take part in the Hash Rush ICO, and this means that there are two things that we need to take note of:
- The minimum amount of Ethereum that can be used for the Hash Rush ICO is 0.1 ETH.
- Cryptocurrencies (also) have transaction fees. This is minimal, about 4 to 5 cents.
With that in mind we will be purchasing 0.11 ETH.
In Coinbase, hit the buy icon and you’ll be taken to a page where you can choose to buy Bitcoin, Ethereum or Litecoin. You will want to make sure that Ethereum is selected and in the ETH box, enter 0.11 (or more if you wish).
After providing the amount of Ethereum that you wish to buy, the price will be displayed automatically. You may also directly edit the price to state how much you want to spend, and this will automatically reflect in the amount of Ethereum you will get. Just make sure that you buy at least 0.11 Ethereum so that you can take part in the Hash Rush ICO.
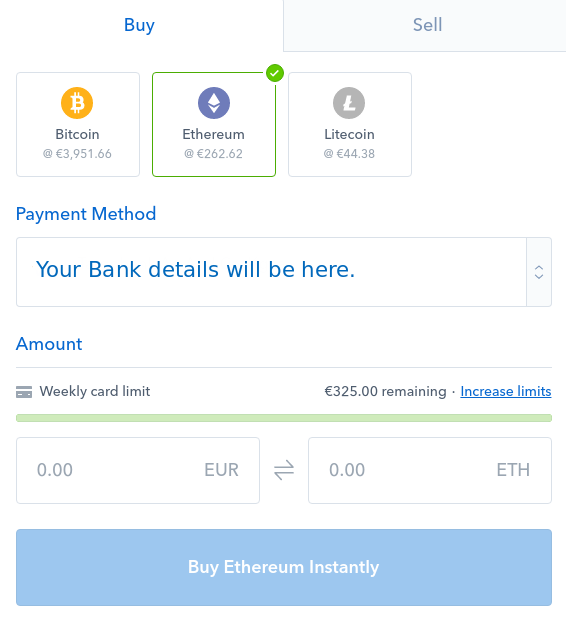
Once you’re happy, just hit buy Ethereum and you’re done with this part!
Final Steps
Now that you have your Ethereum you’re almost done and ready to take part in the Hash Rush ICO. Just follow these steps and you’re good to go!
Create a wallet to store your Ethereum and later your Rush Coin tokens. IMPORTANT: You can not use an exchange wallet to participate in the Hash Rush ICO. You must use your own wallet — we suggest My Ether Wallet, and we have covered these steps in an earlier article that you can find here.
Once you have your wallet set up, go back to Coinbase and in the main menu click on Accounts.
Here you will find your Coinbase Ethereum Wallet (Eth Wallet) and the option to send your Ethereum to another location. Simply click send and follow the on-screen instructions.
With your Ethereum now in your newly made Wallet, you are ready to take part in the ICO. Head on over to the Hash Rush ICO page and click on ‘PARTICIPATE NOW’ to load up on your Rush Coins.
Then simply follow the instructions, and send your ETH from your MyEtherWallet to the address provided.
After your transaction is completed, you should be able to view it in the Hash Rush smart contract.
Now lastly, go to your MyEtherWallet and follow these last steps in order to see your brand new Rush Coin tokens!
- Under ‘Token Balances’, select the option to ‘Add Custom Token’.
- A drop down will appear and you will be required to enter the Rush Coin Token Contract Address: 0x2DBE0f03f1dddbdbc87557e86dF3878AE25af855
- Enter the Token Symbol: RC
- Enter the number of decimals: 8
- Upon submitting these details, the number of Rush Coins tokens should now appear in your MyEtherWallet. Congratulations!
If you still need help, just join our Discord server and a member of the Hash Rush team or our growing community will be happy to help you out.
As a follower of @followforupvotes this post has been randomly selected and upvoted! Enjoy your upvote and have a great day!
A note to everyone interested in Hash Rush reading this article.
We have moved to a new account: @hashrushgame. Please follow us on there in order to stay up to date with all the latest Hash Rush news and content.