HOW TO DRAW KRATOS
In this tutorial, I will teach you how to draw Kratos. This, easy to follow, step by step tutorial will guide you through the whole process of creating a cool rendition of the famous video game character. We will start drawing a dummy, that will serve us as a base over which we will draw our final sketch.
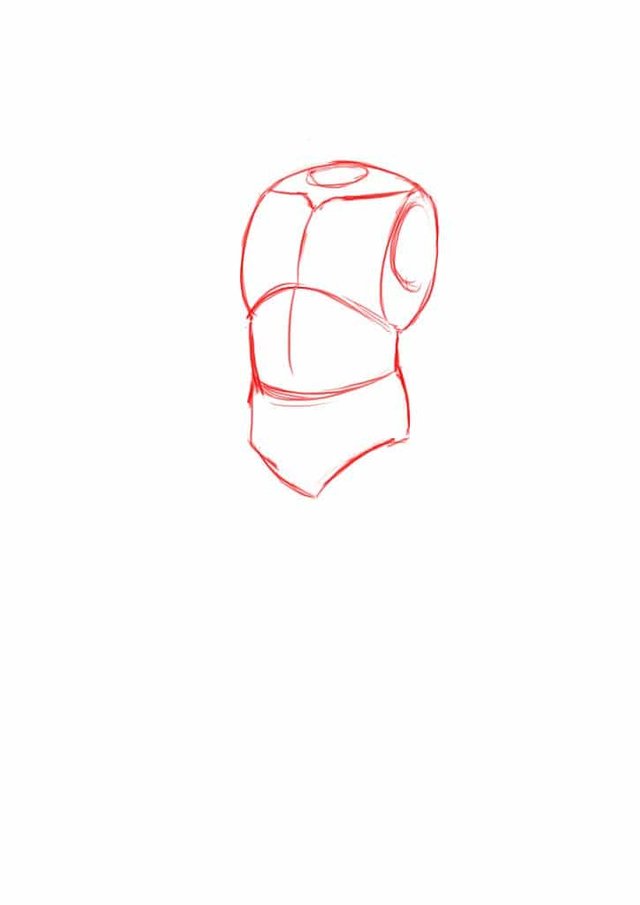
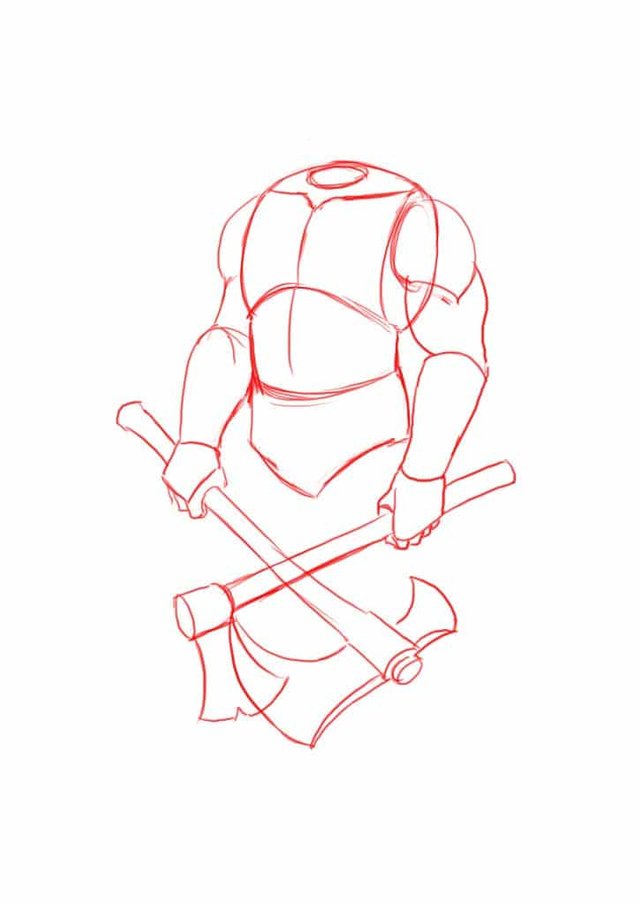
STEP 2: DRAWING THE TORSO
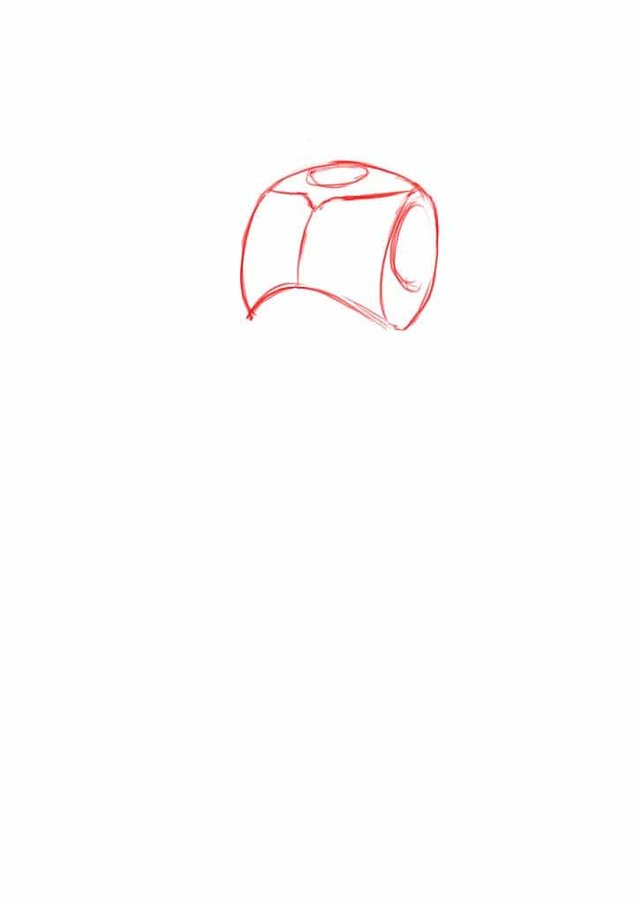
Remember to keep the torso and the waist separated from each other. The space in between them will be the abdominal area. The bottom of the torso will represent the lower ribs. Once both volumes are placed, create a curve line connecting both, waist and torso. This line will divide the front face of the torso ( where the chest is ). You can draw also a curved line under the chest area. Doing that you will define where the arch of the ribs will be placed.
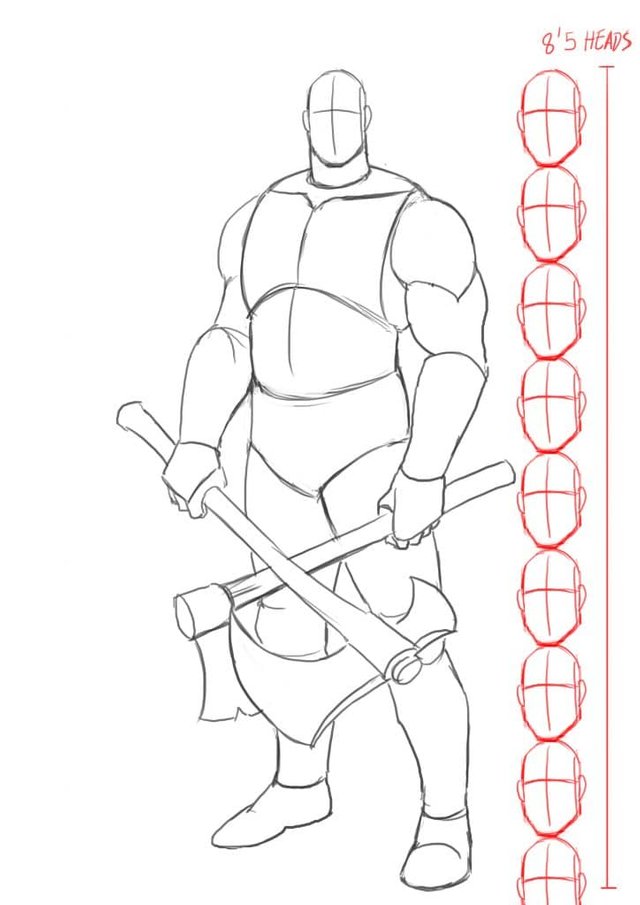
The size of the torso will be over 3 heads or 3 heads and a half in height. Kratos is a semi-god and his anatomy is a little different from a regular human being. A good trick to make your character look more heroic is to use a body ratio of 8 to 8 and a half heads. Like I said before, the torso and the hips must be around 3 to 3 and a half in length and the legs over 4 heads. At the end of step 4, you will find a scale comparison between our Kratos dummy and the 8 heads ratio I´ve been speaking about, so you can have a visual reference on how this ratio works.
Drawing the hips will be the next step in our journey. I usually start drawing the hips and the crotch like if our character was wearing a short swimsuit or male underwear. It simplifies the process creation and makes things easier to understand.
STEP 3: DRAWING THE ARMS
Next step will be to draw the arms. We will start with the shoulders. I’ve seen many people drawing the shoulder like a couple of egg-shaped spheres. In my case, I do the same and I´m looking to create a descending line starting from the traps and continuing on the deltoid muscles. The result is a more natural and fluid body line. The left side shoulder, which is almost totally hidden from the viewers perspective will be drawn as a short curve line coming out from behind the upper part of the torso.
THE BICEPS AND TRICEPS
For the biceps and triceps area, I will draw two curve lines. The biceps line will connect the bottom of the shoulder egg shape and the other side of the curve will connect with the forearm. The triceps will be different. Like the biceps curve will start on the bottom of the shoulder but only will reach half the length of the biceps curve. On this point, it will become almost a flat line that will reach the elbow.
The left arm’s biceps will come out from behind the rib cage area. Take notice of the difference between the left arm shoulder, which is represented as a curve line and the biceps which is drawn as a straight line that ends on the elbow area.
THE FOREARMS
The elbows will be situated on the same height of the floating ribs, on the sides of the torso.
For the forearms, we will draw a tube for each arm. This tubes will become narrower on the bottom part where the wrist connects with the hand. More or less, both wrists will be aligned with the crotch on the hips area.
THE HANDS
Both hands will be drawn as fist because both hands will be grabbing something. The hand on the right will be grabbing a Viking type ax and the hand on the left a big executioner ax. I will draw them quite schematically. For the hand on the right, placed frontally, we will draw a big irregular square for the palm. The fingers will be drawn as little rectangles.
For the hand placed sideways, the main body of the hand will be an irregular pentagon and the fingers again will be drawn as simple rectangles.
Later on, you can define better the different parts of the hands when we will be detailing our drawing.
THE AXES
As you can see both axes are different. The big executioner ax has a bigger edge compare to the Viking type ax. This difference between both weapons will help us to create a more convincing and realistic character and also give us the chance two introduce two different weapon designs on our concept.
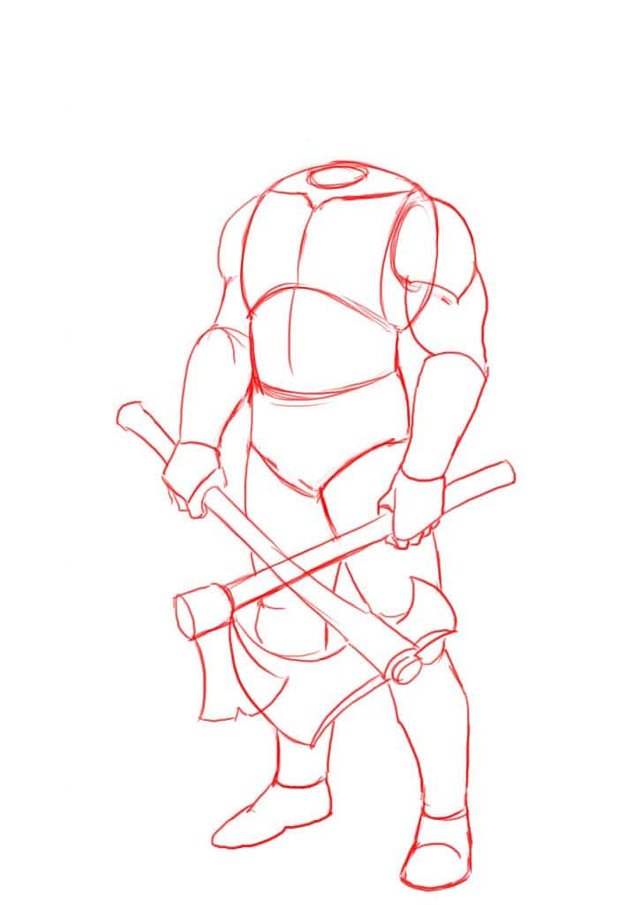
STEP 4: DRAWING THE LEGS
Regarding the length of legs, the thigh will be almost 2 heads more or less and for the shin and the 2 and a half.
The thighs will be drawn as massive tubes, similar to the ones we drew for the forearms but 3 times thicker.
The shins and the calves will be drawn different one to the other:
The calve:
It will present a curve line on top and another one under. The curve line on top will be longer than the one on the exterior side, but still shorter if we compare it with the curve line bellow that follows.
The shin:
Will be drawn as a concave curve. It will starts on the knee and will end on the feet.
THE KNEES
The knees will be almost hidden behind the axes. You can draw them as a couple of ellipses just to know where they should be placed behind the axes. This can help you to divide between the thighs and the shins and calves.
THE FEET
The feet will be represented as geometric shapes. Do to the pose of the character, the front feet will be drawn as some sort of weird rectangle. One of the short sides will be drawn flat and connecting with the shin( where the ankle should be). The other short side will be the point of the feet, where the toes should be. This part will be drawn rounded.
The other foot will be drawn in a 3/4 view and will look like a wedge with a flat part on top, where the feet connects with the shin( the ankle area).
STEP 5: DRAWING THE HEAD
Drawing the head, at this stage, will be quite easy to do. Remember the ellipse we drew on top of our torso. Now it´s time to draw the head on to of the sphere. Just draw a sphere, flatten on the sides and draw a vertical line across it. Once you have this done, you gotta draw a horizontal line. Don´t draw the horizontal line across the middle of the vertical line. Try to draw it a little bit above.
The ears will be placed on the sides of the sphere, more or less at the same height than the horizontal line.
After this step, I will take our dummy and I will draw on top of it, but before I will start drawing I need to make my dummy less visible so it will not distract me and interferer with the final drawing. If you are drawing using paper and pencil you can use a kneaded eraser to reduce the visibility of the dummy sketch without removing completely the drawing.
In case you are drawing on a digital medium, you just need to reduce the layer opacity to 20% so you can leave just a thin trace of the original dummy´s sketch lines.
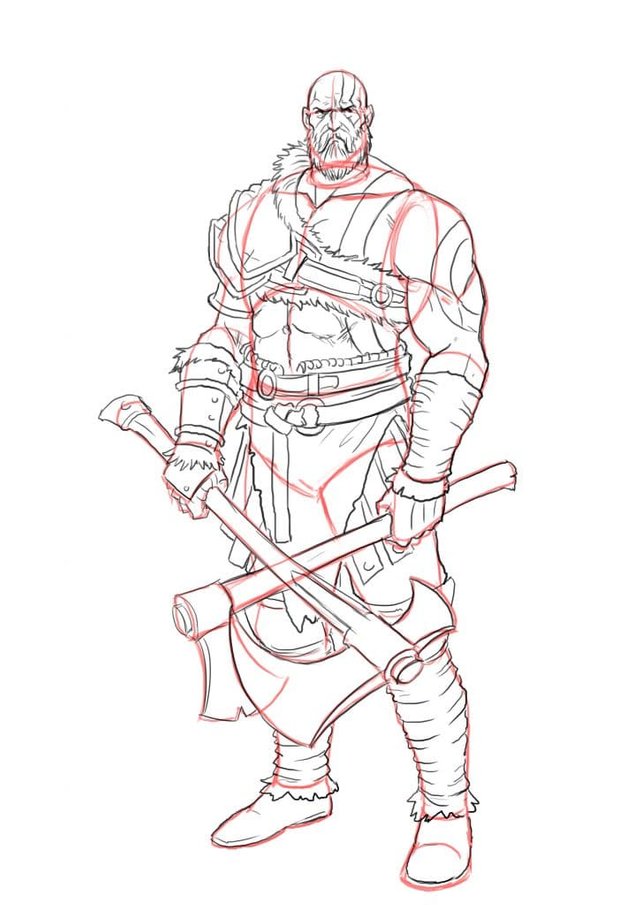
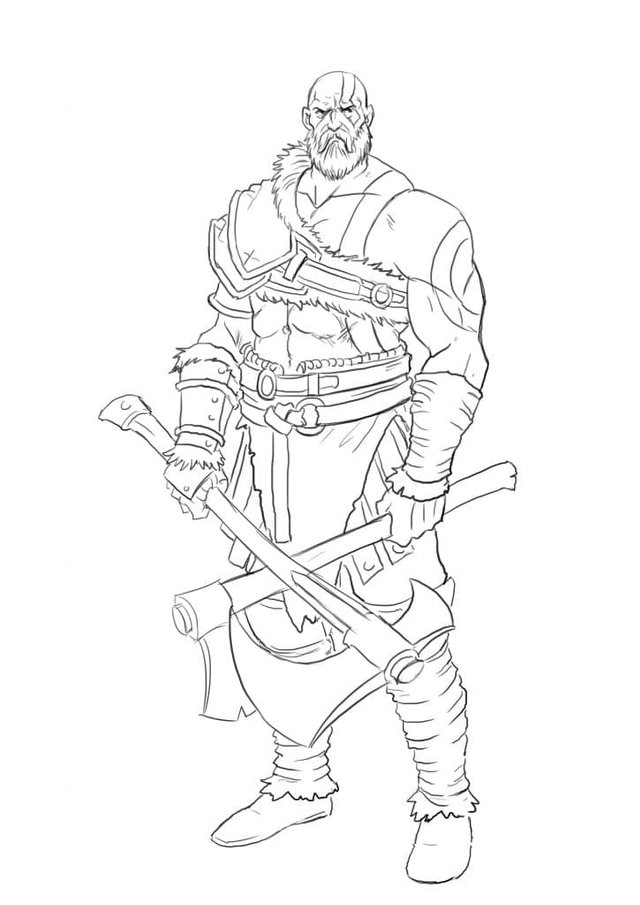
STEP 6: OUTLINING THE CHARACTER
SHOULDERS AND ARMS
In this step, I will define the main muscles and the shoulder pads. One of the most identifiable elements of Kratos, is his brought shoulder. This is why I will start with the shoulder pad. The shoulder pads design will follow a layered disposition with 3 plates of leather armor, one over the other. The plates will be drawn as 3 layers of reinforced leather with some padding.
Coming out from under the shoulder pads, the biceps will be drawn naked and the forearm and the hand will be protected by a leather bracelet with some fur decoration on the borders, and a metal plate attached to it.
The arm on the right will have no shoulder protection. Muscles should be defined properly. The insertion of the shoulder on the biceps are and the line dividing biceps and triceps muscles need to be visible. The forearm will be protected by a leather wrapping. This protective element, different from the bracelet on the other arm, is another artistic license. The idea here is to create an asymmetry between both arms making our character’s costume more visually appealing.
THE TORSO
Krato’s torso has a big barrel chest with prominent pectoral muscles and visible abdominal muscles. The main distinctive element is the leather band crossing across the chest. This band helps to keep the shoulder pads on place.
Another cool element is the thick lines painted across his body. If you remember Kratos background, his full body is covered with the ashes of his dead wife and son.
On the abdomen, right below the belly button, Kratos wears a thick leather sash, with a couple of belts across the waist.
THE LEGS
The first garment piece we can see over Kratos legs is a long piece made of leather patches, all stitched together. He is wearing like some sort of loincloth. Bellow the loincloth, and covering the thighs, we can see some leather bands. These bands are a holdover from his old armor, Spartan’s hoplites used to wear, called Linothoorax.
Kratos also wears long pants with high boots. The shins are wrapped with leather bands, as a form of protection. The boots reach to the knees and cover them with some sort of leather padding. Again this is another form of protection, this time for the joint.
HEAD FEATURES
Drawing the face, we have to keep in mind 4 facial features that need to be clearly represented in order our character´s drawing will be recognizable as Kratos. This distinctive feature will be:
Kratos is fully bold, so no hair on the head.
He has a full beard. This is a new feature added in the latest edition of the game. The beard gives Kratos some seniority and makes him look more experienced.
Kratos has a hooked nose that gives him this aggressive look.
The mark crossing his face and his neck that continues through the body.